android ConstraintLayout布局
1.子控件的位置约束属性:
layout_constraintRight_toLeftOf 在谁左边
layout_constraintRight_toRightOf 在谁右边
layout_constraintTop_toTopOf 在谁上边对齐
layout_constraintTop_toBottomOf 在谁下边
layout_constraintBottom_toTopOf 在谁上边
layout_constraintBottom_toBottomOf 下边对齐
layout_constraintBaseline_toBaselineOf 基于基准线对齐
app:layout_constraintDimensionRatio 宽高比
app:layout_constraintHorizontal_weight,设置水平方向的权重
app:layout_constraintVertical_weight,设置垂直方向的权重
app:layout_constraintHorizontal_chainStyle 没有满屏时候的链样式,有spread spread-inside packed
app:layout_constraintVertical_bias 垂直拉力比例
app:layout-constrainHorizontal_bias 水平拉力比例
Guideline:辅助线
1.位置设置:例子:
<android.support.constraint.ConstraintLayout
xmlns:android="http://schemas.android.com/apk/res/android"
xmlns:app="http://schemas.android.com/apk/res-auto"
xmlns:tools="http://schemas.android.com/tools"
android:id="@+id/activity_main"
android:layout_width="match_parent"
android:layout_height="match_parent"
android:background="#11ff0000"
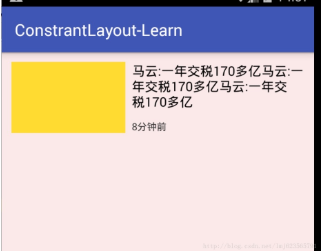
tools:context="com.zhy.constrantlayout_learn.MainActivity"> <TextView
android:id="@+id/tv1"
android:layout_width="140dp"
android:layout_height="86dp"
android:layout_marginLeft="12dp"
android:layout_marginTop="12dp"
android:background="#fd3"
app:layout_constraintLeft_toLeftOf="parent"
app:layout_constraintTop_toTopOf="parent"
/> <TextView
android:id="@+id/tv2"
android:layout_width="0dp"
android:layout_height="wrap_content"
android:layout_marginLeft="8dp"
android:layout_marginRight="12dp"
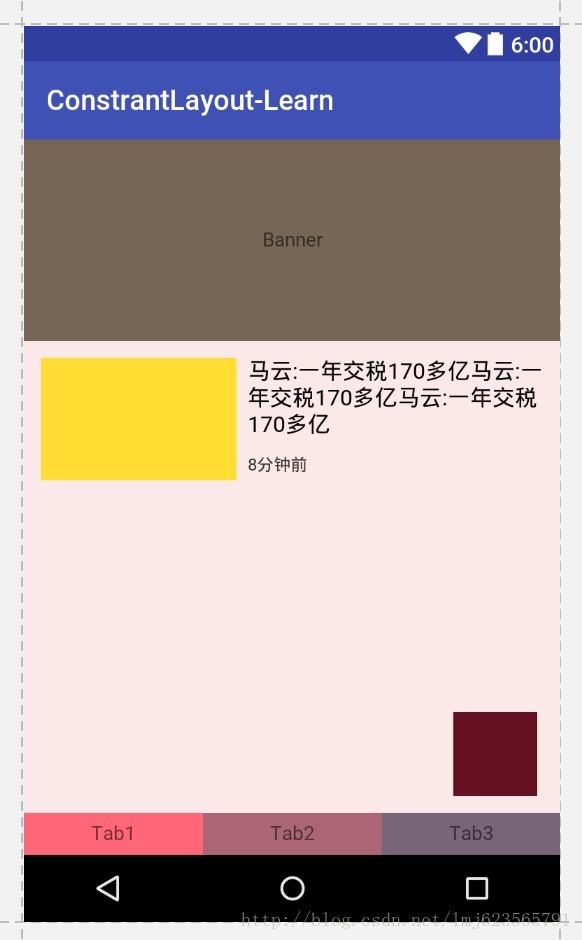
android:text="马云:一年交税170多亿马云:一年交税170多亿马云:一年交税170多亿"
android:textColor="#000000"
android:textSize="16dp"
app:layout_constraintLeft_toRightOf="@id/tv1"
app:layout_constraintRight_toRightOf="parent"
app:layout_constraintTop_toTopOf="@id/tv1" /> <TextView
android:layout_width="wrap_content"
android:layout_height="wrap_content"
android:layout_marginLeft="8dp"
android:layout_marginTop="12dp"
android:text="8分钟前"
android:textColor="#333"
android:textSize="12dp"
app:layout_constraintLeft_toRightOf="@id/tv1"
app:layout_constraintBottom_toBottomOf="@id/tv1" /> </android.support.constraint.ConstraintLayout>
分析:
tv1设置了: tv1应该是在父布局的左上角;
app:layout_constraintLeft_toLeftOf="parent"
app:layout_constraintTop_toTopOf="parent"
tv2设置了: tv2在tv1的右侧,tv2的右侧和父布局对其,tv2和tv1顶部对齐;
app:layout_constraintLeft_toRightOf="@id/tv1"
app:layout_constraintRight_toRightOf="parent"
app:layout_constraintTop_toTopOf="@id/tv1"
tv3设置了: tv3在tv1的右侧,tv3和tv1底部对其。
app:layout_constraintLeft_toRightOf="@id/tv1"
app:layout_constraintBottom_toBottomOf="@id/tv1"
2.使用 match_contraint,即宽高:设置0,让约束来控制布局宽高。
让我们的宽度充满整个父布局
app:layout_constraintDimensionRatio 设置宽高比

//满屏

 android:layout_width="0dp"

 android:layout_height="0dp"

 app:layout_constraintLeft_toLeftOf="parent"

 app:layout_constraintRight_toRightOf="parent"
//三种写法都可以,设置宽高比

app:layout_constraintDimensionRatio="16:6" //16:6==H,16:6 宽:高=16:6

app:layout_constraintDimensionRatio="W,16:6" //6:16==H,16:6 宽:高=6:16
app:layout_constraintDimensionRatio="H,16:6"
该属性指的是宽高比,所以16:6就可以完成我们的需求。
3类似LinearLayout的weight的权重布局
三个tab width均分
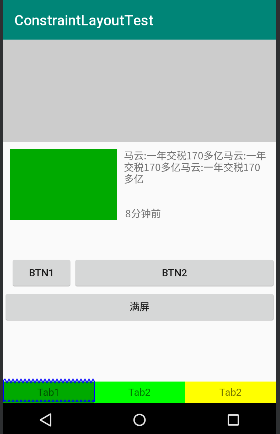
TextView在哪个控件的左边和右边都进行设置,并且width设置为0dp可以实现,三个tab的均分
<TextView

        android:id="@+id/tv4"

        android:layout_width="0dp"

        android:layout_height="30dp"

        android:background="#00aa00"

        android:text="Tab1"

        android:gravity="center"

        app:layout_constraintBottom_toBottomOf="parent"

        app:layout_constraintLeft_toLeftOf="parent"

        app:layout_constraintRight_toLeftOf="@id/tv5"

        />

    <TextView

        android:id="@+id/tv5"

        android:layout_width="0dp"

        android:layout_height="30dp"

        android:text="Tab2"

        android:gravity="center"

        app:layout_constraintBottom_toBottomOf="parent"

        app:layout_constraintLeft_toRightOf="@id/tv4"

        app:layout_constraintRight_toLeftOf="@+id/tv6"

        android:background="#00ff00"

        />

    <TextView

        android:id="@+id/tv6"

        android:layout_width="0dp"

        android:layout_height="30dp"

        android:text="Tab2"

        android:gravity="center"

        app:layout_constraintBottom_toBottomOf="parent"

        app:layout_constraintLeft_toRightOf="@id/tv5"

        android:background="#ffff00"

        app:layout_constraintRight_toRightOf="parent"/>
app:layout_constraintHorizontal_weight,设置水平方向的权重
在上面三个TextView中加入这个属性,值分别设置为1,2,1,效果为第一个行,1:2:1的比例划分,没有设置的效果为第二行均分
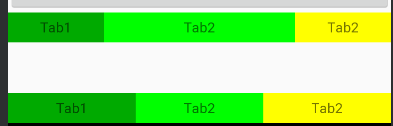
app:layout_constraintHorizontal_chainStyle="spread" 设置链的样式并且width不为0
- spread + 宽度非0

spread + 宽度为0,且可以通过weight控制分配比例(上例)
spread_inside + 宽度非0

- packed + 宽度非0
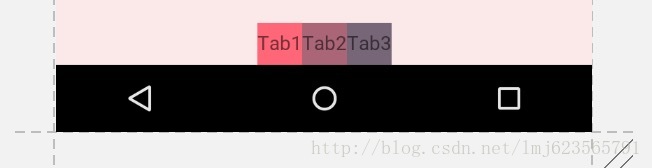
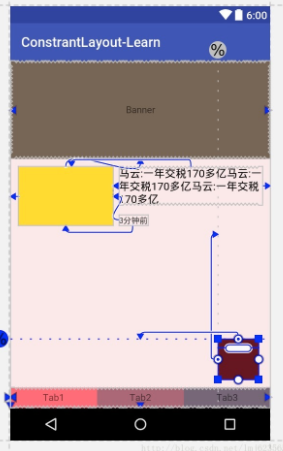
浮动框
 <TextView

        android:layout_width="60dp"

        android:layout_height="60dp"

        android:background="#612"

        app:layout_constraintBottom_toBottomOf="parent"

        app:layout_constraintLeft_toLeftOf="parent"

        app:layout_constraintRight_toRightOf="parent"

        app:layout_constraintTop_toTopOf="parent"

        app:layout_constraintHorizontal_bias="0.9"  //水平方向的拉力,90%说明

        app:layout_constraintVertical_bias="0.9" />
即设置上下两侧间隙比例分别为90%与10%。这个很好理解,我们之前说了,再没有bias这个属性的时候,这两侧的拉力大小是一样的,但是你可以通过bias来控制哪一侧的力要大一些~~明白了么~
所以,该属性可以用于约束之前,控制两侧的“拉力”。
我们看一下效果图:
六、尝试使用Guideline
android.support.constraint.Guideline该类比较简单,主要用于辅助布局,即类似为辅助线,横向的、纵向的。该布局是不会显示到界面上的。
所以其有个属性为:
android:orientation取值为”vertical”和”horizontal”.
除此以外,还差个属性,决定该辅助线的位置:
layout_constraintGuide_begin
layout_constraintGuide_end
layout_constraintGuide_percent
可以通过上面3个属性其中之一来确定属性值位置。
begin=30dp,即可认为距离顶部30dp的地方有个辅助线,根据orientation来决定是横向还是纵向。
end=30dp,即为距离底部。
percent=0.8即为距离顶部80%。
好了,下面看一个例子,刚才我们的浮点按钮,我决定通过两根辅助线来定位,一根横向距离底部80%,一个纵向距离顶部80%,浮点按钮就定位在他们交叉的地方。
<android.support.constraint.ConstraintLayout

...

tools:context="com.zhy.constrantlayout_learn.MainActivity">

<android.support.constraint.Guideline

android:id="@+id/guideline_h"

android:layout_width="wrap_content"

android:layout_height="wrap_content"

android:orientation="horizontal"

app:layout_constraintGuide_percent="0.8" />

<android.support.constraint.Guideline

android:id="@+id/guideline_w"

android:layout_width="wrap_content"

android:layout_height="wrap_content"

android:orientation="vertical"

app:layout_constraintGuide_percent="0.8" />

<TextView

android:layout_width="60dp"

android:layout_height="60dp"

android:background="#612"

app:layout_constraintLeft_toRightOf="@id/guideline_w"

app:layout_constraintTop_toBottomOf="@id/guideline_h" />

</....>
我感觉都不用解释了~~看眼效果图吧:
到此,属性基本上讲完啦~
可以看到,上述相当复杂的一个布局,在ConstraintLayout中完全没有嵌套!
六、总结
本文通过实际的按钮,基本上介绍了ConstraintLayout所支持的所有的属性,全文没有提及拖拽,因为当界面复杂之后,想要完美的拖拽实在是太难了,而且谁也不期望,看不懂拖拽完成后的布局属性吧~
所以,我建议还是尽可能手写,通过本文这样一个流程,虽然支持的属性有20多个,但是分类后并不难记,难记也可以拿出本文翻一翻~
转自:https://blog.csdn.net/lmj623565791/article/details/78011599?utm_source=tuicool&utm_medium=referral
android ConstraintLayout布局的更多相关文章
- Android ConstraintLayout 布局警告
使用 ConstraintLayout 布局出现警告: 此视图不受垂直约束.在运行时,除非添加垂直约束,否则它将跳转到左侧 解决办法: 从Android Studio v3及更高版本开始,从下拉列表中 ...
- Android ConstraintLayout约束控件链接整理
Android新特性介绍,ConstraintLayout完全解析 探索Android ConstraintLayout布局 了解使用Android ConstraintLayout
- Android ConstraintLayout详解(from jianshu)
Android ConstraintLayout详解 https://www.jianshu.com/p/a8b49ff64cd3 1. 概述 在本篇文章中,你会学习到有关Constraint ...
- 了解使用Android ConstraintLayout
说明 Google I/O 2016 上发布了 ConstraintLayout, 简直是要变革 Android 写界面方式. 于是第二天我立即找到相关文档尝试, 这是官方提供的 Codelab 项目 ...
- Android ConstraintLayout的基本使用
升级Android studio到2.3版本之后,发现新建Activity或fragment时,xml布局默认布局由RelativeLayout更改为ConstraintLayout了,既然已经推荐使 ...
- Android添加布局和按键
Android添加布局和按键 Android布局方式分为 1.LinearLayout (线性布局) 2.ConstraintLayout (约束布局) 3.FrameLayout (帧布局) 4.T ...
- 【腾讯Bugly干货分享】Android动态布局入门及NinePatchChunk解密
本文来自于腾讯bugly开发者社区,非经作者同意,请勿转载,原文地址:http://dev.qq.com/topic/57c7ff5d53bbcffd68c64411 作者:黄进——QQ音乐团队 摆脱 ...
- Xamarin.Android之布局文件智能提示问题
一.前言 看到有人问关于xamarin.android的布局没智能提示问题(VS 2015),当然,写布局这东西没提示这是一件相对痛苦的事 ,所以这里就提供一个解决的方案! 二.解决方案 想要智能提示 ...
- android—-线性布局
android五大布局之线性布局. 1.线性布局的特点:各个子元素彼此连接,中间不留空白 而今天我们要讲解的就是第一个布局,LinearLayout(线性布局),我们屏幕适配的使用 用的比较多的就是L ...
随机推荐
- ADV拍卖
#include <stdio.h> int ren,wuping; int qian[20]; int wu1[20],wu2[20],wu3[20]; int a[20],visit[ ...
- verify验证插件的详解
使用此验证插件,我们只需要新建一个实例对象,同时传入一个json对象就行了,这里我们只传入了两个属性:checkItem和callback.下面的代码解析,我们就按照这个例子来. var verify ...
- set,env和export命令显示shell变量其区别,与环境变量扫盲(一)
种类: ♦ set : 用来显示本地变量,显示当前shell的变量,包括当前用户的变量 ♦ env : 用来显示环境变量,显示当前用户的变量. ♦ export: 用来显示和设置环 ...
- 【原】[UIImage imageWithContentsOfFile:]引发的图片无法显示的问题
最近在做一个iOS手机项目的时候,遇到一个奇怪的问题,这里跟大家分享一下. 一.问题重现 1.启动App后,通过http请求下载了一个1.jpg文件到Cache目录下,下载成功之后,将图片显示在界面上 ...
- mybaits中"#"和"$"的区别
动态 sql 是 mybatis 的主要特性之一,在 mapper 中定义的参数传到 xml 中之后,在查询之前 mybatis 会对其进行动态解析.mybatis 为我们提供了两种支持动态 sql ...
- 2016级算法期末上机-H.难题·AlvinZH's Fight with DDLs III
1119 AlvinZH's Fight with DDLs III 思路 难题,最小点覆盖. 分析题意,某一个任务,既可以在笔记本A的 \(a\) 模式下完成,也可以在笔记本B的 \(b\) 模式下 ...
- 题目1003:A+B(字符串转数字)
问题来源 http://ac.jobdu.com/problem.php?pid=1003 问题描述 每次给你两个数,数的形式是每三位有一个间隔符',',计算两数之和. 问题分析 两个问题,一.如何读 ...
- Linux服务器核心参数配置
使用Linux作为长连接的web服务器时,为了增加服务的容量,以及处理性能,需要修改一些参数. 一.多进程绑定CPU 1.使用taskset命令可以绑定进程到指定CPU,以减少多核CPU环境中,单进程 ...
- 【Jenkins】定时构建语法
跟cron定时任务语法基本类似 一.字段有哪些 每行包含5个字段,用制表符或空格隔开,从左至右依次是: 分 时 天 月 星期 二.每个字段的取值范围 分钟 (0–59) 时 (0–23) 天 (1–3 ...
- You need to use a Theme.AppCompat theme (or descendant) with this activity问题
You need to use a Theme.AppCompat theme (or descendant) with this activity问题 https://blog.csdn.net/j ...