SpringBoot实战(十三)之缓存
什么是缓存?
引用下百度百科的解释:
缓存就是数据交换的缓冲区(又称作Cache),当某一硬件要读取数据时,会首先从缓存中查找需要的数据,找到了则直接执行,找不到的话则从内存中查找。由于缓存的运行速度比内存快得多,故缓存的作用就是帮助硬件更快地运行。
因为缓存往往使用的是RAM(断电即掉的非永久性储存),所以在用完后还是会把文件送到硬盘等存储器里永久存储。电脑里最大的缓存就是内存条了,最快的是CPU上镶的L1和L2缓存,显卡的显存是给显卡运算芯片用的缓存,硬盘上也有16M或者32M的缓存。
说到这你或许很疑问为什么要用缓存?
比如面对千万级数据时,对于并发量和性能是非常具有挑战性的。这时如果不采用缓存的话,你每次都要直接去数据库查,那么数据库即便是分库分表,对于性能而言也是一笔不小的开支。说到这你也许还不明白为什么用缓存。直白的讲,将你每次需要到数据库中获取的大批量数据,缓存起来,每次需要查询对应的数据时,直接去缓存里面查。当然了,这里可能还会存在一个比较大的问题,对于部分项目而言,比如广告投放项目或者是一些电商项目,数据变动相对比较大,这样会导致一个问题,就是缓存数据的实时性。这里后续会讲。今天主要讲的是SpringBoot作缓存的简单Demo,主要面向一些初学者,同时笔者也作一格小小记录。框架越往后发展,就越轻量级。想当初,搭建SSM框架,一大堆XML先不说(只要很好的管理起来,看起来也不是那么讨厌),最让人头痛的就是每次引用一些非关系型数据库或者是一些类库都要导入对应的maven依赖,这是一件很头痛的事情,因为有些时候,一些依赖之间,它们会存在一定的冲突。不过还好用maven作为依赖管理,处理冲突问题还是很不错。想到我的一位朋友,他公司用的还是动态web项目。也就是手动导入jar包,有的时候还得build path一下,想到这,我觉得还是很幸运。说的或许有些偏题了,不过最想说还是,感谢老外开发出来这个SpringBoot,因为这样让我们的开发效率更加快了。
不过,就国内而言,虽然也不乏有人研究SpringBoot源码,开发出对应的开发项目,比如JFinal或者是Jeecg,但是在应用方面的广度仍不及老外,离老外还是有一定的差距,不过让我高兴的是,这个差距不再是望尘莫及,而是望其项背。话不多说,源码贴起。
一、导入Maven依赖
<project xmlns="http://maven.apache.org/POM/4.0.0" xmlns:xsi="http://www.w3.org/2001/XMLSchema-instance" xsi:schemaLocation="http://maven.apache.org/POM/4.0.0 http://maven.apache.org/xsd/maven-4.0.0.xsd">

  <modelVersion>4.0.0</modelVersion>

  <groupId>cn.yc.springboot.cache</groupId>

  <artifactId>SprintBoot-Cache</artifactId>

  <version>0.0.1-SNAPSHOT</version>

  <parent>

        <groupId>org.springframework.boot</groupId>

        <artifactId>spring-boot-starter-parent</artifactId>

        <version>2.0.6.RELEASE</version>

        <relativePath/> <!-- lookup parent from repository -->

    </parent>

    <properties>

        <project.build.sourceEncoding>UTF-8</project.build.sourceEncoding>

        <project.reporting.outputEncoding>UTF-8</project.reporting.outputEncoding>

        <java.version>1.8</java.version>

    </properties>

    <dependencies>

        <dependency>

            <groupId>org.springframework.boot</groupId>

            <artifactId>spring-boot-starter</artifactId>

        </dependency>

        <dependency>

            <groupId>org.springframework.boot</groupId>

            <artifactId>spring-boot-starter-test</artifactId>

            <scope>test</scope>

        </dependency>

        <dependency>

            <groupId>org.mybatis.spring.boot</groupId>

            <artifactId>mybatis-spring-boot-starter</artifactId>

            <version>1.3.1</version>

        </dependency>

        <dependency>

            <groupId>mysql</groupId>

            <artifactId>mysql-connector-java</artifactId>

            <version>5.1.30</version>

        </dependency>

        <dependency>

            <groupId>org.springframework.boot</groupId>

            <artifactId>spring-boot-starter-web</artifactId>

        </dependency>

    </dependencies>

    <build>

        <plugins>

            <plugin>

                <groupId>org.springframework.boot</groupId>

                <artifactId>spring-boot-maven-plugin</artifactId>

            </plugin>

        </plugins>

    </build>

</project>
二、执行SQL脚本
DROP TABLE IF EXISTS `article`;

CREATE TABLE `article` (

  `id` int(11) NOT NULL AUTO_INCREMENT,

  `title` varchar(50) DEFAULT NULL,

  `author` varchar(50) DEFAULT NULL,

  `content` text,

  `file_name` varchar(255) DEFAULT NULL,

  `state` int(2) DEFAULT '1',

  PRIMARY KEY (`id`)

) ENGINE=InnoDB AUTO_INCREMENT=3 DEFAULT CHARSET=utf8;

/*Data for the table `article` */

insert  into `article`(`id`,`title`,`author`,`content`,`file_name`,`state`) values (1,'三国演义','罗贯中','test1324fdsafadsfadsfa','test001',1),(2,'水浒城','施耐庵','官逼民反','test002',1);
三、编写对应的类(entity,dao,service及其controller和model、启动类)
SpringbootCacheApplication.java
package com.blog.controller;

import org.springframework.boot.SpringApplication;

import org.springframework.boot.autoconfigure.EnableAutoConfiguration;

import org.springframework.boot.autoconfigure.SpringBootApplication;

import org.springframework.cache.annotation.EnableCaching;

@SpringBootApplication

@EnableAutoConfiguration

@EnableCaching

public class SpringbootCacheApplication {

    public static void main(String[] args) {

        SpringApplication.run(SpringbootCacheApplication.class, args);

    }

}
Article.java
package com.blog.entity;

import java.io.Serializable;

public class Article implements Serializable {

    private Integer id;

    private String title;

    private String content;

    private String author;

    private String fileName;

    private Integer state;

    public Integer getId() {

        return id;

    }

    public void setId(Integer id) {

        this.id = id;

    }

    public String getTitle() {

        return title;

    }

    public void setTitle(String title) {

        this.title = title;

    }

    public String getContent() {

        return content;

    }

    public void setContent(String content) {

        this.content = content;

    }

    public String getFileName() {

        return fileName;

    }

    public void setFileName(String fileName) {

        this.fileName = fileName;

    }

    public Integer getState() {

        return state;

    }

    public void setState(Integer state) {

        this.state = state;

    }

    public String getAuthor() {

        return author;

    }

    public void setAuthor(String author) {

        this.author = author;

    }

}
ArticleMapper.java
package com.blog.dao;

import org.apache.ibatis.annotations.Param;

import com.blog.entity.Article;

public interface ArticleMapper {

    /**

     * 插入一篇文章

     * @param title

     * @param author

     * @param content

     * @param fileName

     * @return

     */

    public Integer addArticle(@Param("title") String  title,@Param("author")String author,

                              @Param("content")String content,@Param("fileName")String fileName);

    /**

     * 根据id获取文章

     * @param id

     * @return

     */

    public Article getArticleById(@Param("id") Integer id);

    /**

     * 更新content

     * @param content

     */

    public Integer updateContentById(@Param("content")String content,@Param("id")Integer id);

    /**

     * 根据id删除文章

     * @param id

     * @return

     */

    public Integer removeArticleById(@Param("id")Integer id);

    /**

     * 获得上一次插入的id

     * @return

     */

    public Integer getLastInertId();

}
ArticleService.java
package com.blog.service; import java.util.concurrent.atomic.AtomicInteger; import org.springframework.beans.factory.annotation.Autowired;
import org.springframework.cache.annotation.CacheConfig;
import org.springframework.cache.annotation.CacheEvict;
import org.springframework.cache.annotation.CachePut;
import org.springframework.cache.annotation.Cacheable;
import org.springframework.stereotype.Service; import com.blog.dao.ArticleMapper;
import com.blog.entity.Article; @Service
@CacheConfig(cacheNames = "articleCache")
public class ArticleService { private AtomicInteger count =new AtomicInteger(0); @Autowired
private ArticleMapper articleMapper; /**
* 增加一篇文章
* @return
*/
@CachePut()
public Integer addArticle(Article article){
Integer result = articleMapper.addArticle(article.getTitle(), article.getAuthor(), article.getContent(), article.getFileName());
if (result>0) {
Integer lastInertId = articleMapper.getLastInertId();
System.out.println("--执行增加操作--id:" + lastInertId);
}
return result;
} /**
* 获取文章
* @param id 文章id
* @return
*/
@Cacheable(key = "#id",unless = "#result.state==0")
public Article getArticle(Integer id) {
try {
//模拟耗时操作
Thread.sleep(5000);
} catch (InterruptedException e) {
e.printStackTrace();
}
final Article artcile = articleMapper.getArticleById(id);
System.out.println("--执行数据库查询操作"+count.incrementAndGet()+"次"+"id:"+id);
return artcile;
} /**
* 通过id更新内容
*
* @param id
* @return
*/
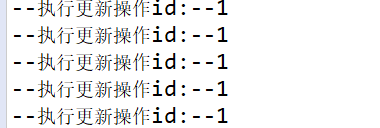
@CacheEvict(key = "#id")
public Integer updateContentById(String contetnt, Integer id) {
Integer result = articleMapper.updateContentById(contetnt, id);
System.out.println("--执行更新操作id:--"+id);
return result;
} /**
* 通过id移除文章
* @param id
* @return
*/
@CacheEvict(key = "#id")
public Integer removeArticleById(Integer id){
final Integer result = articleMapper.removeArticleById(id);
System.out.println("执行删除操作,id:"+id);
return result;
} }
ArticleController.java
package com.blog.controller; import org.mybatis.spring.annotation.MapperScan;
import org.springframework.beans.factory.annotation.Autowired;
import org.springframework.context.annotation.ComponentScan;
import org.springframework.web.bind.annotation.GetMapping;
import org.springframework.web.bind.annotation.PostMapping;
import org.springframework.web.bind.annotation.RequestBody;
import org.springframework.web.bind.annotation.RequestParam;
import org.springframework.web.bind.annotation.RestController; import com.blog.dao.ArticleMapper;
import com.blog.entity.Article;
import com.blog.model.ResultVo;
import com.blog.service.ArticleService; @RestController
@ComponentScan(basePackages = {"com.blog.controller", "com.blog.service"})
@MapperScan(basePackages = {"com.blog.dao"})
public class ArticleController { @Autowired
private ArticleService articleService; @Autowired
ArticleMapper articleMapper; @PostMapping("/add")
public ResultVo addArticle(@RequestBody Article article) { System.out.println(article.toString());
Integer result = articleService.addArticle(article); if (result >= 0) {
return ResultVo.success(result);
}
return ResultVo.fail();
} @GetMapping("/get")
public ResultVo getArticle(@RequestParam("id") Integer id) { Article article = articleService.getArticle(id); if (null != article)
return ResultVo.success(article);
return ResultVo.fail();
} /**
* 更新一篇文章
*
* @param contetnt
* @param id
* @return
*/
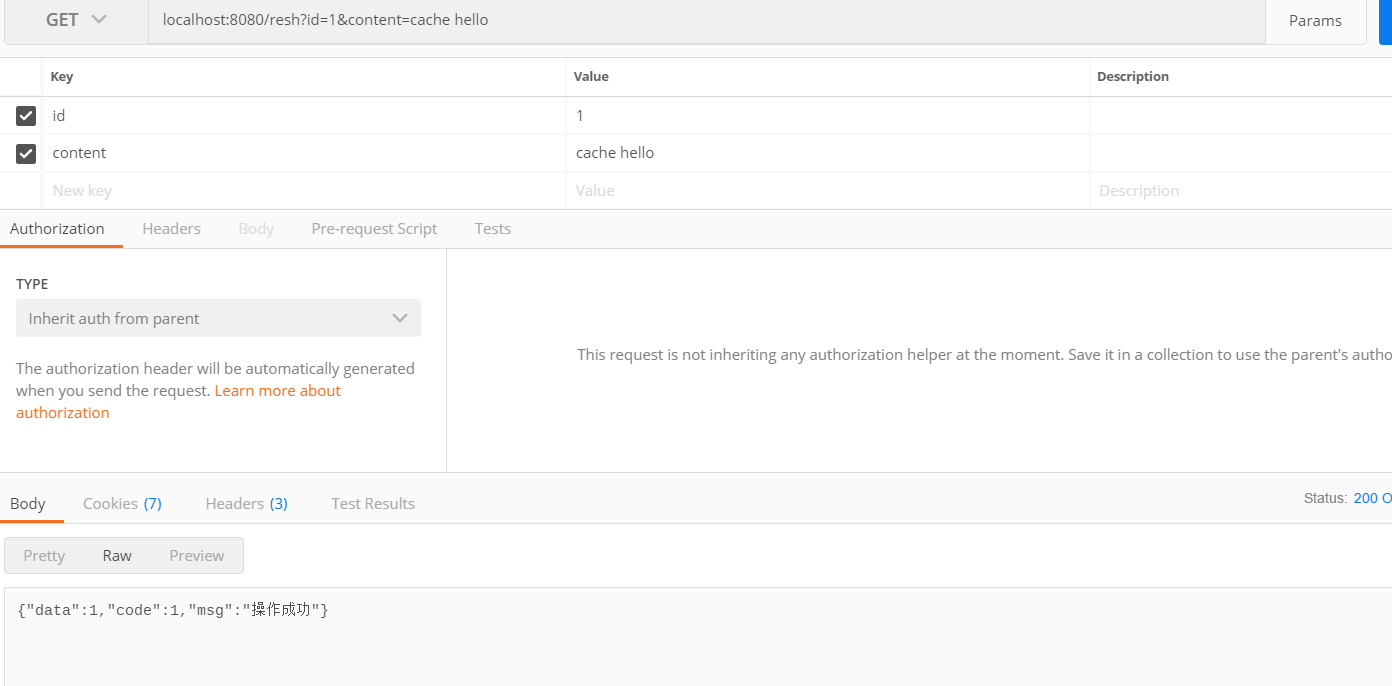
@GetMapping("/resh")
public ResultVo update(@RequestParam("content") String contetnt, @RequestParam("id") Integer id) {
final Integer result = articleService.updateContentById(contetnt, id);
if (result > 0) {
return ResultVo.success(result);
} else {
return ResultVo.fail();
}
} /**
* 删除一篇文章
*
* @param id
* @return
*/
@GetMapping("/rem")
public ResultVo remove(@RequestParam("id") Integer id) { final Integer result = articleService.removeArticleById(id);
if (result > 0) {
return ResultVo.success(result);
} else {
return ResultVo.fail();
}
} }
ResultVo.java
package com.blog.model;

import java.io.Serializable;

public class ResultVo<T> implements Serializable {

    private T data;

    private Integer code;

    private String msg;

    public static final String errorMsg = "操作失败";

    public static final String successMsg = "操作成功";

    public ResultVo(T data) {

        this.data = data;

    }

    public ResultVo(T data, Integer code) {

        this.data = data;

        this.code = code;

    }

    public ResultVo(T data, Integer code, String msg) {

        this.data = data;

        this.code = code;

        this.msg = msg;

    }

    public ResultVo(Integer code, String msg) {

        this.code = code;

        this.msg = msg;

    }

    /**

     * 成功

     *

     * @param <T> 数据

     * @return

     */

    public static <T> ResultVo success(T data) {

        return new ResultVo<T>(data, 1, successMsg);

    }

    /**

     * 失败

     * @param <T>

     * @return

     */

    public static <T> ResultVo fail() {

        return new ResultVo(0, errorMsg);

    }

    public T getData() {

        return data;

    }

    public void setData(T data) {

        this.data = data;

    }

    public Integer getCode() {

        return code;

    }

    public void setCode(Integer code) {

        this.code = code;

    }

    public String getMsg() {

        return msg;

    }

    public void setMsg(String msg) {

        this.msg = msg;

    }

}
四、编写XML及其对应配置文件
ArticleMapper.xml
<?xml version="1.0" encoding="UTF-8" ?>

<!DOCTYPE mapper PUBLIC "-//ibatis.apache.org//DTD Mapper 3.0//EN"

        "http://mybatis.org/dtd/mybatis-3-mapper.dtd">

<mapper namespace="com.blog.dao.ArticleMapper">

    <resultMap type="com.blog.entity.Article" id="articleMap">

        <result column="id" property="id"/>

        <result column="title" property="title"/>

        <result column="author" property="author"/>

        <result column="content" property="content"/>

        <result column="file_name" property="fileName"/>

        <result column="state" property="state"></result>

    </resultMap>

    <insert id="addArticle">

        INSERT INTO  article (title,author,content,file_name,state) values

        (#{title}, #{author}, #{content},#{fileName},'1')

    </insert>

    <select id="getArticleById" resultMap="articleMap">

        select * from article where id = #{id}

    </select>

    <update id="updateContentById">

        update article set content = #{content} where id = #{id}

    </update>

    <update id="removeArticleById">

        update article set state = '0' where id = #{id}

    </update>

    <select id="getLastInertId" resultType="java.lang.Integer">

        select LAST_INSERT_ID()

    </select>

</mapper>
application.properties
spring.datasource.url=jdbc:mysql://localhost:3306/test

spring.datasource.username=root

spring.datasource.password=1234

spring.datasource.driver-class-name=com.mysql.jdbc.Driver

mybatis.mapperLocations=classpath*:mapper/*.xml
四、运行结果
SpringBoot实战(十三)之缓存的更多相关文章
- SpringBoot实战 之 异常处理篇
在互联网时代,我们所开发的应用大多是直面用户的,程序中的任何一点小疏忽都可能导致用户的流失,而程序出现异常往往又是不可避免的,那该如何减少程序异常对用户体验的影响呢?其实方法很简单,对异常进行捕获,然 ...
- apollo客户端springboot实战(四)
1. apollo客户端springboot实战(四) 1.1. 前言 经过前几张入门学习,基本已经完成了apollo环境的搭建和简单客户端例子,但我们现在流行的通常是springboot的客户端 ...
- SpringBoot 使用 EhCache2.x 缓存(三十一)
SpringBoot 使用 EhCache2.x 缓存入门很简单,废话少说上干货: 1.在POM.xml中增加jar包 <!--开启 cache 缓存--> <dependency& ...
- 千锋很火的SpringBoot实战开发教程视频
springboot是什么? Spring Boot是由Pivotal团队提供的全新框架,其设计目的是用来简化新Spring应用的初始搭建以及开发过程.该框架使用了特定的方式来进行配置,从而使开发人员 ...
- SpringBoot实战(四)获取接口请求中的参数(@PathVariable,@RequestParam,@RequestBody)
上一篇SpringBoot实战(二)Restful风格API接口中写了一个控制器,获取了前端请求的参数,现在我们就参数的获取与校验做一个介绍: 一:获取参数 SpringBoot提供的获取参数注解包括 ...
- SpringBoot实战(二)Restful风格API接口
在上一篇SpringBoot实战(一)HelloWorld的基础上,编写一个Restful风格的API接口: 1.根据MVC原则,创建一个简单的目录结构,包括controller和entity,分别创 ...
- 在springboot中使用redis缓存,将缓存序列化为json格式的数据
背景 在springboot中使用redis缓存结合spring缓存注解,当缓存成功后使用gui界面查看redis中的数据 原因 springboot缓存默认的序列化是jdk提供的 Serializa ...
- SpringBoot实战之异常处理篇
在互联网时代,我们所开发的应用大多是直面用户的,程序中的任何一点小疏忽都可能导致用户的流失,而程序出现异常往往又是不可避免的,那该如何减少程序异常对用户体验的影响呢?其实方法很简单,对异常进行捕获,然 ...
- Docker深入浅出系列 | 单机Nginx+Springboot实战
目录 Nginx+Springboot实战 前期准备 实战目标 实战步骤 创建Docker网络 搭建Mysql容器 搭建额度服务集群 搭建Nginx服务 验证额度服务 附录 Nginx+Springb ...
随机推荐
- 最新的dubbo和zookeeper整合的问题
最新的dubbo和zookeeper整合的问题 生活本不易,流人遂自安 博主最新在做小项目练手,在进行dubbo和zookeeper整合的时候遇到了一些问题,在这里这些问题做个小总结吧. 首先需要说明 ...
- MapReduce详解和WordCount模拟
最早接触大数据,常萦绕耳边的一个词「MapReduce」.它到底是什么,能做什么,原理又是什么?且听下文讲解. 是什么 MapReduce 即是一个编程模型,又是一个计算框架,它充分采用了分治的思想, ...
- HTTP完整请求过程
重要申明:感谢原文作者——沐风的心,想看原文请戳这里!我借鉴了原文的页面请求流程,原文见时序图之后正文. 重要申明:感谢原文作者——一行两行,想看原文请戳这里!我借鉴了原文的完整HTTP请求流程. 增 ...
- 【SSH网上商城项目实战28】使用Ajax技术局部更新商品数量和总价
转自: https://blog.csdn.net/eson_15/article/details/51487323 昨天把项目部署了一下,玩了玩,今天完善了一下购物车中修改商品数量就能局部 ...
- javascrip 实现简单的计算器功能
页面样式 <!DOCTYPE html> <html lang="en"> <head> <meta charset="UTF- ...
- BZOJ1968 [Ahoi2005] 约数研究
Description Input 只有一行一个整数 N(0 < N < 1000000). Output 只有一行输出,为整数M,即f(1)到f(N)的累加和. Sample Input ...
- JS之 if语句函数 对接事件动作 函数更改css css对接需要换妆的区id或class
if 函数的实现步骤: function +名字() 指定id , 指定开关(display: none or block) if + else 构成逻辑 控制开关 决定在哪里安置一个灯泡, 指定 ...
- php下载远程大文件(获取远程文件大小)
function download_file($url) { // $url = http://192.168.8.95/vm/download_file?downurl=http://192.168 ...
- Java和C# RSA加解密相互通信和使用公钥加密传输
关于JAVA和C#加解密通讯的话,可以用这个BouncyCastle插件,会帮助你解决很多问题 http://www.bouncycastle.org/ //c#使用java给的公钥进行rsa加密 p ...
- C/C++内存管理详解 ZZ
内存管理是C++最令人切齿痛恨的问题,也是C++最有争议的问题,C++高手从中获得了更好的性能,更大的自由,C++菜鸟的收获则是一遍一遍的 检查代码和对C++的痛恨,但内存管理在C++中无处不在,内存 ...