Unity(IOC)学习笔记
版权声明:本文为博主原创文章,未经博主允许不得转载。 https://blog.csdn.net/m0_37591671/article/details/79432564
Unity(IOC)学习笔记
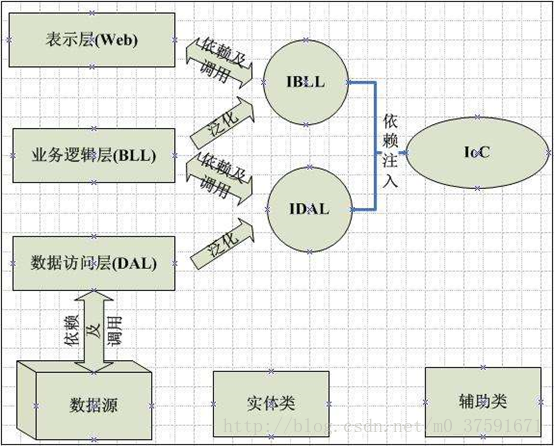
1.IOC
在介绍如何在程序中使用Unity之前,首先说一下什么是IOC:
IOC是Inversion of Control的缩写,被翻译为控制反转,是一种全新的设计模式,用来削减计算机程序的耦合问题,把程序上层对下层的依赖,转移到第三方的容器来装配。 控制反转一般分为两种类型,依赖注入(Dependency Injection,简称DI)和依赖查找(Dependency Lookup)。依赖注入应用比较广泛。
实现Ioc的框架有很多,比如astle Windsor、Unity、Spring.NET、StructureMap,我们这里学习使用微软提供的Unity。
2.Unity
下面介绍如何在程序中使用Unity:
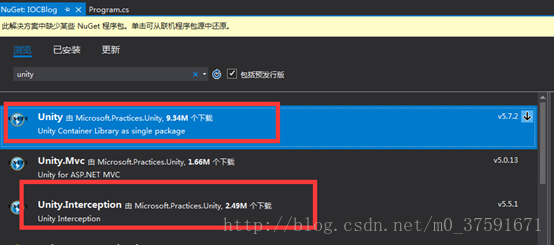
第一步:
首先在Nuget添加Unity包,引用→右键→管理Nuget程序包,要实现AOP必须也添加下面的Unity.Interception包
这里添加Unity版本为5.5.6,Unity.Abstractions版本3.1.3,Unity.Interception版本5.3.1
第二步:
程序中添加一个配置文件的文件夹ConfigFiles,添加配置文件:
第三步:
配置文件:文件结构为
具体配置为:


<?xml version="1.0" encoding="utf-8" ?>
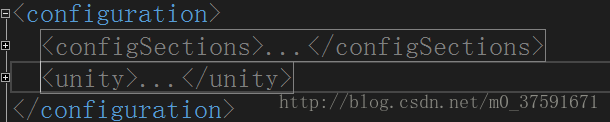
<configuration>
<configSections>
<section name="unity" type="Microsoft.Practices.Unity.Configuration.UnityConfigurationSection, Unity.Configuration"/>
</configSections>
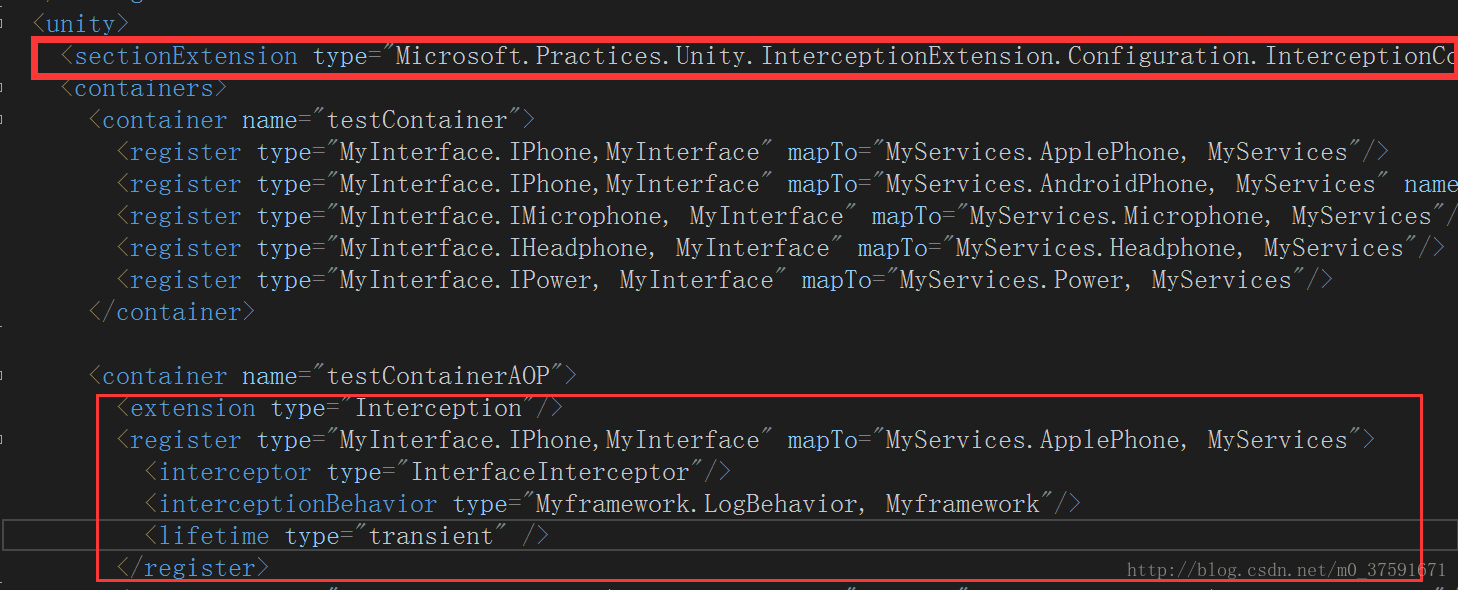
<unity>
<sectionExtension type="Microsoft.Practices.Unity.InterceptionExtension.Configuration.InterceptionConfigurationExtension, Unity.Interception.Configuration"/>
<containers>
<container name="testContainer">
<register type="MyInterface.IPhone,MyInterface" mapTo="MyServices.ApplePhone, MyServices"/>
<register type="MyInterface.IPhone,MyInterface" mapTo="MyServices.AndroidPhone, MyServices" name="Android"/>
<register type="MyInterface.IMicrophone, MyInterface" mapTo="MyServices.Microphone, MyServices"/>
<register type="MyInterface.IHeadphone, MyInterface" mapTo="MyServices.Headphone, MyServices"/>
<register type="MyInterface.IPower, MyInterface" mapTo="MyServices.Power, MyServices"/>
</container>
<container name="testContainerAOP">
<extension type="Interception"/>
<register type="MyInterface.IPhone,MyInterface" mapTo="MyServices.ApplePhone, MyServices">
<interceptor type="InterfaceInterceptor"/>
<interceptionBehavior type="MyFramework.LogBehavior, MyFramework"/>
<lifetime type="transient" />
<!--<constructor>
<param name="pubContext" type="IPubContext" />
<param name="id" type="System.Int32" value="3" />
</constructor>-->
</register>
<register type="MyInterface.IMicrophone, MyInterface" mapTo="MyServices.Microphone, MyServices"/>
<register type="MyInterface.IHeadphone, MyInterface" mapTo="MyServices.Headphone, MyServices"/>
<register type="MyInterface.IPower, MyInterface" mapTo="MyServices.Power, MyServices"/>
<register type="MyInterface.IPhone,MyInterface" mapTo="MyServices.AndroidPhone, MyServices" name="android"/>
<register type="MyInterface.IPhone,MyInterface" mapTo="MyServices.ApplePhone, MyServices" name="apple"/>
</container>
</containers>
</unity>
</configuration>
这里注册了两个Unity容器“testContainer”,“testContainerAOP”,后者是带有AOP的。
解释一下这个register:
<register type="MyInterface.IPhone,MyInterface" mapTo="MyServices.ApplePhone, MyServices"/>
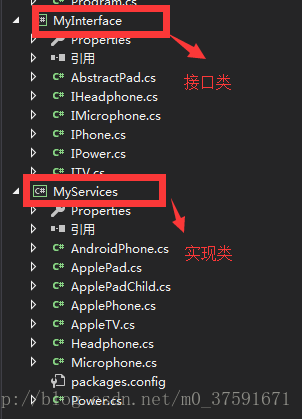
MyInterface.IPhone:表示抽象接口的IPhone抽象类。
MyInterface为抽象类命名空间,即dll名称
MyServices.ApplePhone:表示实现的具体的ApplePhone类。
MyServices:为具体实现类命名空间,即dll名称
第四步:
Unity在程序中使用方式,这里是用配置文件:
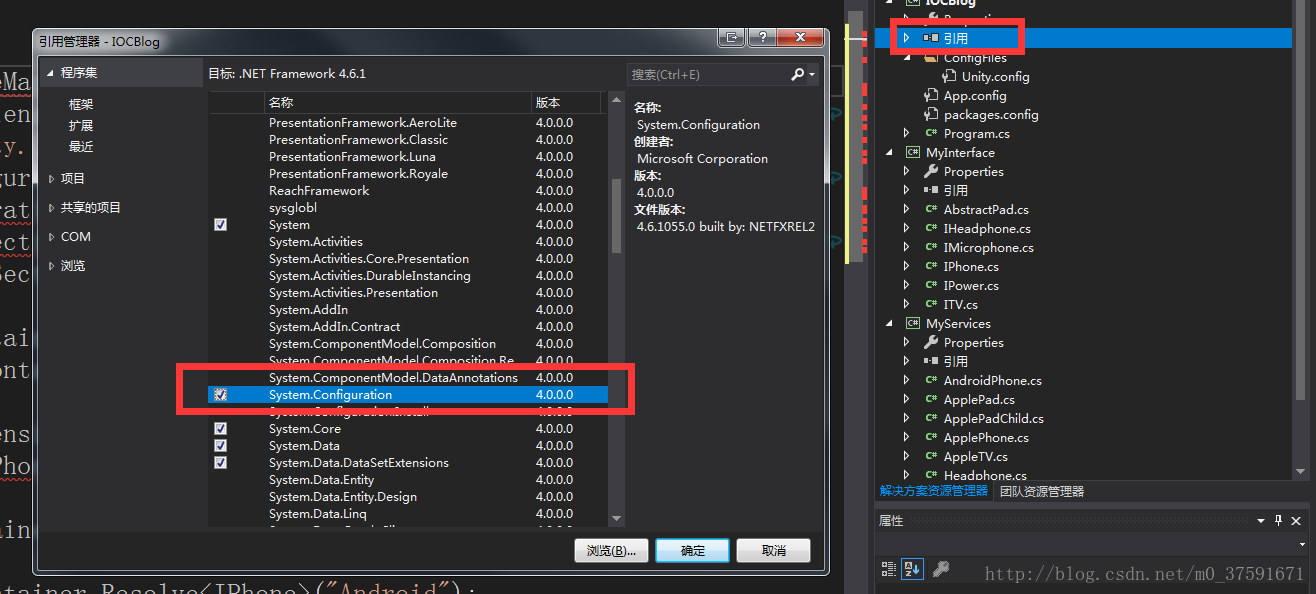
1.首先要添加System.Configuration的引用(引用右键→添加引用→框架):
2.找配置文件的路径
   ExeConfigurationFileMap fileMap = new ExeConfigurationFileMap();

            fileMap.ExeConfigFilename = Path.Combine(AppDomain.CurrentDomain.BaseDirectory + "CfgFiles\\Unity.Config");//找配置文件的路径
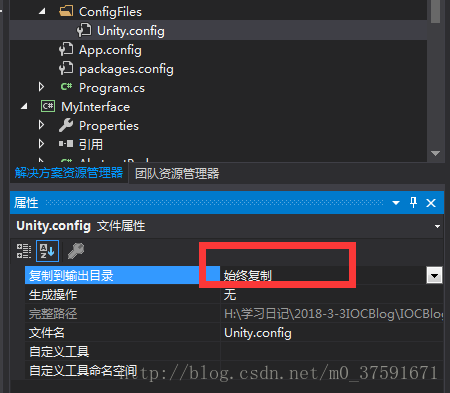
这里要注意吧Unity.config文件修改为始终复制:
3. 声明容器IUnityContainer
IUnityContainer container = new UnityContainer();

 section.Configure(container, "testContainer");
4.Resolve解析类型对象
IPhone phone = container.Resolve<IPhone>();

phone.Call();

IPhone android = container.Resolve<IPhone>("Android");

android.Call();
这里要说一下通过命名注册来区分生成的不同对象实例,即 上面的"Android",在配置文件中是这样注册的:
<register type="MyInterface.IPhone,MyInterface" mapTo="MyServices.AndroidPhone, MyServices" name="Android"/>
5.将MyServices编译生成的dll拷贝到项目文件的Bin/debug文件夹。
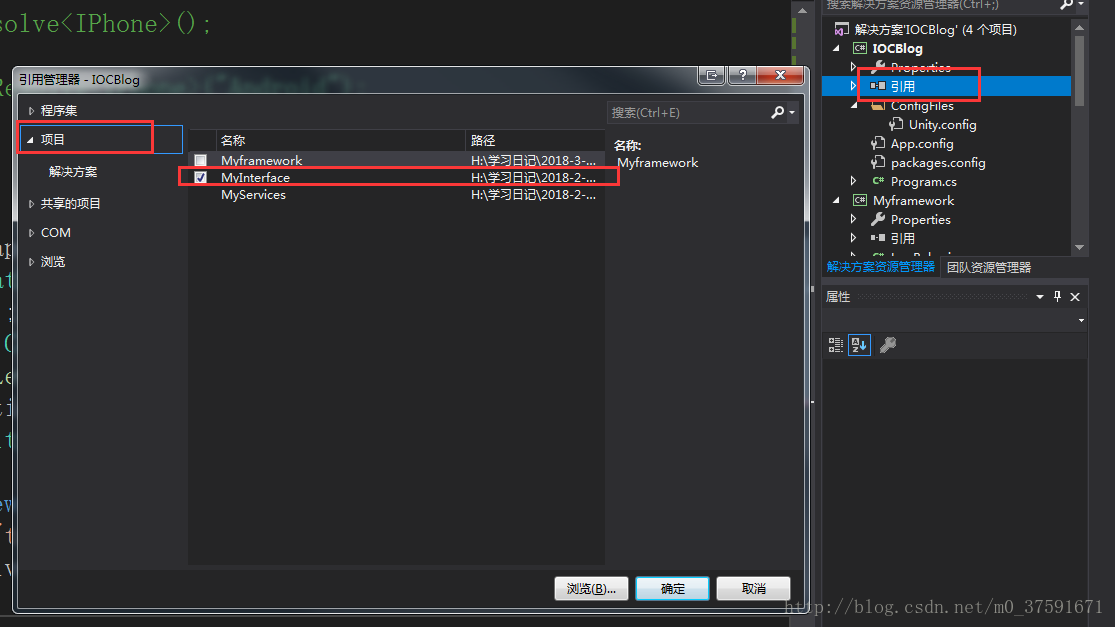
6.在项目中添加对接口的引用:
具体代码:
  static void Main(string[] args)

        {

            {

                //通过配置文件

                ExeConfigurationFileMap fileMap = new ExeConfigurationFileMap();

                fileMap.ExeConfigFilename = Path.Combine(AppDomain.CurrentDomain.BaseDirectory + "ConfigFiles\\Unity.Config");//找配置文件的路径

                Configuration configuration = ConfigurationManager.OpenMappedExeConfiguration(fileMap, ConfigurationUserLevel.None);

                UnityConfigurationSection section = (UnityConfigurationSection)configuration.GetSection(UnityConfigurationSection.SectionName);

                IUnityContainer container = new UnityContainer();

                section.Configure(container, "testContainer");

                container.AddNewExtension<Interception>().Configure<Interception>()

               .SetInterceptorFor<IPhone>(new InterfaceInterceptor());

                IPhone phone = container.Resolve<IPhone>();

                phone.Call();

                IPhone android = container.Resolve<IPhone>("Android");

                android.Call();

            }

        }
3.Unity中实现AOP
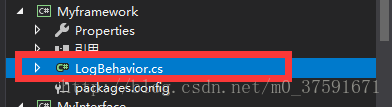
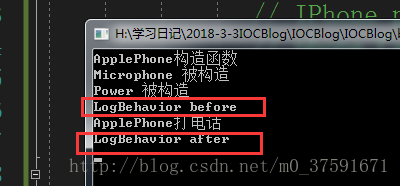
1.首先添加一个LogBehavior 的类,用来实现记录日志功能。
先要添加在Myframwork类库添加Unity,版本一样,以免冲突。然后继承IInterceptionBehavior接口。
public class LogBehavior: IInterceptionBehavior

    {

        public IEnumerable<Type> GetRequiredInterfaces()

        {

            return Type.EmptyTypes;

        }

        public IMethodReturn Invoke(IMethodInvocation input, GetNextInterceptionBehaviorDelegate getNext)

        {

            Console.WriteLine("LogBehavior before");

            IMethodReturn method = getNext()(input, getNext);

            Console.WriteLine("LogBehavior after");

            return method;

        }

        public bool WillExecute

        {

            get { return true; }

        }

    }
2.在配置文件中配置:
<configuration>

  <configSections>

    <section name="unity" type="Microsoft.Practices.Unity.Configuration.UnityConfigurationSection, Unity.Configuration"/>

  </configSections>

  <unity>

    <sectionExtension type="Microsoft.Practices.Unity.InterceptionExtension.Configuration.InterceptionConfigurationExtension, Unity.Interception.Configuration"/>

    <containers>

      <container name="testContainer">

        <register type="MyInterface.IPhone,MyInterface" mapTo="MyServices.ApplePhone, MyServices"/>

        <register type="MyInterface.IPhone,MyInterface" mapTo="MyServices.AndroidPhone, MyServices" name="Android"/>

        <register type="MyInterface.IMicrophone, MyInterface" mapTo="MyServices.Microphone, MyServices"/>

        <register type="MyInterface.IHeadphone, MyInterface" mapTo="MyServices.Headphone, MyServices"/>

        <register type="MyInterface.IPower, MyInterface" mapTo="MyServices.Power, MyServices"/>

      </container>

      <container name="testContainerAOP">

        <extension type="Interception"/>

        <register type="MyInterface.IPhone,MyInterface" mapTo="MyServices.ApplePhone, MyServices">

          <interceptor type="InterfaceInterceptor"/>

          <interceptionBehavior type="Myframework.LogBehavior, Myframework"/>

          <lifetime type="transient" />

        </register>

        <register type="MyInterface.IMicrophone, MyInterface" mapTo="MyServices.Microphone, MyServices"/>

        <register type="MyInterface.IHeadphone, MyInterface" mapTo="MyServices.Headphone, MyServices"/>

        <register type="MyInterface.IPower, MyInterface" mapTo="MyServices.Power, MyServices"/>

        <register type="MyInterface.IPhone,MyInterface" mapTo="MyServices.AndroidPhone, MyServices" name="android"/>

        <register type="MyInterface.IPhone,MyInterface" mapTo="MyServices.ApplePhone, MyServices" name="apple"/>

      </container>

    </containers>

  </unity>

</configuration>
3.将Myframwork编译生成的dll拷贝到项目文件的Bin/debug文件夹。
4.在程序中使用:
 ExeConfigurationFileMap fileMap = new ExeConfigurationFileMap();

                fileMap.ExeConfigFilename = Path.Combine(AppDomain.CurrentDomain.BaseDirectory + "ConfigFiles\\Unity.Config");//找配置文件的路径

                Configuration configuration = ConfigurationManager.OpenMappedExeConfiguration(fileMap, ConfigurationUserLevel.None);

                UnityConfigurationSection section = (UnityConfigurationSection)configuration.GetSection(UnityConfigurationSection.SectionName);

                IUnityContainer container = new UnityContainer();

                section.Configure(container, "testContainerAOP");

                IPhone phone = container.Resolve<IPhone>();

                phone.Call();
5.运行效果:
Unity(IOC)学习笔记的更多相关文章
- Unity Shader学习笔记-1
本篇文章是对Unity Shader入门精要的学习笔记,插图大部分来自冯乐乐女神的github 如果有什么说的不正确的请批评指正 目录 渲染流水线 流程图 Shader作用 屏幕映射 三角形遍历 两大 ...
- 从0开始学习Unity的学习笔记(I 界面学习和简单模型拼装)
先给一个大致今天学习的图,然后后面是细节 1.下载Unity :官网下载需要版本 2.Unity安装:一定不要有中文路径:一台电脑可以安装不同版本的Unity,但是要安装在不同的文件夹下: 3. 新建 ...
- 【Unity Shader学习笔记】Unity基础纹理-单张纹理
1 单张纹理 1.1 纹理 使用纹理映射(Texture Mapping)技术,我们把一张图片逐纹素(Texel)地控制模型的颜色. 美术人员建模时,会在建模软件中利用纹理展开技术把纹理映射坐标(Te ...
- Unity sqlite学习笔记一
1.SQLITE的常识 SQLite是一个开源免费的数据库,一般用于嵌入系统或者小规模的应用软件开发中,你可以像使用Access一样使用它. sqlite的主要优点:零配置(Zero Configur ...
- unity 3D 学习笔记
1.父对象的初始位置设,即刚开始的空对象的根节点位置应当设置成(0,0,0) 这样设置可以避免以后出现奇怪的坐标. GameObject实际上就是一些组件的容器. unity 使用公用变量原因是,在U ...
- Unity Shader学习笔记 - 用UV动画实现沙滩上的泡沫
这个泡沫效果来自远古时代的Unity官方海岛Demo, 原效果直接复制3个材质球在js脚本中做UV动画偏移,这里尝试在shader中做动画并且一个pass中完成: // Upgrade NOTE: r ...
- Unity的学习笔记(XLua的初学用法并在lua中使用unity周期函数)
自己最近也在研究怎么用lua控制UI,然后看着网上介绍,决定选用XLua,毕竟TX爸爸出的,有人维护,自己琢磨着怎么用,于是弄出来一个能用的作为记录. 当然,XLua主要是用于热更新,我自己是拿来尝试 ...
- 【Unity Shader学习笔记】Unity基础纹理-渐变纹理
纹理可以用来存储任何表面属性. 可以通过使用渐变纹理来实现插画风格的渲染效果. 这项技术是由Valve公司提出的.Valve使用它来渲染游戏中具有插画风格的角色. 我们使用半兰伯特模型计算漫反射. 因 ...
- 【Unity Shader学习笔记】Unity基础纹理-法线贴图
1 高度纹理 使用一张纹理改变物体表面法线,为模型提供更多细节. 有两种主要方法: 1.高度映射:使用一张高度纹理(height map)来模拟表面位移(displacement).得到一个修改后的法 ...
- 【Unity Shader学习笔记】Unity光照基础-高光反射
1.原理 1.1.Phong模型 计算高光反射需要表面法线.视角方向.光源方向.反射方向等. 在这四个矢量中,我们实际上只需要知道其中3个矢量即可,而第4个矢量(反射方向r)可以通过其他信息计算得到: ...
随机推荐
- VMwarep挂载镜像及配置本地Yum源
1.挂载镜像: *. 通过mount命令 linux mount挂载设备(u盘,光盘,iso等 )使用说明 *. 通过VMware的控制页面手工挂载 1.1 打开Vmware软 ...
- 【t038】&&【u214】金字塔
Time Limit: 1 second Memory Limit: 128 MB [问题描述] 小X来到一个雄奇的金字塔挖宝,但是这是一座被诅咒的金字塔,小X必须马上逃离这里,否则小X就会被埋在金字 ...
- python RESTful API框架:Eve 高速入门
Eve是一款Python的REST API框架.用于公布高可定制的.全功能的RESTful的Web服务.帮你轻松创建和部署API,本文翻译自Eve官方站点: http://python-eve.org ...
- Directx9.0 学习教程3 -图形学之创建点 线 三角形 等
1.首先 介绍点的表示方法 struct CUSTOMVERTEX { float x,y,z; }; CUSTOMVERTEX Vertices[] = { {-5.0, -5.0, 0.0}, { ...
- HDU 3400 Line belt (三分再三分)
HDU 3400 Line belt (三分再三分) ACM 题目地址: pid=3400" target="_blank" style="color:rgb ...
- Zabbix监控Tomcat,Redis
一 Tomcat监控 1.1.1 Tomcat 端配置 JMX 编辑catalina.sh文件,配置如下: CATALINA_OPTS="$CATALINA_OPTS -Dcom.sun.m ...
- css实现一个缺口小三角
.square{ width:; height:; margin:0 auto; border:6px solid transparent; border-bottom: 6px solid red; ...
- go-web编程之处理xml
摘抄自astaxie的开源书籍 build-web-application-with-golang 接下来的例子以下面XML描述的信息进行操作. <?xml version="1.0& ...
- C#空值和null判断
一.空值判断效率 string s = ""; if(s == ""){} if(s == string.Empty){} if (string.IsNullO ...
- vue踩坑记-在项目中安装依赖模块npm install报错
在维护别人的项目的时候,在项目文件夹中安装npm install模块的时候,报错如下: npm ERR! path D:\ShopApp\node_modules\fsevents\node_modu ...