
Linux系统下安装配置 OpenLDAP + phpLDAPadmin
实验环境:
操作系统:Centos 7.4
服务器ip:192.168.3.41
运行用户:root
网络环境:Internet
LDAP(轻量级目录访问协议)是一个能实现提供被称为目录服务的信息服务,也是一套用户认证体系系统;一般在大型企业、学校、政府单位使用的比较多,LDAP是由4部分组成,这4部分分别是slapd(独立LDAP守护进程)、slurpd(独立的LDAP更新复制守护进程)、LDAP协议库、工具软件和示例客户端(phpLDAPadmin),目录服务是一种特殊的数据库系统,用来存储用户信息的数据库,读写速度非常快,扩展性非常强,可以实现与地方系统直接对接整合起来统一管理用户信息。

LDAP说起来也不简单,但是ALDP在Linux应用范围是比较广泛的,如果想要深入的了解LDAP,建议去看下刘遄老师《Linux就该这么学》这本教程,里面解释的非常详细,也可以在百度输入此书名去官网看,想要在Linux部署还是推荐这本书去系统的学习,对初学者还是很有版本的,这篇文章搭建ldap+phpldapadmin也是在Linux环境下运行的,所以还是需要Linux基础才能看懂下面的配置步骤。
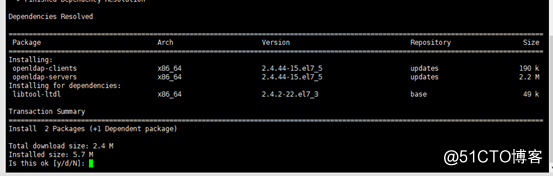
1、安装OpenLDAP
[root@centos7 ~]# yum install openldap-servers openldap-clients -y
[root@centos7 ~]# cp /usr/share/openldap-servers/DB_CONFIG.example /var/lib/ldap/DB_CONFIG
[root@centos7 ~]# ll /var/lib/ldap/DB_CONFIG
-rw-r--r--. 1 root root 845 Aug 1 10:04 /var/lib/ldap/DB_CONFIG
[root@centos7 ~]# chown ldap. /var/lib/ldap/DB_CONFIG //授权配置文件
[root@centos7 ~]# more /etc/passwd|grep ldap
ldap:x:55:55:OpenLDAP server:/var/lib/ldap:/sbin/nologin

[root@centos7 ~]# systemctl start slapd.service //启动slapd服务
[root@centos7 ~]# systemctl enable slapd.service //设置开机自动启动slapd服务
2、设置OpenLDAP管理员密码
[root@centos7 ~]# slappasswd
New password: //password
Re-enter new password:
{SSHA}d5pkA0TU6b+8/kEoMIxJ59QofCLV
为"olcRootPW"指定上面生成的密码
[root@centos7 ~]# vim chrootpw.ldif
dn: olcDatabase={0}config,cn=config
changetype: modify
add: olcRootPW
olcRootPW: {SSHA}d5pkA0TU6b+8/kEokgQeMIxJ59QofCLV

[root@centos7 ~]# ldapadd -Y EXTERNAL -H ldapi:/// -f chrootpw.ldif
SASL/EXTERNAL authentication started
SASL username: gidNumber=0+uidNumber=0,cn=peercred,cn=external,cn=auth
SASL SSF: 0
modifying entry "olcDatabase={0}config,cn=config"
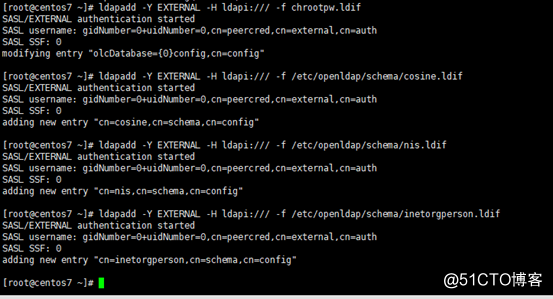
3、导入基本模式
[root@centos7 ~]# ldapadd -Y EXTERNAL -H ldapi:/// -f /etc/openldap/schema/cosine.ldif
SASL/EXTERNAL authentication started
SASL username: gidNumber=0+uidNumber=0,cn=peercred,cn=external,cn=auth
SASL SSF: 0
adding new entry "cn=cosine,cn=schema,cn=config"
[root@centos7 ~]# ldapadd -Y EXTERNAL -H ldapi:/// -f /etc/openldap/schema/nis.ldif
SASL/EXTERNAL authentication started
SASL username: gidNumber=0+uidNumber=0,cn=peercred,cn=external,cn=auth
SASL SSF: 0
adding new entry "cn=nis,cn=schema,cn=config"
[root@centos7 ~]# ldapadd -Y EXTERNAL -H ldapi:/// -f /etc/openldap/schema/inetorgperson.ldif
SASL/EXTERNAL authentication started
SASL username: gidNumber=0+uidNumber=0,cn=peercred,cn=external,cn=auth
SASL SSF: 0
adding new entry "cn=inetorgperson,cn=schema,cn=config"
4、在LDAP DB上设置域名,生成目录管理器密码
[root@centos7 ~]# slappasswd
New password:
Re-enter new password:
{SSHA}Oq61fgUFW9+ItZboTaW1+VbLuAYst7zw
注意:下面配置文件这里得注意每一个属性: 后必须有空格,但是值的后面不能有任何空格
[root@centos7 ~]# vim chdomain.ldif
# replace to your own domain name for "dc=***,dc=***" section
# specify the password generated above for "olcRootPW" section
dn: olcDatabase={1}monitor,cn=config
changetype: modify
replace: olcAccess
olcAccess: {0}to * by dn.base="gidNumber=0+uidNumber=0,cn=peercred,cn=external,cn=auth"
read by dn.base="cn=Manager,dc=srv,dc=world" read by * none
dn: olcDatabase={2}hdb,cn=config
changetype: modify
replace: olcSuffix
olcSuffix: dc=srv,dc=world
dn: olcDatabase={2}hdb,cn=config
changetype: modify
replace: olcRootDN
olcRootDN: cn=Manager,dc=srv,dc=world
dn: olcDatabase={2}hdb,cn=config
changetype: modify
add: olcRootPW
olcRootPW: {SSHA}Oq61fgUFW9+ItZboTaW1+VbLuAYst7zw
dn: olcDatabase={2}hdb,cn=config
changetype: modify
add: olcAccess
olcAccess: {0}to attrs=userPassword,shadowLastChange by
dn="cn=Manager,dc=srv,dc=world" write by anonymous auth by self write by * none
olcAccess: {1}to dn.base="" by * read
olcAccess: {2}to * by dn="cn=Manager,dc=srv,dc=world" write by * read
[root@centos7 ~]# ldapmodify -Y EXTERNAL -H ldapi:/// -f chdomain.ldif
SASL/EXTERNAL authentication started
SASL username: gidNumber=0+uidNumber=0,cn=peercred,cn=external,cn=auth
SASL SSF: 0
modifying entry "olcDatabase={1}monitor,cn=config"
modifying entry "olcDatabase={2}hdb,cn=config"
modifying entry "olcDatabase={2}hdb,cn=config"
modifying entry "olcDatabase={2}hdb,cn=config"
modifying entry "olcDatabase={2}hdb,cn=config"
[root@centos7 ~]# vim basedomain.ldif
# replace to your own domain name for "dc=***,dc=***" section
dn: dc=srv,dc=world
objectClass: top
objectClass: dcObject
objectclass: organization
o: Server World
dc: Srv
dn: cn=Manager,dc=srv,dc=world
objectClass: organizationalRole
cn: Manager
description: Directory Manager
dn: ou=People,dc=srv,dc=world
objectClass: organizationalUnit
ou: People
dn: ou=Group,dc=srv,dc=world
objectClass: organizationalUnit
ou: Group
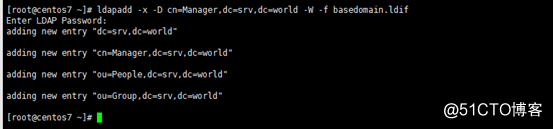
[root@centos7 ~]# ldapadd -x -D "cn=Manager,dc=srv,dc=world" -W -f basedomain.ldif
Enter LDAP Password: //输入上面设置的目录管理器密码 password
adding new entry "dc=srv,dc=world"
adding new entry "cn=Manager,dc=srv,dc=world"
adding new entry "ou=People,dc=srv,dc=world"
adding new entry "ou=Group,dc=srv,dc=world"
[root@centos7 ~]# ldapsearch -x -b "cn=Manager,dc=srv,dc=world"
# extended LDIF
#
# LDAPv3
# base <cn=Manager,dc=srv,dc=world> with scope subtree
# filter: (objectclass=*)
# requesting: ALL
#
# Manager, srv.world
dn: cn=Manager,dc=srv,dc=world
objectClass: organizationalRole
cn: Manager
description: Directory Manager
# search result
search: 2
result: 0 Success
# numResponses: 2
# numEntries: 1
5、设置Firewalld,如果未启用防火墙关闭,忽略
[root@centos7 ~]# firewall-cmd --add-service=ldap --permanent
[root@centos7 ~]# firewall-cmd --reload
6、安装并配置Apache
[root@centos7 ~]# yum install httpd-devel.x86_64 httpd.x86_64 -y
[root@centos7 ~]# mv /etc/httpd/conf.d/welcome.conf /etc/httpd/conf.d/welcome.conf.bak
[root@centos7 ~]# vim /etc/httpd/conf/httpd.conf
# line 86: change to admin's email address
ServerAdmin root@srv.world

# line 95: change to your server's name
ServerName www.srv.world:80

# line 151: change
AllowOverride All

# line 164: add file name that it can access only with directory's name
DirectoryIndex index.html index.cgi index.php

# add follows to the end //在尾部新增
# server's response header
ServerTokens Prod
# keepalive is ON
KeepAlive On

[root@centos7 ~]# systemctl start httpd.service
[root@centos7 ~]# systemctl enable httpd.service
[root@centos7 ~]# firewall-cmd --add-service=http --permanent //防火墙排除httpd服务,如果没有启用防火墙,此步骤可以忽略。
success
[root@centos7 ~]# firewall-cmd --reload //重新加载firewall
success
[root@centos7 ~]# vim /var/www/html/index.html //测试apache服务
<html>
<body>
<div style="width: 100%; font-size: 40px; font-weight: bold; text-align: center;">
Test Page
</div>
</body>
</html>
测试:http://192.168.3.41/index.html

7、安装PHP
[root@centos7 ~]# yum -y install php php-mbstring php-pear
[root@centos7 ~]# vim /etc/php.ini
#修改时区 878行
date.timezone = Asia/Shanghai

[root@centos7 ~]# systemctl restart httpd.service
[root@centos7 ~]# vim /var/www/html/index.php
<html>
<body>
<div style="width: 100%; font-size: 40px; font-weight: bold; text-align: center;">
<?php
print Date("Y/m/d");
?>
</div>
</body>
</html>
php打印日期
测试:http://192.168.3.41/index.php

可以不安装phpLDAPadmin工具,直接下载Windows系统下的LdapAdmin应用程序
8、安装phpLDAPadmin
[root@centos7 ~]# yum install phpldapadmin.noarch -y
[root@centos7 ~]# vim /etc/phpldapadmin/config.php
397 $servers->setValue('login','attr','dn'); #取消397行注释
398 //$servers->setValue('login','attr','uid'); #注释398

[root@centos7 ~]# vim /etc/httpd/conf.d/phpldapadmin.conf
#
# Web-based tool for managing LDAP servers
#
Alias /phpldapadmin /usr/share/phpldapadmin/htdocs
Alias /ldapadmin /usr/share/phpldapadmin/htdocs
<Directory /usr/share/phpldapadmin/htdocs>
<IfModule mod_authz_core.c>
# Apache 2.4
#只允许本地请求访问
# Require local
#允许所有的请求访问
Require all granted
#允许IP段访问
#Require ip 10.0.0.0/24
</IfModule>
<IfModule !mod_authz_core.c>
# Apache 2.2
Order Deny,Allow
Deny from all
Allow from 127.0.0.1
Allow from ::1
</IfModule>
</Directory>
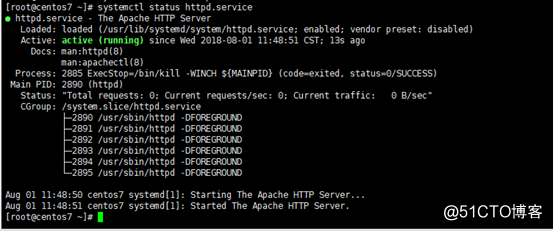
[root@centos7 ~]# systemctl restart httpd.service
[root@centos7 ~]# systemctl status httpd.service
测试:http://192.168.3.41/ldapadmin/
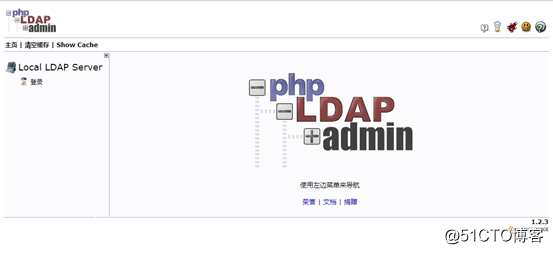
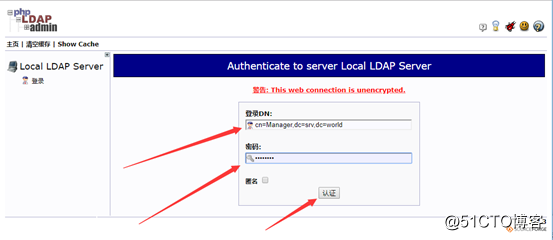
如果是按照上面配置执行的操作,登录一直提示失败,需要执行
[root@centos7 ~]# setsebool -P httpd_can_connect_ldap on
cn=Manager,dc=srv,dc=world
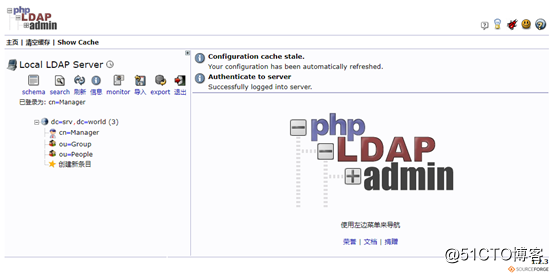
9、基本操作和使用
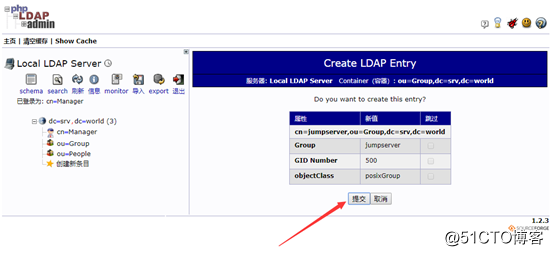
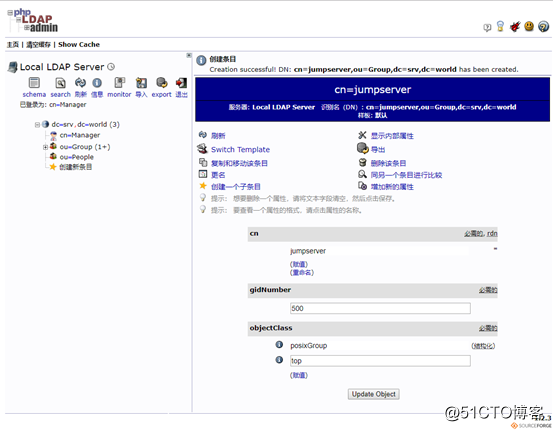
9.1、添加组
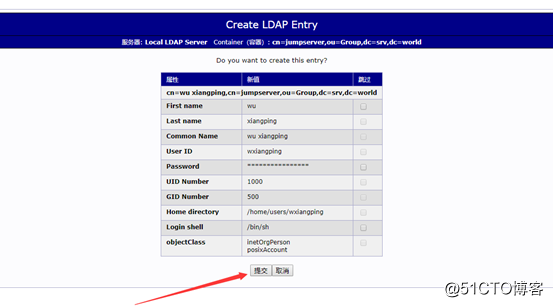
9.2、添加用户
9.3、phpldapadmin的网站的apache配置文件
# vim /etc/httpd/conf.d/phpldapadmin.conf
#
# Web-based tool for managing LDAP servers
#
Alias /phpldapadmin /usr/share/phpldapadmin/htdocs
Alias /ldapadmin /usr/share/phpldapadmin/htdocs
#注意:/usr/share/phpldapadmin/htdocs 是phpldapadmin根目录
<Directory /usr/share/phpldapadmin/htdocs>
<IfModule mod_authz_core.c>
# Apache 2.4
#只允许本地请求访问
# Require local
#允许所有的请求访问
Require all granted
#允许IP段访问
#Require ip 192.168.3.0/24
</IfModule>
<IfModule !mod_authz_core.c>
# Apache 2.2
Order Deny,Allow
Deny from all
Allow from 127.0.0.1
Allow from ::1
</IfModule>
</Directory>
这里可以直接访问phpldapadmin后台,最好是通过apache做密码验证才能登录,这样比较安全。
参考文献:httpd配置认证才能访问网站(原创实践操作).note
10、禁止匿名用户登录
# vim /root/ldap_disable_bind_anon.ldif
angetype: modify
add: olcDisallows
olcDisallows: bind_anon
dn: cn=config
changetype: modify
add: olcRequires
olcRequires: authc
dn: olcDatabase={-1}frontend,cn=config
changetype: modify
add: olcRequires
olcRequires: authc
[root@centos7 ~]# ldapadd -Y EXTERNAL -H ldapi:/// -f ldap_disable_bind_anon.ldif
SASL/EXTERNAL authentication started
SASL username: gidNumber=0+uidNumber=0,cn=peercred,cn=external,cn=auth
SASL SSF: 0
modifying entry "cn=config"
modifying entry "olcDatabase={-1}frontend,cn=config"
[root@centos7 ~]# systemctl restart slapd.service
Linux系统下安装配置 OpenLDAP + phpLDAPadmin的更多相关文章
- Linux系统下安装配置JDK(rpm方式及tar.gz方式)
以前都是在Windows环境进行开发的,最近因工作需要:学习在Linux系统下搭建开发环境,自此记录搭建过程,以方便查阅. 本文借鉴了 Angel挤一挤 .小五 两位的博客. 准备材料: JDK下载链 ...
- 在linux系统下安装配置apacheserver
我所用的是centos linux系统,但apache的服务在linux系统都大同小异.像ubuntu redhat等等. now let us go! 如有问题, 欢迎直邮: zhe ...
- 小白都能看懂的Linux系统下安装配置Zabbix
实验环境: 操作系统:Centos 7.6 服务器ip:192.168.10.100 运行用户:root 网络环境:Internet Zabbix是一个基于web界面的提供分布式系统监控及网络功能的企 ...
- linux系统下安装配置解压版的MySQL数据库
一.解压文件到当前目录 命令:tar -zxvf mysql....tar.gz 二.移动解压完成的文件夹到目标目录并更名mysql 命令:mv mysql-版本号 /usr/local/mysql ...
- Linux学习---linux系统下安装配置Jenkins
1.首先准备java环境,安装JDK 2.下载jenkins至Linux服务器 下载地址:https://wiki.jenkins-ci.org/display/JENKINS/Installing+ ...
- linux系统下安装配置Jenkins
准备java 环境 安装java sdk yum -y install java 验证是否安装成功 java -version 下载安装jenkins 官网:https://wiki.jenkins- ...
- Linux系统下安装Redis和Redis集群配置
Linux系统下安装Redis和Redis集群配置 一. 下载.安装.配置环境: 1.1.>官网下载地址: https://redis.io/download (本人下载的是3.2.8版本:re ...
- 【linux配置】Linux系统下安装rz/sz命令以及使用说明
Linux系统下安装rz/sz命令以及使用说明 对于经常使用Linux系统的人员来说,少不了将本地的文件上传到服务器或者从服务器上下载文件到本地,rz / sz命令很方便的帮我们实现了这个功能,但是很 ...
- 在Linux系统下安装大于mysql5.5版本的数据库
linux下mysql 5.5的安装方法: 1.安装所需要系统库相关库文件 gcc等开发包,在安装linux系统的时候安装. 2.创建mysql安装目录 # mkdir -p /usr/lo ...
随机推荐
- Python的流程控制
条件判断 通过`if`,`elif`,`else`关键字来实现条件判断逻辑的实现,执行改结构中的其中一个,其结构如下: if condition1: pass elif condition2: pas ...
- 趣学算法 PDF pdf 下载 陈小玉版
趣学算法pdf高清无水印版下载 最近在网上找趣学算法pdf,最后还是买了完整版,今天将本书分享出来,分享给那些和我一样在网上苦苦寻找的小可爱们,有条件的话请支持正版! 链接:https://pan.b ...
- python 进程 multiprocessing模块
一.multiprocess.process模块 1.process类 Process([group [, target [, name [, args [, kwargs]]]]]),由该类实例化得 ...
- JAVA 重载方法,参数为NULL时,调用的处理 (精确性原则)
引子:大家可以思考一下下面程序的输出结果 public class TestNull { public void show(String a){ System.out.println("St ...
- ucore_lab0
一直想好好学习一下操作系统课程,去一个Mooc网站上找了一门操作系统的课程.这便是里面的配套实验. 实验指导:点这里 lab0主要是准备相关的操作环境.课程推荐使用qemu作为硬件模拟器,推荐运行环境 ...
- luogu 1865 数论 线性素数筛法
洛谷 1865 数论 线性素数筛法 最基本的线性素数筛法,当做复习欧拉筛法了,没有尝试过使用更暴力的筛法... WA了一次,手抖没打\n 传送门 (https://www.luogu.org/prob ...
- linux svn命令具体解释
检測是否安装svn:svnserve --version svn服务的关闭:killall svnserve 创建svn库:svnadmin create /opt/svn/repos 配置自己主动启 ...
- UNIX环境高级编程(6):文件I/O(2)
文件共享: UNIX系统支持在不同进程间共享打开的文件. 内核使用三种数据结构表示打开的文件.他们之间的关系决定了在文件共享方面一个进程对还有一个进程可能产生的影响: (1)每一个进程在进程表中都有一 ...
- css样式中@import引入样式
css样式中@import引入样式 学习了:http://www.cnblogs.com/zbo/archive/2010/11/17/1879590.html
- Android Parcelable vs Serializable
序列化 在Android中.对象在实现序列化之前是无法直接作为Intent參数在Activity之间传递的. Android中对象序列化能够通过实现Serializable接口或者实现Parcelab ...