Neo4j创建自动索引
一、创建Neo4j的Legacy indexing
1.为节点创建索引
官方API的创建示例为:

将一节点添加至索引:
public static void AddNodeIndex(String nid)

    {

        String txUri=SERVER_ROOT_URI+"index/node/favorites";

        WebResource resource = Client.create().resource(txUri);

        String entity="{\"value\" : \"n204\",\"uri\" : \"http://192.168.209.128:7474/db/data/node/"+nid+"\",\"key\" : \"n201\"}";

        ClientResponse response = resource.accept(MediaType.APPLICATION_JSON)

                .type(MediaType.APPLICATION_JSON).entity(entity)

                .post(ClientResponse.class);

        System.out.println(response.getStatus());

        System.out.println(response.getEntity(String.class));

        response.close();

    }
ps:nid是要添加索引的节点ID value是索引值 key是索引名称
2.通过属性查找节点
public static void GetNodeByIndex()

    {

        String txUri=SERVER_ROOT_URI+"index/node/favorites/n201/n201";

        WebResource resource = Client.create().resource(txUri);

        ClientResponse response = resource.accept(MediaType.APPLICATION_JSON)

                .type(MediaType.APPLICATION_JSON)

                .get(ClientResponse.class);

        System.out.println(response.getStatus());

        System.out.println(response.getEntity(String.class));

        response.close();

    }
txUri路径中:favorites为刚创建的索引名称,第一个n201是节点索引key,第二个n201是节点索引值
二、自动创建索引(Legacy Automatic Indexes)
What default configuration means depends on how you have configured your database. If you haven’t
changed any indexing configuration, it means the indexes will be using a Lucene-based backend.
数据库配置之后,就可以自动创建索引
1.配置文件配置
Auto-indexing must be enabled through configuration before we can create or configure them. Firstly
ensure that you’ve added some config like this into your server’s conf/neo4j.properties file:
打开conf/neo4j.properties文件如图
配置下面的节点
# Enable auto-indexing for nodes, default is false.

node_auto_indexing=true

# The node property keys to be auto-indexed, if enabled.

node_keys_indexable=name,ki

# Enable auto-indexing for relationships, default is false.

relationship_auto_indexing=true

# The relationship property keys to be auto-indexed, if enabled.

relationship_keys_indexable=name,ki
Node_keys_indexable、relationship_keys_indexable对应节点、关系的属性
配置完成之后重启服务
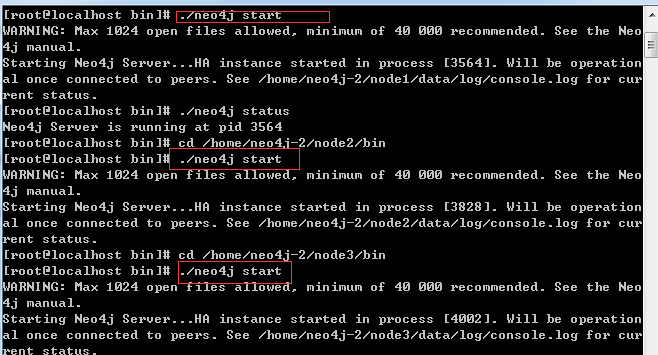
重启三个节点的集群
2。测试索引
插入一个节点和关系
    // 创建节点

    @Test

    public void test2() {

        URI uri = CreateSimpleGraph.createNode();

        CreateSimpleGraph.addProperty(uri, "name", "张三");

        URI uri1 = CreateSimpleGraph.createNode();

        CreateSimpleGraph.addProperty(uri1, "name", "李四");

    }

// 为节点设置关系

    @Test

    public void test6() {

        for (int i = ; i < ; i++) {

            try {

                URI suri = new URI("http://192.168.209.128:7474/db/data/node/171391");

                String uri1="http://192.168.209.128:7474/db/data/node/";

                URI euri = new URI("http://192.168.209.128:7474/db/data/node/171392");

                URI reluri= CreateSimpleGraph.addRelationship(suri, euri, "家人","{\"ki\" : \"1234567890\", \"name\" : \"无\" }");

                System.out.println(reluri);

            } catch (URISyntaxException e) {

                // 异常信息输出该内容

                e.printStackTrace();

            }

        }

    }
3.通过属性查找节点
public static void GetNodeByAutoIndex(String ki)

    {

//        String txUri=SERVER_ROOT_URI+"index/node/node_auto_index/name/"+ki;

        String txUri=SERVER_ROOT_URI+"index/auto/node/ki/"+ki;

        WebResource resource = Client.create().resource(txUri);

        ClientResponse response = resource.accept(MediaType.APPLICATION_JSON)

                .type(MediaType.APPLICATION_JSON)

                .get(ClientResponse.class);

        System.out.println(response.getStatus());

        System.out.println(response.getEntity(String.class));

        response.close();

    }

    public static void GetRelationshipByAutoIndex(String ki)

    {

//        String txUri=SERVER_ROOT_URI+"index/node/node_auto_index/name/"+ki;

        String txUri=SERVER_ROOT_URI+"index/auto/relationship/ki/"+ki;

        WebResource resource = Client.create().resource(txUri);

        ClientResponse response = resource.accept(MediaType.APPLICATION_JSON)

                .type(MediaType.APPLICATION_JSON)

                .get(ClientResponse.class);

        System.out.println(response.getStatus());

        System.out.println(response.getEntity(String.class));

        response.close();

    }
关系的输出结果为:
[ {

  "extensions" : { },

  "metadata" : {

    "id" : ,

    "type" : "家人"

  },

  "data" : {

    "name" : "无",

    "ki" : ""

  },

  "property" : "http://192.168.209.128:7474/db/data/relationship/337/properties/{key}",

  "start" : "http://192.168.209.128:7474/db/data/node/171391",

  "self" : "http://192.168.209.128:7474/db/data/relationship/337",

  "end" : "http://192.168.209.128:7474/db/data/node/171392",

  "type" : "家人",

  "properties" : "http://192.168.209.128:7474/db/data/relationship/337/properties"

} ]
这里说明一下,传值为中文的时候,查询不出来,可能需要编码,因为工作暂时没有用到,就没有再研究了
三、NEO4J批量插入和用户密码问题
1.批量操作
批量操作的官方文档地址:http://neo4j.com/docs/milestone/rest-api-batch-ops.html
public static int BatchInserterNode(String body) {

        // String

        // body="[{\"method\":\"POST\",\"to\":\"/node\",\"body\":{\"name\":\"aaa\",\"lead\":\"aaa1\"},\"id\":0},{\"method\":\"POST\",\"to\":\"/node\",\"body\":{\"name\":\"bbb\",\"lead\":\"bbb1\"},\"id\":1}]";

        // POST {} to the node entry point URI

        ClientResponse response = GetResourceInstance("batch")

                .accept(MediaType.APPLICATION_JSON)

                .type(MediaType.APPLICATION_JSON).entity(body)

                .post(ClientResponse.class);

        // System.out.println(String.format(

        // "POST to [%s], status code [%d], location header [%s]",

        // nodeEntryPointUri, response.getStatus(), location.toString()));

        String entity = response.getEntity(String.class);

        response.close();

        int status = response.getStatus();

        return status;

    }

//调用

//批量插入速度测试

    @Test

    public void test10()

    {

        StringBuilder sbody=new StringBuilder();

        sbody.append("[");

        for (int i = ; i < ; i++) {

            if(i>)

            {

                sbody.append(",");

            }

            sbody.append("{");

            sbody.append("\"method\":\"POST\",\"to\":\"/node\",\"body\":{\"name\":\"n"+i+"\",\"lead\":\"a"+i+"\"},\"id\":"+i+"");

            sbody.append("}");

        }

        sbody.append("]");

        long st = System.currentTimeMillis();

        int status= CreateSimpleGraph.BatchInserterNode(sbody.toString());

        System.out.println("插入状态:"+status);

        long et = System.currentTimeMillis();

        System.out.println("插入10000条数据总共耗时:" + (et - st) + "毫秒");

    }
批量插入的速度10000条大概在6秒左右吧
2.NEO4J密码操作
本次用的版本是:neo4j-enterprise-2.2.0-unix,连接数据库的时候需要输入用户名称密码。上个版本好像是不用的。
使用密码时:
public void checkDatabaseIsRunning() {

        // START SNIPPET: checkServer

        WebResource resource = Client.create().resource(SERVER_ROOT_URI);

        ClientResponse response = resource.get(ClientResponse.class);

        resource.addFilter(new HTTPBasicAuthFilter("neo4j", ""));

        if (response.getStatus() == ) {

            System.out.println("连接成功!");

        } else {

            System.out.println("连接失败!");

        }

        // System.out.println(String.format("GET on [%s], status code [%d]",

        // SERVER_ROOT_URI, response.getStatus()));

        response.close();

        // END SNIPPET: checkServer

    }
如不需要使用密码,可以在配置文件进行配置
vi /conf/neo4j-server.properties这个文件
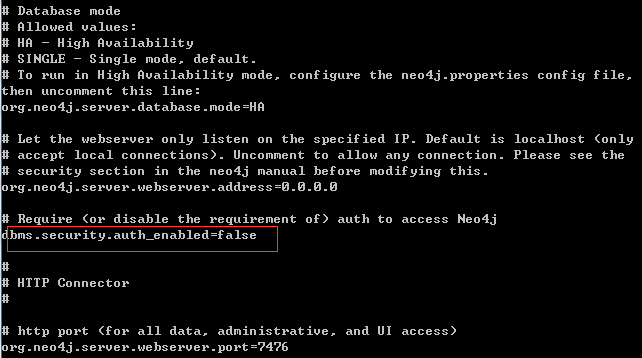
这里改成false即可,默认是True
参考文档
http://neo4j.com/docs/milestone/rest-api-batch-ops.html
http://neo4j.com/docs/milestone/rest-api-auto-indexes.html
http://neo4j.com/docs/milestone/rest-api-security.html
Neo4j创建自动索引的更多相关文章
- Eclipse下maven使用嵌入式(Embedded)Neo4j创建Hello World项目
Eclipse下maven使用嵌入式(Embedded)Neo4j创建Hello World项目 新建一个maven工程,这里不赘述如何新建maven工程. 添加Neo4j jar到你的工程 有两种方 ...
- MongoDB 创建基础索引、组合索引、唯一索引以及优化
一.索引 MongoDB 提供了多样性的索引支持,索引信息被保存在system.indexes 中,且默认总是为_id创建索引,它的索引使用基本和MySQL 等关系型数据库一样.其实可以这样说说,索引 ...
- 《高性能MySQL》——第五章创建高性能索引
1.创建索引基本语法格 在MySQL中,在已经存在的表上,可以通过ALTER TABLE语句直接为表上的一个或几个字段创建索引.基本语法格式如下: ALTER TABLE 表名 ADD [UNIQUE ...
- LabVIEW中数组的自动索引
我们在LabVIEW里面使用While或者是For循环结构的时候,就会发现每一个循环中在它们的循环结构的边界都可以自动完成一个数组元素的索引或累积.LabVIEW中循环结构的这种能力就叫做自动索引(A ...
- windows系统中 利用kibana创建elasticsearch索引等操作
elasticsearch之借用kibana平台创建索引 1.安装好kibana平台 确保kibana以及elasticsearch正常运行 2.打开kibana平台在Dev Tools 3.创建一个 ...
- 利用Phoenix为HBase创建二级索引
为什么需要Secondary Index 对于Hbase而言,如果想精确地定位到某行记录,唯一的办法是通过rowkey来查询.如果不通过rowkey来查找数据,就必须逐行地比较每一列的值,即全表扫瞄. ...
- mysql创建唯一索引UNIQUE INDEX,以及报错“#失败原因: [Execute: Duplicate entry '733186700' for key 'uniq_video_id_index']”
要给t_video_prods表的video_id字段创建唯一所以,可以使用下面这条语句: alter table t_video_prods add UNIQUE INDEX `uniq_video ...
- MYSQ创建联合索引,字段的先后顺序,对查询的影响分析
MYSQ创建联合索引,字段的先后顺序,对查询的影响分析 前言 最左匹配原则 为什么会有最左前缀呢? 联合索引的存储结构 联合索引字段的先后顺序 b+树可以存储的数据条数 总结 参考 MYSQ创建联合索 ...
- es创建普通索引以及各种查询
创建索引 创建普通索引: PUT /my_index { "settings": { "index": { "number_of_shards&quo ...
随机推荐
- IPv6实验准备
这篇是我的第一篇博客,我想先对H3C的<IPv6技术>的实验部分进行实验和总结,欢迎评论转载. 本实验用的网路设备模拟器是HCL_7.1.59,hcl的这款模拟器非常耗费内存,各种报错,因 ...
- 在as3中使用protobuf
在最近参与开发的adobe air项目中,前后端的通信协议从XML.JSON再到protobuf,最后选择protobuf原因,主要是前后端维护protobuf协议就行了,同时还可以利用IDE做一些编 ...
- CMD:在当前文件夹下打开cmd命令
对于电脑老鸟而言,在使用windows系统的过程中,经常需要在cmd窗口中输入一些命令进行操作.但是如果每一次都是在cmd窗口中用CD命令进行相应的文件夹目录,实在不便,尤其是在文件夹层次比较多而且带 ...
- golang,liteide设置 windows7(64)
1.安转go的环境,exe安装包 2.下载liteide27.2.1 3.打开liteide开始开发,在里面添加gopath,无法读取windows里面的gopath设置,不知道什么原因,以管理员运行 ...
- Ubuntu 16.04 安装ftp服务器传输文件
最近在搞深度学习,老师比较宝贝他的服务器,要求我以后负责管理服务器.往后所有要使用服务器的人都必须向我申请账号,然后只允许客户端访问,使用文件传输软件传输文件.像我这样一个linux菜逼,这种要求不是 ...
- KnockoutJS中父元素有click绑定引起checked绑定时失效
KnockoutJS中的checked绑定如果父元素有click绑定,会出现状态点击没反应,实际KO的值已经变化的情况. 这种情况下应该在checked绑定的元素上除了阻止事件冒泡,另外还需要额外加上 ...
- [2014.01.27]wfPrintOcx 票据打印控件 v5.3
支持选择打印机,并自动记忆选择的打印机. 适合打印各类票据格式. 支持画正方形.长方形.圆形.椭圆.横线.竖线.HTTP图片. 支持数字金额转换成中文大写金额. 可以设置固定宽度的文字自动换行. 组件 ...
- 结构体struct 与 联合union
1.C语言中的结构体 1.1 定义 结构体是由一系列相同或不同类型的变量组成的集合. struct 结构体名{ //struct为关键字,“结构体名”为用户定义的类型标识. ...
- delphi 动态更改屏幕分辨率(转)
一.如何动态更改屏幕分辨率 有许多小工具可以在不重新启动Windows的条件下,动态更改屏幕分辨率.你是不是也想自己动手做一个呢?请在interface段中加入下面一句 function Resolu ...
- linux 添加静态ip dns
/etc/network 下:interfaces auto loiface lo inet loopbackauto eth0iface eth0 inet staticaddress 192.16 ...