Vue+koa2开发一款全栈小程序(9.图书详情页)
1.获取图书详情
1.修改server/controllers/bookdetail.js为
const {mysql}=require('../qcloud')

module.exports=async(ctx)=>{

    const {id}=ctx.request.query

    const detail=await mysql('books')

                        .select('books.*','csessioninfo.user_info')

                        .join('csessioninfo','books.openid','csessioninfo.open_id')

                        .where('id',id)

                        .first()

    const info=JSON.parse(detail.user_info)

    ctx.state.data=Object.assign({},detail,{

        user_info:{

            name:info.nickName,

            image:info.avatarUrl

        }

    })

}
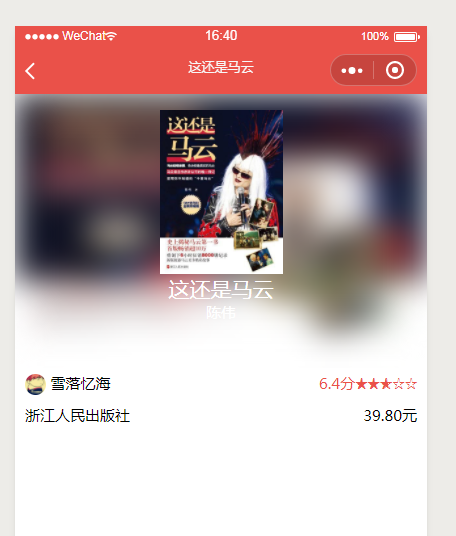
2.在mydemo/src/components/BookInfo.vue
<template>

    <div class="bookinfo">

        <div class="thumb">

            <img class="back"

                :src="info.image"

                mode="aspectFull">

            <img class="img"

            :src="info.image"

            mode="aspectFit">

            <div class="info">

                <div class="title">

                    {{info.title}}

                </div>

                <div class="author">

                    {{info.author}}

                </div>

            </div>

        </div>

        <div class="detail">

            <img :src="userinfo.image" class="avatar" mode="aspectFit">

            {{userinfo.name}}

            <div class="right text-primary">

                {{info.rate}}分<Rate :value='info.rate'></Rate>

            </div>

        </div>

        <div class="detail">

            {{info.publisher}}

            <div class="right">

                {{info.price}}

            </div>

        </div>

    </div>

</template>

<script>

import Rate from '@/components/Rate'

export default {

    components:{

        Rate

    },

    props:['info'],

    computed:{

        userinfo(){

            return this.info.user_info||{}

        }

    }

}

</script>

<style lang="scss">

.bookinfo{

    font-size: 14px;

    .right{

        float: right;

    }

    .detail{

        padding: 5px 10px;

        .avatar{

            width: 20px;

            height: 20px;

            border-radius: 50%;

            vertical-align: middle;

        }

    }

    .thumb{

        width: 750rpx;

        height: 500rpx;

        overflow: hidden;

        position: relative;

        .back{

            filter: blur(15px);

            width: 100%;

        }

        .img{

            position: absolute;

            width: 100%;

            height: 300rpx;

            left: 0;

            top:30rpx;

        }

        .info{

            color: white;

            position:absolute;

            width: 100%;

            left: 0;

            top: 330rpx;

            text-align: center;

            .title{

                font-size: 20px;

            }

            .author{

                font-size: 14px;

            }

        }

    }

}

</style>
3.在src/pages/detail/index.vue中,加入代码,才可以有分享转发功能
    onShareAppMessage: (res) => {

        if (res.from === 'button') {

            console.log("来自页面内转发按钮");

            console.log(res.target);

            }

        else {

            console.log("来自右上角转发菜单")

        }

        return {

            // title: '',

            // path: '/pages/share/share?id=123',

            // imageUrl: "/images/1.jpg",

            success: (res) => {

            console.log("转发成功", res);

            },

            fail: (res) => {

            console.log("转发失败", res);

            }

        }

    }
index.vue
<template>

<div>

    <BookInfo :info='info'></BookInfo>

</div>

</template>

<script>

import {get} from '@/until'

import BookInfo from '@/components/BookInfo'

export default {

    components:{

        BookInfo

    },

    data(){

        return{

            bookid:'',

            info:{}

        }

    },

    methods:{

        async getDetail(){

            const info=await get('/weapp/bookdetail',{id:this.bookid})

            wx.setNavigationBarTitle({title:info.data.title})

            this.info=info.data

        }

    },

    mounted(){

        this.bookid=this.$root.$mp.query.id //this.$root.$mp.query获取跳转链接传过来的对象集合

        this.getDetail()

    },

    onShareAppMessage: (res) => {

        if (res.from === 'button') {

            console.log("来自页面内转发按钮");

            console.log(res.target);

            }

        else {

            console.log("来自右上角转发菜单")

        }

        return {

            // title: '',

            // path: '/pages/share/share?id=123',

            // imageUrl: "/images/1.jpg",

            success: (res) => {

            console.log("转发成功", res);

            },

            fail: (res) => {

            console.log("转发失败", res);

            }

        }

    }

}

</script>

<style>

</style>
2.图书tags和简介显示
1.在server/controllers/bookdetail.js中修改代码,增添返回tag和简介的代码
const {mysql}=require('../qcloud')

module.exports=async(ctx)=>{

    const {id}=ctx.request.query

    const detail=await mysql('books')

                        .select('books.*','csessioninfo.user_info')

                        .join('csessioninfo','books.openid','csessioninfo.open_id')

                        .where('id',id)

                        .first()

    const info=JSON.parse(detail.user_info)

    ctx.state.data=Object.assign({},detail,{

        tags:detail.tags.split(','),

        summary:detail.summary.split('\n'),

        user_info:{

            name:info.nickName,

            image:info.avatarUrl

        }

    })

}
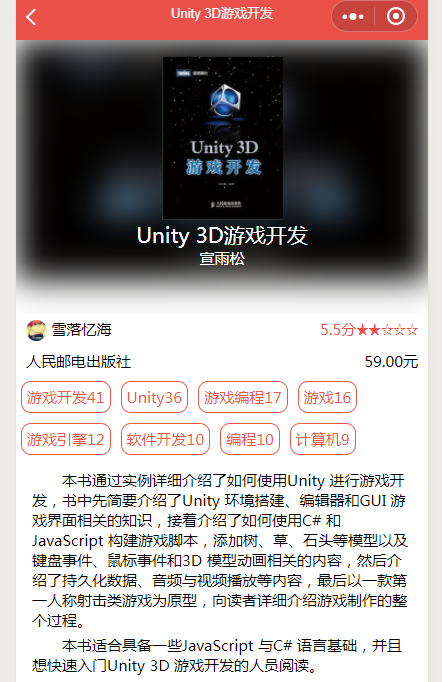
2.在mydemo/src/components/BookInfo.vue
<template>

    <div class="bookinfo">

        <div class="thumb">

            <img class="back"

                :src="info.image"

                mode="aspectFull">

            <img class="img"

            :src="info.image"

            mode="aspectFit">

            <div class="info">

                <div class="title">

                    {{info.title}}

                </div>

                <div class="author">

                    {{info.author}}

                </div>

            </div>

        </div>

        <div class="detail">

            <img :src="userinfo.image" class="avatar" mode="aspectFit">

            {{userinfo.name}}

            <div class="right text-primary">

                {{info.rate}}分<Rate :value='info.rate'></Rate>

            </div>

        </div>

        <div class="detail">

            {{info.publisher}}

            <div class="right">

                {{info.price}}

            </div>

        </div>

        <div class="tags">

            <div class="badge" :key="tag" v-for="tag in info.tags">{{tag}}</div>

        </div>

        <div class="summary">

            <p :key="i" v-for="(sum,i) in info.summary">{{sum}}</p>

        </div>

    </div>

</template>

<script>

import Rate from '@/components/Rate'

export default {

    components:{

        Rate

    },

    props:['info'],

    computed:{

        userinfo(){

            return this.info.user_info||{}

        }

    }

}

</script>

<style lang="scss">

.bookinfo{

    font-size: 14px;

    .right{

        float: right;

    }

    .detail{

        padding: 5px 10px;

        .avatar{

            width: 20px;

            height: 20px;

            border-radius: 50%;

            vertical-align: middle;

        }

    }

    .thumb{

        width: 750rpx;

        height: 500rpx;

        overflow: hidden;

        position: relative;

        .back{

            filter: blur(15px);

            width: 100%;

        }

        .img{

            position: absolute;

            width: 100%;

            height: 300rpx;

            left: 0;

            top:30rpx;

        }

        .info{

            color: white;

            position:absolute;

            width: 100%;

            left: 0;

            top: 330rpx;

            text-align: center;

            .title{

                font-size: 20px;

            }

            .author{

                font-size: 14px;

            }

        }

    }

    .badge{

        display: inline-block;

        margin:5px;

        padding: 5px;

        border-radius: 10px;

        border:1px #EA5A49 solid;

        color: #EA5A49;

    }

    .summary{

        padding: 0 15px;

        margin-top: 10px;

        p{

            text-indent: 2em;

            font-size: 14px;

            margin-top: 5px;

        }

    }

}

</style>
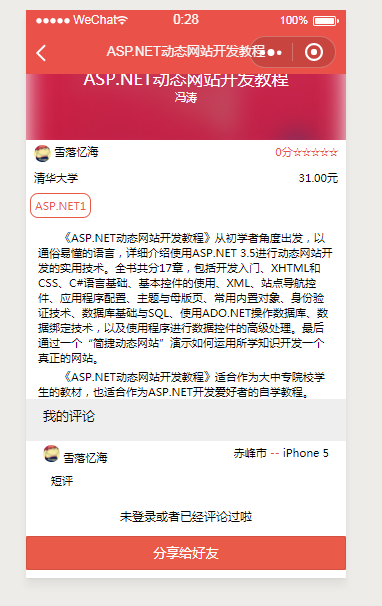
效果图
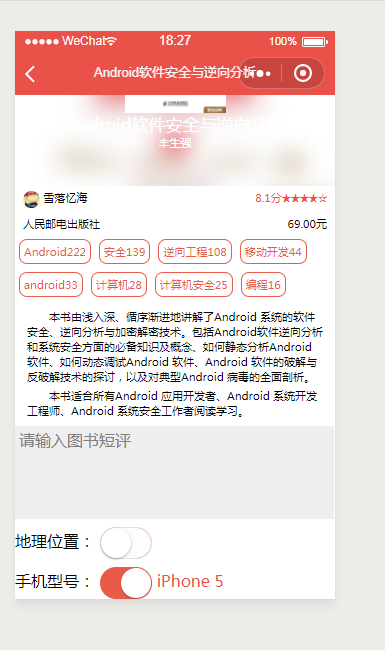
3.获取手机型号、地理位置,用户评论功能
1.评论框和获取用户手机型号,在src/pages/detail/index.vue中
<template>

<div>

    <BookInfo :info='info'></BookInfo>

    <div class="comment">

        <textarea v-model="comment"

                    class="textarea"

                    :maxlength="100"

                    placeholder="请输入图书短评"></textarea>

        <div class="location">

            地理位置:

            <switch color='#EA5A49' :checked='location' @change="getGeo"></switch>

            <span class="text-primary">{{location}}</span>

        </div>

        <div class="phone">

            手机型号:

            <switch color='#EA5A49' :checked='phone' @change="getPhone"></switch>

            <span class="text-primary">{{phone}}</span>

        </div>

    </div>

</div>

</template>

<script>

import {get} from '@/until'

import BookInfo from '@/components/BookInfo'

export default {

    components:{

        BookInfo

    },

    data(){

        return{

            bookid:'',

            info:{},

            comment:'',

            location:'',

            phone:''

        }

    },

    methods:{

        async getDetail(){

            const info=await get('/weapp/bookdetail',{id:this.bookid})

            wx.setNavigationBarTitle({title:info.data.title})

            this.info=info.data

        },

        getGeo(){},

        getPhone(e){

            if(e.target.value){

                const phoneInfo=wx.getSystemInfoSync()

                console.log(phoneInfo)

                this.phone=phoneInfo.model

            }else{

                // 没选中

                this.phone=''

            }

        }

    },

    mounted(){

        this.bookid=this.$root.$mp.query.id //this.$root.$mp.query获取跳转链接传过来的对象集合

        this.getDetail()

    },

    onShareAppMessage: (res) => {

        if (res.from === 'button') {

            console.log("来自页面内转发按钮");

            console.log(res.target);

            }

        else {

            console.log("来自右上角转发菜单")

        }

        return {

            // title: '',

            // path: '/pages/share/share?id=123',

            // imageUrl: "/images/1.jpg",

            success: (res) => {

            console.log("转发成功", res);

            },

            fail: (res) => {

            console.log("转发失败", res);

            }

        }

    }

}

</script>

<style lang='scss'>

    .comment{

        margin-top: 10px;

        .textarea{

            width: 730rpx;

            height: 200rpx;

            background: #eee;

            padding: 10rpx;

        }

        .location{

            margin-top: 10px;

        }

        .phone{

            margin-top:10px;

        }

    }

</style>
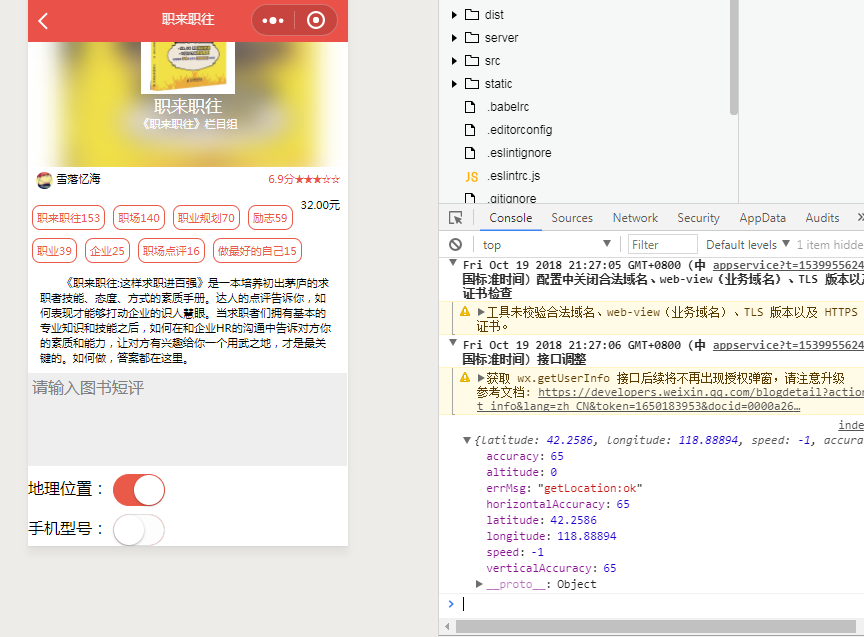
2.获取经纬度 在src/pages/detail/index.vue中
<template>

<div>

    <BookInfo :info='info'></BookInfo>

    <div class="comment">

        <textarea v-model="comment"

                    class="textarea"

                    :maxlength="100"

                    placeholder="请输入图书短评"></textarea>

        <div class="location">

            地理位置:

            <switch color='#EA5A49' :checked='location' @change="getGeo"></switch>

            <span class="text-primary">{{location}}</span>

        </div>

        <div class="phone">

            手机型号:

            <switch color='#EA5A49' :checked='phone' @change="getPhone"></switch>

            <span class="text-primary">{{phone}}</span>

        </div>

    </div>

</div>

</template>

<script>

import {get} from '@/until'

import BookInfo from '@/components/BookInfo'

export default {

    components:{

        BookInfo

    },

    data(){

        return{

            bookid:'',

            info:{},

            comment:'',

            location:'',

            phone:''

        }

    },

    methods:{

        async getDetail(){

            const info=await get('/weapp/bookdetail',{id:this.bookid})

            wx.setNavigationBarTitle({title:info.data.title})

            this.info=info.data

        },

        getGeo(e){

            if(e.target.value){

                wx.getLocation({

                    success:geo=>{

                        console.log(geo)

                    }

                })

            }else{

                this.location=''

            }

        },

        getPhone(e){

            if(e.target.value){

                const phoneInfo=wx.getSystemInfoSync()

                console.log(phoneInfo)

                this.phone=phoneInfo.model

            }else{

                // 没选中

                this.phone=''

            }

        }

    },

    mounted(){

        this.bookid=this.$root.$mp.query.id //this.$root.$mp.query获取跳转链接传过来的对象集合

        this.getDetail()

    },

    onShareAppMessage: (res) => {

        if (res.from === 'button') {

            console.log("来自页面内转发按钮");

            console.log(res.target);

            }

        else {

            console.log("来自右上角转发菜单")

        }

        return {

            // title: '',

            // path: '/pages/share/share?id=123',

            // imageUrl: "/images/1.jpg",

            success: (res) => {

            console.log("转发成功", res);

            },

            fail: (res) => {

            console.log("转发失败", res);

            }

        }

    }

}

</script>

<style lang='scss'>

    .comment{

        margin-top: 10px;

        .textarea{

            width: 730rpx;

            height: 200rpx;

            background: #eee;

            padding: 10rpx;

        }

        .location{

            margin-top: 10px;

        }

        .phone{

            margin-top:10px;

        }

    }

</style>
效果图
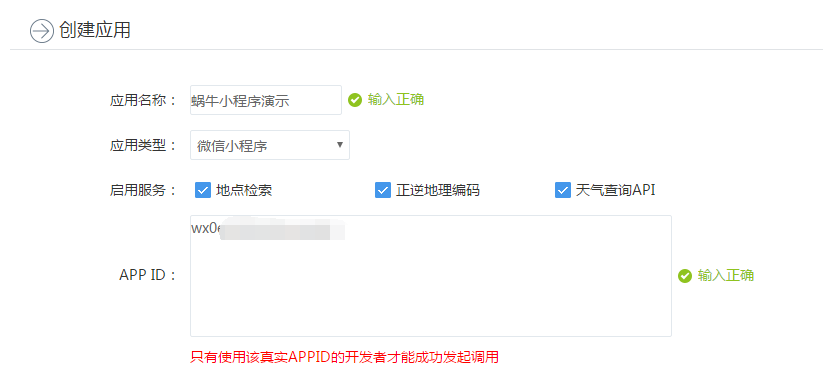
3.通过配合百度地图的api,通过经纬度获取地理位置
1.百度地图开放平台网址:
http://lbsyun.baidu.com/apiconsole/key
2.服务文档和使用方法网址:
http://lbsyun.baidu.com/index.php?title=webapi/guide/webservice-geocoding
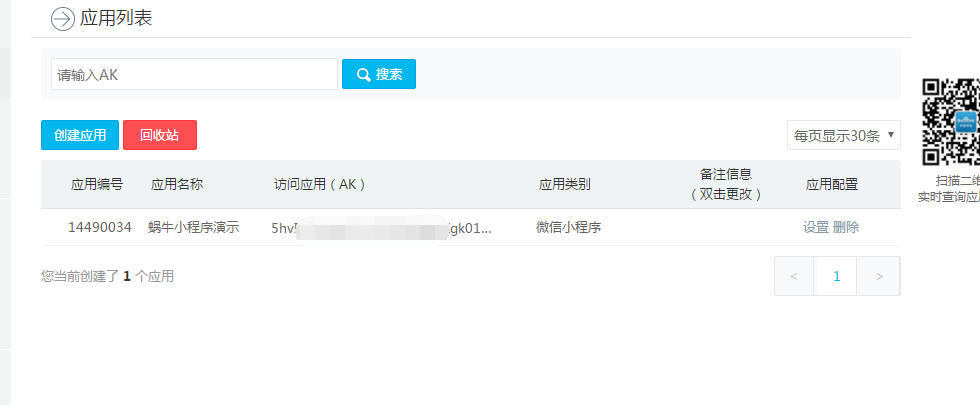
根据使用指南,注册,申请百度开发者,获取服务秘钥(AK)
部分过程图
3.全球逆地理编码(给经纬度输出地点名称)文档地址:
http://lbsyun.baidu.com/index.php?title=webapi/guide/webservice-geocoding-abroad
4.在src/pages/detail/index.vue中
<template>

<div>

    <BookInfo :info='info'></BookInfo>

    <div class="comment">

        <textarea v-model="comment"

                    class="textarea"

                    :maxlength="100"

                    placeholder="请输入图书短评"></textarea>

        <div class="location">

            地理位置:

            <switch color='#EA5A49' :checked='location' @change="getGeo"></switch>

            <span class="text-primary">{{location}}</span>

        </div>

        <div class="phone">

            手机型号:

            <switch color='#EA5A49' :checked='phone' @change="getPhone"></switch>

            <span class="text-primary">{{phone}}</span>

        </div>

    </div>

</div>

</template>

<script>

import {get} from '@/until'

import BookInfo from '@/components/BookInfo'

export default {

    components:{

        BookInfo

    },

    data(){

        return{

            bookid:'',

            info:{},

            comment:'',

            location:'',

            phone:''

        }

    },

    methods:{

        async getDetail(){

            const info=await get('/weapp/bookdetail',{id:this.bookid})

            wx.setNavigationBarTitle({title:info.data.title})

            this.info=info.data

        },

        getGeo(e){

            const ak='你的ak'

            let url='http://api.map.baidu.com/geocoder/v2/'

            if(e.target.value){

                wx.getLocation({

                    success:geo=>{

                        wx.request({

                            url,

                            data:{

                                ak,

                                location:`${geo.latitude},${geo.longitude}`,

                                output:'json'

                            },

                            success:res=>{

                                // console.log(res)

                                if(res.data.status==0){

                                    this.location=res.data.result.addressComponent.city

                                }else{

                                    // console.log('出错了')

                                    this.location='未知地点'

                                }

                            }

                        })

                        // console.log(geo)

                    }

                })

            }else{

                this.location=''

            }

        },

        getPhone(e){

            if(e.target.value){

                const phoneInfo=wx.getSystemInfoSync()

                console.log(phoneInfo)

                this.phone=phoneInfo.model

            }else{

                // 没选中

                this.phone=''

            }

        }

    },

    mounted(){

        this.bookid=this.$root.$mp.query.id //this.$root.$mp.query获取跳转链接传过来的对象集合

        this.getDetail()

    },

    onShareAppMessage: (res) => {

        if (res.from === 'button') {

            console.log("来自页面内转发按钮");

            console.log(res.target);

            }

        else {

            console.log("来自右上角转发菜单")

        }

        return {

            // title: '',

            // path: '/pages/share/share?id=123',

            // imageUrl: "/images/1.jpg",

            success: (res) => {

            console.log("转发成功", res);

            },

            fail: (res) => {

            console.log("转发失败", res);

            }

        }

    }

}

</script>

<style lang='scss'>

    .comment{

        margin-top: 10px;

        .textarea{

            width: 730rpx;

            height: 200rpx;

            background: #eee;

            padding: 10rpx;

        }

        .location{

            margin-top: 10px;

        }

        .phone{

            margin-top:10px;

        }

    }

</style>
效果图,emmmm,通过经纬度这么定位,而且还是wifi的经纬度,除了城市是准的,其他偏差还挺大的,感觉还是通过ip定位比较靠谱一点,嗯。

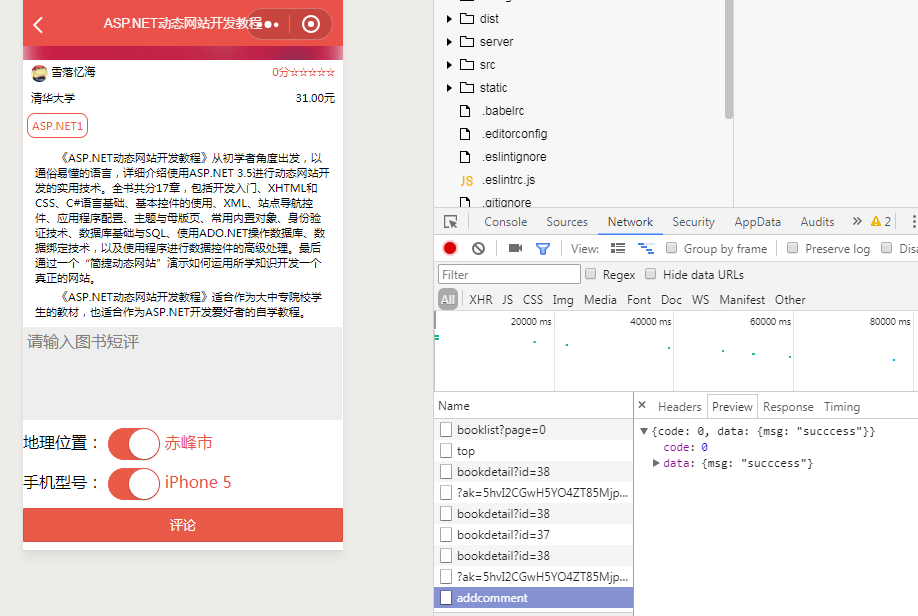
4.点击评论发起请求
1.功能定义:
一个用户只能评论一次
如果已经评论过了,再次访问就看到评论列表,而不是评论输入框
2.在mydemo/src/pages/detail/index/vue中,增加button评论按钮,样式,以及addComment方法
<template>

<div>

    <BookInfo :info='info'></BookInfo>

    <div class="comment">

        <textarea v-model="comment"

                    class="textarea"

                    :maxlength="100"

                    placeholder="请输入图书短评"></textarea>

        <div class="location">

            地理位置:

            <switch color='#EA5A49' :checked='location' @change="getGeo"></switch>

            <span class="text-primary">{{location}}</span>

        </div>

        <div class="phone">

            手机型号:

            <switch color='#EA5A49' :checked='phone' @change="getPhone"></switch>

            <span class="text-primary">{{phone}}</span>

        </div>

        <button class="btn" @click="addComment">

            评论

        </button>

    </div>

</div>

</template>

<script>

import {get,post,showModal} from '@/until'

import BookInfo from '@/components/BookInfo'

export default {

    components:{

        BookInfo

    },

    data(){

        return{

            userinfo:'',

            bookid:'',

            info:{},

            comment:'',

            location:'',

            phone:''

        }

    },

    methods:{

        async getDetail(){

            const info=await get('/weapp/bookdetail',{id:this.bookid})

            wx.setNavigationBarTitle({title:info.data.title})

            this.info=info.data

        },

        getGeo(e){

            const ak='5hvI2CGwH5YO4ZT85MjpxXgk01WWSGOi'

            let url='http://api.map.baidu.com/geocoder/v2/'

            if(e.target.value){

                wx.getLocation({

                    success:geo=>{

                        wx.request({

                            url,

                            data:{

                                ak,

                                location:`${geo.latitude},${geo.longitude}`,

                                output:'json'

                            },

                            success:res=>{

                                // console.log(res)

                                if(res.data.status==0){

                                    this.location=res.data.result.addressComponent.city

                                }else{

                                    // console.log('出错了')

                                    this.location='未知地点'

                                }

                            }

                        })

                        // console.log(geo)

                    }

                })

            }else{

                this.location=''

            }

        },

        getPhone(e){

            if(e.target.value){

                const phoneInfo=wx.getSystemInfoSync()

                // console.log(phoneInfo)

                this.phone=phoneInfo.model

            }else{

                // 没选中

                this.phone=''

            }

        },

        async addComment(){

            // 评论内容 手机型号 地理位置 图书id 用户的openid

            const data={

                openid:this.userinfo.openId,

                bookid:this.bookid,

                comment:this.comment,

                phone:this.phone,

                location:this.location

            }

            // console.log(data)

            if(!this.comment){

                return

            }

            try{

               await post('/weapp/addcomment',data)

               this.comment=''

            }catch(e){

                showModel('失败',e.msg)

            }

        }

    },

    mounted(){

        this.bookid=this.$root.$mp.query.id //this.$root.$mp.query获取跳转链接传过来的对象集合

        this.getDetail()

        const userinfo=wx.getStorageSync('userinfo')

        // console.log(888,userinfo)

        if(userinfo){

            this.userinfo=userinfo

        }

    },

    onShareAppMessage: (res) => {

        if (res.from === 'button') {

            console.log("来自页面内转发按钮");

            console.log(res.target);

            }

        else {

            console.log("来自右上角转发菜单")

        }

        return {

            // title: '',

            // path: '/pages/share/share?id=123',

            // imageUrl: "/images/1.jpg",

            success: (res) => {

            console.log("转发成功", res);

            },

            fail: (res) => {

            console.log("转发失败", res);

            }

        }

    }

}

</script>

<style lang='scss'>

    .comment{

        margin-top: 10px;

        .textarea{

            width: 730rpx;

            height: 200rpx;

            background: #eee;

            padding: 10rpx;

        }

        .location{

            margin-top: 10px;

        }

        .phone{

            margin-top:10px;

            margin-bottom: 10px;

        }

    }

</style>
效果图

5.后台接口的实现
1.打开mysql数据库对话框,新建评论表comments
show databases; /*查看数据库列表*/

use cauth; /* 使用cAuth数据库*/

CREATE TABLE `comments` (

  `id` int(11) NOT NULL AUTO_INCREMENT,

  `openid` varchar(100) NOT NULL,

  `bookid` varchar(100) NOT NULL,

  `comment` varchar(200) NOT NULL,

  `phone` varchar(20) DEFAULT NULL,

  `location` varchar(20) DEFAULT NULL,

  PRIMARY KEY (`id`)

) ENGINE=InnoDB AUTO_INCREMENT=6 DEFAULT CHARSET=utf8;

/*创建comments表*/

desc comments; /* 查看comments表的字段*/

select * from comments; /*查看comments的记录*/
2.在server/routes/index.js内增加路由
router.post('/addcomment',controllers.addcomment)
3.在server/controllers目录下新建addComment.js
const {mysql} =require('../qcloud')

module.exports=async (ctx)=>{

    const {bookid,comment,openid,location,phone}=ctx.request.body

    console.log(bookid,comment,openid,location,phone)

    try{

        await mysql('comments').insert({bookid,comment,openid,location,phone})

        ctx.state.data={

            msg:'succcess'

        }

    }catch(e){

        ctx.state={

            code:-1,

            data:{

                msg:'评论失败:'+e.sqlMessage

            }

        }

    }

}
效果图

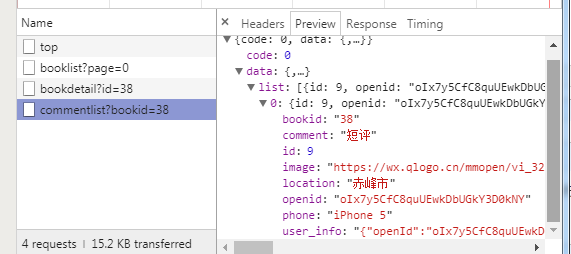
4.评论列表实现
1.在mydemo/src/pages/detail/index/vue中的mounted中增加获取评论列表this.getComments()方法,在methods中编写
<template>

<div>

    <BookInfo :info='info'></BookInfo>

    <div class="comment">

        <textarea v-model="comment"

                    class="textarea"

                    :maxlength="100"

                    placeholder="请输入图书短评"></textarea>

        <div class="location">

            地理位置:

            <switch color='#EA5A49' :checked='location' @change="getGeo"></switch>

            <span class="text-primary">{{location}}</span>

        </div>

        <div class="phone">

            手机型号:

            <switch color='#EA5A49' :checked='phone' @change="getPhone"></switch>

            <span class="text-primary">{{phone}}</span>

        </div>

        <button class="btn" @click="addComment">

            评论

        </button>

    </div>

</div>

</template>

<script>

import {get,post,showModal} from '@/until'

import BookInfo from '@/components/BookInfo'

export default {

    components:{

        BookInfo

    },

    data(){

        return{

            userinfo:'',

            bookid:'',

            info:{},

            comment:'',

            comments:[],

            location:'',

            phone:''

        }

    },

    methods:{

        async getDetail(){

            const info=await get('/weapp/bookdetail',{id:this.bookid})

            wx.setNavigationBarTitle({title:info.data.title})

            this.info=info.data

        },

        getGeo(e){

            const ak='5hvI2CGwH5YO4ZT85MjpxXgk01WWSGOi'

            let url='http://api.map.baidu.com/geocoder/v2/'

            if(e.target.value){

                wx.getLocation({

                    success:geo=>{

                        wx.request({

                            url,

                            data:{

                                ak,

                                location:`${geo.latitude},${geo.longitude}`,

                                output:'json'

                            },

                            success:res=>{

                                // console.log(res)

                                if(res.data.status==0){

                                    this.location=res.data.result.addressComponent.city

                                }else{

                                    // console.log('出错了')

                                    this.location='未知地点'

                                }

                            }

                        })

                        // console.log(geo)

                    }

                })

            }else{

                this.location=''

            }

        },

        getPhone(e){

            if(e.target.value){

                const phoneInfo=wx.getSystemInfoSync()

                // console.log(phoneInfo)

                this.phone=phoneInfo.model

            }else{

                // 没选中

                this.phone=''

            }

        },

        async addComment(){

            // 评论内容 手机型号 地理位置 图书id 用户的openid

            const data={

                openid:this.userinfo.openId,

                bookid:this.bookid,

                comment:this.comment,

                phone:this.phone,

                location:this.location

            }

            // console.log(data)

            if(!this.comment){

                return

            }

            try{

               await post('/weapp/addcomment',data)

               this.comment=''

            }catch(e){

                showModel('失败',e.msg)

            }

        },

        async getComments(){

            const comments=await get('/weapp/commentlist',{bookid:this.bookid})

            this.comments=comments

        }

    },

    mounted(){

        this.bookid=this.$root.$mp.query.id //this.$root.$mp.query获取跳转链接传过来的对象集合

        this.getDetail()

        const userinfo=wx.getStorageSync('userinfo')

        // console.log(888,userinfo)

        if(userinfo){

            this.userinfo=userinfo

        }

        this.getComments()

    },

    onShareAppMessage: (res) => {

        if (res.from === 'button') {

            console.log("来自页面内转发按钮");

            console.log(res.target);

            }

        else {

            console.log("来自右上角转发菜单")

        }

        return {

            // title: '',

            // path: '/pages/share/share?id=123',

            // imageUrl: "/images/1.jpg",

            success: (res) => {

            console.log("转发成功", res);

            },

            fail: (res) => {

            console.log("转发失败", res);

            }

        }

    }

}

</script>

<style lang='scss'>

    .comment{

        margin-top: 10px;

        .textarea{

            width: 730rpx;

            height: 200rpx;

            background: #eee;

            padding: 10rpx;

        }

        .location{

            margin-top: 10px;

        }

        .phone{

            margin-top:10px;

            margin-bottom: 10px;

        }

    }

</style>
2.在server/router/index.js中增加路由
router.get('/commentlist',controllers.commentlist)
3.在server/controllers目录下新建commentlist.js
const {mysql}=require('../qcloud')

module.exports=async(ctx)=>{

    const {bookid}=ctx.request.query

    const comments=await mysql('comments')

                            .select('comments.*','cSessionInfo.user_info')

                            .join('cSessionInfo','comments.openid','cSessionInfo.open_id')

                            .where('bookid',bookid)

    ctx.state.data={

        list:comments.map(v=>{

            const info=JSON.parse(v.user_info)

            return Object.assign({},v,{

                title:info.nickName,

                image:info.avatarUrl

            })

        })

    }

}
效果图
5.评论列表封装成一个组件
1.在src/components目录下新建CommentList.vue
<template>

    <div class="comment-list">

        <div class="page-title" v-if="comments.length">

            我的评论

        </div>

        <div class="comment" v-for="comment in comments" :key="comment.id">

            <div class="user">

                <div class="inline">

                    <img class="avatar" :src="comment.image" mode='aspectFit'>

                    {{comment.title}}

                </div>

                <div class="right">

                    {{comment.location||'未知地点'}}

                    <span class="text-primary">--</span>

                    {{comment.phone||'未知型号'}}

                </div>

            </div>

            <div style="clear:both;"></div>

            <div class="content">

                {{comment.comment}}

            </div>

        </div>

    </div>

</template>

<script>

export default {

    props:['comments']

}

</script>

<style lang='scss'>

.comment-list{

    background: #eee;

    font-size: 14px;

    .page-title{

        padding-left: 20px;

        background: #eee;

        line-height: 40px;

        font-size: 16px;

        }

    .comment{

        background: white;

        margin-bottom: 10px;

        padding: 5px 20px;

        .content{

            margin: 10px;

        }

        .user{

            .inline{

                float: left;

            }

            .right{

                float:right;

            }

            .avatar{

                width:20px;

                height: 20px;

                border-radius: 50%;

            }

        }

    }

}

</style>
2.在src/pages/detail/index.vue中修改增加代码
<template>

<div>

    <BookInfo :info='info'></BookInfo>

    <CommentList :comments="comments"></CommentList>

    <div class="comment" v-if="showAdd">

        <textarea v-model="comment"

                    class="textarea"

                    :maxlength="100"

                    placeholder="请输入图书短评"></textarea>

        <div class="location">

            地理位置:

            <switch color='#EA5A49' :checked='location' @change="getGeo"></switch>

            <span class="text-primary">{{location}}</span>

        </div>

        <div class="phone">

            手机型号:

            <switch color='#EA5A49' :checked='phone' @change="getPhone"></switch>

            <span class="text-primary">{{phone}}</span>

        </div>

        <button class="btn" @click="addComment">

            评论

        </button>

    </div>

    <div v-else class="text-footer">

        未登录或者已经评论过啦

    </div>

    <button class="btn" open-type="share">分享给好友</button>

</div>

</template>

<script>

import {get,post,showModal} from '@/until'

import BookInfo from '@/components/BookInfo'

import CommentList from '@/components/CommentList'

export default {

    components:{

        BookInfo,

        CommentList

    },

    data(){

        return{

            userinfo:'',

            bookid:'',

            info:{},

            comment:'',

            comments:[],

            location:'',

            phone:''

        }

    },

    methods:{

        async getDetail(){

            const info=await get('/weapp/bookdetail',{id:this.bookid})

            wx.setNavigationBarTitle({title:info.data.title})

            this.info=info.data

        },

        getGeo(e){

            const ak='5hvI2CGwH5YO4ZT85MjpxXgk01WWSGOi'

            let url='http://api.map.baidu.com/geocoder/v2/'

            if(e.target.value){

                wx.getLocation({

                    success:geo=>{

                        wx.request({

                            url,

                            data:{

                                ak,

                                location:`${geo.latitude},${geo.longitude}`,

                                output:'json'

                            },

                            success:res=>{

                                // console.log(res)

                                if(res.data.status==0){

                                    this.location=res.data.result.addressComponent.city

                                }else{

                                    // console.log('出错了')

                                    this.location='未知地点'

                                }

                            }

                        })

                        // console.log(geo)

                    }

                })

            }else{

                this.location=''

            }

        },

        getPhone(e){

            if(e.target.value){

                const phoneInfo=wx.getSystemInfoSync()

                // console.log(phoneInfo)

                this.phone=phoneInfo.model

            }else{

                // 没选中

                this.phone=''

            }

        },

        async addComment(){

            // 评论内容 手机型号 地理位置 图书id 用户的openid

            const data={

                openid:this.userinfo.openId,

                bookid:this.bookid,

                comment:this.comment,

                phone:this.phone,

                location:this.location

            }

            // console.log(data)

            if(!this.comment){

                return

            }

            try{

               await post('/weapp/addcomment',data)

               this.comment=''

               this.getComments()

            }catch(e){

                showModel('失败',e.msg)

            }

        },

        async getComments(){

            const comments=await get('/weapp/commentlist',{bookid:this.bookid})

            // console.log(11111,comments.data.list[0])

            this.comments=comments.data.list

        }

    },

    computed:{

        showAdd(){

            // 没登录

            if(!this.userinfo.openId){

                return false

            }

            if(this.comments.filter(v=>v.openid==this.userinfo.openId).length){

                return false

            }

            return true

        }

    },

    mounted(){

        this.bookid=this.$root.$mp.query.id //this.$root.$mp.query获取跳转链接传过来的对象集合

        this.getDetail()

        const userinfo=wx.getStorageSync('userinfo')

        // console.log(888,userinfo)

        if(userinfo){

            this.userinfo=userinfo

        }

        this.getComments()

    },

    onShareAppMessage: (res) => {

        if (res.from === 'button') {

            console.log("来自页面内转发按钮");

            console.log(res.target);

            }

        else {

            console.log("来自右上角转发菜单")

        }

        return {

            // title: '',

            // path: '/pages/share/share?id=123',

            // imageUrl: "/images/1.jpg",

            success: (res) => {

            console.log("转发成功", res);

            },

            fail: (res) => {

            console.log("转发失败", res);

            }

        }

    }

}

</script>

<style lang='scss'>

    .comment{

        margin-top: 10px;

        .textarea{

            width: 730rpx;

            height: 200rpx;

            background: #eee;

            padding: 10rpx;

        }

        .location{

            margin-top: 10px;

        }

        .phone{

            margin-top:10px;

            margin-bottom: 10px;

        }

    }

</style>
效果图
6.修整代码格式
打开cmd,cd到项目目录mydemo下,执行
npm run lint
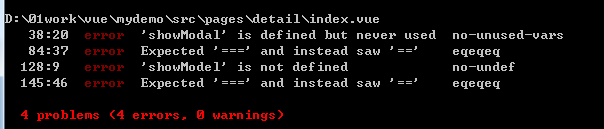
发现有四处代码不规范,去改正
应该是三个等号写成了两个等号,showModal写错了,写成了showModel
Vue+koa2开发一款全栈小程序(9.图书详情页)的更多相关文章
- Vue+koa2开发一款全栈小程序(8.图书列表页)
1.图书列表页获取数据 1.在server/routes/index.js中新增路由 router.get('/booklist',controllers.booklist) 2.在server/co ...
- Vue+koa2开发一款全栈小程序(7.图书录入功能)
1.图书录入功能 1.获取图书信息 1.在mydemo/src/until.js中封装工具函数post和get // 工具函数 import config from './config' // htt ...
- Vue+koa2开发一款全栈小程序(1.课程介绍+2.ES6入门)
1.课程介绍 1.课程概述 1.做什么? Vue+koa2开发一款全栈小程序 2.哪些功能? 个人中心.图书列表.图书详情.图书评论.个人评论列表 3.技术栈 小程序.Vue.js.koa2.koa- ...
- Vue+koa2开发一款全栈小程序(5.服务端环境搭建和项目初始化)
1.微信公众平台小程序关联腾讯云 腾讯云的开发环境是给免费的一个后台,但是只能够用于开发,如果用于生产是需要花钱的,我们先用开发环境吧 1.用小程序开发邮箱账号登录微信公众平台 2.[设置]→[开发者 ...
- Vue+koa2开发一款全栈小程序(3.vue入门、Mpvue入门)
1.Vue-cli 1.新建一个vue项目 打开cmd 官方命令行工具 npm install -g vue-cli //安装脚手架 cd到你想要存放demo的目录下,然后 vue init webp ...
- Vue+koa2开发一款全栈小程序(6.个人中心)
1.用户信息的获取和展示 1.初始化数据库 cd到server目录下,执行 node tools/initdb.js 登录mysql控制界面,查看初始化以后生成的表 show databases; u ...
- Vue+koa2开发一款全栈小程序(4.Koa入门)
1.Koa是什么? 基于nodejs平台的下一代web开发框架 1.Express原班人马打造,更精简 2.Async+await处理异步 3.洋葱圈型的中间件机制 新建一个koa项目 1.打开cmd ...
- 微信小程序云开发-从0打造云音乐全栈小程序
第1章 首门小程序“云开发”课程,你值得学习本章主要介绍什么是小程序云开发以及学习云开发的重要性,并介绍项目的整体架构,真机演示项目功能,详细介绍整体课程安排.课程适用人群以及需要掌握的前置知识.通过 ...
- 从零开发一款自己的小程序UI组件库(一)
写在前面:有开发过小程序的朋友肯定知道组件化开发的特性,高内聚与低耦合.使用已有的UI组件库,诸如:vantUI-weapp.minUI-weapp等UI组件库的诞生使我们的开发速度大大的加快,丰富的 ...
随机推荐
- (办公)mysql连接不上(java.sql.SQLException: null, message from server: "Host 'LAPTOP-O0GA2P8J' is not allowed to connect to this MySQL server")(转)
转载自csdn文章:https://blog.csdn.net/Tangerine_bisto/article/details/803461511.对所有主机进行访问授权 GRANT ALL PRIV ...
- 创建你的第一个Composer/Packagist包
今天我们要介绍一下如何通过Composer和Packagist向PHP社区贡献代码包.首先,如果你是一个PHP开发者但是还不知道什么是Composer,请先参考了一下这篇文章http://docs.p ...
- Saltstack_使用指南06_远程执行-指定目标
1. 主机规划 Targeting Minions文档 https://docs.saltstack.com/en/latest/contents.html 另请参见:自动化运维神器之saltstac ...
- 使用PlanViz进行ABAP CDS性能分析
如管理学学者彼得·德鲁克所说:你无法管理你不能衡量的东西( If you can't measure it, you can't manage it).要对已有程序进行性能优化,首先要对它的运行状况做 ...
- canvas save()和canvas restore()状态的保存和恢复使用方法及实例
canvas.save()用来保存先前状态的 canvas.restore()用来恢复之前保存的状态 注:两种方法必须搭配使用,否则没有效果 <!DOCTYPE html> <htm ...
- 网络流 之 dinic算法
我觉得这个dinic的算法和之前的增广路法差不多 .使用BFS对残余网络进行分层,在分层时,只要进行到汇点的层次数被算出即可停止, 因为按照该DFS的规则,和汇点同层或更下一层的节点,是不可能走到汇点 ...
- 使用Fabric Node SDK进行Invoke和Query
前面的文章都是在讲解Fabric网络的搭建和ChainCode的开发,那么在ChainCode开发完毕后,我们就需要使用Fabric SDK做应用程序的开发了.官方虽然提供了Node.JS,Java, ...
- Oracle通过Navicat导入表数据与机构,数据无法直接查询,需要加双引号的问题
使用navicat 导入表到ORACLE时,总是会遇到虽然表格完整导入到数据库,但是往往查不出来数据,网上提供的解决办法是把查询的列 加上 双引号,或者表名加上双引号,但这解决办法却减慢了编写sql ...
- vuex state使用
访问vuex中的state值 方式1 <div>{{$store.state.count}}</div> 方式2 <template> <div id=&qu ...
- JS操作数组-2
1. 找出数组 arr 中重复出现过的元素 function duplicates(arr) { var result = []; var count = []; for (var i=0;i< ...