
spring boot 集成 websocket 实现消息主动推送
spring boot 集成 websocket 实现消息主动
前言
http协议是无状态协议,每次请求都不知道前面发生了什么,而且只可以由浏览器端请求服务器端,而不能由服务器去主动通知浏览器端,是单向的,在很多场景就不适合,比如实时的推送,消息通知或者股票等信息的推送;在没有 websocket 之前,要解决这种问题,只能依靠 ajax轮询 或者 长轮询,这两种方式极大的消耗资源;而websocket,只需要借助http协议进行握手,然后保持着一个websocket连接,直到客户端主动断开;相对另外的两种方式,websocket只进行一次连接,当有数据的时候再推送给浏览器,减少带宽的浪费和cpu的使用。
WebSocket是html5新增加的一种通信协议,目前流行的浏览器都支持这个协议,例如Chrome,Safari,Firefox,Opera,IE等等,对该协议支持最早的应该是chrome,从chrome12就已经开始支持,随着协议草案的不断变化,各个浏览器对协议的实现也在不停的更新。该协议还是草案,没有成为标准,不过成为标准应该只是时间问题了,从WebSocket草案的提出到现在已经有十几个版本了,目前对该协议支持最完善的浏览器应该是chrome,毕竟WebSocket协议草案也是Google发布的,下面我们教程我们使用springboot 集成 websocket 实现消息的一对一以及全部通知功能。
本文使用spring boot 2.1.1+ jdk1.8 + idea。
一:引入依赖
如何创建springboot项目本文不再赘述,首先在创建好的项目pom.xml中引入如下依赖:
<!--引入websocket依赖 -->
<dependency>
<groupId>org.springframework.boot</groupId>
<artifactId>spring-boot-starter-websocket</artifactId>
</dependency><!--引入thymeleaf模板引擎依赖-->
<dependency>
<groupId>org.springframework.boot</groupId>
<artifactId>spring-boot-starter-thymeleaf</artifactId>
</dependency>
二:创建websocket配置类
ServerEndpointExporter 会自动注册使用了@ServerEndpoint注解声明的Websocket endpoint。要注意,如果使用独立的servlet容器,而不是直接使用springboot的内置容器,就不要注入ServerEndpointExporter,因为它将由容器自己提供和管理。
package com.sailing.websocket.config;

import org.springframework.context.annotation.Bean;

import org.springframework.context.annotation.Configuration;

import org.springframework.web.socket.server.standard.ServerEndpointExporter;

/**

 * @author baibing

 * @project: springboot-socket

 * @package: com.sailing.websocket.config

 * @Description: socket配置类,往 spring 容器中注入ServerEndpointExporter实例

 * @date 2018/12/20 09:46

 */

@Configuration

public class WebSocketConfig {

    @Bean

    public ServerEndpointExporter serverEndpointExporter(){

        return new ServerEndpointExporter();

    }

}
三:编写websocket服务端代码
package com.sailing.websocket.common;

import org.springframework.stereotype.Component;

import javax.websocket.*;

import javax.websocket.server.PathParam;

import javax.websocket.server.ServerEndpoint;

import java.io.IOException;

import java.util.HashMap;

import java.util.Map;

import java.util.concurrent.atomic.AtomicInteger;

/**

 * @author baibing

 * @project: springboot-socket

 * @package: com.sailing.websocket.common

 * @Description: WebSocket服务端代码,包含接收消息,推送消息等接口

 * @date 2018/12/200948

 */

@Component

@ServerEndpoint(value = "/socket/{name}")

public class WebSocketServer {

    //静态变量,用来记录当前在线连接数。应该把它设计成线程安全的。

    private static AtomicInteger online = new AtomicInteger();

    //concurrent包的线程安全Set,用来存放每个客户端对应的WebSocketServer对象。

    private static Map<String,Session> sessionPools = new HashMap<>();

    /**

     * 发送消息方法

     * @param session 客户端与socket建立的会话

     * @param message 消息

     * @throws IOException

     */

    public void sendMessage(Session session, String message) throws IOException{

        if(session != null){

            session.getBasicRemote().sendText(message);

        }

    }

    /**

     * 连接建立成功调用

     * @param session 客户端与socket建立的会话

     * @param userName 客户端的userName

     */

    @OnOpen

    public void onOpen(Session session, @PathParam(value = "name") String userName){

        sessionPools.put(userName, session);

        addOnlineCount();

        System.out.println(userName + "加入webSocket!当前人数为" + online);

        try {

            sendMessage(session, "欢迎" + userName + "加入连接!");

        } catch (IOException e) {

            e.printStackTrace();

        }

    }

    /**

     * 关闭连接时调用

     * @param userName 关闭连接的客户端的姓名

     */

    @OnClose

    public void onClose(@PathParam(value = "name") String userName){

        sessionPools.remove(userName);

        subOnlineCount();

        System.out.println(userName + "断开webSocket连接!当前人数为" + online);

    }

    /**

     * 收到客户端消息时触发(群发)

     * @param message

     * @throws IOException

     */

    @OnMessage

    public void onMessage(String message) throws IOException{

        for (Session session: sessionPools.values()) {

            try {

                sendMessage(session, message);

            } catch(Exception e){

                e.printStackTrace();

                continue;

            }

        }

    }

    /**

     * 发生错误时候

     * @param session

     * @param throwable

     */

    @OnError

    public void onError(Session session, Throwable throwable){

        System.out.println("发生错误");

        throwable.printStackTrace();

    }

    /**

     * 给指定用户发送消息

     * @param userName 用户名

     * @param message 消息

     * @throws IOException

     */

    public void sendInfo(String userName, String message){

        Session session = sessionPools.get(userName);

        try {

            sendMessage(session, message);

        }catch (Exception e){

            e.printStackTrace();

        }

    }

    public static void addOnlineCount(){

        online.incrementAndGet();

    }

    public static void subOnlineCount() {

        online.decrementAndGet();

    }

}
四:增加测试页面路由配置类
如果为每一个页面写一个action太麻烦,spring boot 提供了页面路由的统一配置,在 spring boot 2.0 以前的版本中我们只需要继承 WebMvcConfigurerAdapter ,并重写它的 addViewControllers 方法即可,但是 2.0版本后 WebMvcConfigurerAdapter已经被废弃,使用 WebMvcConfigurer 接口代替(其实WebMvcConfigurerAdapter也是实现了WebMvcConfigurer),所以我们只需要实现它即可:
package com.sailing.websocket.config;

import org.springframework.context.annotation.Configuration;

import org.springframework.web.servlet.config.annotation.ResourceHandlerRegistry;

import org.springframework.web.servlet.config.annotation.ViewControllerRegistry;

import org.springframework.web.servlet.config.annotation.WebMvcConfigurer;

import org.springframework.web.servlet.config.annotation.WebMvcConfigurerAdapter;

/**

 * 在SpringBoot2.0及Spring 5.0 WebMvcConfigurerAdapter已被废弃,目前找到解决方案就有

 * 1 直接实现WebMvcConfigurer (官方推荐)

 * 2 直接继承WebMvcConfigurationSupport

 * @ https://blog.csdn.net/lenkvin/article/details/79482205

 */

@Configuration

public class WebMvcConfig implements WebMvcConfigurer {

    /**

     * 为各个页面提供路径映射

     * @param registry

     */

    @Override

    public void addViewControllers(ViewControllerRegistry registry) {

        registry.addViewController("/client").setViewName("client");

        registry.addViewController("/index").setViewName("index");

    }

}
五:创建测试页面
在 resources下面创建 templates 文件夹,编写两个测试页面 index.html 和 client.html 和上面配置类中的viewName相对应,两个页面内容一模一样,只是在连接websocket部分模拟的用户名不一样,一个叫 lucy 一个叫 lily :
<!DOCTYPE HTML>

<html>

<head>

    <title>WebSocket</title>

</head>

<body>

Welcome<br/>

<input id="text" type="text" /><button onclick="send()">Send</button>    <button onclick="closeWebSocket()">Close</button>

<div id="message">

</div>

</body>

<script type="text/javascript">

    var websocket = null;

    //判断当前浏览器是否支持WebSocket

    if('WebSocket' in window){

        websocket = new WebSocket("ws://localhost:8080/socket/lucy");

    }else{

        alert('Not support websocket')

    }

    //连接发生错误的回调方法

    websocket.onerror = function(){

        setMessageInnerHTML("error");

    };

    //连接成功建立的回调方法

    websocket.onopen = function(event){

        setMessageInnerHTML("open");

    }

    //接收到消息的回调方法

    websocket.onmessage = function(event){

        setMessageInnerHTML(event.data);

    }

    //连接关闭的回调方法

    websocket.onclose = function(){

        setMessageInnerHTML("close");

    }

    //监听窗口关闭事件,当窗口关闭时,主动去关闭websocket连接,防止连接还没断开就关闭窗口,server端会抛异常。

    window.onbeforeunload = function(){

        websocket.close();

    }

    //将消息显示在网页上

    function setMessageInnerHTML(innerHTML){

        document.getElementById('message').innerHTML += innerHTML + '<br/>';

    }

    //关闭连接

    function closeWebSocket(){

        websocket.close();

    }

    //发送消息

    function send(){

        var message = document.getElementById('text').value;

        websocket.send(message);

    }

</script>

</html>
<!DOCTYPE HTML>
<html>
<head>
<title>WebSocket</title>
</head>
<body>
Welcome<br/>
<input id="text" type="text" /><button onclick="send()">Send</button> <button onclick="closeWebSocket()">Close</button>
<div id="message">
</div>
</body>
<script type="text/javascript">
var websocket = null;
//判断当前浏览器是否支持WebSocket
if('WebSocket' in window){
websocket = new WebSocket("ws://localhost:8080/socket/lily");
}else{
alert('Not support websocket')
}
//连接发生错误的回调方法
websocket.onerror = function(){
setMessageInnerHTML("error");
};
//连接成功建立的回调方法
websocket.onopen = function(event){
setMessageInnerHTML("open");
}
//接收到消息的回调方法
websocket.onmessage = function(event){
setMessageInnerHTML(event.data);
}
//连接关闭的回调方法
websocket.onclose = function(){
setMessageInnerHTML("close");
}
//监听窗口关闭事件,当窗口关闭时,主动去关闭websocket连接,防止连接还没断开就关闭窗口,server端会抛异常。
window.onbeforeunload = function(){
websocket.close();
}
//将消息显示在网页上
function setMessageInnerHTML(innerHTML){
document.getElementById('message').innerHTML += innerHTML + '<br/>';
}
//关闭连接
function closeWebSocket(){
websocket.close();
}
//发送消息
function send(){
var message = document.getElementById('text').value;
websocket.send(message);
}
</script>
</html>六:测试webscoket controller
package com.sailing.websocket.controller;

import com.sailing.websocket.common.WebSocketServer;

import org.springframework.web.bind.annotation.RequestMapping;

import org.springframework.web.bind.annotation.RequestMethod;

import org.springframework.web.bind.annotation.RequestParam;

import org.springframework.web.bind.annotation.RestController;

import javax.annotation.Resource;

import java.io.IOException;

/**

 * @author baibing

 * @project: springboot-socket

 * @package: com.sailing.websocket.controller

 * @Description: websocket测试controller

 * @date 2018/12/20 10:11

 */

@RestController

public class SocketController {

    @Resource

    private WebSocketServer webSocketServer;

    /**

     * 给指定用户推送消息

     * @param userName 用户名

     * @param message 消息

     * @throws IOException

     */

    @RequestMapping(value = "/socket", method = RequestMethod.GET)

    public void testSocket1(@RequestParam String userName, @RequestParam String message){

        webSocketServer.sendInfo(userName, message);

    }

    /**

     * 给所有用户推送消息

     * @param message 消息

     * @throws IOException

     */

    @RequestMapping(value = "/socket/all", method = RequestMethod.GET)

    public void testSocket2(@RequestParam String message){

        try {

            webSocketServer.onMessage(message);

        } catch (IOException e) {

            e.printStackTrace();

        }

    }

}
七:测试
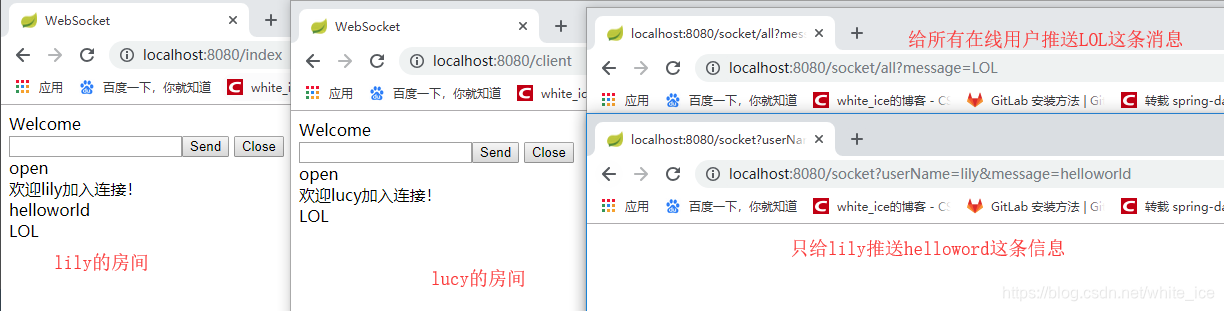
访问 http://localhost:8080/index 和 http://localhost:8080/client 分别打开两个页面并连接到websocket,http://localhost:8080/socket?userName=lily&message=helloworld 给lily发送消息,http://localhost:8080/socket/all?message=LOL 给全部在线用户发送消息: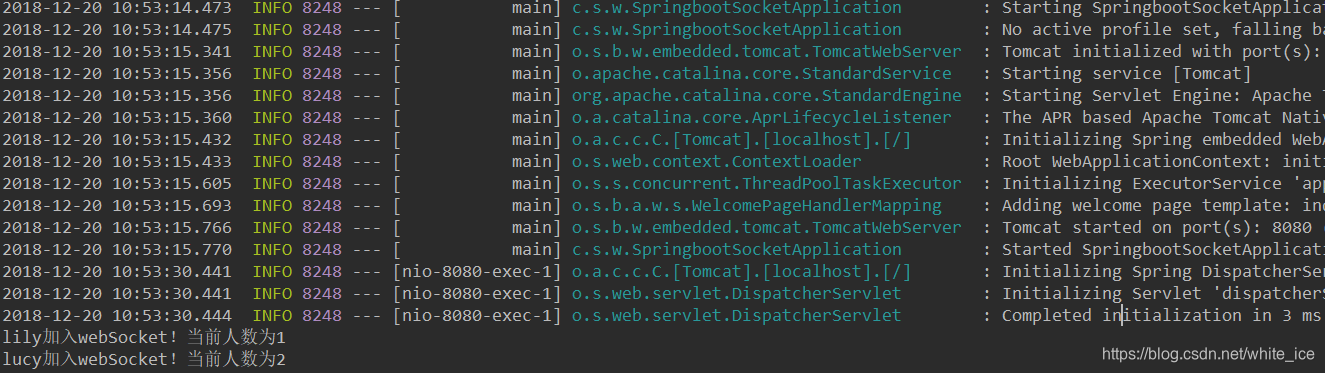
spring boot 集成 websocket 实现消息主动推送的更多相关文章
- Spring Boot 集成 WebSocket 实现服务端推送消息到客户端
假设有这样一个场景:服务端的资源经常在更新,客户端需要尽量及时地了解到这些更新发生后展示给用户,如果是 HTTP 1.1,通常会开启 ajax 请求询问服务端是否有更新,通过定时器反复轮询服务端响应的 ...
- spring boot 集成 websocket 实现消息主动
来源:https://www.cnblogs.com/leigepython/p/11058902.html pom.xml 1 <?xml version="1.0" en ...
- PHP版微信公共平台消息主动推送,突破订阅号一天只能发送一条信息限制
2013年10月06日最新整理. PHP版微信公共平台消息主动推送,突破订阅号一天只能发送一条信息限制 微信公共平台消息主动推送接口一直是腾讯的私用接口,相信很多朋友都非常想要用到这个功能. 通过学习 ...
- 【websocket】spring boot 集成 websocket 的四种方式
集成 websocket 的四种方案 1. 原生注解 pom.xml <dependency> <groupId>org.springframework.boot</gr ...
- spring boot集成Websocket
websocket实现后台像前端主动推送消息的模式,可以减去前端的请求获取数据的模式.而后台主动推送消息一般都是要求消息回馈比较及时,同时减少前端ajax轮询请求,减少资源开销. spring boo ...
- Spring boot集成Websocket,前端监听心跳实现
第一:引入jar 由于项目是springboot的项目所以我这边简单的应用了springboot自带的socket jar <dependency> <groupId>org. ...
- 【转】Spring+Websocket实现消息的推送
本文主要有三个步骤 1.用户登录后建立websocket连接,默认选择websocket连接,如果浏览器不支持,则使用sockjs进行模拟连接 2.建立连接后,服务端返回该用户的未读消息 3.服务端进 ...
- Channels集成到Django消息实时推送
channel架构图 InterFace Server:负责对协议进行解析,将不同的协议分发到不同的Channel Channel Layer:频道层,可以是一个FIFO队列,通常使用Redis Dj ...
- spring boot集成websocket实现聊天功能和监控功能
本文参考了这位兄台的文章: https://blog.csdn.net/ffj0721/article/details/82630134 项目源码url: https://github.com/zhz ...
随机推荐
- Denali NAND FLASH控制器的验证
NAND FLASH的结构如图所示: Denali NAND FLASH控制器模块提供了从AHB总线到外部NAND FLASH存储器芯片IO管脚的访问功能.主要技术特性包括: 1.标准32位AHB总线 ...
- 前后端分离项目中后台集成shiro需要注意的二三事
1. 修改 Shiro 认证失败后默认重定向处理问题 a. 继承需要使用的 ShiroFilter,重载 onAccessDenied() 方法: @Override protected boolea ...
- day63—JavaScript浏览器对象cookie
转行学开发,代码100天——2018-05-18 今天的主要学内容时JavaScript中浏览器对象——cookie. cookie用于存储web页面的用户信息,其存储容量很小,一般几k左右.如常见的 ...
- 快速入门分布式消息队列之 RabbitMQ(1)
目录 目录 前言 简介 安装 RabbitMQ 基本对象概念 Message 消息 Producer 生产者 Consumer 消费者 Queue 队列 Exchange 交换机 Binding 绑定 ...
- 阶段1 语言基础+高级_1-3-Java语言高级_1-常用API_1_第4节 ArrayList集合_18-练习三_按指定格式打印集合的方法
主要锻炼用集合作为参数 使用if判断语句
- SpringMVC起步(一)
SpringMVC起步(一) 笔记来源于慕课网:https://www.imooc.com/video/7126/0 MVC:Model-View-Controller Model:模型层,业务数据的 ...
- C#后台保存Cookie
一般是: Response.Cookies["backurl"].Expires.AddDays(2); 但是,IE浏览器保存Cookie用 Response.Cookies[&q ...
- linux 截取变量字符串
STR=123456abc FINAL=`echo ${STR: -1}` 或者 FINAL=${STR: -1} 都可以让FINAL获得c这个最后一个字符 Linux 的字符串截取很有用.有八种 ...
- [Web 前端] 015 css 三种元素的介绍
1. 块元素,内联元素,内联块元素 元素就是标签 布局中常用的有三种标签 块元素 内联元素 内联块元素 1.1 块元素 也称为行元素 布局中常用的标签,如 div.p.ul.li.h1~h6.dl.d ...
- win10创建扩展分区
1.开始菜单中选择命令提示符,以管理员身份运行. 2.运行“diskpart”命令. 3.DISKPART>后面输入list disk命令,显示磁盘列表. 4.选择磁盘,select disk ...