springboot web - 启动(4) tomcat
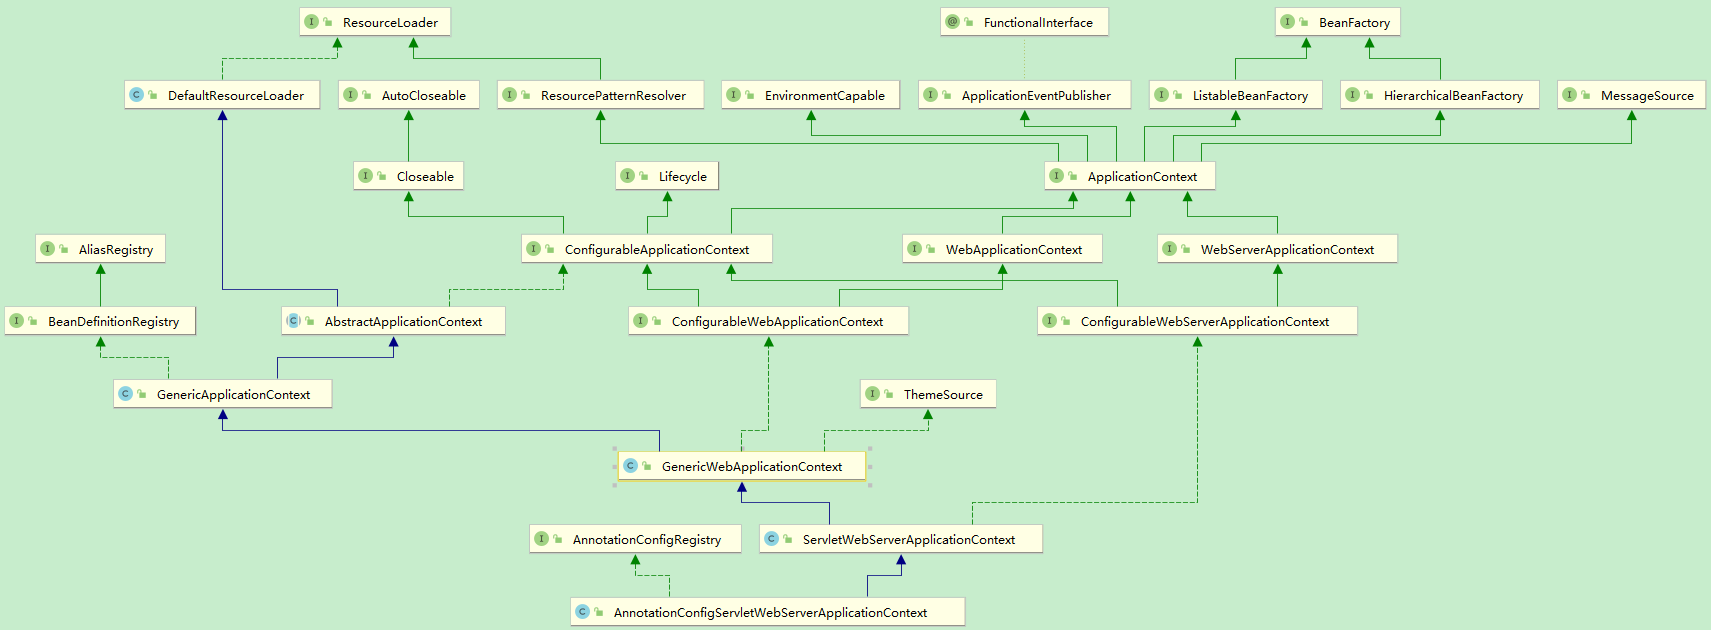
第二篇里面, 看到容器创建的是 AnnotationConfigServletWebServerApplicationContext 类型.
一 .类图
二. 构造
public GenericApplicationContext() {
  //创建 bean 工厂

    this.beanFactory = new DefaultListableBeanFactory();

}

public AnnotationConfigServletWebServerApplicationContext() {
  //创建读取器

    this.reader = new AnnotatedBeanDefinitionReader(this);
  //创建扫描器

    this.scanner = new ClassPathBeanDefinitionScanner(this);

}
构造函数中, 创建了三个类, 并赋值给相应的属性.
三. 启动 tomcat
@Override

public void refresh() throws BeansException, IllegalStateException {

    synchronized (this.startupShutdownMonitor) {

        // Prepare this context for refreshing.

        prepareRefresh();

        // Tell the subclass to refresh the internal bean factory.

        ConfigurableListableBeanFactory beanFactory = obtainFreshBeanFactory();

        // Prepare the bean factory for use in this context.

        prepareBeanFactory(beanFactory);

        try {

            // Allows post-processing of the bean factory in context subclasses.

            postProcessBeanFactory(beanFactory);

            // Invoke factory processors registered as beans in the context.

            invokeBeanFactoryPostProcessors(beanFactory);

            // Register bean processors that intercept bean creation.

            registerBeanPostProcessors(beanFactory);

            // Initialize message source for this context.

            initMessageSource();

            // Initialize event multicaster for this context.

            initApplicationEventMulticaster();

            // Initialize other special beans in specific context subclasses.

            onRefresh();

            // Check for listener beans and register them.

            registerListeners();

            // Instantiate all remaining (non-lazy-init) singletons.

            finishBeanFactoryInitialization(beanFactory);

            // Last step: publish corresponding event.

            finishRefresh();

        }

        catch (BeansException ex) {

            if (logger.isWarnEnabled()) {

                logger.warn("Exception encountered during context initialization - " +

                        "cancelling refresh attempt: " + ex);

            }

            // Destroy already created singletons to avoid dangling resources.

            destroyBeans();

            // Reset 'active' flag.

            cancelRefresh(ex);

            // Propagate exception to caller.

            throw ex;

        }

        finally {

            // Reset common introspection caches in Spring's core, since we

            // might not ever need metadata for singleton beans anymore...

            resetCommonCaches();

        }

    }

}
这里我主要是想要了解tomcat启动, 所以一些方法, 就先不看.
1. onRefresh()
onRefresh() 方法执行的是 ServletWebServerApplicationContext 的方法.
@Override

protected void onRefresh() {

    super.onRefresh();

    try {

        createWebServer();

    }

    catch (Throwable ex) {

        throw new ApplicationContextException("Unable to start web server", ex);

    }

}
createWebServer() 方法中, 会创建 Tomcat 类.
private void createWebServer() {

    WebServer webServer = this.webServer;
  //当前进来, servletContext 为null

    ServletContext servletContext = getServletContext();

    if (webServer == null && servletContext == null) {
     //创建了 TomcatServletWebServerFactory 类

        ServletWebServerFactory factory = getWebServerFactory();
     //创建 Tomcat

        this.webServer = factory.getWebServer(getSelfInitializer());

    }

    else if (servletContext != null) {

        try {

            getSelfInitializer().onStartup(servletContext);

        }

        catch (ServletException ex) {

            throw new ApplicationContextException("Cannot initialize servlet context",

                    ex);

        }

    }

    initPropertySources();

}
getWebServer方法里面, 就创建了 Tomcat 类, 并对其进行一些配置操作.
@Override

public WebServer getWebServer(ServletContextInitializer... initializers) {
  //创建 Tomcat

    Tomcat tomcat = new Tomcat();

    File baseDir = (this.baseDirectory != null ? this.baseDirectory

            : createTempDir("tomcat"));

    tomcat.setBaseDir(baseDir.getAbsolutePath());

    Connector connector = new Connector(this.protocol);

    tomcat.getService().addConnector(connector);

    customizeConnector(connector);

    tomcat.setConnector(connector);

    tomcat.getHost().setAutoDeploy(false);

    configureEngine(tomcat.getEngine());

    for (Connector additionalConnector : this.additionalTomcatConnectors) {

        tomcat.getService().addConnector(additionalConnector);

    }

    prepareContext(tomcat.getHost(), initializers);
  //这里会创建 TomcatWebServer 实例, 并返回

    return getTomcatWebServer(tomcat);

}
这里的 protocol 是有一个默认值的:
public static final String DEFAULT_PROTOCOL = "org.apache.coyote.http11.Http11NioProtocol";

private String protocol = DEFAULT_PROTOCOL;
可以看到, 这里默认使用的是 同步非阻塞io协议. 需要注意的是, 在 new Connector() 的时候 对 Http11NioProtocol 进行了反射实例化.
public Http11NioProtocol() {

    super(new NioEndpoint());

}
在实例化的时候, new 了一个 NioEndpoint. 这个东西很重要, 后面会看到.
getTomcatWebServer()
protected TomcatWebServer getTomcatWebServer(Tomcat tomcat) {

    return new TomcatWebServer(tomcat, getPort() >= 0);

}
在创建 TomcatWebServer 的时候, 就会启动 Tomcat
public TomcatWebServer(Tomcat tomcat, boolean autoStart) {

    Assert.notNull(tomcat, "Tomcat Server must not be null");

    this.tomcat = tomcat;

    this.autoStart = autoStart;

    initialize();

}

private void initialize() throws WebServerException {

    TomcatWebServer.logger

            .info("Tomcat initialized with port(s): " + getPortsDescription(false));

    synchronized (this.monitor) {

        try {

            addInstanceIdToEngineName();

            Context context = findContext();

            context.addLifecycleListener((event) -> {

                if (context.equals(event.getSource())

                        && Lifecycle.START_EVENT.equals(event.getType())) {

                    // Remove service connectors so that protocol binding doesn't

                    // happen when the service is started.

                    removeServiceConnectors();

                }

            });

            // Start the server to trigger initialization listeners

            this.tomcat.start();

            // We can re-throw failure exception directly in the main thread

            rethrowDeferredStartupExceptions();

            try {

                ContextBindings.bindClassLoader(context, context.getNamingToken(),

                        getClass().getClassLoader());

            }

            catch (NamingException ex) {

                // Naming is not enabled. Continue

            }

            // Unlike Jetty, all Tomcat threads are daemon threads. We create a

            // blocking non-daemon to stop immediate shutdown

            startDaemonAwaitThread();

        }

        catch (Exception ex) {

            stopSilently();

            throw new WebServerException("Unable to start embedded Tomcat", ex);

        }

    }

}
2. finishRefresh()
ServletWebServerApplicationContext 重写了该方法.
@Override

protected void finishRefresh() {
  //调用父类的 finishedRefresh 方法, 保证处理完整性

    super.finishRefresh();
  //启动 TomcatWebServer

    WebServer webServer = startWebServer();

    if (webServer != null) {

        publishEvent(new ServletWebServerInitializedEvent(webServer, this));

    }

}
startWebServer()
private WebServer startWebServer() {

    WebServer webServer = this.webServer;

    if (webServer != null) {

        webServer.start();

    }

    return webServer;

}

@Override

public void start() throws WebServerException {

    synchronized (this.monitor) {

        if (this.started) {

            return;

        }

        try {
       //遍历service, 拿到service, 然后绑定 Connector

            addPreviouslyRemovedConnectors();

            Connector connector = this.tomcat.getConnector();

            if (connector != null && this.autoStart) {

                performDeferredLoadOnStartup();

            }

            checkThatConnectorsHaveStarted();

            this.started = true;

            TomcatWebServer.logger

                    .info("Tomcat started on port(s): " + getPortsDescription(true)

                            + " with context path '" + getContextPath() + "'");

      ......

}
addPreviouslyRemovedConnectors()
private void addPreviouslyRemovedConnectors() {

    Service[] services = this.tomcat.getServer().findServices();

    for (Service service : services) {

        Connector[] connectors = this.serviceConnectors.get(service);

        if (connectors != null) {

            for (Connector connector : connectors) {

                service.addConnector(connector);

                if (!this.autoStart) {

                    stopProtocolHandler(connector);

                }

            }

            this.serviceConnectors.remove(service);

        }

    }

}
service 在绑定 Connector 的时候, 会启动 Connector
 @Override

public void addConnector(Connector connector) {

    synchronized (connectorsLock) {

        connector.setService(this);

        Connector results[] = new Connector[connectors.length + 1];

        System.arraycopy(connectors, 0, results, 0, connectors.length);

        results[connectors.length] = connector;

        connectors = results;

        if (getState().isAvailable()) {

            try {

                connector.start();

            } catch (LifecycleException e) {

                log.error(sm.getString(

                        "standardService.connector.startFailed",

                        connector), e);

            }

        }

        // Report this property change to interested listeners

        support.firePropertyChange("connector", null, connector);

    }

}
看一下 connector.start() 方法.
@Override

public final synchronized void start() throws LifecycleException {

   ......try {

        setStateInternal(LifecycleState.STARTING_PREP, null, false);

        startInternal();

        if (state.equals(LifecycleState.FAILED)) {

            // This is a 'controlled' failure. The component put itself into the

            // FAILED state so call stop() to complete the clean-up.

            stop();

        } else if (!state.equals(LifecycleState.STARTING)) {

            // Shouldn't be necessary but acts as a check that sub-classes are

            // doing what they are supposed to.

            invalidTransition(Lifecycle.AFTER_START_EVENT);

        } else {

            setStateInternal(LifecycleState.STARTED, null, false);

        }

    } catch (Throwable t) {

        // This is an 'uncontrolled' failure so put the component into the

        // FAILED state and throw an exception.

        ExceptionUtils.handleThrowable(t);

        setStateInternal(LifecycleState.FAILED, null, false);

        throw new LifecycleException(sm.getString("lifecycleBase.startFail", toString()), t);

    }

}
startInternal() 是一个抽象方法, 其中的一个实现类 Connector
@Override

protected void startInternal() throws LifecycleException {

    // Validate settings before starting

    if (getPort() < 0) {

        throw new LifecycleException(sm.getString(

                "coyoteConnector.invalidPort", Integer.valueOf(getPort())));

    }

    setState(LifecycleState.STARTING);

    try {

        protocolHandler.start();

    } catch (Exception e) {

        throw new LifecycleException(

                sm.getString("coyoteConnector.protocolHandlerStartFailed"), e);

    }

}
接着进 start() 方法
@Override

public void start() throws Exception {

    if (getLog().isInfoEnabled()) {

        getLog().info(sm.getString("abstractProtocolHandler.start", getName()));

    }

    endpoint.start();

    // Start async timeout thread

    asyncTimeout = new AsyncTimeout();

    Thread timeoutThread = new Thread(asyncTimeout, getNameInternal() + "-AsyncTimeout");

    int priority = endpoint.getThreadPriority();

    if (priority < Thread.MIN_PRIORITY || priority > Thread.MAX_PRIORITY) {

        priority = Thread.NORM_PRIORITY;

    }

    timeoutThread.setPriority(priority);

    timeoutThread.setDaemon(true);

    timeoutThread.start();

}
endPoint.start() 方法:
public final void start() throws Exception {

    if (bindState == BindState.UNBOUND) {

        bind();

        bindState = BindState.BOUND_ON_START;

    }

    startInternal();

}
这个bind() 执行的是NioEndpoint 中的方法, 进行端口绑定监听.
 @Override

public void bind() throws Exception {

    serverSock = ServerSocketChannel.open();

    socketProperties.setProperties(serverSock.socket());

    InetSocketAddress addr = (getAddress()!=null?new InetSocketAddress(getAddress(),getPort()):new InetSocketAddress(getPort()));

    serverSock.socket().bind(addr,getAcceptCount());

    serverSock.configureBlocking(true); //mimic APR behavior

    // Initialize thread count defaults for acceptor, poller

    if (acceptorThreadCount == 0) {

        // FIXME: Doesn't seem to work that well with multiple accept threads

        acceptorThreadCount = 1;

    }

    if (pollerThreadCount <= 0) {

        //minimum one poller thread

        pollerThreadCount = 1;

    }

    setStopLatch(new CountDownLatch(pollerThreadCount));

    // Initialize SSL if needed

    initialiseSsl();

    selectorPool.open();

}
总结:
从执行流程上来看,
1. 在onRefresh() 中, 启动Tomcat
2. 在 finishBeanFactoryInitialization() 中进行了后台方法的路由映射(待续)
3. 在finishRefresh()中进行了端口绑定监听
springboot web - 启动(4) tomcat的更多相关文章
- springboot web - 启动(1) 创建SpringApplication
一. 测试代码 @SpringBootApplication public class SbmvcApplication { public static void main(String[] args ...
- springboot web - 启动(2) run()
接上一篇 在创建 SpringApplication 之后, 调用了 run() 方法. public ConfigurableApplicationContext run(String... arg ...
- springboot项目启动后tomcat服务器自动关闭 解决方法
需要在pom.xml中添加 <dependency> <groupId>org.springframework.boot</groupId> <artifac ...
- SpringBoot集成Socket服务后打包(war包)启动时如何启动Socket服务(web应用外部tomcat启动)
1.首先知道SpringBoot打包为jar和war包是不一样的(只讨论SpringBoot环境下web应用打包) 1.1.jar和war包的打开方式不一样,虽然都依赖java环境,但是j ...
- SpringBoot应用部署到Tomcat中无法启动问题
SpringBoot应用部署到Tomcat中无法启动问题 背景 最近公司在做一些内部的小型Web应用时, 为了提高开发效率决定使用SpringBoot, 这货自带Servlet容器, 你在开发We ...
- SpringBoot应用部署到Tomcat中无法启动问题(初识)
参考http://blog.csdn.net/asdfsfsdgdfgh/article/details/52127562 背景 最近公司在做一些内部的小型Web应用时, 为了提高开发效率决定使用Sp ...
- 多个springboot项目部署到tomcat,Error deploying web application archive
每个springboot单独部署到tomcat下可以正常启动,多个一个就发生异常 Error deploying web application archive 解决:配置文件加上配置区分 sprin ...
- 使用spring等框架的web程序在Tomcat下的启动顺序及思路理清
大牛请绕过,此文仅针对自己小白水平,对web程序的启动流程做个清晰的回顾. 一.使用spring等框架的web程序在Tomcat下的启动流程 1)Tomcat是根据web.xml来启动的.首先到web ...
- Intellij IDEA创建的Web项目配置Tomcat并启动Maven项目
本篇博客讲解IDEA如何配置Tomcat. 大部分是直接上图哦. 点击如图所示的地方,进行添加Tomcat配置页面 弹出页面后,按照如图顺序找到,点击+号 tomcat Service -> L ...
随机推荐
- Java1变量数据类型和运算符
day02_变量数据类型和运算符 1 2 3 4 5 6 7 8 9 10 11 12 13 14 15 16 17 public class jh_01_数据类型说明 { public ...
- 【OpenGL】变换矩阵计算公式
摘自: http://ogldev.atspace.co.uk/www/tutorial06/tutorial06.html, http://ogldev.atspace.co.uk/www/tuto ...
- php连接mySql数据库 示例
<?php header("content-type:text/html;charset=utf-8"); error_reporting(E_ALL); /* 连接数据库- ...
- Qt 条件编译 arm windows linux 判断 跨平台
如果代码里面有些判断需要不同的参数做判断: 办法:在pro文件里面做定义 方法1:直接定义一个宏:用的时候可以直接判断,这样做不好的地方是编译前需要重新切换一下宏 1)定义宏 DEFINES += _ ...
- 开源堡垒机jumpserver
开源堡垒机jumpserver 开源堡垒机jumpserver的安装 开源堡垒机jumpserver的配置和使用
- [MacOS]Sublime text3 安装(一)
官网地址 https://www.sublimetext.com/ 直接下载地址(MacOS) https://download.sublimetext.com/Sublime%20Text%20Bu ...
- Charm Bracelet 一维01背包
A - Charm Bracelet Time Limit:1000MS Memory Limit:65536KB 64bit IO Format:%lld & %llu Su ...
- 高并发之——深入解析Callable接口
本文纯干货,从源码角度深入解析Callable接口,希望大家踏下心来,打开你的IDE,跟着文章看源码,相信你一定收获不小. 1.Callable接口介绍 Callable接口是JDK1.5新增的泛型接 ...
- CentOS 7.6下安装 NVM 管理不同版本的 Node.js
学习网站:https://www.linuxidc.com/Linux/2019-10/160918.htm
- Node.js的__dirname,__filename,process.cwd(),./的一些坑
参考博客:https://github.com/jawil/blog/issues/18