Spring-Gateway与Spring-Security在前后端分离项目中的实践
前言
网上貌似webflux这一套的SpringSecurity操作资料貌似很少。
自己研究了一波,记录下来做一点备忘,如果能帮到也在迷惑的人一点点,就更好了。
新项目是前后端分离的项目,前台vue,后端SpringCloud2.0,采用oauth2.0机制来获得用户,权限框架用的gateway。
一,前台登录
大概思路前台主要是配合项目中配置的clientId,clientSecret去第三方服务器拿授权码code,然后拿这个code去后端交互,后端根据code去第三方拿用户信息,由于第三方只保存用户信息,不管具体的业务权限,所以我会在本地保存一份用户副本,用来做权限关联。用户登录成功后,会把一些用户基本信息(脱敏)生成jwt返回给前端放到head中当Authorization,同时后端把一些相关联的菜单,权限等数据放到redis里做关联,为后面的权限控制做准备。
二,SpringSecurity的webflux应用
如果用过SpringSecurity,HttpSecurity应该是比较熟悉的,基于Web允许为特定的http请求配置安全性。
WebFlux中ServerHttpSecurity与HttpSecurity提供的相似的类似,但仅适用于WebFlux。默认情况下,它将应用于所有请求,但可以使用securityMatcher(ServerWebExchangeMatcher)或其他类似方法进行限制。
项目比较特殊,就不能全展示了,大概写一写,开启Security如下:
@EnableWebFluxSecurity

public class MyExplicitSecurityConfiguration {

  @Bean

  SecurityWebFilterChain webFluxSecurityFilterChain(ServerHttpSecurity http) throws Exception {

    http.securityContextRepository(new NoOpServerSecurityContextAutoRepository(tokenProvider)).httpBasic().disable()

      .formLogin().disable()

      .csrf().disable()

      .logout().disable();

    http.addFilterAt(corsFilter(), SecurityWebFiltersOrder.CORS)

      .authorizeExchange()

      .matchers(EndpointRequest.to("health", "info"))

      .permitAll()

      .and()

      .authorizeExchange()

      .pathMatchers(HttpMethod.OPTIONS)

      .permitAll()

      .and()

      .authorizeExchange()

      .pathMatchers(HttpMethod.PUT)

      .denyAll()

      .and()

      .authorizeExchange()

      .pathMatchers(HttpMethod.DELETE)

      .denyAll()

      .and()

      .authorizeExchange()

      .pathMatchers(HttpMethod.HEAD)

      .denyAll()

      .and()

      .authorizeExchange()

      .pathMatchers(HttpMethod.PATCH)

      .denyAll()

      .and()

      .authorizeExchange()

      .pathMatchers(HttpMethod.TRACE)

      .denyAll()

      .and()

      .authorizeExchange()

      .pathMatchers(excludedAuthPages).permitAll()

      .and()

      .authorizeExchange()

      .pathMatchers(authenticatedPages).authenticated()

      .and()

      .exceptionHandling()

      .accessDeniedHandler(new AccessDeniedEntryPointd())

      .and()

      .authorizeExchange()

      .and()

      .addFilterAt(webFilter(), SecurityWebFiltersOrder.AUTHORIZATION)

      .authorizeExchange()

      .pathMatchers("/**").access(new JwtAuthorizationManager(tokenProvider))

      .anyExchange().authenticated();

    return http.build();

  }

}
因为是前后端分离项目,所以没有常规的后端的登录操作,把这些disable掉。
securityContextRepository是个用于在请求之间保留SecurityContext策略接口,实现类是WebSessionServerSecurityContextRepository(session存储),还有就是NoOpServerSecurityContextRepository(用于无状态应用),像我们JWT这种就用后者,不能用前者,应该我们是无状态的应用,没有主动clear的操作,会导致内存溢出等问题。
build()方法中会有一个初始化操作。

初始化操作就设置成了WebSessionServerSecurityContextRepository,我们就自己在SecurityWebFilterChain中设置成NoOpServerSecurityContextRepository。
接下来我们为了满足自定义认证需求,我们自己配置一个AuthenticationWebFilter。
   public AuthenticationWebFilter webFilter() {

        AuthenticationWebFilter authenticationWebFilter = new AuthenticationWebFilter(new JWTReactiveAuthenticationManager(userCache, tokenProvider, coreUserApi));

        authenticationWebFilter.setServerAuthenticationConverter(new TokenAuthenticationConverter(guestList, tokenProvider));

        authenticationWebFilter.setRequiresAuthenticationMatcher(new NegatedServerWebExchangeMatcher(ServerWebExchangeMatchers.pathMatchers(excludedAuthPages)));

        authenticationWebFilter.setSecurityContextRepository(new NoOpServerSecurityContextAutoRepository(tokenProvider));

        return authenticationWebFilter;

    }
几个特殊的类,稍微解释下。
AuthenticationWebFilter
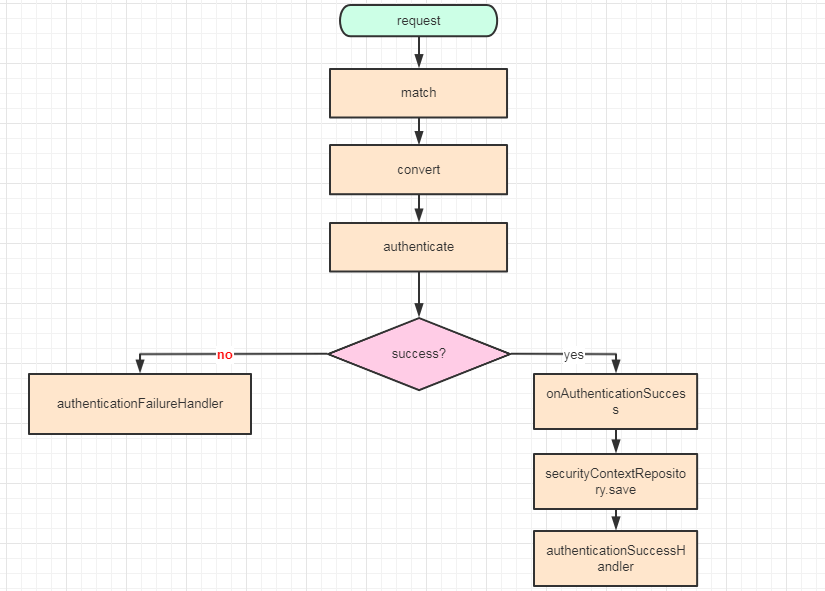
一个执行特定请求身份验证的WebFilter,包含了一整套验证的流程操作,具体上源码看一眼基本能了解个大概。
	@Override

	public Mono<Void> filter(ServerWebExchange exchange, WebFilterChain chain) {

		return this.requiresAuthenticationMatcher.matches(exchange)

			.filter( matchResult -> matchResult.isMatch())

			.flatMap( matchResult -> this.authenticationConverter.convert(exchange))

			.switchIfEmpty(chain.filter(exchange).then(Mono.empty()))

			.flatMap( token -> authenticate(exchange, chain, token))

			.onErrorResume(AuthenticationException.class, e -> this.authenticationFailureHandler

					.onAuthenticationFailure(new WebFilterExchange(exchange, chain), e));

	}

	private Mono<Void> authenticate(ServerWebExchange exchange, WebFilterChain chain, Authentication token) {

		return this.authenticationManagerResolver.resolve(exchange)

			.flatMap(authenticationManager -> authenticationManager.authenticate(token))

			.switchIfEmpty(Mono.defer(() -> Mono.error(new IllegalStateException("No provider found for " + token.getClass()))))

			.flatMap(authentication -> onAuthenticationSuccess(authentication, new WebFilterExchange(exchange, chain)));

	}

	protected Mono<Void> onAuthenticationSuccess(Authentication authentication, WebFilterExchange webFilterExchange) {

		ServerWebExchange exchange = webFilterExchange.getExchange();

		SecurityContextImpl securityContext = new SecurityContextImpl();

		securityContext.setAuthentication(authentication);

		return this.securityContextRepository.save(exchange, securityContext)

			.then(this.authenticationSuccessHandler

				.onAuthenticationSuccess(webFilterExchange, authentication))

			.subscriberContext(ReactiveSecurityContextHolder.withSecurityContext(Mono.just(securityContext)));

	}
ServerWebExchangeMatcher
一个用来匹配URL用来验证的接口,我代码中用的是他的实现类NegatedServerWebExchangeMatcher,这个类就是指一些我设置的白名单的url就不要验证了,他还有许多实现类,具体可以参见源码,我这就不累述了。
ServerAuthenticationConverter
一个用于从ServerWebExchange转换为用于通过提供的org.springframework.security.authentication.ReactiveAuthenticationManager进行身份验证的Authentication的策略。 如果结果为Mono.empty() ,则表明不进行任何身份验证尝试。我这边自己实现了一个TokenAuthenticationConverter,主要功能就是通过JWT转换成Authentication(UsernamePasswordAuthenticationToken)。
ReactiveAuthenticationManager
对提供的Authentication进行身份验证,基本上核心的验证操作就在它提供的唯一方法authenticate里进行操作,根据conver那边转换过来的Authentication当参数进行具体的验证操作,简述如下:
    @Override

    public Mono<Authentication> authenticate(final Authentication authentication) {

        if (authentication.isAuthenticated()) {

            return Mono.just(authentication);

        }

        return Mono.just(authentication)

                .switchIfEmpty(Mono.defer(this::raiseBadCredentials))

                .cast(UsernamePasswordAuthenticationToken.class)

                .flatMap(this::authenticateToken)

                .publishOn(Schedulers.parallel())

                .onErrorResume(e -> raiseBadCredentials())

                .switchIfEmpty(Mono.defer(this::raiseBadCredentials))

                .map(u -> {

                    UsernamePasswordAuthenticationToken usernamePasswordAuthenticationToken = new UsernamePasswordAuthenticationToken(authentication.getPrincipal(), authentication.getName(), Collections.EMPTY_LIST);

                    usernamePasswordAuthenticationToken.setDetails(u);

                    return usernamePasswordAuthenticationToken;

                });

    }
ServerSecurityContextRepository
用于在请求之间保留SecurityContext,因为在登录成功后我们是需要保存一个登录的数据,用来后面的请求进行相关的操作。因为我们是无状态的,所以其实NoOpServerSecurityContextRepository是能
满足我们的需求,我们不需要进行实际的save,但是load我们稍微要改造下,所以我实现了ServerSecurityContextRepository,仿照NoOpServerSecurityContextRepository,实现了一个自定义的Repository,为什么load我们要改造,就是因为虽然我们是无状态的,但是实际上每次请求,我们依然要区分到底是谁,为了后面的权限验证做准备,所以我们根据jwt可以生成一个SecurityContext放入ReactiveSecurityContextHolder。

public class NoOpServerSecurityContextAutoRepository

        implements ServerSecurityContextRepository {

    private TokenProvider tokenProvider;

    public NoOpServerSecurityContextAutoRepository(TokenProvider tokenProvider) {

        this.tokenProvider = tokenProvider;

    }

    public Mono<Void> save(ServerWebExchange exchange, SecurityContext context) {

        return Mono.empty();

    }

    public Mono<SecurityContext> load(ServerWebExchange exchange) {

        String token = exchange.getRequest().getHeaders().getFirst("Authorization");

        if (StrUtil.isNotBlank(token)) {

            SecurityContext securityContext = new SecurityContextImpl();

            securityContext.setAuthentication(new UsernamePasswordAuthenticationToken("password", token, Collections.EMPTY_LIST));

            return Mono.justOrEmpty(securityContext);

        } else {

            return Mono.empty();

        }

    }

}
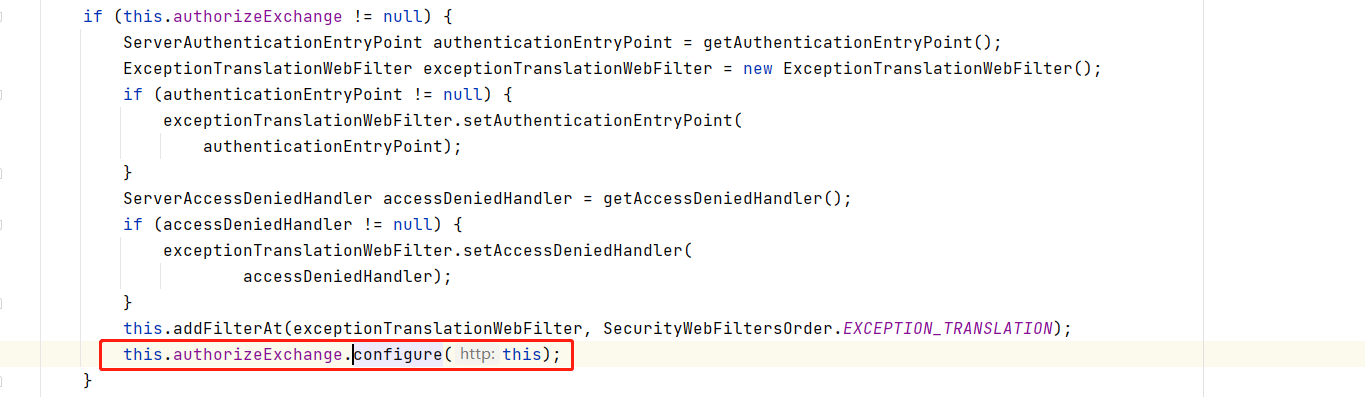
权限验证

权限验证是在图上配置的。大概的流程,可以看下面的截图。

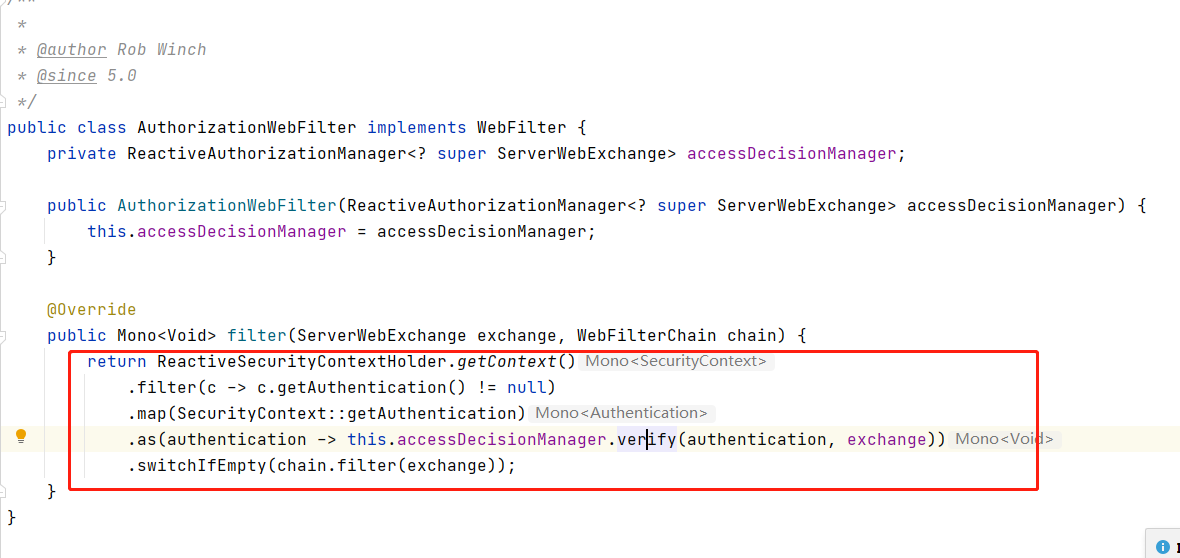
AuthorizationWebFilter
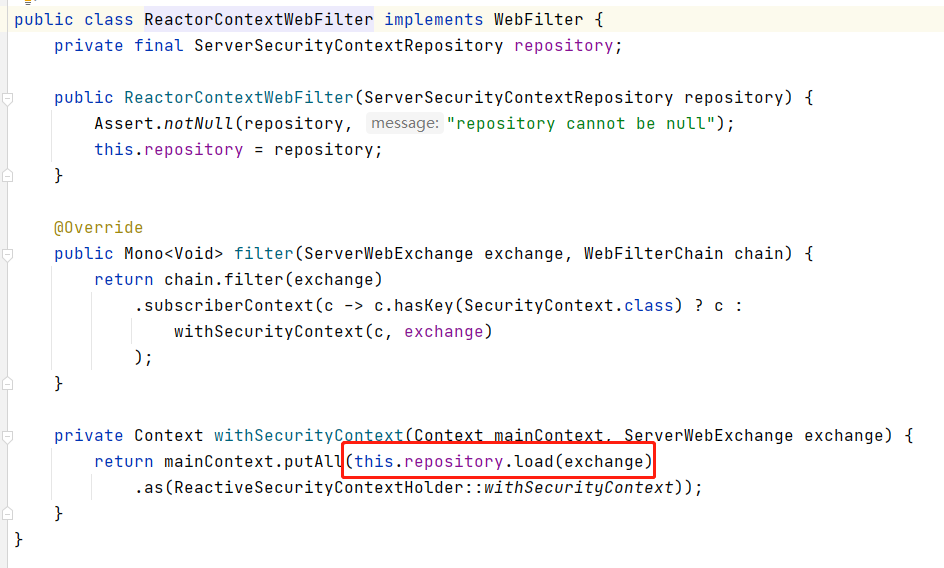
跟到里面,我们发现了最主要的就是这个AuthorizationWebFilter,用来做权限验证的,然后我们在filter方法里面就看得很清楚了,他第一步就是拿的ReactiveSecurityContextHolder.getContext(),然后我们之前在ReactorContextWebFilter里的load操作就是从我们NoOpServerSecurityContextAutoRepository里塞到ReactiveSecurityContextHolder里,因为本质 来说SpringSecurity就是个filter集合,我们从ReactorContextWebFilter里load,然后在AuthorizationWebFilter取,这样就能拿到Authentication来做权限验证了。
ReactiveAuthorizationManager
反应式授权管理器接口,可以确定Authentication是否有权访问特定对象。其实看源码就很清楚了,就是根据Authentication来做具体的权限验证。
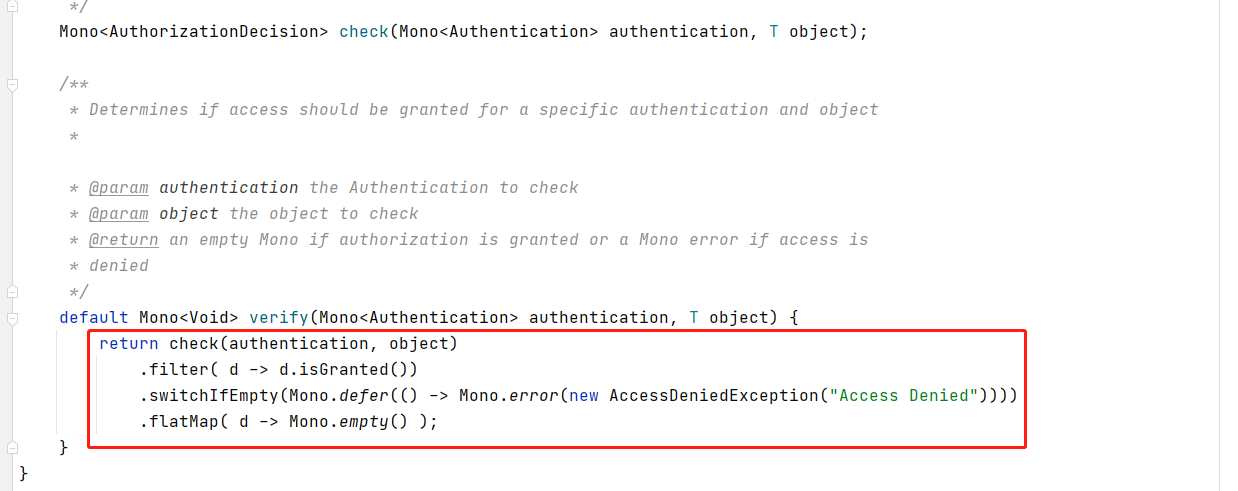
代码很清楚,就不细讲了,我们主要是写check方法。所以我这边自已实现了一个JwtAuthorizationManager类用来做具体的check,内容我就不贴了,简单来说就是拿Authentication里的内容去redis里查对应的菜单权限。
结语
上面就我实际项目中的一些点滴记录,Spring-Security虽是一个博大精深的框架,细研究代码,其实也能大致明白整体的思路,虽然webflux让这一层代码更加了一层迷雾,但是只要努力钻研,总会有茅塞顿开的时候。
附上相关代码,由于是生产项目,只能截取部分代码,仅供参考。
Spring-Gateway与Spring-Security在前后端分离项目中的实践的更多相关文章
- 《论vue在前后端分离项目中的实践之年终总结》
我是2014年的时候开始了解知道的vue,当时vue还不太成熟,想用但是又怕自己hold不住,况且那时候vue还没有成熟的(路由.验证.ui组件)插件,社区也是不温不火的,再说也没有合适的机遇让我去项 ...
- 分享我在前后端分离项目中Gitlab-CI的经验
长话短说,今天分享我为前后端分离项目搭建Gitlab CI/CD流程的一些额外经验. Before Gitlab-ci是Gitlab提供的CI/CD特性,结合Gitlab简单友好的配置界面,能愉悦的在 ...
- 基于spring security 实现前后端分离项目权限控制
前后端分离的项目,前端有菜单(menu),后端有API(backendApi),一个menu对应的页面有N个API接口来支持,本文介绍如何基于spring security实现前后端的同步权限控制. ...
- 在前后端分离项目中使用SpringBoot集成Shiro
前言 这次在处理一个小项目时用到了前后端分离,服务端使用springboot2.x.权限验证使用了Shiro.前后端分离首先需要解决的是跨域问题,POST接口跨域时会预发送一个OPTIONS请求,浏览 ...
- 前后端分离项目中后台集成shiro需要注意的二三事
1. 修改 Shiro 认证失败后默认重定向处理问题 a. 继承需要使用的 ShiroFilter,重载 onAccessDenied() 方法: @Override protected boolea ...
- 前后端分离项目 nginx配置实践
新项目采用前后端分离的方式开发,前后端代码打算分开部署(同机器且同域名),但打算支持后端依然可访问静态资源. 搜索nginx配置大部分都通过url前缀进行转发来做前后端分离,不适用目前项目. 说明 前 ...
- 08 Django REST Framework 解决前后端分离项目中的跨域问题
01-安装模块 pip install django-cors-headers 02-添加到INSTALL_APPS中 INSTALLED_APPS = ( ... 'corsheaders', .. ...
- Aspnet Mvc 前后端分离项目手记(二)关于token认证
在前后端分离的项目中,首先我们要解决的问题就是身份认证 以往的时候,我们使用cookie+session,或者只用cookie来保持会话. 一,先来复习一下cookie和session 首先我们来复习 ...
- 实战!spring Boot security+JWT 前后端分离架构认证登录!
大家好,我是不才陈某~ 认证.授权是实战项目中必不可少的部分,而Spring Security则将作为首选安全组件,因此陈某新开了 <Spring Security 进阶> 这个专栏,写一 ...
随机推荐
- 用铁电存储器FRAM让穿戴式设备更省电
可穿戴设备应用中的显示屏消耗了大部分电池电力.解决方法之一是直接提高电池容量,但是大容量电池会加大尺寸和重量,对可穿戴设备不合适,尤其是在市场不断追求更小型化的新款产品时更是如此.更具挑战性的是电池技 ...
- 手把手教你Spring Boot整合Mybatis Plus 代码生成器
一.在pom.xml中添加所需依赖 <!-- MyBatis-Plus代码生成器--> <dependency> <groupId>com.baomidou< ...
- 如何把数据放到C#的心里之 DB2实例
平时偶尔因为工作需要得自己写一些小工具去操作数据库,因为只是需要实现一些小的功能,也不涉及多类型的数据库,也许就是一次性的使用.所以此时那些大而全的数据库操作框架,也就不再那么适合我了.而本篇博文主要 ...
- OSS对象储存
简介 阿里云对象存储服务(Object Storage Service,简称 OSS),是阿里云提供的海量.安全.低成本.高可靠的云存储服务. 使用流程 名词解释 Endpoint(访问域名) Ac ...
- 为WebView 同步cookie
import android.os.Build;import android.text.TextUtils;import android.webkit.CookieManager;import and ...
- COM技术中的VARIANT and VARIANTARG
VARIANT and VARIANTARG Use VARIANTARG to describe arguments passed within DISPPARAMS, and VARIANT to ...
- Linux fork()一个进程内核态的变化
[前言]用户态的变化,耳熟能详不在赘述.现在支持读时共享,写时复制. 一.内核态的变化 1.fork一个子进程代码 #include <stdio.h> #include <stdl ...
- Python爬虫系统化学习(4)
Python爬虫系统化学习(4) 在之前的学习过程中,我们学习了如何爬取页面,对页面进行解析并且提取我们需要的数据. 在通过解析得到我们想要的数据后,最重要的步骤就是保存数据. 一般的数据存储方式有两 ...
- 医学图像 | DualGAN与儿科超声心动图分割 | MICCAI
文章转自微信公众号:「机器学习炼丹术」 作者:炼丹兄(已授权) 联系方式:微信cyx645016617(欢迎交流共同进步) 论文名称:"Dual Network Generative Adv ...
- 微信小程序日期时间选择器(精确到秒)
<picker mode="multiSelector" value="{{dateTime1}}" bindchange="changeDat ...