redis集群cluster简单设置
环境:
这里参考官方使用一台服务器:Centos 7 redis-5.0.4 192.168.10.10
redis集群cluster最少要3个主节点,所以本次需要创建6个实例:3个主节点,3个从节点。
1、创建cluster工作目录
[root@localhost ~]# mkdir -p /opt/redis-5.0.4/cluster-test/{7000,7001,7002,7003,7004,7005}
2、创建cluster的配置文件
[root@localhost ~]# cd /opt/redis-5.0./cluster-test/

[root@localhost cluster-test]# vim /redis.conf

port        // 端口号

daemonize yes   // 开启守护进程

dir "/opt/redis-5.0.4/cluster-test/data"  // 集群的工作目录

logfile "/opt/redis-5.0.4/cluster-test/log/cluster-7000.log" // 日志文件

dbfilename "dump-7000.rdb"

cluster-enabled yes   // 启用集群功能

cluster-config-file nodes-.conf   // 集群配置文件的名字

cluster-require-full-coverage no  // #redis cluster需要16384个slot都正常的时候才能对外提供服务,换句话说,只要任何一个slot异常那么整个cluster不对外提供服务。 因此生产环境一般为no

cluster-node-timeout   //请求超时  默认15秒,可自行设置

appendonly yes  //aof日志开启  有需要就开启,它会每次写操作都记录一条日志
由于这6个实例的配置文件除了端口以外基本相同。所以我们将redis.conf分别复制一份到剩下的7001、7002、7003、7004、7005的目录下然后修改对应的端口。
最终的配置文件看起来向下面这样
[root@localhost cluster-test]# vim /redis.conf

port

daemonize yes

dir "/opt/redis-5.0.4/cluster-test/data"

logfile "/opt/redis-5.0.4/cluster-test/log/cluster-7000.log"

dbfilename "dump-7000.rdb"

cluster-enabled yes

cluster-config-file nodes-.conf

cluster-require-full-coverage no

cluster-node-timeout

appendonly yes

---------------------------------------------------------------------

[root@localhost cluster-test]# vim /redis.conf

port

daemonize yes

dir "/opt/redis-5.0.4/cluster-test/data"

logfile "/opt/redis-5.0.4/cluster-test/log/cluster-7001.log"

dbfilename "dump-7001.rdb"

cluster-enabled yes

cluster-config-file nodes-.conf

cluster-require-full-coverage no

cluster-node-timeout

appendonly yes

------------------------------------------------------------------------

[root@localhost cluster-test]# vim /redis.conf

port

daemonize yes

dir "/opt/redis-5.0.4/cluster-test/data"

logfile "/opt/redis-5.0.4/cluster-test/log/cluster-7002.log"

dbfilename "dump-7002.rdb"

cluster-enabled yes

cluster-config-file nodes-.conf

cluster-require-full-coverage no

cluster-node-timeout

appendonly yes

------------------------------------------------------------------------

[root@localhost cluster-test]# vim /redis.conf

port

daemonize yes

dir "/opt/redis-5.0.4/cluster-test/data"

logfile "/opt/redis-5.0.4/cluster-test/log/cluster-7003.log"

dbfilename "dump-7003.rdb"

cluster-enabled yes

cluster-config-file nodes-.conf

cluster-require-full-coverage no

cluster-node-timeout

appendonly yes

------------------------------------------------------------------------

[root@localhost cluster-test]# vim /redis.conf

port

daemonize yes

dir "/opt/redis-5.0.4/cluster-test/data"

logfile "/opt/redis-5.0.4/cluster-test/log/cluster-7004.log"

dbfilename "dump-7004.rdb"

cluster-enabled yes

cluster-config-file nodes-.conf

cluster-require-full-coverage no

cluster-node-timeout

appendonly yes

------------------------------------------------------------------------

[root@localhost cluster-test]# vim /redis.conf

port

daemonize yes

dir "/opt/redis-5.0.4/cluster-test/data"

logfile "/opt/redis-5.0.4/cluster-test/log/cluster-7005.log"

dbfilename "dump-7005.rdb"

cluster-enabled yes

cluster-config-file nodes-.conf

cluster-require-full-coverage no

cluster-node-timeout

appendonly yes
redis.conf
创建好配置文件,在创建对应的cluster工作目录和日志文件目录
[root@localhost ~]# mkdir -p /opt/redis-5.0./cluster-test/data

[root@localhost ~]# mkdir -p /opt/redis-5.0./cluster-test/log
3、运行集群
这里需要注意:
如果你使用的是Redis 5,我们可以使用redis-cli中的Redis集群命令行实用程序来创建新的集群、检查或重新分割现有集群,等等。
对于Redis版本3或4,需要使用redis-trib。可以在Redis源代码发行版的src目录中找到它。需要安装redis gem才能运行redis-trib,而gem需要reby环境,所以需要安装reby
如果是redis版本5以下的请按照下面安装reby环境和redis.gem。
3.1安装reby环境
[root@localhost cluster-test]# wget -P /opt/source https://cache.ruby-lang.org/pub/ruby/2.3/ruby-2.3.1.tar.gz
[root@localhost cluster-test]# tar -zxvf /opt/source/ruby-2.3.1.tar.gz -C /opt/
[root@localhost cluster-test]# cd /opt/ruby-2.3.1/
[root@localhost ruby-2.3.1]# ./configure --prefix=/opt/ruby231
[root@localhost ruby-2.3.1]# make && make install
[root@localhost bin]# vim /etc/profile  // 添加环境变量
PATH="/opt/python362/bin:/usr/local/sbin:/usr/local/bin:/usr/sbin:/usr/bin:/root/bin:/opt/tngx230/sbin:/opt/node-v8.6.0-linux-x64/bin:/opt/ruby231/bin"
[root@localhost src]# cp /opt/ruby231/bin/ruby /usr/local/  // redis-trib.rb会到这里去找reby
[root@localhost src]# cp /opt/ruby231/bin/gem /usr/local/
[root@localhost bin]# source /etc/profile  // 使配置立即生效
3.2安装redis.gem
[root@localhost ~]# gem install redis
3.3开启redis实例
[root@localhost ~]# redis-server /opt/redis-5.0./cluster-test//redis.conf

[root@localhost ~]# redis-server /opt/redis-5.0./cluster-test//redis.conf

[root@localhost ~]# redis-server /opt/redis-5.0./cluster-test//redis.conf

[root@localhost ~]# redis-server /opt/redis-5.0./cluster-test//redis.conf

[root@localhost ~]# redis-server /opt/redis-5.0./cluster-test//redis.conf

[root@localhost ~]# redis-server /opt/redis-5.0./cluster-test//redis.conf
开启成功后,看起来像下面这样:

3.3运行集群
[root@localhost src]# ./redis-trib.rb create --replicas 127.0.0.1: 127.0.0.1: 127.0.0.1: 127.0.0.1: 127.0.0.1: 127.0.0.1:
如果是redis5.0以上版本会有如下提示信息:
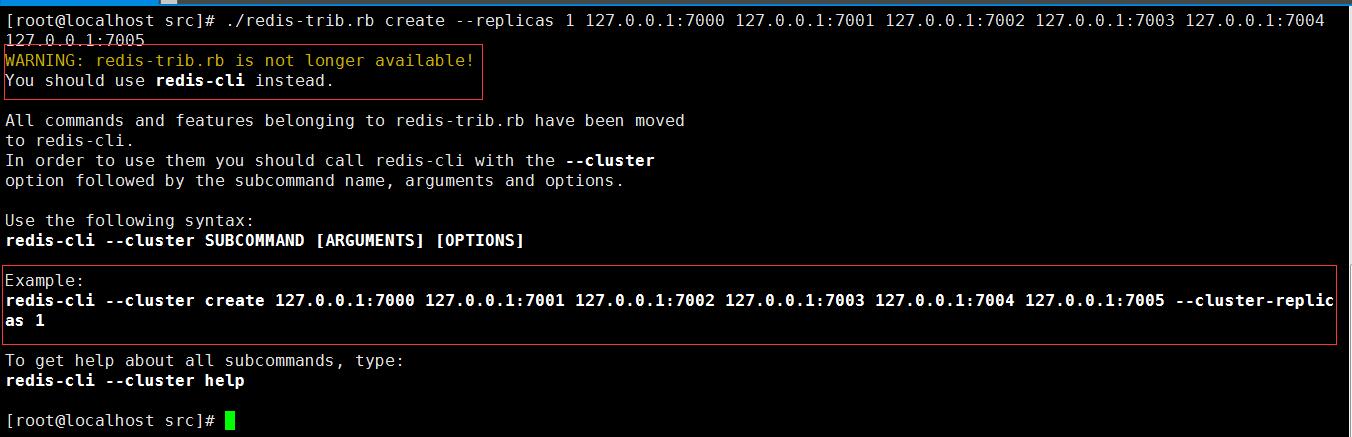
对于3或4版本的盆友,我也就只能走到这里了,下面我将以5.0版本进行操作。
4、运行集群
[root@localhost src]# redis-cli --cluster create 127.0.0.1: 127.0.0.1: 127.0.0.1: 127.0.0.1: 127.0.0.1: 127.0.0.1: --cluster-replicas
命令执行成功后,会看到如下界面:
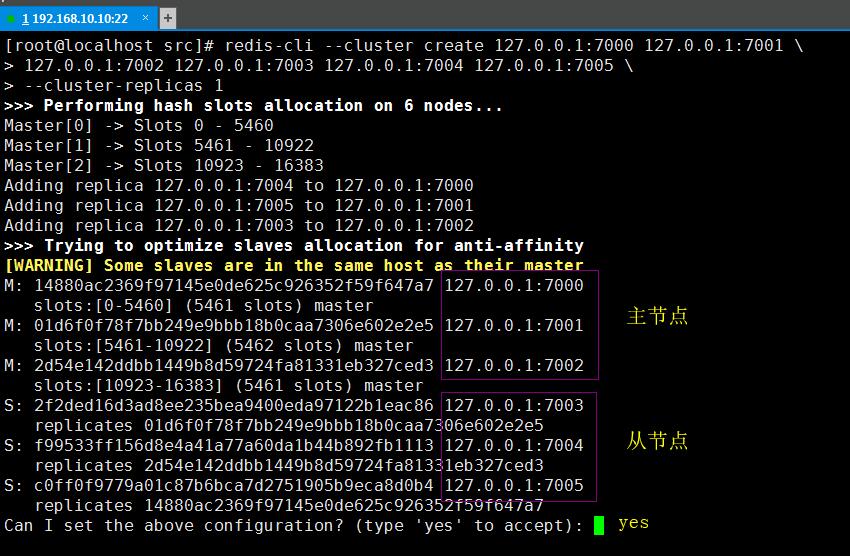
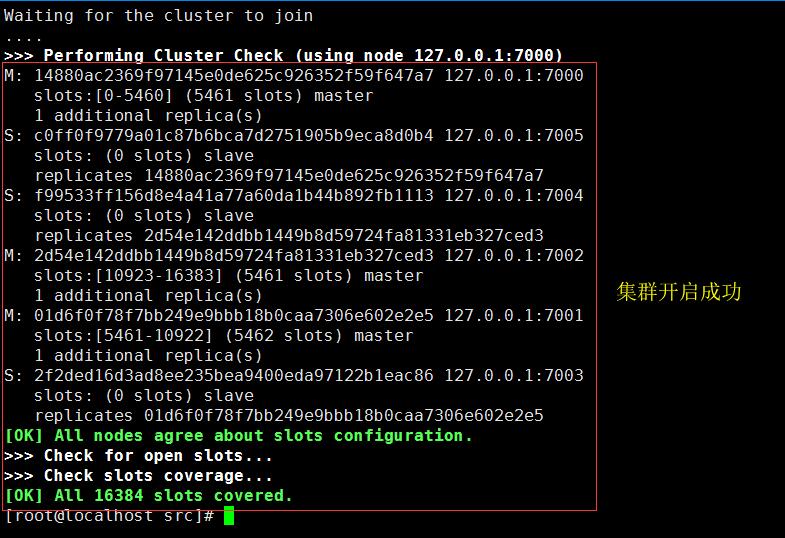
输入yes根据上面的配置进行设置开启集群,集群开启成功后如下所示:
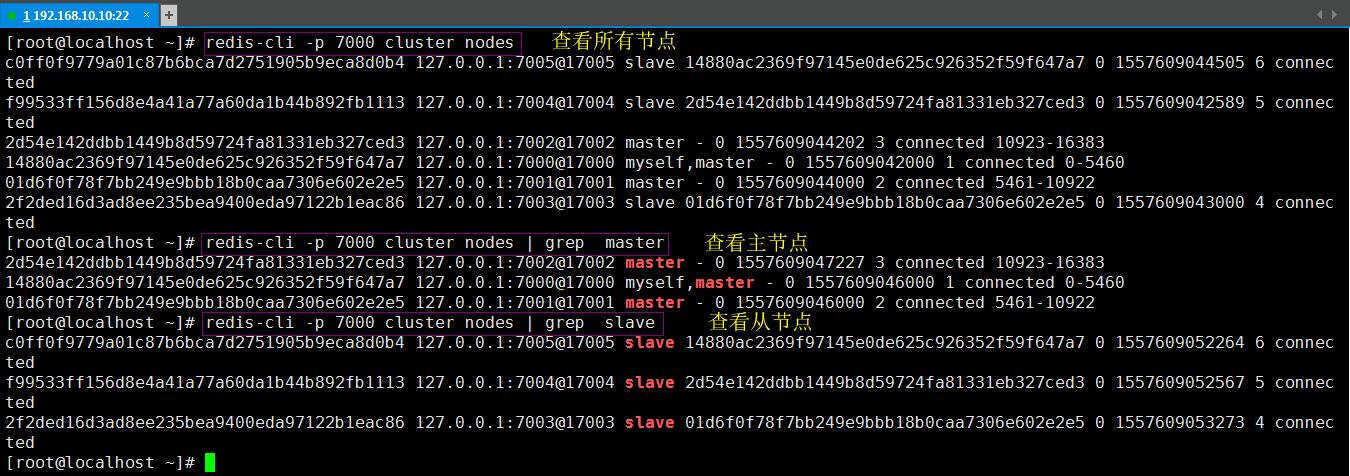
5、查看集群状态
redis-cli -p  cluster info   // 查看节点详细信息

redis-cli -p  cluster nodes  // 查看所有节点

redis-cli -p  cluster nodes | grep master  // 过滤出主节点

redis-cli -p  cluster nodes | grep slave   // 过滤出从节点
6、验证集群
开两个shell登陆redis实例
[root@localhost ~]# redis-cli -c -p    // 登陆7000的实例

[root@localhost ~]# redis-cli -c -p    // 登陆7003的实例
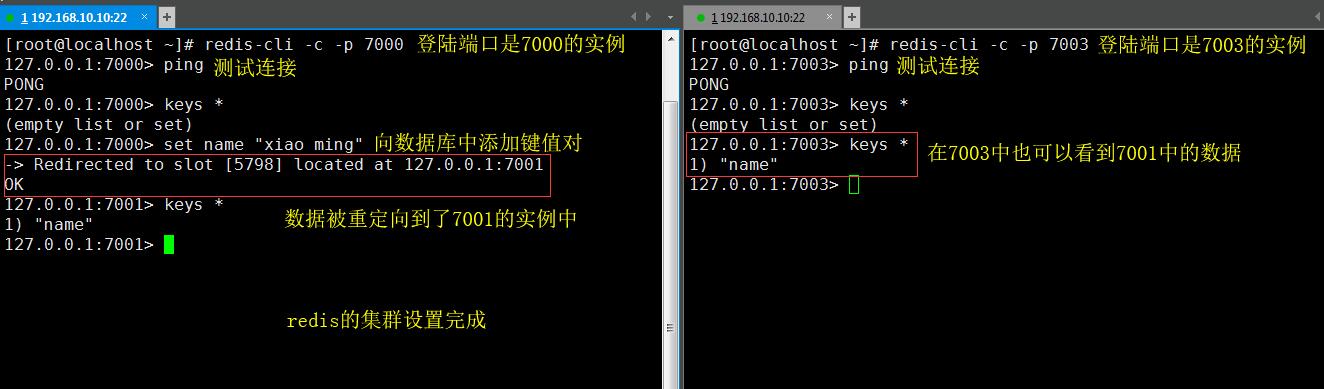
--------------------------------------------------------------------------------到此redis集群就算简单的实现了-----------------------------------------------------------------
参考文档:https://redis.io/topics/cluster-tutorial
redis集群cluster简单设置的更多相关文章
- redis单点、redis主从、redis哨兵sentinel,redis集群cluster配置搭建与使用
目录 redis单点.redis主从.redis哨兵 sentinel,redis集群cluster配置搭建与使用 1 .redis 安装及配置 1.1 redis 单点 1.1.2 在命令窗口操作r ...
- Docker快速构建Redis集群(cluster)
Docker快速构建Redis集群(cluster) 以所有redis实例运行在同一台宿主机上为例子 搭建步骤 redis集群目录清单 . ├── Dockerfile ├── make_master ...
- redis集群搭建及设置账户(转)
Redis集群搭建以及为集群设置密码 介绍安装环境与版本 用两台虚拟机模拟6个节点,一台机器3个节点,创建出3 master.3 salve 环境. redis 采用 redis-3.2.4 版本. ...
- redis集群cluster模式搭建
实验服务器 :192.168.44.139 192.168.44.138 192.168.44.144 在 192.168.44.139上操作: 将redis的包上传的新建的目录newtouc ...
- redis 集群的密码设置
redis的密码设置有2种方式 1, 这个方法我没试 修改所有Redis集群中的redis.conf文件加入: masterauth passwd123 requirepass passwd123 ...
- Redis集群-Cluster模式
我理解的此模式与哨兵模式根本区别: 哨兵模式采用主从复制模式,主和从数据都是一致的.全量数据: Cluster模式采用数据分片存储,对每个 key 计算 CRC16 值,然后对 16384 取模,可以 ...
- Spring Boot集成Redis集群(Cluster模式)
目录 集成jedis 引入依赖 配置绑定 注册 获取redis客户端 使用 验证 集成spring-data-redis 引入依赖 配置绑定 注册 获取redis客户端 使用 验证 异常处理 同样的, ...
- [个人翻译]Redis 集群教程(中)
上一篇:http://www.cnblogs.com/li-peng/p/6143709.html 官方原文地址:https://redis.io/topics/cluster-tutorial 水 ...
- Python 检测系统时间,k8s版本,redis集群,etcd,mysql,ceph,kafka
一.概述 线上有一套k8s集群,部署了很多应用.现在需要对一些基础服务做一些常规检测,比如: 系统时间,要求:k8s的每一个节点的时间,差值上下不超过2秒 k8s版本,要求:k8s的每一个节点的版本必 ...
随机推荐
- yum 安装apache php mysql
安装: yum install -y httpd php 查看版本:. rpm -qa httpd php httpd-2.2.15-54.el6.centos.x86_64 php-5.3.3-48 ...
- 其他综合-Kickstart无人值守安装系统CentOS 7
Kickstart无人值守安装系统CentOS 7 1.概述 1.1 关于PXE Preboot Execution Environment 翻译过来就是预启动执行环境:简称 PXE :传统安装操作系 ...
- 使用rider做为unity的代码编辑器
使用Rider做的编写Unity代码的IDE,记录一些与VS不相同的笔记 安装和设置方法: 我使用Rider 2019.1 + Unity3D 2018.3.4,在安装完Rider之后,在Unity中 ...
- 201871010118-唐敬博《面向对象程序设计(java)》第十一周学习总结
在博客园撰写博客(随笔),总结10周学习内容,作业格式要求如下: 博文名称:学号-姓名<面向对象程序设计(java)>第十一周学习总结(1分) 博文正文开头格式:(2分) 项目 内容 这个 ...
- 玩转淘宝SVN
http://guojun2sq.blog.163.com/blog/static/64330861201492965059142/(参考) 三步走: 1.注册账号http://code.taobao ...
- django的几个常见命令、request请求取值形式、数据库连接、
django基础知识薄弱点 几个常见的命令 #创建django项目 django-admin startproject mysite #启动django项目 python manage.py runs ...
- django之cookies,session 、中间件及跨站请求伪造
cookies 和session 为什么会有cookie? 由于http协议是无状态的,即用户访问过后,不留痕迹(状态可以理解为客户端和服务器在某次会话中产生的数据,那无状态的就以为这些数据不会被 ...
- Taro/微信小程序解析XML
npm i xmldom PS: https://www.npmjs.com/package/xmldom https://blog.csdn.net/caojie1008/article/detai ...
- xBIM初步使用
1.新建一个c#项目,在工具->NuGet程序包管理器->程序包管理控制台 输入如下命令: Install-Package Xbim.Essentials -Version 4.0.29 ...
- Django-Debug-Toolbar插件
目录 django配置插件: 介绍: 安装及配置: 优化ORM: django配置插件: ---配置Django-Debug-Toolbar 介绍: Django-Debug-Toolbar是项目开发 ...