微信小程序 - 表单验证插件WxValidate(自定义警告信息形式)
弹出的形式对于用户来说,总是不太友好的
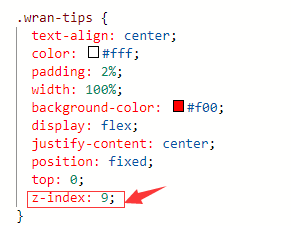
可能会出现层级问题(只需要设置一下提示的层级即可)

WxValidate内置规则
以下代码拷贝即可使用~
wxml
<form bindsubmit='submitCheckInfo'> <!-- 提示警告! -->
<view class='wran-tips' style='{{displayWarn}}'>
<text>{{warnInfo}}</text>
</view> <view class="container">
<view class='container-info'>
<view class="man-form-info">
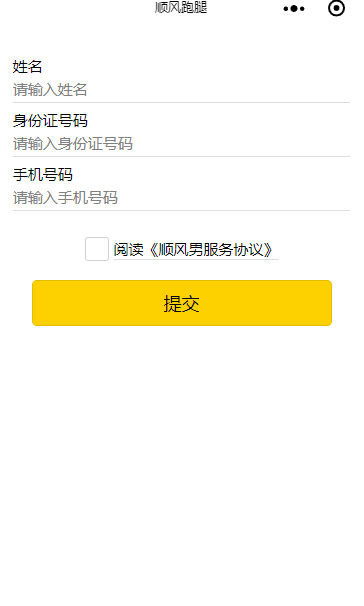
<view class='name'>姓名
<input placeholder='请输入姓名' name="name"></input>
</view>
<view class='idcard'>
身份证号码
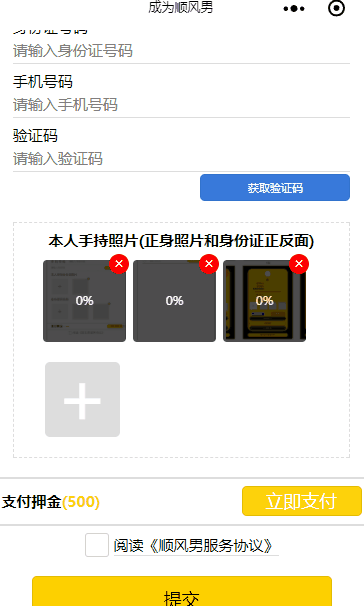
<input maxlength='18' placeholder='请输入身份证号码' type='idcard' name="idcard"></input>
</view> <view class='phone'>
手机号码
<input maxlength='11' placeholder='请输入手机号码' type='number' bindinput="phoneInput" name="tel"></input>
</view> </view>
</view> <view class='read-man-pact'>
<checkbox-group name="assistance">
<checkbox></checkbox>
<navigator class='pact'>阅读《顺风男服务协议》</navigator>
</checkbox-group>
</view> <view class='submit-form-info'>
<button form-type='submit'>提交</button>
</view> </view>
</form>
js
import WxValidate from '../../../utils/WxValidate';
Page({
/**
* 页面的初始数据
*/
data: {
// 初始化警告
displayWarn: 'display:none'
},
/**
* 生命周期函数--监听页面加载
*/
onLoad: function(options) {
// 校验规则 -rules
this.initValidate();
},
/**
* 表单验证->(可自定义验证形式)
*/
showWarnInfo(error) {
// 当前page是this对象
let page = this;
// 延时时间等待
let delayTime = 1;
// 延时等待毫秒,现设置为1000
let delayMillsecond = 1000;
// 调用显示警告函数
showWran(page, error, delayTime, delayMillsecond);
},
/**
* 表单-提交前的(校验)
*/
submitCheckInfo(e) {
const params = e.detail.value
console.log(params)
// 传入表单数据,调用验证方法
if (!this.WxValidate.checkForm(params)) {
const error = this.WxValidate.errorList[0]
this.showWarnInfo(error)
return false
}
// 验证通过以后
this.submitForm(params);
},
/**
* 表单-提交(到后端)
*/
submitForm(params) {
console.log(params);
wx.showToast({
title: '提交吧~Q!',
})
},
/**
* 表单-验证字段
*/
initValidate() {
const rules = {
name: {
required: true,
rangelength: [2, 4]
},
idcard: {
required: true,
idcard: true,
},
tel: {
required: true,
tel: true,
},
regcode: {
required: false,
minlength: 6
},
assistance: {
required: true,
assistance: true,
},
}
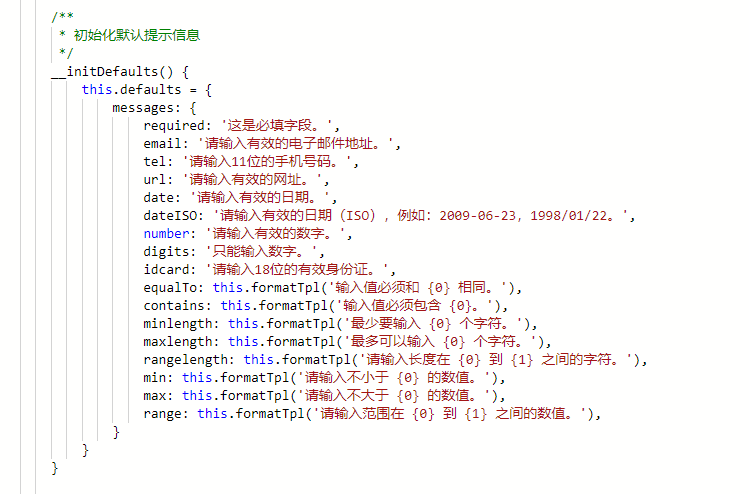
// 验证字段的提示信息,若不传则调用默认的信息
const messages = {
name: {
required: '请输入姓名',
rangelength: '请输入2~4个汉字个汉字'
},
tel: {
required: '请输入11位手机号码',
tel: '请输入正确的手机号码',
},
idcard: {
required: '请输入身份证号码',
idcard: '请输入正确的身份证号码',
},
regcode: {
required: '请输入验证码',
minlength: '请输入正确的验证码'
},
assistance: {
required: '请勾选 《顺风男服务协议》'
},
}
// 创建实例对象
this.WxValidate = new WxValidate(rules, messages)
// 自定义验证规则
this.WxValidate.addMethod('assistance', (value, param) => {
return this.WxValidate.optional(value) || (value.length >= 1 && value.length <= 2)
}, '请勾选 《顺风男服务协议》')
}
})
/**
* 可加入工具集-减少代码量
*/
function showWran(page, error, delayTime, delayMillsecond) {
let timesRun = 0;
let interval = setInterval(function() {
timesRun += delayTime;
if (timesRun === delayTime) {
clearInterval(interval);
}
page.setData({
warnInfo: error.msg,
displayWarn: 'display:none'
});
}, delayMillsecond);
page.setData({
warnInfo: error.msg,
displayWarn: 'display:block'
});
}
wxss
 @import "../../template/up-pic.wxss";

 page {

   font-size: 30rpx;

 }

 button:active {

   opacity: 0.7;

 }

 .wran-tips {

   text-align: center;

   color: #fff;

   padding: 2%;

   width: 100%;

   background-color: #f00;

   display: flex;

   justify-content: center;

   position: fixed;

   top:;

 }

 .container-info {

   padding: 5%;

   /* margin-top: 4%; */

 }

 .man-form-info {

   display: flex;

   flex-wrap: wrap;

   justify-content: center;

 }

 .man-form-info .name, .man-form-info .idcard, .man-form-info .phone,

 .man-form-info .regcode {

   display: flex;

   width: 100%;

   flex-wrap: wrap;

   margin-top: 2%;

 }

 .man-form-info input {

   width: 100%;

   border-bottom: 1px solid #ddd;

 }

 .regcode {

   position: relative;

 }

 .regcode button {

   border-radius: 10rpx;

   background-color: #3879d9;

   color: #fff;

   height: 54rpx;

   line-height: 54rpx;

   font-size: 23rpx;

   width: 300rpx;

   margin-top: -2%;

 }

 .regcode input {

   /* width: 50%; */

   width: 100%;

 }

 .code {

   position: relative;

   width: 100%;

 }

 .code button {

   position: absolute;

   top: 72rpx;

   right:;

 }

 input:hover {

   border-bottom: 2px solid #ddd;

 }

 .self-idcard-info {

   margin-top: 15%;

   display: flex;

   flex-wrap: wrap;

   justify-content: center;

   width: 100%;

   border: 1px dashed #ddd;

   padding: 2%;

 }

 .f-center {

   display: flex;

   justify-content: center;

   width: 100%;

 }

 .picture_list {

   /* justify-content: center; */

   padding: 0 7%;

 }

 .add-image {

   background-color: #ddd;

   color: #fff;

 }

 .upload_progress {

   width: 167rpx;

   height: 164rpx;

 }

 .apply {

   width: 96%;

   display: flex;

   justify-content: space-between;

   align-items: center;

   padding: 2%;

   border-top: 2px solid #ddd;

   border-bottom: 2px solid #ddd;

 }

 .apply-deposit {

   font-weight: bold;

 }

 .apply-deposit-amount {

   font-weight: bold;

   color: #fdd20c;

 }

 .apply button {

   margin:;

   padding:;

   width: 240rpx;

   height: 60rpx;

   line-height: 60rpx;

   color: #fff;

   background-color: #fdd20c;

 }

 .read-man-pact {

   display: flex;

   justify-content: center;

   padding: 2%;

 }

 .read-man-pact checkbox-group {

   display: flex;

   align-items: center;

 }

 .pact {

   border-bottom: 1px solid #ddd;

 }

 .submit-form-info {

   display: flex;

   justify-content: center;

 }

 .submit-form-info button {

   background-color: #fdd000;

   width: 80%;

   margin: 3% 0;

 }
微信小程序 - 表单验证插件WxValidate(自定义警告信息形式)的更多相关文章
- 微信小程序——表单验证插件WxValidate的二次封装(二)
在上一篇博客<微信小程序——仿jqueryValidate表单验证插件WxValidate的二次封装>中,我将WxValidate做了再次封装,简化了初始规则数据的构造,但是当有错误时页面 ...
- 微信小程序——表单验证插件WxValidate的二次封装(终极版)
微信小程序表单验证前面的两篇文章做的效果总感觉都有点不太友好,第一篇里的效果是将错误信息通过对话框形式弹出来,这种形式在web形式下早已经淘汰了:第二篇是一次性全部显示所有的错误,然后3秒后自动消失, ...
- 微信小程序 - 表单验证插件WxValidate使用
插件下载地址及官方文档:https://github.com/skyvow/wx-extend 具体的WxValidate.js文件的位置在wx-extend/src/assets/plugins/w ...
- 微信小程序——仿jqueryValidate表单验证插件WxValidate的二次封装(一)
在做web开发时,表单验证插件我们前端用的是jqueryValidate,由于个人主要精力是在后台JAVA开发上,为了让插件与后台更好的结合和使用,通过JAVA的自定义组件将表单全部重新写了一边,同时 ...
- 微信小程序-表单
wxml <view> 按钮: <button size="{{buttom.size}}" type="{{buttom.type}}" p ...
- 微信小程序-表单组件
button 按钮 注:button-hover 默认为{background-color: rgba(0, 0, 0, 0.1); opacity: 0.7;} 示例代码: /** wxss **/ ...
- 微信小程序-表单笔记
发布页——向云端数据库上传多行文字和4张图片 第6,8行注释掉和不注释掉都可以实现数据上传 var _this = this; wx.cloud.callFunction({ name: 'searc ...
- 微信小程序 --- 表单输入验证(手机号、邮箱验证、输入非空)
js代码 Page({ /** * 页面的初始数据 */ data: { indicatorDots: false, ...
- 微信小程序-表单笔记2
本地添加4张图片并显示至页面——组件位置.设置样式.列表渲染 Q.button是一张图片,需要实现点击这张图片后选择本地图片后显示至页面,不知道怎么让本地图片将button挤到右边 S.在wxml中 ...
随机推荐
- java中final修饰符的使用
1.final修饰符的用法: final可以修饰变量,被final修饰的变量被赋初始值之后,不能对它重新赋值. final可以修饰方法,被final修饰的方法不能被重写. final可以修饰类,被fi ...
- 【SQL】服务器环境下的SQL
一.大型数据库的三层体系结构 web服务器:比如在淘宝页面上,输入“牛肉干”,就是web服务器来处理,提交给应用服务器. 应用服务器:在获取到“牛肉干”这个请求后,应用服务器决定如何汇集结果,并进行相 ...
- k8s的网络学习
1.Kubernetes 网络模型 Kubernetes 采用的是基于扁平地址空间的网络模型,集群中的每个 Pod 都有自己的 IP 地址,Pod 之间不需要配置 NAT 就能直接通信.另外,同一个 ...
- java两种实现二分查找方式
二分查找法适用于 升序排列的数组,如果你所要操作的数组不是升序排序的,那么请用排序算法,排序一下. 说明:使用二分查找法相比顺序查找 节约了时间的开销,但是增加了空间使用.因为需要动态记录 起始索引 ...
- crontab自动备份MySQL数据库并删除5天前备份
1.创建备份文件夹 //备份数据库文件夹 mkdir /data/backmysql //crontab日志 mkdir /data/logs 2.创建脚本文件 db_user="xxx ...
- (6)python 循环控制
一.if语句 1.条件执行和if语句 2.else子句 3.elif子句 多个检查条件时 4.嵌套代码 5.空语句 使用pass占位 6.断言 关键字 assert 判断表达式前加上这个关键字表示, ...
- Mysql数据库的安装及配置
本文转载自http://www.cnblogs.com/xiaoluo501395377/archive/2013/04/07/3003278.html 如果要在Linux上做j2ee开发,首先得搭建 ...
- 【欧拉函数】BZOJ2190-[SDOI2012]longge的数学问题
[题目大意] 求出∑gcd(i, N)(1<=i <=N). [思路] 对于x=ak,y=bk,若gcd(a,b)=1则必有gcd(x,y)=1.枚举N的所有因数,∑gcd(i, N)=∑ ...
- Activity组件(传递数据)
(一) 1.效果图:点击按钮“调用第二个Activity”,转到第二页面,之后点击“返回数据”,将第二个页面的数据传到第一个页面 2. activity_main.xml <?x ...
- iOS 调H5方法不执行没反应的坑
调用H5的方法需要给H5传一些参数,参数中包括图片的base64字符串. 错误一: 图片转base64,后面参数不能随便写,正确做法如下 NSData *imageData = UIImageJPEG ...