
【Telerik控件学习】-建立自己的图形编辑工具(Diagram)
Telerik提供了RadDiagram控件,用于图形元素的旋转,拖拽和缩放.更重要的是,它还拓展了许多绑定的命令(复制,剪切,粘贴,回退等等).
我们可以用来组织自己的图形编辑工具.
Step1.定义图形元素容器(Shape)的基类,继承RadDiagramShape,并重写Serialize和Deserialize方法,来定制将来对象的保存或复制.
    /// <summary>

    /// 图形Shape控件

    /// </summary>

    public class FigureShape : RadDiagramShape

    {

        public FigureShape()

        {

            IsConnectorsManipulationEnabled = false;

        }

        /// <summary>

        /// 序列化

        /// </summary>

        /// <returns></returns>

        public override SerializationInfo Serialize()

        {

            SerializationInfo serializationInfo = base.Serialize();

            try

            {

                var obj = base.Content as FigureBase;

                if (obj != null)

                {

                    IFormatter formatter = new BinaryFormatter();

                    using (var ms = new MemoryStream())

                    {

                        formatter.Serialize(ms, obj);

                        serializationInfo["Figure"] = Convert.ToBase64String(ms.ToArray());

                    }

                }

            }

            catch (Exception e)

            {

                throw new Exception("序列化过程失败:" + e.Message);

            }

            return serializationInfo;

        }

        /// <summary>

        /// 反序列化

        /// </summary>

        /// <param name="serializationInfo"></param>

        public override void Deserialize(SerializationInfo serializationInfo)

        {

            base.Deserialize(serializationInfo);

            try

            {

                if (serializationInfo["Figure"] != null)

                {

                    var buffer = Convert.FromBase64String(serializationInfo["Figure"].ToString());

                    IFormatter formatter = new BinaryFormatter();

                    using (var ms = new MemoryStream(buffer))

                    {

                        Content = formatter.Deserialize(ms);

                        //绑定Shape坐标和Figure坐标

                        this.DataContext = Content;

                        var binding = new Binding("Position") { Mode = BindingMode.TwoWay };

                        this.SetBinding(PositionProperty, binding);

                    }

                }

            }

            catch (Exception e)

            {

                throw new Exception("反序列化过程失败:" + e.Message);

            }

        }

    }
Step2.定义图形元素基类,并支持可序列化
    /// <summary>

    /// 图形基类

    /// </summary>

    [Serializable]

    public abstract class FigureBase : NotificationObject

    {

        /// <summary>

        /// 图形位置

        /// </summary>

        private Point position;

        public Point Position

        {

            get { return position; }

            set { position = value; RaisePropertyChanged("Position"); }

        }

    }
Step3.定义基本图形元素,继承FigureBase,只列出一个示例,不再详述
    [Serializable]

    public class StationFig : FigureBase

    {

        /// <summary>

        /// xml节点构造

        /// </summary>

        /// <param name="node"></param>

        public StationFig(XmlNode node)

        {

            var infoNode = node.ChildNodes.Cast<XmlNode>().FirstOrDefault(s => s.Name == "use");

            var xAttri = infoNode.GetAttributeByName("x");

            var yAttri = infoNode.GetAttributeByName("y");

            this.Position = new Point(double.Parse(xAttri), double.Parse(yAttri));

            this.StationType = infoNode.GetAttributeByName("class");

        }

        /// <summary>

        /// 厂站类型(220kv,500kv)

        /// </summary>

        private string stationType;

        public string StationType

        {

            get { return stationType; }

            set { stationType = value; RaisePropertyChanged("StationType"); }

        }

    }
Step4.定义图形元素的样式
    <!--线路样式-->

    <DataTemplate DataType="{x:Type svgFigs:LineFig}" >

        <Path x:Name="path" StrokeThickness="" Data="{Binding Path}"/>

        <DataTemplate.Triggers>

            <DataTrigger Binding="{Binding LineType}" Value="kv500">

                <Setter Property="Stroke" Value="Yellow" TargetName="path"/>

            </DataTrigger>

            <DataTrigger Binding="{Binding LineType}" Value="kv220">

                <Setter Property="Stroke" Value="White" TargetName="path"/>

            </DataTrigger>

        </DataTemplate.Triggers>

    </DataTemplate>

    <!--厂站样式-->

    <DataTemplate DataType="{x:Type svgFigs:StationFig}" >

        <Ellipse x:Name="ellipse" Width="" Height="" Fill="Transparent" StrokeThickness=""/>

        <DataTemplate.Triggers>

            <DataTrigger Binding="{Binding StationType}" Value="kv500">

                <Setter Property="Stroke" Value="Yellow" TargetName="ellipse"/>

            </DataTrigger>

            <DataTrigger Binding="{Binding StationType}" Value="kv220">

                <Setter Property="Stroke" Value="White" TargetName="ellipse"/>

            </DataTrigger>

        </DataTemplate.Triggers>

    </DataTemplate>

    <!--文本样式-->

    <DataTemplate DataType="{x:Type svgFigs:TextFig}" >

        <TextBlock x:Name="text" Foreground="White" FontFamily="{Binding FontFamily}" FontSize="{Binding FontSize}" Text="{Binding Text}"/>

    </DataTemplate>
Step5.界面编辑工具面板
<telerik:RadDiagram x:Name="diagram"  MinWidth="" BorderThickness=""

Background="Black"

IsBackgroundSurfaceVisible="False"

IsSnapToItemsEnabled="False"

IsSnapToGridEnabled="False"/>
Step6.关键步骤,定义Shape容器中ContentTemplate显示内容
<Style TargetType="{x:Type common:FigureShape}">

      <Setter Property="BorderBrush" Value="{x:Null}"/>

      <Setter Property="Background" Value="Transparent"/>

      <Setter Property="Position" Value="{Binding Position,Mode=TwoWay}"/>

       <Setter Property="Content" Value="{Binding}"/>

       <Setter Property="Template">

           <Setter.Value>

                <ControlTemplate TargetType="{x:Type common:FigureShape}">

                      <ContentPresenter/>

                 </ControlTemplate>

            </Setter.Value>

        </Setter>

</Style>
Step7.增加图形元素到面板
        /// <summary>

        /// 增加图元到绘图面板

        /// </summary>

        /// <param name="figure"></param>

        private void AddFigureToDiagram(FigureBase figure)

        {

            var shape = new FigureShape() { DataContext = figure };

            diagram.AddShape(shape);

        }
编辑工具示例:(支持图元的旋转,移动,缩放,复制粘贴等操作,属性编辑,缩略图导航...)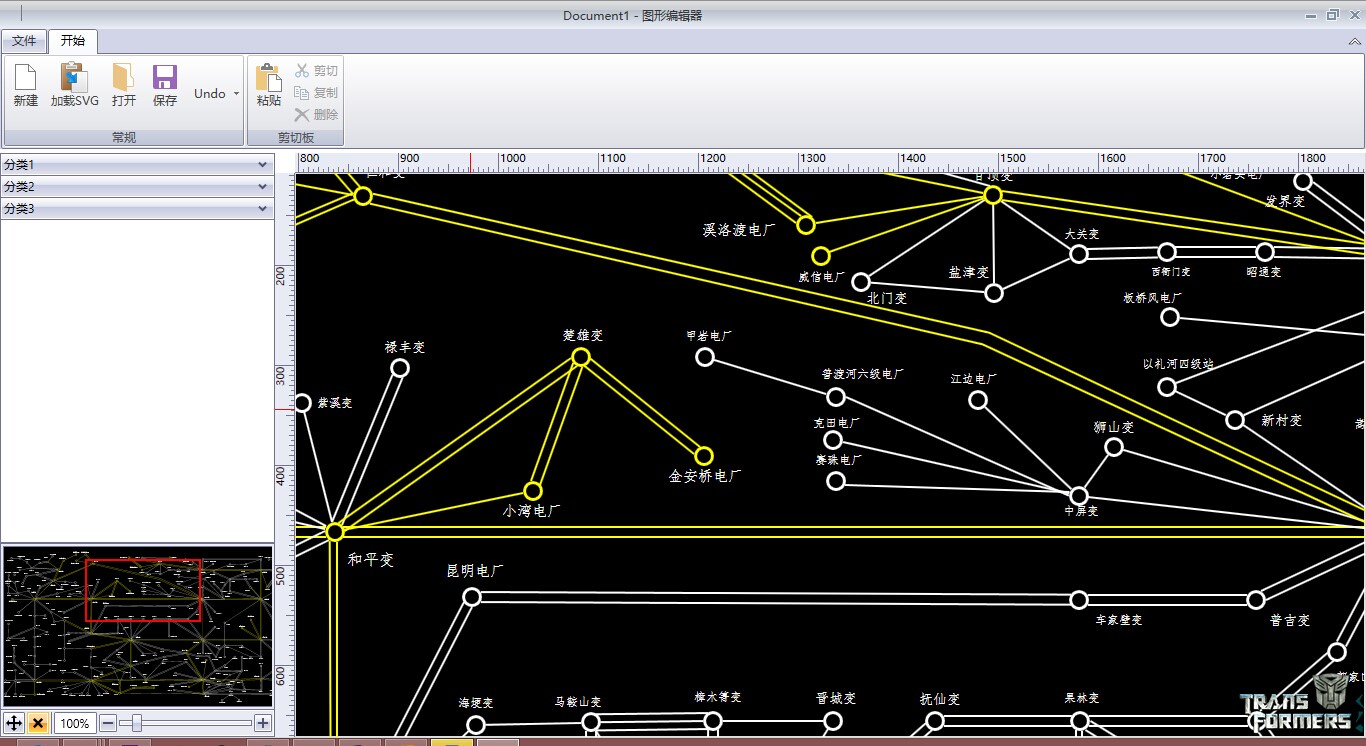
【Telerik控件学习】-建立自己的图形编辑工具(Diagram)的更多相关文章
- 【Telerik控件学习】-制作3D效果的柱状图(ChartView)
首先,定义柱状图,并设置自定义的DataTemplate <telerik:RadCartesianChart > <telerik:RadCartesianChart.Horizo ...
- IOS学习笔记(四)之UITextField和UITextView控件学习
IOS学习笔记(四)之UITextField和UITextView控件学习(博客地址:http://blog.csdn.net/developer_jiangqq) Author:hmjiangqq ...
- DevExpress控件学习总结(转)
DevExpress控件学习总结 1.Navigation & Layout 1.1 Bar Manager 如果想在窗体或用户控件(user control)上添加工具条(bars)或弹 ...
- Android Material Design控件学习(三)——使用TextInputLayout实现酷市场登录效果
前言 前两次,我们学习了 Android Material Design控件学习(一)--TabLayout的用法 Android Material Design控件学习(二)--Navigation ...
- WinFrom 第三方控件 TeleRik控件
1.首先从工具-拓展与应用中下载安装 TeleRik WinFroms VsExtensions TeleRik dll文件 2.工具箱控件 将Telerik控件更新过来 3.新建一个 ...
- wxPython控件学习之wx.grid.Grid 表格控件
wxPython控件学习之wx.grid.Grid (包括对GridCellEditor和GridCelRender的扩展,以支持更多的grid cell 样式, 以GridCellColorEdit ...
- 转)delphi chrome cef3 控件学习笔记 (二)
(转)delphi chrome cef3 控件学习笔记 (二) https://blog.csdn.net/risesoft2012/article/details/51260832 原创 2016 ...
- PyQt5Day03--程序基本结构之面向对象版本+控件学习
1.程序基本结构之面向对象版本 (1)开发阶段(自己写好并测试)——设置为模版qto from PyQt5.Qt import * class Window(QWidget): def __init_ ...
- DevExpress控件学习总结 z
1.Navigation & Layout 1.1 Bar Manager 如果想在窗体或用户控件(user control)上添加工具条(bars)或弹出菜单(popup menus),我们 ...
随机推荐
- java.lang.RuntimeException: java.sql.SQLException: Too many parameters: expected 0, was given 1 Quer
如果出现类似这样的错误,检查一下是否sql语句和参数的位置对调了. java.lang.RuntimeException: java.sql.SQLException: Too many parame ...
- JavaWeb学习之JDBC API中常用的接口和类
JDBC API中包含四个常用的接口和一个类分别是: 1.Connection接口 2.Statement接口 3.PreparedStatement接口 4.ResultSet接口 5.Driver ...
- BlockingQueue<> 队列的作用
BlockingQueue<> 队列的作用 BlockingQueue 实现主要用于生产者-使用者队列 BlockingQueue 实现主要用于生产者-使用者队列,BlockingQueu ...
- 月亮之眼_KEY
[问题描述] 吉儿是一家古董店的老板娘,由于她经营有道,小店开得红红火火.昨天,吉儿无意之中得到了散落民间几百年的珍宝--月亮之眼.吉儿深知"月亮之眼"价值连城:它是由许多珍珠相连 ...
- MTVERIFY
MTVERIFY宏即适用于GUI程序也适用于console程序,这个宏内部其实是记录并解释了Win32 GetLastError()的结果.如果Win32函数失败,MTVERIFY()会打印出一段简短 ...
- Dice (II) (DP)唉,当时没做出来
Dice (II) Time Limit: 3000MS Memory Limit: 32768KB 64bit IO Format: %lld & %llu [Submit] [ ...
- qplot函数用法(转载)
http://blog.csdn.net/u014801157/article/details/24372499 写的很全面 放在这里记录下
- Vim的基本使用(二)
本文为原创文章,转载请标明出处 目录 11.可视模式 12.指定计数 13.重复命令 14.外部命令 15.命令行编辑 16.文件编辑 17.分割窗口 18.GUI命令 19.配置 20.Vim Ch ...
- 基于nginx的虚拟主机的配置
安装pcre tar -xvf pcre-8.32.tar.gz cd pcre-8.32 ./configure make;make install 安装nginx 首先创建一个nginx用户,以n ...
- Tensorflow卷积神经网络
卷积神经网络(Convolutional Neural Network, CNN)是一种前馈神经网络, 在计算机视觉等领域被广泛应用. 本文将简单介绍其原理并分析Tensorflow官方提供的示例. ...