pytorch学习笔记(5)--神经网络
(一)神经网络的骨架 nn.Module
import torch

from torch import nn

class Tudui(nn.Module):

    def __init__(self):

        super().__init__()

    def forward(self, input):

        output = input+1

        return output

tudui = Tudui()

x = torch.tensor(1.0)

output = tudui(x)

print(output)
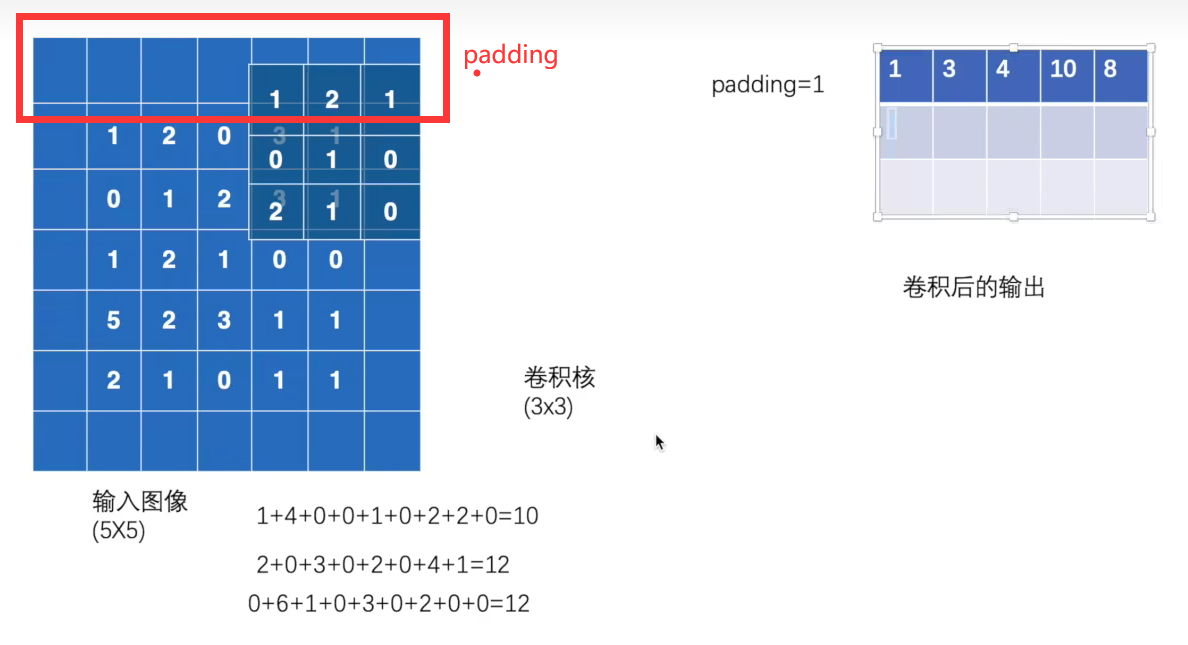
(二) 卷积操作conv2d:
stride:一次几步
padding:输入的边缘是否进行填充
import torch

import torch.nn.functional as F

input = torch.tensor([[1, 2, 0, 3, 1],

                      [0, 1, 2, 3, 1],

                      [1, 2, 1, 0, 0],

                      [5, 2, 3, 1, 1],

                      [2, 1, 0, 1, 1]])

kernel = torch.tensor([[1, 2, 1],

                       [0, 1, 0],

                       [2, 1, 0]])

input = torch.reshape(input, (1, 1, 5, 5))

kernel = torch.reshape(kernel, (1, 1, 3, 3))

print(input.shape)

print(kernel.shape)

output = F.conv2d(input, kernel, stride=1)

print(output)

output2 = F.conv2d(input, kernel, stride=2)

print(output2)

output3 = F.conv2d(input, kernel, stride=1, padding=1)

print(output3)
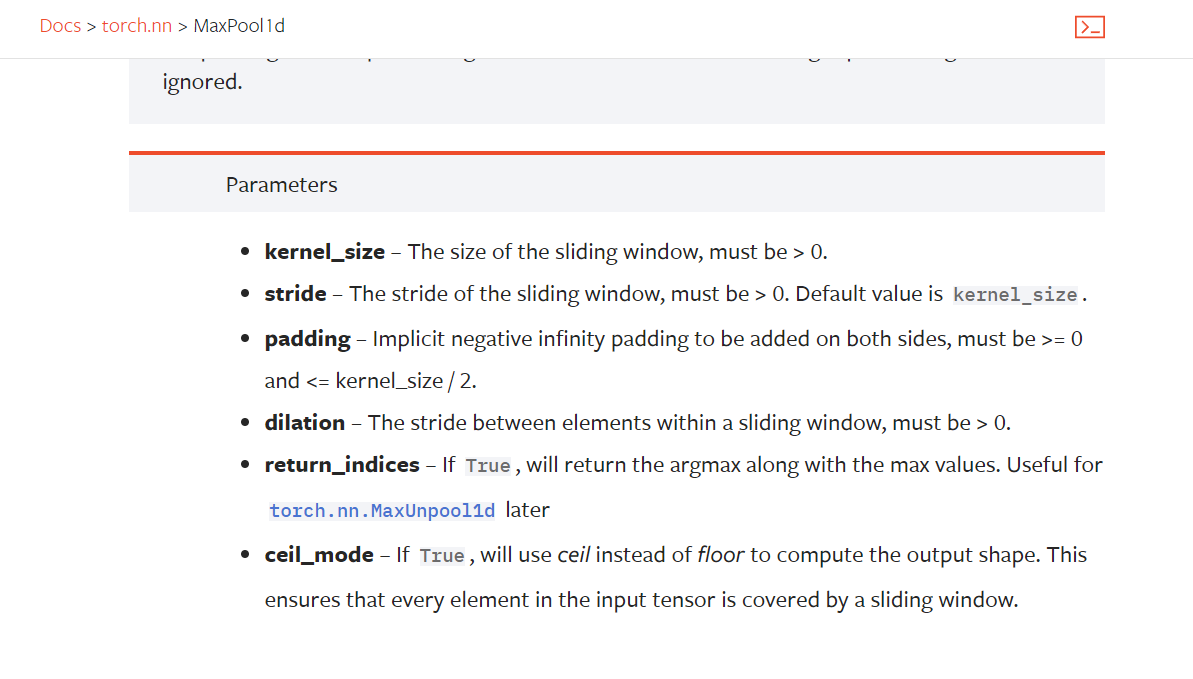
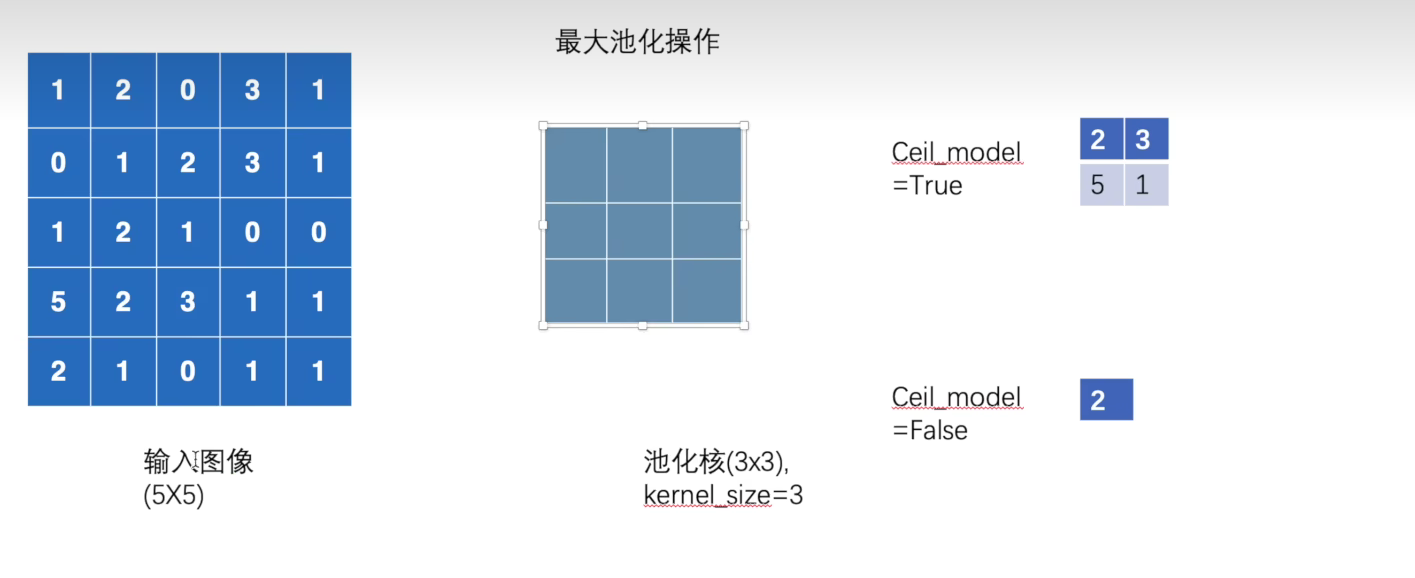
(三)MaxPool最大池化
kernel_size:
stride 不设置默认= kernel_size
import torch

from torch import nn

from torch.nn import MaxPool2d

input = torch.tensor([[1, 2, 0, 3, 1],

                      [0, 1, 2, 3, 1],

                      [1, 2, 1, 0, 0],

                      [5, 2, 3, 1, 1],

                      [2, 1, 0, 1, 1]], dtype=torch.float32)

input = torch.reshape(input, (-1, 1, 5, 5))

print(input.shape)

class Tudui(nn.Module):

    def __init__(self):

        super(Tudui, self).__init__()

        self.maxpool1 = MaxPool2d(kernel_size=3, ceil_mode=False)

    def forward(self, input):

        output = self.maxpool1(input)

        return output

tudui = Tudui()

output = tudui(input)

print(output)
import torch

import torchvision.datasets

from torch import nn

from torch.nn import MaxPool2d

from torch.utils.data import DataLoader

# input = torch.tensor([[1, 2, 0, 3, 1],

#                       [0, 1, 2, 3, 1],

#                       [1, 2, 1, 0, 0],

#                       [5, 2, 3, 1, 1],

#                       [2, 1, 0, 1, 1]], dtype=torch.float32)

# input = torch.reshape(input, (-1, 1, 5, 5))

# print(input.shape)

from torch.utils.tensorboard import SummaryWriter

dataset = torchvision.datasets.CIFAR10("../dataset", train=False, transform=torchvision.transforms.ToTensor(), download=False)

dataloader = DataLoader(dataset, batch_size=64)

class Tudui(nn.Module):

    def __init__(self):

        super(Tudui, self).__init__()

        self.maxpool1 = MaxPool2d(kernel_size=3, ceil_mode=False)

    def forward(self, input):

        output = self.maxpool1(input)

        return output

tudui = Tudui()

step = 0

writer = SummaryWriter("../logs")

for data in dataloader:

    imgs, target = data

    writer.add_images("input_MaxPool", imgs, step)

    output = tudui(imgs)

    writer.add_images("output_MaxPool", output, step)

    step = step+1

writer.close()

pytorch学习笔记(5)--神经网络的更多相关文章
- CNN学习笔记:神经网络表示
CNN学习笔记:神经网络表示 双层神经网络模型 在一个神经网络中,当你使用监督学习训练它的时候,训练集包含了输入x还有目标输出y.隐藏层的含义是,在训练集中,这些中间节点的真正数值,我们是不知道的,即 ...
- 【pytorch】pytorch学习笔记(一)
原文地址:https://pytorch.org/tutorials/beginner/deep_learning_60min_blitz.html 什么是pytorch? pytorch是一个基于p ...
- TensorFlow学习笔记——深层神经网络的整理
维基百科对深度学习的精确定义为“一类通过多层非线性变换对高复杂性数据建模算法的合集”.因为深层神经网络是实现“多层非线性变换”最常用的一种方法,所以在实际中可以认为深度学习就是深度神经网络的代名词.从 ...
- Pytorch学习笔记(二)---- 神经网络搭建
记录如何用Pytorch搭建LeNet-5,大体步骤包括:网络的搭建->前向传播->定义Loss和Optimizer->训练 # -*- coding: utf-8 -*- # Al ...
- PyTorch学习笔记6--案例2:PyTorch神经网络(MNIST CNN)
上一节中,我们使用autograd的包来定义模型并求导.本节中,我们将使用torch.nn包来构建神经网络. 一个nn.Module包含各个层和一个forward(input)方法,该方法返回outp ...
- 莫烦pytorch学习笔记(八)——卷积神经网络(手写数字识别实现)
莫烦视频网址 这个代码实现了预测和可视化 import os # third-party library import torch import torch.nn as nn import torch ...
- 【深度学习】Pytorch 学习笔记
目录 Pytorch Leture 05: Linear Rregression in the Pytorch Way Logistic Regression 逻辑回归 - 二分类 Lecture07 ...
- Pytorch学习笔记(一)——简介
一.Tensor Tensor是Pytorch中重要的数据结构,可以认为是一个高维数组.Tensor可以是一个标量.一维数组(向量).二维数组(矩阵)或者高维数组等.Tensor和numpy的ndar ...
- [PyTorch 学习笔记] 3.1 模型创建步骤与 nn.Module
本章代码:https://github.com/zhangxiann/PyTorch_Practice/blob/master/lesson3/module_containers.py 这篇文章来看下 ...
- [PyTorch 学习笔记] 3.3 池化层、线性层和激活函数层
本章代码:https://github.com/zhangxiann/PyTorch_Practice/blob/master/lesson3/nn_layers_others.py 这篇文章主要介绍 ...
随机推荐
- winform Message应用
今天遇到了一个问题,winform 中使用自定义控件时,希望在点击自定义控件时设置控件为选中状态.而且这个自定义控件在一个窗体中被创建多个. 但在自定义控件中添加子控件后,导致鼠标点击事件只能响应在子 ...
- JAVA JAR包注册成服务,开机启动,WINSW使用
1,下载工具 WINSW. https://www.aliyundrive.com/s/fACj3xk8R74 点击链接保存,或者复制本段内容,打开「阿里云盘」APP ,无需下载极速在线查看,视频原画 ...
- Navcat 密码查看,密码找回
第一步 window下打开注册表 打开以下路径 \HKEY_ CURRENT_ USER\Software\Premium Soft\Navicat\Servers 获取对应数据库信息 如图可见加密后 ...
- IE和FireFox 对FORM enctype属性的认识存在差异
IE和FireFox 对FORM enctype属性的认识存在差异,一般来说对于动态创建的form,如果因为要上传文件的原因很自然的会使用类似如下的代码: 1 //create form 2 th ...
- PyTorch Geometric(pyg)学习
参考2个链接: 第十六课.Pytorch-geometric入门(一)_tzc_fly的博客-CSDN博客_pytorch-geometric 第十七课.Pytorch-geometric入门(二)_ ...
- php curl方法封装
/** * @desc 获取设备的监控项实时值 * * @return url请求地址 * @return method 请求方法(POST,GET,PUT)等 * @return postfiel ...
- ADC采样信号RMS测量值的Verilog实现
术语"RMS"代表"Root-Mean-Squared".大多数书籍将此定义为"产生与等效直流电源相同的加热效果的交流电量",或者沿着这些线 ...
- Django-django-celery的配置
1.安装django-celery pip install django-celery 2.添加配置 demos/demos/settings.py(我的项目名为demos,这里只是示范,切勿搞混 ...
- centos7.6 dokcer-compose在线和离线安装
在线安装可参考官网文档:https://docs.docker.com/compose/install/#install-compose curl -SL https://github.com/doc ...
- 百题计划-5 codeforces 651 div2 D. Odd-Even Subsequence 二分检查
https://codeforces.com/contest/1370/problem/D 二分检查 #include<bits/stdc++.h> using namespace std ...