SMB共享
[root@samba1 ~]# yum install samba samba-client samba-common -y
因为只有真实存在的用户才能在samba中建立,所以我们新建两个测试用户
[root@samba1 ~]# useradd test
[root@samba1 ~]# id test
uid=1001(test) gid=1001(test) groups=1001(test)
[root@samba1 ~]# useradd bss
[root@samba1 ~]# id bss
uid=1002(bss) gid=1002(bss) groups=1002(bss)
[root@samba1 ~]# smbpasswd -a test ##添加一个samba用户
New SMB password:
Retype new SMB password:
Added user test.
[root@samba1 ~]# pdbedit -L ##查看samba用户
test:1001:
[root@samba1 ~]# pdbedit -x test ##删除samba用户
[root@samba1 ~]# pdbedit -L
建上两个用户用来测试:test bss
Client机器:
[root@samba2 ~]# yum install samba-client -y
[root@samba2 ~]# smbclient -L //192.168.52.145 ##访问失败
Enter root's password:
session setup failed: NT_STATUS_LOGON_FAILURE
在服务端:
[root@samba1 ~]# getsebool -a | grep samba
samba_enable_home_dirs --> on ##将此项打开
client端
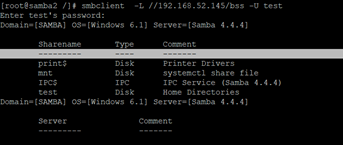
[root@samba2 ~]# smbclient -L //192.168.52.145 -U bss ##用建立的用户查看信息
Enter bss's password:
Domain=[SAMBA] OS=[Windows 6.1] Server=[Samba 4.4.4]
Sharename Type Comment
--------- ---- -------
print$ Disk Printer Drivers
IPC$ IPC IPC Service (Samba 4.4.4)
bss Disk Home Directories
Domain=[SAMBA] OS=[Windows 6.1] Server=[Samba 4.4.4]
Server Comment
--------- -------
Workgroup Master
--------- -------
[root@samba2 ~]# smbclient //192.168.52.145/bss -U bss ##用用户登陆,可以查看信息目录内容
Enter bss's password:
Domain=[SAMBA] OS=[Windows 6.1] Server=[Samba 4.4.4]
smb: \> ls
. D 0 Thu Mar 14 18:08:34 2019
.. D 0 Thu Mar 14 18:08:34 2019
.mozilla DH 0 Mon Mar 11 19:06:49 2019
.bash_logout H 18 Tue Jul 12 23:17:09 2016
.bash_profile H 193 Tue Jul 12 23:17:09 2016
.bashrc H 231 Tue Jul 12 23:17:09 2016
18093056 blocks of size 1024. 14720464 blocks available
上传文件:
###通过登陆的方式去上传
[root@samba2 ~]# cd /mnt/ ##需要在文件所在目录上传
[root@samba2 mnt]# ls
[root@samba2 mnt]# touch file
[root@samba2 mnt]# ls
file
[root@samba2 mnt]# smbclient //192.168.52.145/bss -U bss
Enter bss's password:
Domain=[SAMBA] OS=[Windows 6.1] Server=[Samba 4.4.4]
smb: \> ls
. D 0 Thu Mar 14 18:08:34 2019
.. D 0 Thu Mar 14 18:08:34 2019
.mozilla DH 0 Mon Mar 11 19:06:49 2019
.bash_logout H 18 Tue Jul 12 23:17:09 2016
.bash_profile H 193 Tue Jul 12 23:17:09 2016
.bashrc H 231 Tue Jul 12 23:17:09 2016
18093056 blocks of size 1024. 14720660 blocks available
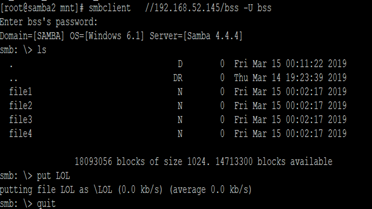
smb: \> put file
putting file file as \file (0.0 kb/s) (average 0.0 kb/s) ##上传成功
###用挂载的方式写入文件:
Client端:
[root@samba2 mnt]# mount //192.168.52.145/bss /media/ -o username=bss,password=westos
[root@samba2 mnt]# df
Filesystem 1K-blocks Used Available Use% Mounted on
/dev/sda3 18093056 3348660 14744396 19% /
devtmpfs 918960 0 918960 0% /dev
tmpfs 933644 144 933500 1% /dev/shm
tmpfs 933644 9196 924448 1% /run
tmpfs 933644 0 933644 0% /sys/fs/cgroup
/dev/sda1 2037760 172088 1865672 9% /boot
tmpfs 186732 16 186716 1% /run/user/0
/dev/sr0 3704296 3704296 0 100% /run/media/root/RHEL-7.3 Server.x86_64
//192.168.52.145/bss 18093056 3372484 14720572 19% /media
[root@samba2 mnt]# cd /media/
[root@samba2 media]# ls
file
[root@samba2 media]# touch file{1..6}
[root@samba2 media]# ls
file file1 file2 file3 file4 file5 file6
[root@samba2 media]# vim /etc/fstab ##设置开机自启,但此种方式一旦服务方端启动,会导致客户端也无法启动
//192.168.52.145/bss /media cifs defaults,username=bss,password=westos 0 0
[root@samba2 /]# umount /media/ ##先卸载已挂载的目录
[root@samba2 /]# mount -a ##通过此命令进行挂载,如果没有报错即成功
Ps:也可以将挂载命令写入/etc/rc.d/rc.local 此文件中,也可以实现开机自启,需要给予此文件执行权限
挂载命令: mount //192.168.52.145/bss /media/ -o username=bss,password=westos
共享文件:
服务端:
[root@samba1 /]# mkdir /bss
[root@samba1 /]# touch /bss/test9
[root@samba1 /]# semanage fcontext -a -t samba_share_t '/bss(/.*)?' #修改安全上下文
[root@samba1 /]# semanage fcontext -l | grep /bss
/bss(/.*)? all files system_u:object_r:samba_share_t:s0
[root@samba1 /]# restorecon -RvvF /bss/
Restorecon reset /bss context unconfined_u:object_r:default_t:s0->system_u:object_r:samba_share_t:s0
[root@samba1 /]# vim /etc/samba/smb.conf ##添加模块
[bss]
comment = bss dir
path = /bss
[root@samba1 /]# systemctl restart smb.service
客户端:
[root@samba2 /]# smbclient //192.168.52.145/bss -U bss ##客户登陆
Enter bss's password:
Domain=[SAMBA] OS=[Windows 6.1] Server=[Samba 4.4.4]
smb: \> ls
. D 0 Thu Mar 14 19:28:12 2019
.. DR 0 Thu Mar 14 19:23:39 2019
test9 N 0 Thu Mar 14 19:28:12 2019
18093056 blocks of size 1024. 14713772 blocks available
共享系统目录:
服务端:
[root@samba1 /]# vim /etc/samba/smb.conf ##添加系统目录模块
[mnt]
comment = systemctl share file
path = /mnt
[root@samba1 /]# systemctl restart smb.service
此时可以在客户端查询,但登入后无法操作
[root@samba2 /]# smbclient -L //192.168.52.145/mnt -U bss
Enter bss's password:
Domain=[SAMBA] OS=[Windows 6.1] Server=[Samba 4.4.4]
Sharename Type Comment
--------- ---- -------
print$ Disk Printer Drivers
DIR Disk bss dir
mnt Disk systemctl share file
IPC$ IPC IPC Service (Samba 4.4.4)
bss Disk Home Directories
因为是系统目录,如果更改安全上下文,会影响其他用户使用,所以对samba服务开放一些权限;
在服务端:
[root@samba1 /]# setsebool -P samba_export_all_ro on
[root@samba1 /]# setsebool -P samba_export_all_rw on
[root@samba1 /]# getsebool -a | grep samba
samba_export_all_ro --> on ##开方读写权限
samba_export_all_rw --> on
再次在客户端登陆:
[root@samba2 /]# smbclient //192.168.52.145/mnt -U test
Enter test's password:
Domain=[SAMBA] OS=[Windows 6.1] Server=[Samba 4.4.4]
smb: \> ls
. D 0 Thu Mar 10 19:05:55 2016
.. DR 0 Thu Mar 14 19:23:39 2019
file N 0 Thu Mar 14 23:23:52 2019
18093056 blocks of size 1024. 14713952 blocks available
权限管理:
[root@samba1 mnt]# vim /etc/samba/smb.conf ##在自己共享的目录中添加如下
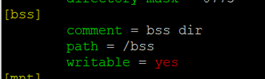
writable = yes ##代表所有用户可写
Ps:需要注意自己共享目录的可写权限。
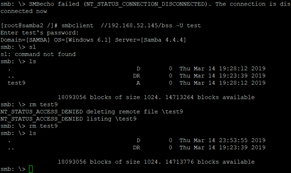
客户端登陆后可对共享目录中的内容进行删改
[root@samba2 /]# smbclient //192.168.52.145/bss -U test
Enter test's password:
Domain=[SAMBA] OS=[Windows 6.1] Server=[Samba 4.4.4]
smb: \> ls
. D 0 Thu Mar 14 19:28:12 2019
.. DR 0 Thu Mar 14 19:23:39 2019
test9 A 0 Thu Mar 14 19:28:12 2019
18093056 blocks of size 1024. 14713264 blocks available
smb: \> rm test9
指定用户可写:
在服务端
[root@samba1 bss]# vim /etc/samba/smb.conf
在自己的共享目录中添加如下策略
write list = @test ##仅写test代表仅有test用户可以操作,加上@代表test用户组的成员都可以操作。
在客户端可以使用不同用户登入测试:
bss用户:

test用户:

指定用户登陆:
[root@samba1 bss]# vim /etc/samba/smb.conf
在自己的共享目录模块下
valid users = test ##指定只有test用户可以登陆
valid users = +test ##指定只有test组的用户可以登陆
[root@samba1 bss]# systemctl restart smb.service
隐藏共享目录:
[root@samba1 bss]# vim /etc/samba/smb.conf
browseable = no ##代表将此目录隐藏
[root@samba1 bss]# systemctl restart smb.service
客户端:
匿名用户登陆:
[root@samba1 bss]# vim /etc/samba/smb.conf
map to guest = bad user ##其他用户映射到guest
guest ok = yes ##允许其他用户登陆
[root@samba1 bss]# systemctl restart smb.service
将普通用户指定为root用户;
服务端:
[root@samba1 bss]# vim /etc/samba/smb.conf
admin users = bss ##指定bss为超级用户
[root@samba1 bss]# systemctl restart smb.service
客户端测试:
在服务端查看这个文件:
我们以bss用户上传的文件,在这里却是属于root用户,这时因为我们将bss用户指定成为了超级用户

多用户挂载:
首先在客户端卸掉与服务端共享目录的挂载
[root@samba2 mnt]# yum install cifs-utils.x86_64 -y
[root@samba2 mnt]# vim /root/smbpass
##填写用户信息,此处用户必须在samba服务器上存在
username=bss
password=westos
[root@samba2 mnt]# chmod 600 /root/smbpass
[root@samba2 mnt]# mount -o credentials=/root/smbpass,sec=ntlmssp,multiuser //192.168.52.145/bss /media/
[root@samba2 mnt]# df
Filesystem 1K-blocks Used Available Use% Mounted on
/dev/sda3 18093056 3349384 14743672 19% /
devtmpfs 918960 0 918960 0% /dev
tmpfs 933644 144 933500 1% /dev/shm
tmpfs 933644 9168 924476 1% /run
tmpfs 933644 0 933644 0% /sys/fs/cgroup
/dev/sda1 2037760 172088 1865672 9% /boot
tmpfs 186732 16 186716 1% /run/user/0
/dev/sr0 3704296 3704296 0 100% /run/media/root/RHEL-7.3 Server.x86_64
//192.168.52.145/bss 18093056 3379408 14713648 19% /media ##挂载成功
[root@samba2 mnt]# cd /media/
[root@samba2 media]# ls
file1 file2 file3 file4 LOL
[root@samba2 media]# touch pps ##超级用户没有问题
[root@samba2 media]# su – test ##切换到普通用户,会发现无法查看
[test@samba2 ~]$ cd /media
[test@samba2 media]$ ls
ls: reading directory .: Permission denied
[test@samba2 media]$ cifscreds add -u bss 192.168.52.145 ##客户端的普通用户test通过
Password:
[test@samba2 media]$ ls
file1 file2 file3 file4 LOL pps
其他区用户同理
SMB共享的更多相关文章
- 第九章 通过 SMB 共享虚拟机
自 Windows Server 2012 起,微软引入了 SMB 3.0 的概念,通过 SMB 3.0,可以实现很多新的功能,包括我们介绍过的"SMB 多通道",以及将虚拟机 ...
- 通过 SMB 共享目录
在 system1 上配置SMB服务 ,要求: 1.您的 SMB 服务器必须是 STAFF 工作组的一个成员 2.共享 /common 目录,共享名必须为 common 3.只有 group8.exa ...
- 九.配置SMB共享(Samba共享)
• Samba 软件项目 – 用途:为客户机提供共享使用的文件夹 – 协议:SMB(TCP 139).CIFS(TCP 445) • 所需软件包:samba • 系统服务:smb 管理共享账号 ...
- SMB共享配置
SMB 使用命令挂载和卸载SMB文件系统 自动挂载SMB文件系统 红帽企业 ...
- 小白的linux笔记3:对外联通——开通ssh和ftp和smb共享
1.SSH的开通.https://www.cnblogs.com/DiDiao-Liang/articles/8283686.html 安装:yum install sshd或yum install ...
- [SMB share]Create SMB share under powershell / poweshell下创建本机的SMB共享
New-SmbShare -Name share-name -Path C:\share -FolderEnumerationMode AccessBased -CachingMode Documen ...
- OSX: 10.9的SMB网络共享连接可能破坏其权限设置
参见以前的Blog,“OSX: 10.9 Mavericks的重要更新技术细节(1)”,自从10.9之后,它的内核默认地使用全新的SMB2协议,这本来是令人期待的变化,不过根据这多年来和OS X系统的 ...
- smbtar - 直接备份SMB/CIFS共享资源到UNIX磁带设备的shell脚本
总览 smbtar -s server [-p password] [-x service] [-X] [-d directory] [-u user] [-t tape] [-b blocksize ...
- 让Vagrant在Windwos下支持使用NFS/SMB共享文件夹从而解决目录共享IO缓慢的问题
此问题是在拥有相同配置的环境中,项目在win10跑的慢而在win7就正常的情况下发现的,一步步调试之后发现是文件操作的相关行为变的很慢,于是考虑到可能是系统问题,后来在如下链接找到了解决办法:http ...
随机推荐
- Photo4
Story: 我手捧玫瑰,一个人,走在桥上.桥下是波澜壮阔的大海,一不小心,我就有失足的危险.海鸟的低鸣在我耳际盘旋着,浪汹涌,仿佛要把我吞噬掉.你也许奇怪,为何我一人手捧玫瑰走在桥上.只因,女骑从来 ...
- Mybatis:动态sql
动态 SQL MyBatis 的强大特性之一便是它的动态 SQL.如果你有使用 JDBC 或其他类似框架的经验,你就能体会到根据不同条件拼接 SQL 语句有多么痛苦.拼接的时候要确保不能忘了必要的空格 ...
- 白盒测试实践项目(day6)
胡俊辉负责JUint测试部分,了解JUint测试的方法,并对其他成员介绍JUint的使用,负责JUnit部分相关文档的编写,负责博客园博客的维护,负责小组成员的任务分类与管理. 李建文负责代码复审部分 ...
- Linux下oracle定时备份
1. 设置数据库空表可导出(oracel11g) 用PL/SQL登录数据库(或者其他工具) 执行: select 'alter table '||table_name||' allocate exte ...
- 什么是awt ?
http://docs.oracle.com/javase/6/docs/technotes/guides/awt/ Abstract Window Toolkit (AWT) The Abstrac ...
- [LintCode笔记了解一下]64.合并排序数组
Given two sorted integer arrays A and B, merge B into A as one sorted array. 思路: 因为A的后面的部分都是空的留出来给我们 ...
- [Postgres]合并多行到一列(转)
转自http://csk83.sinaapp.com/?p=104 在实际应用中常常遇见这样的情况,见下表,我们现在需要统计出来每年每个人的工资总和以及发放月份. user_name year mon ...
- ubuntu 编译安装 mod_wsgi
在编译过程中遇到一些问题,记录下来方便别人使用. step1: 下载.windows下面会有编译好的包,Ubuntu没有需要自己编译. 地址: https://github.com/GrahamDum ...
- 【转】Android - 线程同步
什么是线程同步? 当使用多个线程来访问同一个数据时,非常容易出现线程安全问题(比如多个线程都在操作同一数据导致数据不一致),所以我们用同步机制来解决这些问题. 实现同步机制有两个方法: 1.同步代码块 ...
- .NET WCF Return String 字符串有反斜杠的处理
应该是: {"Message":"Hello World"} 结果是:" {\"Message\":\"Hello Wo ...