
eclipse maven创建web项目
创建SSM整合项目
一.使用Eclipse中的maven插件创建web项目
1:
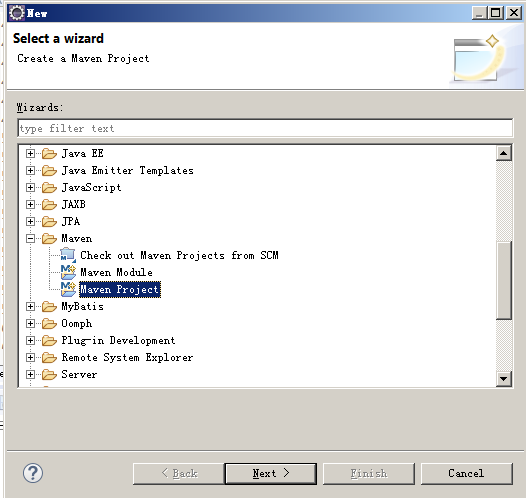
2:

3:

4:
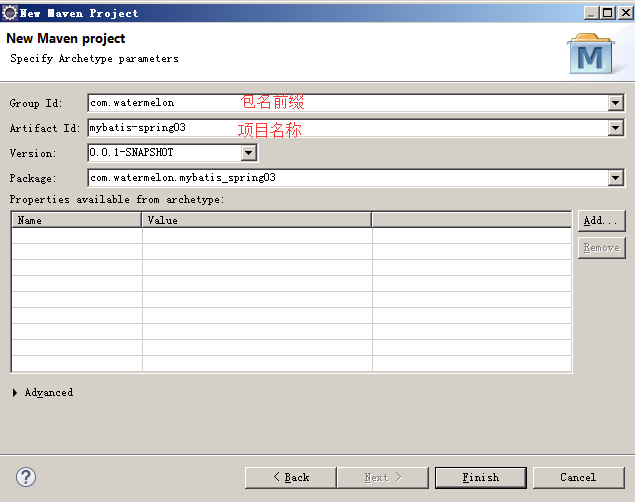
5:maven web项目创建成功。(去掉index.jsp文件重新创建jsp文件,报错消失)

6.
7.
8.Eclipse创建一个动态web项目,将其中的web.xml配置文件拷贝到maven项目中,注意修改项目名称。
二、添加xml配置
1.web.xml配置
<?xml version="1.0" encoding="UTF-8"?>

<web-app xmlns:xsi="http://www.w3.org/2001/XMLSchema-instance" xmlns="http://xmlns.jcp.org/xml/ns/javaee" xsi:schemaLocation="http://xmlns.jcp.org/xml/ns/javaee http://xmlns.jcp.org/xml/ns/javaee/web-app_3_1.xsd" id="WebApp_ID" version="3.1">

  <display-name>mybatis-spring02</display-name>

  <welcome-file-list>

    <welcome-file>index.html</welcome-file>

    <welcome-file>index.htm</welcome-file>

    <welcome-file>index.jsp</welcome-file>

    <welcome-file>default.html</welcome-file>

    <welcome-file>default.htm</welcome-file>

    <welcome-file>default.jsp</welcome-file>

  </welcome-file-list>

  <!-- web容器启动时根据contextConfigLocation配置的路径读取Spring的配置文件,然后启动Spring -->

  <context-param>

      <param-name>contextConfigLocation</param-name>

      <param-value>classpath:applicationContext.xml</param-value>

  </context-param>

  <listener>

      <listener-class>

          org.springframework.web.context.ContextLoaderListener

      </listener-class>

  </listener>

  <!-- 配置Springmvc所有的请求都要通过DispatcherServlet -->

  <servlet>

      <servlet-name>springmvc</servlet-name>

      <servlet-class>

          org.springframework.web.servlet.DispatcherServlet

      </servlet-class>

      <init-param>

          <param-name>contextConfigLocation</param-name>

          <param-value>classpath:springmvc-servlet.xml</param-value>

      </init-param>

      <load-on-startup>1</load-on-startup>

  </servlet>

  <servlet-mapping>

      <servlet-name>springmvc</servlet-name>

      <url-pattern>/</url-pattern>

  </servlet-mapping>

  <!-- 编码utf-8 -->

  <filter>

      <filter-name>SpringEncodingFilter</filter-name>

      <filter-class>

          org.springframework.web.filter.CharacterEncodingFilter

      </filter-class>

      <init-param>

          <param-name>encoding</param-name>

          <param-value>UTF-8</param-value>

      </init-param>

      <init-param>

          <param-name>forceEncoding</param-name>

          <param-value>true</param-value>

      </init-param>

  </filter>

  <filter-mapping>

      <filter-name>SpringEncodingFilter</filter-name>

      <url-pattern>/*</url-pattern>

  </filter-mapping>

</web-app>
2.springmvc-servlet.xml
<?xml version="1.0" encoding="UTF-8"?>

<beans xmlns="http://www.springframework.org/schema/beans"

    xmlns:xsi="http://www.w3.org/2001/XMLSchema-instance"

    xmlns:context="http://www.springframework.org/schema/context"

    xmlns:mvc="http://www.springframework.org/schema/mvc"

    xmlns:tx="http://www.springframework.org/schema/tx"

    xsi:schemaLocation="http://www.springframework.org/schema/mvc http://www.springframework.org/schema/mvc/spring-mvc-4.3.xsd

        http://www.springframework.org/schema/beans http://www.springframework.org/schema/beans/spring-beans.xsd

        http://www.springframework.org/schema/context http://www.springframework.org/schema/context/spring-context-4.3.xsd

        http://www.springframework.org/schema/tx http://www.springframework.org/schema/tx/spring-tx-4.3.xsd">

    <!-- 启用Controller注解支持 -->

    <mvc:annotation-driven></mvc:annotation-driven>

    <!-- 配置一个简单的静态资源映射规则 -->

    <mvc:resources location="static/" mapping="/static/**"></mvc:resources>

    <!-- 扫描Controller包下面的类 -->

    <context:component-scan base-package="com.watermelon.*.controller"></context:component-scan>

    <!-- InternalResourceViewResolver将视图名映射为URL文件 -->

    <bean class="org.springframework.web.servlet.view.InternalResourceViewResolver">

        <property name="viewClass" value="org.springframework.web.servlet.view.JstlView"></property>

        <property name="prefix" value="/WEB-INF/jsp/"></property>

        <property name="suffix" value=".jsp"></property>

    </bean>

</beans>
3.mybatis-config.xml
<?xml version="1.0" encoding="UTF-8" ?>

<!DOCTYPE configuration

    PUBLIC "-//mybatis.org//DTD Config 3.0//EN"

    "http://mybatis.org/dtd/mybatis-3-config.dtd">

<configuration>

    <settings>

        <setting name="logImpl" value="LOG4J"/>

        <setting name="cacheEnabled" value="true"/>

        <setting name="mapUnderscoreToCamelCase" value="true"/>

        <setting name="aggressiveLazyLoading" value="false"/>

    </settings>

</configuration>
4.log4j.properties
### Global logging configuration

log4j.rootLogger=ERROR, stdout

### Uncomment for MyBatis logging

log4j.logger.com.watermelon.web.mapper=TRACE

### Console output...

log4j.appender.stdout=org.apache.log4j.ConsoleAppender

log4j.appender.stdout.layout=org.apache.log4j.PatternLayout

log4j.appender.stdout.layout.ConversionPattern=%5p [%t] - %m%n
5.applicationContext.xml
<?xml version="1.0" encoding="UTF-8"?>

<beans xmlns="http://www.springframework.org/schema/beans"

    xmlns:xsi="http://www.w3.org/2001/XMLSchema-instance"

    xmlns:aop="http://www.springframework.org/schema/aop"

    xmlns:tx="http://www.springframework.org/schema/tx"

    xmlns:context="http://www.springframework.org/schema/context"

    xmlns:mybatis-spring="http://mybatis.org/schema/mybatis-spring"

    xsi:schemaLocation="http://www/springframework.org/schema/context http://www/springframework.org/schema/context/spring-context.xsd

        http://mybatis.org/schema/mybatis-spring http://mybatis.org/schema/mybatis-spring-1.2.xsd

        http://www.springframework.org/schema/beans http://www.springframework.org/schema/beans/spring-beans.xsd

        http://www.springframework.org/schema/context http://www.springframework.org/schema/context/spring-context-4.3.xsd

        http://www.springframework.org/schema/aop http://www.springframework.org/schema/aop/spring-aop-4.3.xsd

        http://www.springframework.org/schema/tx http://www.springframework.org/schema/tx/spring-tx-4.3.xsd">

     <!--spring  -->

     <context:component-scan base-package="com.watermelon.web.service.impl"/>

    <bean class="org.mybatis.spring.mapper.MapperScannerConfigurer">

        <property name="addToConfig" value="true"/>

        <property name="basePackage" value="com.watermelon.web.mapper"/>

    </bean>

     <!-- spring自动扫描 包下面的带注解的类,并注册到Sping的bean容器中 service.impl

    <context:component-scan base-package="com.watermelon.web.service.impl"></context:component-scan>-->

    <!-- mybatis-spring:scan 会扫描com.watermelon.dao包下面的所有接口当作Spring的bean配置

    <mybatis-spring:scan base-package="com.watermelon.web.mapper"/>-->

    <bean id="dataSource" class="org.apache.ibatis.datasource.pooled.PooledDataSource">

        <property name="driver" value="com.mysql.jdbc.Driver"/>

        <property name="url" value="jdbc:mysql://localhost:3306/simple"/>

        <property name="username" value="root"/>

        <property name="password" value="123456"/>

    </bean>

    <bean id="sqlSessionFactory" class="org.mybatis.spring.SqlSessionFactoryBean">

        <property name="configLocation" value="classpath:mybatis-config.xml"/>

        <property name="dataSource" ref="dataSource"/>

        <property name="mapperLocations">

            <array>

                <value>classpath:com/watermelon/web/mapper/*.xml</value>

            </array>

        </property>

        <property name="typeAliasesPackage" value="com.watermelon.web.model"/>

    </bean>

  <!-- Spring  aop事务 -->

    <aop:aspectj-autoproxy/>

    <aop:config>

        <aop:pointcut id="appService" expression="execution(* com.watermelon.*.service..*Service*.*(..))"/>

        <aop:advisor advice-ref="txAdvice" pointcut-ref="appService"/>

    </aop:config>

    <tx:advice id="txAdvice" transaction-manager="transactionManager">

        <tx:attributes>

            <tx:method name="select*" read-only="true"/>

            <tx:method name="find*" read-only="true"/>

            <tx:method name="get*" read-only="true"/>

            <tx:method name="*"/>

        </tx:attributes>

    </tx:advice>

    <bean id="transactionManager" class="org.springframework.jdbc.datasource.DataSourceTransactionManager">

        <property name="dataSource" ref="dataSource"/>

    </bean>

</beans>
项目结构:

eclipse maven创建web项目的更多相关文章
- Eclipse maven创建web项目报错Could not resolve archetype
1.下载http://repo1.maven.org/maven2/archetype-catalog.xml 通过eclipse下载和网页下载我这里都比较慢,最后用的迅雷下载 2.将本地xml文件配 ...
- (转)Maven学习总结(七)——eclipse中使用Maven创建Web项目
孤傲苍狼只为成功找方法,不为失败找借口! Maven学习总结(七)——eclipse中使用Maven创建Web项目 一.创建Web项目 1.1 选择建立Maven Project 选择File -&g ...
- Maven学习总结(7)——eclipse中使用Maven创建Web项目
Maven学习总结(七)--eclipse中使用Maven创建Web项目 一.创建Web项目 1.1 选择建立Maven Project 选择File -> New ->Project,如 ...
- Eclipse+Maven创建webapp项目<一>(转)
还在为jar下载而烦恼吗?还在为jar依赖关系而烦恼吗?还在为jar冲突而烦恼吗?强大的maven项目管理工具来拯救你们呢?自动下载jar,自动下载jar依赖包.你什么都不用做,只需要在中央仓库中co ...
- Eclipse+Maven创建webapp项目
Eclipse+Maven创建webapp项目<一> 1.开启eclipse,右键new-->other,如下图找到maven project 2.选择maven project,显 ...
- Eclipse+Maven创建webapp项目<一>
Eclipse+Maven创建webapp项目<一> 1.开启eclipse,右键new——>other,如下图找到maven project 2.选择maven project,显 ...
- Eclipse+Maven创建webapp项目<一><二><三>
转-http://www.cnblogs.com/candle806/p/3439469.html Eclipse+Maven创建webapp项目<一> 1.开启eclipse,右键new ...
- Eclipse+Maven创建webapp项目<一> (转)
Eclipse+Maven创建webapp项目<一> 1.开启eclipse,右键new——>other,如下图找到maven project 2.选择maven project,显 ...
- maven 创建web项目的标准目录结构
maven 创建web项目的标准目录结构 CreateTime--2018年4月18日21:05:37 Author:Marydon 1.标准目录介绍(开发目录) 2.在eclipse下,目录展示 ...
随机推荐
- 解决Antimalware Service Executable CPU,内存占用高的问题
1.win键+R键打开运行对话框框,输入gpedit.msc打开本地组策略编辑器(组策略):2.依次打开计算机配置-管理模板-Windows组件-Windows Defender:3.如果要关闭Win ...
- WebLoad 解析服务器返回的JSON格式内容
服务器返回Json格式的响应内容经常是以 String (txt) 形式返回给客户端.客户端需要把 文本形式的内容还原为Json格式以进一步做处理(如,取得返回内容的一个值作为下个请求的一个输入).这 ...
- 桐桐的糖果计划(vijos 1325)
背景 桐桐是一个快乐的小朋友,他生活中有许多许多好玩的事,让我们一起来看看吧…… 描述 桐桐很喜欢吃棒棒糖.他家处在一大堆糖果店的附近. 但是,他们家的区域经常出现塞车.塞人等情况,这导致他不得不等到 ...
- 【NOIP2017练习】怎样更有力气(二分答案,线性扫描)
题意:OI大师抖儿在夺得银牌之后,顺利保送pku.这一天,抖儿问长者:“我虽然已经保送了,但我的志向是为国家健康工作五十年.请问我应该怎样变得更有力气?” 长者回答:“你啊,Too Young T ...
- 动态链接 - dll和so文件区别与构成
动态链接,在可执行文件装载时或运行时,由操作系统的装载程序加载库.大多数操作系统将解析外部引用(比如库)作为加载过程的一部分.在这些系统上,可执行文件包含一个叫做import directory的 ...
- 【.Net 学习系列】-- FileSystemWatcher 监控文件夹新生成文件,并在确认文件没有被其他程序占用后将其移动到指定文件夹
监控文件夹测试程序: using System; using System.Collections.Generic; using System.IO; using System.Linq; using ...
- Android GIS开发系列计划
本系列博客的整理与写作计划如下,计划3个月(至2018.2)完成. 第一部分, 入门季 第二部分, Android基础季 第三部分, Data Flow 季 第四部分, 可视化季 第五部分, GIS常 ...
- Outlook2010 没有Exchange Server,怎么自动回复邮件?
步骤 1:创建邮件模板 单击“开始”>“新建邮件”. 在邮件正文中,键入要作为自动答复发送的邮件. 在邮件窗口中,单击“文件”>“另存为”. 在“另存为”对话框中的“保存类型”列表中,单击 ...
- C#程序如何把窗体文件从从一个项目中复制到另一个项目
一个窗体有三个文件,全部拷贝到新的项目中 在新的项目中点击显示所有文件,然后右击导入的文件,点击包括在项目中,会自动修改颜色(此时还没有被识别为窗体) 重启这个项目,三个文件已经被识别出来了 ...
- iOS社交分享Twitter、Facebook、拷贝到剪切板、LINE、及邮件
准备 首先要引进例如以下三个framework: MessageUI.framework Social.framework Accounts.framework 并在实现这几个方法的地方引入下面几个头 ...