【Hadoop离线基础总结】日志采集框架Flume
日志采集框架Flume
Flume介绍
概述
Flume是一个分布式、可靠、和高可用的海量日志采集、聚合和传输的系统。它可以采集文件,socket数据包、文件、文件夹、kafka等各种形式源数据,又可以将采集到的数据 sink(下沉) 到HDFS、hbase、hive、kafka等众多外部存储系统中,因此,flume可以适用于大部分的日常数据采集场景运行机制
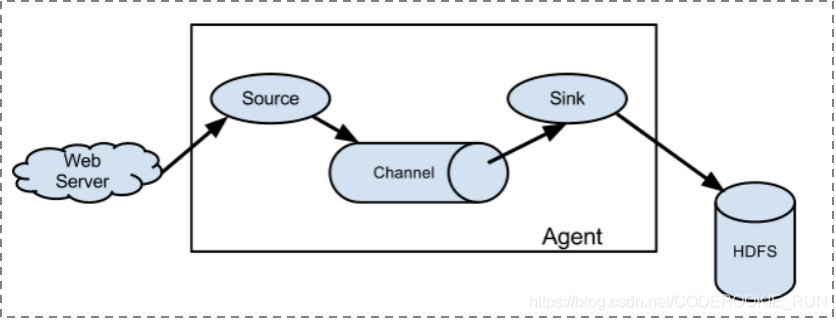
Flume分布式系统中最核心的角色是Agent,每一个Agent相当于一个数据传递员,其内部有三个组件:
Source:数据采集组件,对接数据源,采集数据
Channel:传输通道组件,主要是将Source的数据传递到sink,也可以理解为是一个缓冲区
Sink:下沉组件,用于往下一级Agent或者最终存储系统传递数据结构图
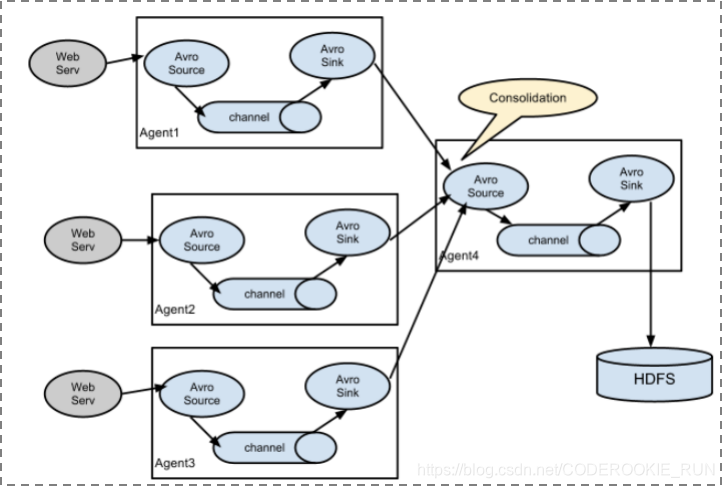
简单结构
复杂结构
Flume的安装部署
下载解压修改配置文件
前提是要有Hadoop环境
CDH版本Flume安装包下载地址:http://archive.cloudera.com/cdh5/cdh/5/
tar -zxvf flume-ng-1.6.0-cdh5.14.0.tar.gz -C /export/servers/解压下载好的flume安装包
cd /export/servers/apache-flume-1.6.0-cdh5.14.0-bin/conf到flume的conf文件夹下
cp flume-env.sh.template flume-env.sh复制出一份flume-env.sh
vim flume-env.sh编辑复制出的flume-env.sh
export JAVA_HOME=/export/servers/jdk1.8.0_141只需要配置Java路径即可开发配置文件
flume用户使用指南:http://archive.cloudera.com/cdh5/cdh/5/flume-ng-1.6.0-cdh5.14.0/FlumeUserGuide.html
vim /export/servers/apache-flume-1.6.0-cdh5.14.0-bin/conf/netcat-logger.conf在flume的conf文件夹下新建一个配置文件(名字可以自定义)# 定义这个agent中各组件的名字
a1.sources = r1
a1.sinks = k1
a1.channels = c1 # 描述和配置source组件:r1
a1.sources.r1.type = netcat
a1.sources.r1.bind = 192.168.0.30
a1.sources.r1.port = 44444 # 描述和配置sink组件:k1
a1.sinks.k1.type = logger # 描述和配置channel组件,此处使用是内存缓存的方式
a1.channels.c1.type = memory
a1.channels.c1.capacity = 1000
a1.channels.c1.transactionCapacity = 100 # 描述和配置source channel sink之间的连接关系
a1.sources.r1.channels = c1
a1.sinks.k1.channel = c1
启动配置文件
先用一个最简单的例子来测试一下程序环境是否正常
指定采集方案配置文件,在相应的节点上启动Flume Agent
bin/flume-ng agent -c conf -f conf/netcat-logger.conf -n a1 -Dflume.root.logger=INFO,console
-c conf 指定Flume自身配置文件所在目录
-f conf/netcat-logger.conf 指定描述的采集方案,也就是上面配置的文件
-n a1 指定Agent名字安装telnet准备测试
yum -y install telnet在node02机器上安装telnet客户端,用于模拟数据的发送
telnet node03 44444使用telnet模拟数据发送


Flume采集案例(一)
采集需求
某服务器的某特定目录下,会不断产生新的文件,每当有新文件出现,就需要把文件采集到HDFS中去思路
先根据flume用户使用指南定义三大要素:
数据源组件: 也就是Source,选择Spooling Directory Source,配置时写成spooldir
spooldir的特性:1.监视一个目录,只要目录中出现新文件,就会采集文件中的内容
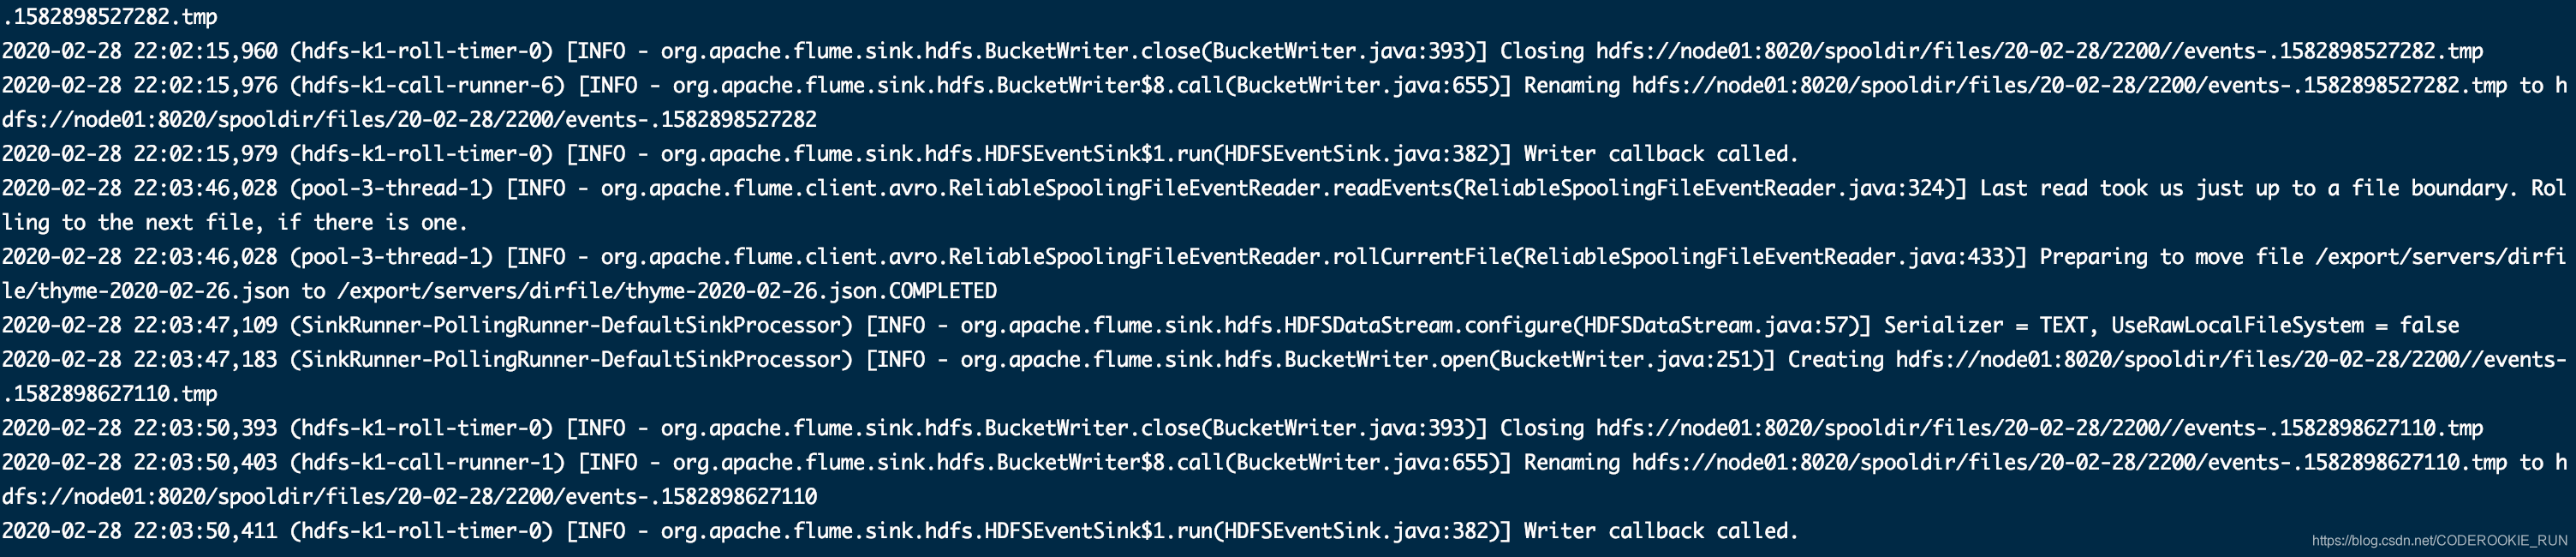
2.采集完成的文件,会被agent自动添加一个后缀:COMPLETED
3.所监视的目录中不允许重复出现相同文件名的文件
下沉组件: 也就是Sink,选择HDFS Sink,因为是要将文件采集到的HDFS中
通道组件:Channel,选择Memory Channel和File Channel都可以Flume配置文件开发
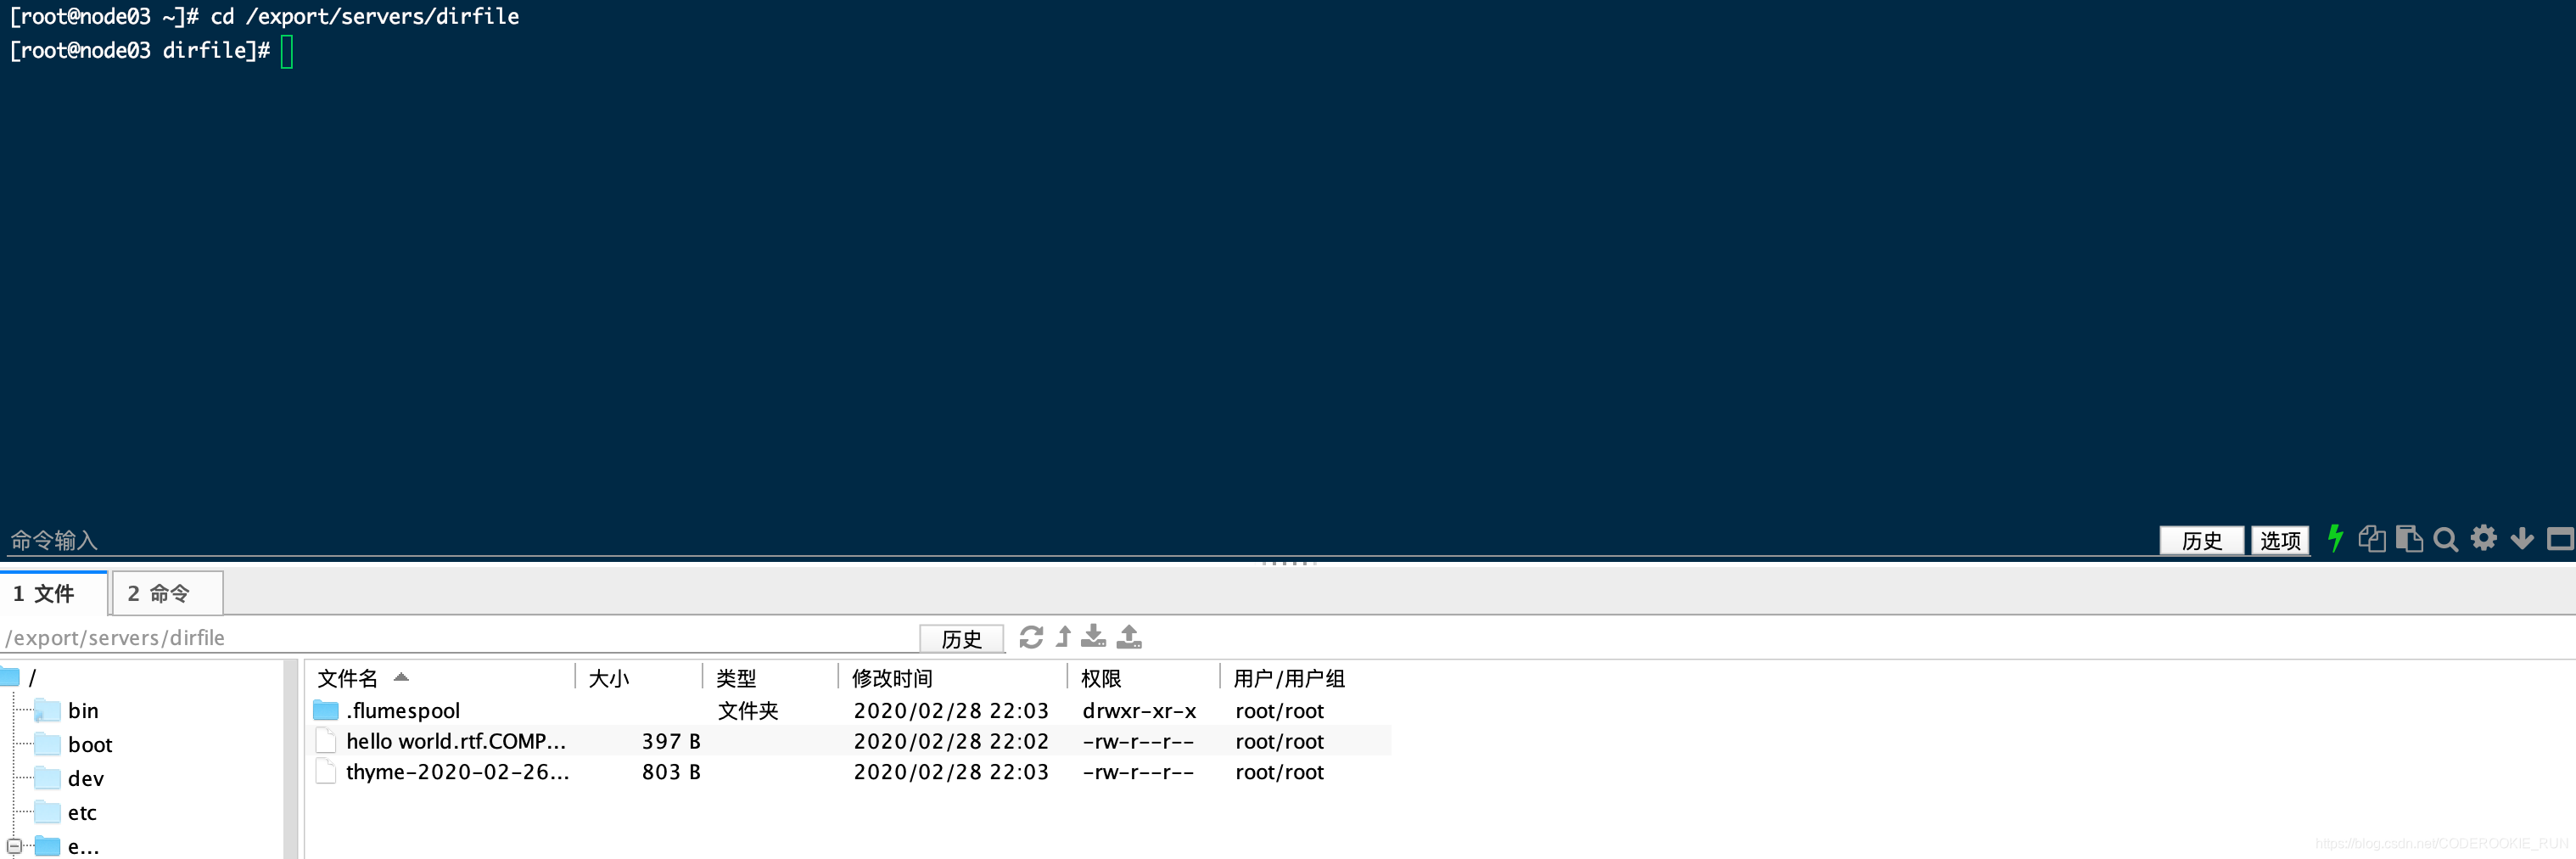
mkdir -p /export/servers/dirfile先建立一个供我们监控的文件夹
cd /export/servers/apache-flume-1.6.0-cdh5.14.0-bin/conf到Flume的conf文件夹下
vim spooldir.conf新建配置文件
注意:一定不能往监控目录中重复丢同名文件
flume比较脆弱,一旦抛异常,就会停止工作,必须重启
那么怎么判定flume停止工作呢
1.如果源数据没有变少,flume可能已经停止工作
2.如果目的地数据没有变多,flume可能也已经停止工作
那么面对flume的脆弱性又有什么办法呢?
1.可以写一个脚本,定时检测源数据有没有减少,目的数据有没有增多,如果有,则停掉当前flume并重启
2.用failover机制# 定义Agent各个组件的名字
a1.sources = r1
a1.sinks = k1
a1.channels = c1 # 描述和配置source组件
##注意:不能往监控目录中重复丢同名文件
a1.sources.r1.type = spooldir
a1.sources.r1.spoolDir = /export/servers/dirfile
a1.sources.r1.fileHeader = true # 描述和配置sink组件
a1.sinks.k1.type = hdfs
a1.sinks.k1.channel = c1
a1.sinks.k1.hdfs.path = hdfs://node01:8020/spooldir/files/%y-%m-%d/%H%M/
a1.sinks.k1.hdfs.filePrefix = events-
# 文件的采集策略,这样可以控制flume采集数据的频率,避免在HDFS上产生大量小文件
# 文件多长时间采集一次
a1.sinks.k1.hdfs.round = true
a1.sinks.k1.hdfs.roundValue = 10
a1.sinks.k1.hdfs.roundUnit = minute
# 文件多大采集一次
a1.sinks.k1.hdfs.rollInterval = 3
a1.sinks.k1.hdfs.rollSize = 20
a1.sinks.k1.hdfs.rollCount = 5
a1.sinks.k1.hdfs.batchSize = 1
a1.sinks.k1.hdfs.useLocalTimeStamp = true
#生成的文件类型,默认是Sequencefile,可用DataStream,则为普通文本
a1.sinks.k1.hdfs.fileType = DataStream # 描述和配置channel组件,此处使用是内存缓存的方式
a1.channels.c1.type = memory
a1.channels.c1.capacity = 1000
a1.channels.c1.transactionCapacity = 100 # 描述和配置source channel sink之间的连接关系
a1.sources.r1.channels = c1
a1.sinks.k1.channel = c1
启动配置文件
bin/flume-ng agent -c ./conf -f ./conf/spooldir.conf -n a1 -Dflume.root.logger=INFO,console
Flume采集案例(二)
采集需求
业务系统使用log4j生成的日志,日志内容不断增加,需要把追加到日志文件中的数据实时采集到HDFS思路
先根据flume用户使用指南定义三大要素:
数据源组件: Source,选择Exec Source,配置时写成exec
下沉组件: Sink,选择HDFS Sink
通道组件:Channel,选择Memory Channel和File Channel都可以Flume配置文件开发
cd /export/servers/apache-flume-1.6.0-cdh5.14.0-bin/conf到Flume的conf文件夹下
vim tail-file.conf新建配置文件# 定义agent各个组件名字
agent1.sources = source1
agent1.sinks = sink1
agent1.channels = channel1 # 描述并配置tail -F source1 (拦截器,暂时不用)
agent1.sources.source1.type = exec
agent1.sources.source1.command = tail -F /export/servers/taillogs/access_log
agent1.sources.source1.channels = channel1 # 配置source1主机
#agent1.sources.source1.interceptors = i1
#agent1.sources.source1.interceptors.i1.type = host
#agent1.sources.source1.interceptors.i1.hostHeader = hostname # 描述并配置sink1
agent1.sinks.sink1.type = hdfs
#a1.sinks.k1.channel = c1
agent1.sinks.sink1.hdfs.path = hdfs://node01:8020/weblog/flume-collection/%y-%m-%d/%H-%M
agent1.sinks.sink1.hdfs.filePrefix = access_log
agent1.sinks.sink1.hdfs.maxOpenFiles = 5000
agent1.sinks.sink1.hdfs.batchSize= 100
agent1.sinks.sink1.hdfs.fileType = DataStream
agent1.sinks.sink1.hdfs.writeFormat =Text
agent1.sinks.sink1.hdfs.rollSize = 102400
agent1.sinks.sink1.hdfs.rollCount = 1000000
agent1.sinks.sink1.hdfs.rollInterval = 60
agent1.sinks.sink1.hdfs.round = true
agent1.sinks.sink1.hdfs.roundValue = 10
agent1.sinks.sink1.hdfs.roundUnit = minute
agent1.sinks.sink1.hdfs.useLocalTimeStamp = true # 描述和配置channel组件,此处使用是内存缓存的方式
agent1.channels.channel1.type = memory
agent1.channels.channel1.keep-alive = 120
agent1.channels.channel1.capacity = 500000
agent1.channels.channel1.transactionCapacity = 600 # 描述和配置source channel sink之间的连接关系
agent1.sources.source1.channels = channel1
agent1.sinks.sink1.channel = channel1
启动配置文件
bin/flume-ng agent -c ./conf -f ./conf/tail-file.conf -n agent1 -Dflume.root.logger=INFO,console
Flume采集案例(三)
采集需求
第一个agent负责收集文件当中的数据,通过网络发送到第二个agent当中去,第二个agent负责接收第一个agent发送的数据,并将数据保存到hdfs上面去思路
用node02做第一个agent,node03做第二个agent
在node02的配置:
数据源组件: Source,选择Exec Source,因为第一个agent的作用是收集文件当中的数据
下沉组件: Sink,选择Avro Sink,Avro Sink主要就是用来做多级agent的串联
通道组件:Channel,选择Memory Channel
在node03的配置:
数据源组件: Source,选择Avro Source,因为第一个agent的下沉为Avro Sink,所以接收上一个agent的数据就应该用Avro Source
下沉组件: Sink,选择HDFS Sink,因为最后把数据保存到HDFS上去
通道组件:Channel,选择Memory ChannelFlume配置文件开发
先在node02安装flume
cd /export/servers/
scp -r apache-flume-1.6.0-cdh5.14.0-bin/ node02:$PWD
在node02先开发flume配置文件
cd /export/servers/apache-flume-1.6.0-cdh5.14.0-bin/conf
vim tail-avro-avro-logger.conf# 命名agent各个组件
a1.sources = r1
a1.sinks = k1
a1.channels = c1 # 描述和配置source组件
a1.sources.r1.type = exec
a1.sources.r1.command = tail -F /export/servers/taillogs/access_log
a1.sources.r1.channels = c1 # 描述和配置sink组件
##sink端的avro是一个数据发送者
a1.sinks = k1
a1.sinks.k1.type = avro
a1.sinks.k1.channel = c1
a1.sinks.k1.hostname = 192.168.0.30
a1.sinks.k1.port = 4141
a1.sinks.k1.batch-size = 10 # 描述和配置channel组件
a1.channels.c1.type = memory
a1.channels.c1.capacity = 1000
a1.channels.c1.transactionCapacity = 100 # 描述和配置source channel sink之间的连接关系
a1.sources.r1.channels = c1
a1.sinks.k1.channel = c1
将node03下的脚本和数据拷贝到node02
cd /export/servers/
scp -r ./shells/ ./taillogs/ node02:$PWD
再在node03开发flume配置文件
cd /export/servers/apache-flume-1.6.0-cdh5.14.0-bin/conf
vim avro-hdfs.conf# 命名agent的各个组件
a1.sources = r1
a1.sinks = k1
a1.channels = c1 # 描述和配置source组件
##source中的avro组件是一个接收者服务
a1.sources.r1.type = avro
a1.sources.r1.channels = c1
a1.sources.r1.bind = 192.168.0.30
a1.sources.r1.port = 4141 # 描述sink组件
a1.sinks.k1.type = hdfs
a1.sinks.k1.hdfs.path = hdfs://node01:8020/avro/hdfs/%y-%m-%d/%H%M/
a1.sinks.k1.hdfs.filePrefix = events-
a1.sinks.k1.hdfs.round = true
a1.sinks.k1.hdfs.roundValue = 10
a1.sinks.k1.hdfs.roundUnit = minute
a1.sinks.k1.hdfs.rollInterval = 3
a1.sinks.k1.hdfs.rollSize = 20
a1.sinks.k1.hdfs.rollCount = 5
a1.sinks.k1.hdfs.batchSize = 1
a1.sinks.k1.hdfs.useLocalTimeStamp = true
#生成的文件类型,默认是Sequencefile,可用DataStream,则为普通文本
a1.sinks.k1.hdfs.fileType = DataStream # 使用memory channel来缓存events
a1.channels.c1.type = memory
a1.channels.c1.capacity = 1000
a1.channels.c1.transactionCapacity = 100 # 将source和sink通过channel绑定
a1.sources.r1.channels = c1
a1.sinks.k1.channel = c1
bin/flume-ng agent -c conf -f conf/avro-hdfs.conf -n a1 -Dflume.root.logger=INFO,console在node03启动flume配置文件
bin/flume-ng agent -c conf -f conf/tail-avro-avro-logger.conf -n a1 -Dflume.root.logger=INFO,console在node02启动flume配置文件
sh /export/servers/shells/tail-file.shnode02启动shell脚本生成文件
failover高可用机制
角色分配
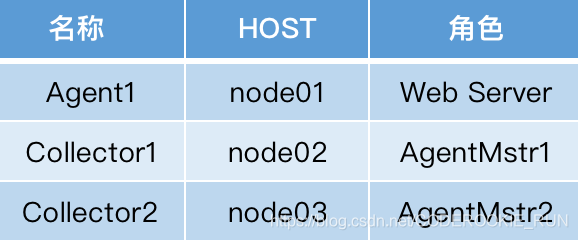
流程
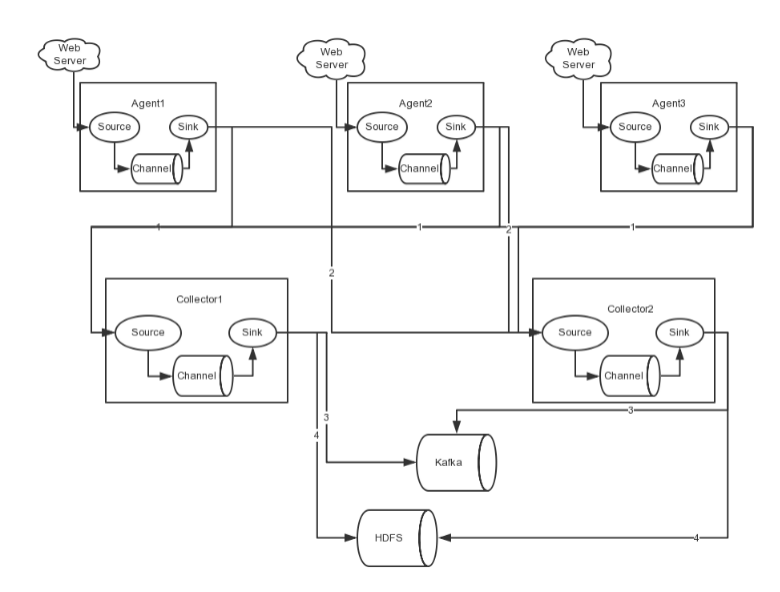
Agent1数据分别流入到Collector1和Collector2,Flume NG本身提供了Failover机制,可以自动切换和恢复。在上图中,有3个产生日志服务器分布在不同的机房,要把所有的日志都收集到一个集群中存储。开发配置Flume NG集群
1.node01安装配置flume与拷贝文件脚本
cd /export/servers/在node03执行这三个命令
scp -r apache-flume-1.6.0-cdh5.14.0-bin/ node01:$PWD
scp -r shells/ taillogs/ node01:$PWD
开发flume配置文件
cd /export/servers/apache-flume-1.6.0-cdh5.14.0-bin/conf
vim agent.conf# agent各个组件的命名
## 注意这里有两个sinks 代表了AgentMstr1和AgentMstr2
agent1.channels = c1
agent1.sources = r1
agent1.sinks = k1 k2 # 配置一个组,用来放k1,k2
agent1.sinkgroups = g1 # 描述配置agent1的channel组件
agent1.channels.c1.type = memory
agent1.channels.c1.capacity = 1000
agent1.channels.c1.transactionCapacity = 100 # 描述配置agent1的source组件
agent1.sources.r1.channels = c1
agent1.sources.r1.type = exec
agent1.sources.r1.command = tail -F /export/servers/taillogs/access_log
agent1.sources.r1.interceptors = i1 i2
agent1.sources.r1.interceptors.i1.type = static
agent1.sources.r1.interceptors.i1.key = Type
agent1.sources.r1.interceptors.i1.value = LOGIN
agent1.sources.r1.interceptors.i2.type = timestamp # 描述配置agent1的sink组件
## 因为有两个传输目标,所以应该配置两个sink组件
agent1.sinks.k1.channel = c1
agent1.sinks.k1.type = avro
agent1.sinks.k1.hostname = node02
agent1.sinks.k1.port = 52020 # 描述配置agent1的另一个sink组件
agent1.sinks.k2.channel = c1
agent1.sinks.k2.type = avro
agent1.sinks.k2.hostname = node03
agent1.sinks.k2.port = 52020 # 配置sinkgroups
agent1.sinkgroups.g1.sinks = k1 k2 # 配置failover机制
## k1权重为10,k2权重为1
agent1.sinkgroups.g1.processor.type = failover
agent1.sinkgroups.g1.processor.priority.k1 = 10
agent1.sinkgroups.g1.processor.priority.k2 = 1
agent1.sinkgroups.g1.processor.maxpenalty = 10000
2.开发node02和node03的flume配置文件
node02
cd /export/servers/apache-flume-1.6.0-cdh5.14.0-bin/conf
vim collector.conf# 命名各个组件
a1.sources = r1
a1.channels = c1
a1.sinks = k1 # 配置channel组件
a1.channels.c1.type = memory
a1.channels.c1.capacity = 1000
a1.channels.c1.transactionCapacity = 100 # 配置source组件
a1.sources.r1.type = avro
a1.sources.r1.bind = node02
a1.sources.r1.port = 52020
a1.sources.r1.interceptors = i1
a1.sources.r1.interceptors.i1.type = static
a1.sources.r1.interceptors.i1.key = Collector
a1.sources.r1.interceptors.i1.value = node02
a1.sources.r1.channels = c1 # 配置sink组件
a1.sinks.k1.type=hdfs
a1.sinks.k1.hdfs.path= hdfs://node01:8020/flume/failover/
a1.sinks.k1.hdfs.fileType=DataStream
a1.sinks.k1.hdfs.writeFormat=TEXT
a1.sinks.k1.hdfs.rollInterval=10
a1.sinks.k1.channel=c1
a1.sinks.k1.hdfs.filePrefix=%Y-%m-%d
node03
cd /export/servers/apache-flume-1.6.0-cdh5.14.0-bin/conf
vim collector.conf# 命名各个组件
a1.sources = r1
a1.channels = c1
a1.sinks = k1 # 配置channel组件
a1.channels.c1.type = memory
a1.channels.c1.capacity = 1000
a1.channels.c1.transactionCapacity = 100 # 配置source组件
a1.sources.r1.type = avro
a1.sources.r1.bind = node03
a1.sources.r1.port = 52020
a1.sources.r1.interceptors = i1
a1.sources.r1.interceptors.i1.type = static
a1.sources.r1.interceptors.i1.key = Collector
a1.sources.r1.interceptors.i1.value = node03
a1.sources.r1.channels = c1 # 配置sink组件
a1.sinks.k1.type=hdfs
a1.sinks.k1.hdfs.path= hdfs://node01:8020/flume/failover/
a1.sinks.k1.hdfs.fileType=DataStream
a1.sinks.k1.hdfs.writeFormat=TEXT
a1.sinks.k1.hdfs.rollInterval=10
a1.sinks.k1.channel=c1
a1.sinks.k1.hdfs.filePrefix=%Y-%m-%d
3.顺序启动flume
bin/flume-ng agent -c conf -f conf/collector.conf -n a1 -Dflume.root.logger=DEBUG,console启动node03的flume
bin/flume-ng agent -c conf -f conf/collector.conf -n a1 -Dflume.root.logger=DEBUG,console启动node02的flume
bin/flume-ng agent -c conf -f conf/agent.conf -n agent1 -Dflume.root.logger=DEBUG,console启动node01的flume
4.在node01启动脚本文件
cd /export/servers/shells
sh tail-file.sh
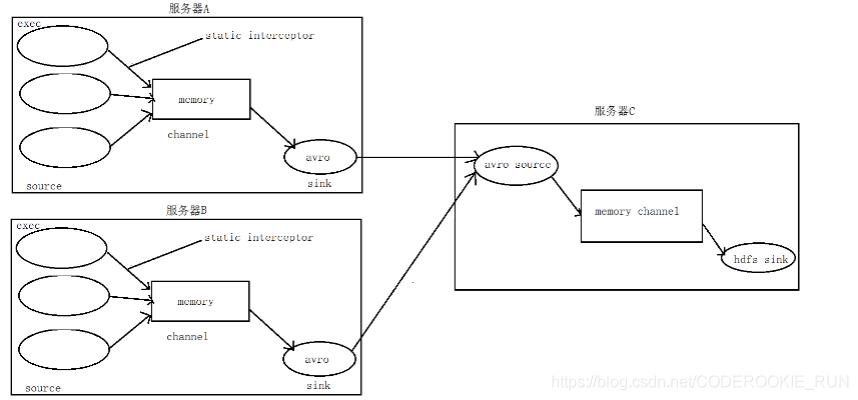
Flume静态拦截器的使用
需求
把A、B 机器中的access.log、nginx.log、web.log 采集汇总到C机器上然后统一收集到hdfs指定的目录中:
/source/logs/access/20180101/**
/source/logs/nginx/20180101/**
/source/logs/web/20180101/**场景分析
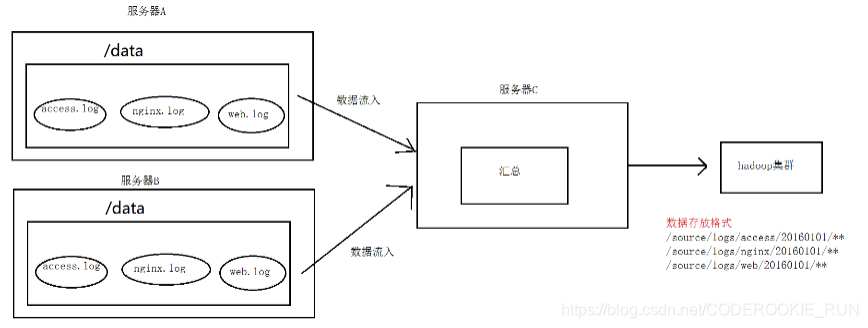
数据流程处理分析
实现
将node01、node02分别分配为采集端服务器A和服务器B,node03为服务端的服务器C
1.首先开发node01和node02的配置文件
分别在node01、node02执行以下命令
cd /export/servers/apache-flume-1.6.0-cdh5.14.0-bin/conf
vim exec_source_avro_sink.conf# Name the components on this agent
a1.sources = r1 r2 r3
a1.sinks = k1
a1.channels = c1 # Describe/configure the source
a1.sources.r1.type = exec
a1.sources.r1.command = tail -F /export/servers/taillogs/access.log
a1.sources.r1.interceptors = i1
a1.sources.r1.interceptors.i1.type = static
## static拦截器的功能就是往采集到的数据的header中插入自己定## 义的key-value对
a1.sources.r1.interceptors.i1.key = type
a1.sources.r1.interceptors.i1.value = access a1.sources.r2.type = exec
a1.sources.r2.command = tail -F /export/servers/taillogs/nginx.log
a1.sources.r2.interceptors = i2
a1.sources.r2.interceptors.i2.type = static
a1.sources.r2.interceptors.i2.key = type
a1.sources.r2.interceptors.i2.value = nginx a1.sources.r3.type = exec
a1.sources.r3.command = tail -F /export/servers/taillogs/web.log
a1.sources.r3.interceptors = i3
a1.sources.r3.interceptors.i3.type = static
a1.sources.r3.interceptors.i3.key = type
a1.sources.r3.interceptors.i3.value = web # Describe the sink
a1.sinks.k1.type = avro
a1.sinks.k1.hostname = node03
a1.sinks.k1.port = 41414 # Use a channel which buffers events in memory
a1.channels.c1.type = memory
a1.channels.c1.capacity = 20000
a1.channels.c1.transactionCapacity = 10000 # Bind the source and sink to the channel
a1.sources.r1.channels = c1
a1.sources.r2.channels = c1
a1.sources.r3.channels = c1
a1.sinks.k1.channel = c1
2.在node03上面开发flume配置文件
cd /export/servers/apache-flume-1.6.0-cdh5.14.0-bin/conf
vim avro_source_hdfs_sink.confa1.sources = r1
a1.sinks = k1
a1.channels = c1
#定义source
a1.sources.r1.type = avro
a1.sources.r1.bind = 192.168.52.120
a1.sources.r1.port =41414 #添加时间拦截器
a1.sources.r1.interceptors = i1
a1.sources.r1.interceptors.i1.type = org.apache.flume.interceptor.TimestampInterceptor$Builder #定义channels
a1.channels.c1.type = memory
a1.channels.c1.capacity = 20000
a1.channels.c1.transactionCapacity = 10000 #定义sink
a1.sinks.k1.type = hdfs
a1.sinks.k1.hdfs.path=hdfs://192.168.52.100:8020/source/logs/%{type}/%Y%m%d
a1.sinks.k1.hdfs.filePrefix =events
a1.sinks.k1.hdfs.fileType = DataStream
a1.sinks.k1.hdfs.writeFormat = Text
#时间类型
a1.sinks.k1.hdfs.useLocalTimeStamp = true
#生成的文件不按条数生成
a1.sinks.k1.hdfs.rollCount = 0
#生成的文件按时间生成
a1.sinks.k1.hdfs.rollInterval = 30
#生成的文件按大小生成
a1.sinks.k1.hdfs.rollSize = 10485760
#批量写入hdfs的个数
a1.sinks.k1.hdfs.batchSize = 10000
#flume操作hdfs的线程数(包括新建,写入等)
a1.sinks.k1.hdfs.threadsPoolSize=10
#操作hdfs超时时间
a1.sinks.k1.hdfs.callTimeout=30000 #组装source、channel、sink
a1.sources.r1.channels = c1
a1.sinks.k1.channel = c1
3.在node01与node02上面开发shell脚本,模拟数据生成
cd /export/servers/shells
vim server.sh#!/bin/bash
while true
do
date >> /export/servers/taillogs/access.log;
date >> /export/servers/taillogs/web.log;
date >> /export/servers/taillogs/nginx.log;
sleep 0.5;
done
4.顺序启动flume
bin/flume-ng agent -c conf -f conf/avro_source_hdfs_sink.conf -n a1 -Dflume.root.logger=DEBUG,console启动node03的flume实现数据收集
bin/flume-ng agent -c conf -f conf/exec_source_avro_sink.conf -n a1 -Dflume.root.logger=DEBUG,console启动node01和node02实现数据监控
sh /export/servers/shells/server.sh启动node01和node02生成脚本文件
Flume自定义拦截器
需求
在数据采集之后,通过flume的拦截器,实现不需要的数据过滤掉,并将指定的第一个字段进行加密,加密之后再往hdfs上面保存
只需要第1、2、4、6、7列的数据,并对第一个字段加密13601249301 100 200 300 400 500 600 700
13601249302 100 200 300 400 500 600 700
13601249303 100 200 300 400 500 600 700
13601249304 100 200 300 400 500 600 700
13601249305 100 200 300 400 500 600 700
13601249306 100 200 300 400 500 600 700
13601249307 100 200 300 400 500 600 700
13601249308 100 200 300 400 500 600 700
13601249309 100 200 300 400 500 600 700
13601249310 100 200 300 400 500 600 700
13601249311 100 200 300 400 500 600 700
13601249312 100 200 300 400 500 600 700
实现
1.创建maven java工程,导入jar包<repositories>
<repository>
<id>cloudera</id>
<url>https://repository.cloudera.com/artifactory/cloudera-repos/</url>
</repository>
</repositories>
<dependencies>
<dependency>
<groupId>org.apache.flume</groupId>
<artifactId>flume-ng-core</artifactId>
<version>1.6.0-cdh5.14.0</version>
<scope>provided</scope>
</dependency>
</dependencies>
2.自定义flume的拦截器
package cn.itcast.iterceptor;

import com.google.common.base.Charsets;

import org.apache.flume.Context;

import org.apache.flume.Event;

import org.apache.flume.interceptor.Interceptor;

import java.security.MessageDigest;

import java.security.NoSuchAlgorithmException;

import java.util.ArrayList;

import java.util.List;

import java.util.regex.Matcher;

import java.util.regex.Pattern;

import static cn.itcast.iterceptor.CustomParameterInterceptor.Constants.*;

public class CustomParameterInterceptor implements Interceptor {

    /** The field_separator.指明每一行字段的分隔符 */

    private final String fields_separator;

    /** The indexs.通过分隔符分割后,指明需要那列的字段 下标*/

    private final String indexs;

    /** The indexs_separator. 多个下标的分隔符*/

    private final String indexs_separator;

    /**

     *

     * @param indexs

     * @param indexs_separator

     */

    public CustomParameterInterceptor( String fields_separator,

                                       String indexs, String indexs_separator,String encrypted_field_index) {

        String f = fields_separator.trim();

        String i = indexs_separator.trim();

        this.indexs = indexs;

        this.encrypted_field_index=encrypted_field_index.trim();

        if (!f.equals("")) {

            f = UnicodeToString(f);

        }

        this.fields_separator =f;

        if (!i.equals("")) {

            i = UnicodeToString(i);

        }

        this.indexs_separator = i;

    }

    /*

     *

     * \t 制表符 ('\u0009') \n 新行(换行)符 (' ') \r 回车符 (' ') \f 换页符 ('\u000C') \a 报警

     * (bell) 符 ('\u0007') \e 转义符 ('\u001B') \cx  空格(\u0020)对应于 x 的控制符

     *

     * @param str

     * @return

     * @data:2015-6-30

     */

    /** The encrypted_field_index. 需要加密的字段下标*/

    private final String encrypted_field_index;

    public static String UnicodeToString(String str) {

        Pattern pattern = Pattern.compile("(\\\\u(\\p{XDigit}{4}))");

        Matcher matcher = pattern.matcher(str);

        char ch;

        while (matcher.find()) {

            ch = (char) Integer.parseInt(matcher.group(2), 16);

            str = str.replace(matcher.group(1), ch + "");

        }

        return str;

    }

    /*

     * @see org.apache.flume.interceptor.Interceptor#intercept(org.apache.flume.Event)

     * 单个event拦截逻辑

     */

    public Event intercept(Event event) {

        if (event == null) {

            return null;

        }

        try {

            String line = new String(event.getBody(), Charsets.UTF_8);

            String[] fields_spilts = line.split(fields_separator);

            String[] indexs_split = indexs.split(indexs_separator);

            String newLine="";

            for (int i = 0; i < indexs_split.length; i++) {

                int parseInt = Integer.parseInt(indexs_split[i]);

                //对加密字段进行加密

                if(!"".equals(encrypted_field_index)&&encrypted_field_index.equals(indexs_split[i])){

                    newLine+=StringUtils.GetMD5Code(fields_spilts[parseInt]);

                }else{

                    newLine+=fields_spilts[parseInt];

                }

                if(i!=indexs_split.length-1){

                    newLine+=fields_separator;

                }

            }

            event.setBody(newLine.getBytes(Charsets.UTF_8));

            return event;

        } catch (Exception e) {

            return event;

        }

    }

    /*

     * @see org.apache.flume.interceptor.Interceptor#intercept(java.util.List)

     * 批量event拦截逻辑

     */

    public List<Event> intercept(List<Event> events) {

        List<Event> out = new ArrayList<Event>();

        for (Event event : events) {

            Event outEvent = intercept(event);

            if (outEvent != null) {

                out.add(outEvent);

            }

        }

        return out;

    }

    /*

     * @see org.apache.flume.interceptor.Interceptor#initialize()

     */

    public void initialize() {

        // TODO Auto-generated method stub

    }

    /*

     * @see org.apache.flume.interceptor.Interceptor#close()

     */

    public void close() {

        // TODO Auto-generated method stub

    }

    /**

     * 相当于自定义Interceptor的工厂类

     * 在flume采集配置文件中通过制定该Builder来创建Interceptor对象

     * 可以在Builder中获取、解析flume采集配置文件中的拦截器Interceptor的自定义参数:

     * 字段分隔符,字段下标,下标分隔符、加密字段下标 ...等

     * @author

     *

     */

    public static class Builder implements Interceptor.Builder {

        /** The fields_separator.指明每一行字段的分隔符 */

        private  String fields_separator;

        /** The indexs.通过分隔符分割后,指明需要那列的字段 下标*/

        private  String indexs;

        /** The indexs_separator. 多个下标下标的分隔符*/

        private  String indexs_separator;

        /** The encrypted_field. 需要加密的字段下标*/

        private  String encrypted_field_index;

        /*

         * @see org.apache.flume.conf.Configurable#configure(org.apache.flume.Context)

         */

        public void configure(Context context) {

            fields_separator = context.getString(FIELD_SEPARATOR, DEFAULT_FIELD_SEPARATOR);

            indexs = context.getString(INDEXS, DEFAULT_INDEXS);

            indexs_separator = context.getString(INDEXS_SEPARATOR, DEFAULT_INDEXS_SEPARATOR);

            encrypted_field_index= context.getString(ENCRYPTED_FIELD_INDEX, DEFAULT_ENCRYPTED_FIELD_INDEX);

        }

        /*

         * @see org.apache.flume.interceptor.Interceptor.Builder#build()

         */

        public Interceptor build() {

            return new CustomParameterInterceptor(fields_separator, indexs, indexs_separator,encrypted_field_index);

        }

    }

    /**

     * 常量

     *

     */

    public static class Constants {

        /** The Constant FIELD_SEPARATOR. */

        public static final String FIELD_SEPARATOR = "fields_separator";

        /** The Constant DEFAULT_FIELD_SEPARATOR. */

        public static final String DEFAULT_FIELD_SEPARATOR =" ";

        /** The Constant INDEXS. */

        public static final String INDEXS = "indexs";

        /** The Constant DEFAULT_INDEXS. */

        public static final String DEFAULT_INDEXS = "0";

        /** The Constant INDEXS_SEPARATOR. */

        public static final String INDEXS_SEPARATOR = "indexs_separator";

        /** The Constant DEFAULT_INDEXS_SEPARATOR. */

        public static final String DEFAULT_INDEXS_SEPARATOR = ",";

        /** The Constant ENCRYPTED_FIELD_INDEX. */

        public static final String ENCRYPTED_FIELD_INDEX = "encrypted_field_index";

        /** The Constant DEFAUL_TENCRYPTED_FIELD_INDEX. */

        public static final String DEFAULT_ENCRYPTED_FIELD_INDEX = "";

        /** The Constant PROCESSTIME. */

        public static final String PROCESSTIME = "processTime";

        /** The Constant PROCESSTIME. */

        public static final String DEFAULT_PROCESSTIME = "a";

    }

    /**

     * 工具类:字符串md5加密

     */

    public static class StringUtils {

        // 全局数组

        private final static String[] strDigits = { "0", "1", "2", "3", "4", "5",

                "6", "7", "8", "9", "a", "b", "c", "d", "e", "f" };

        // 返回形式为数字跟字符串

        private static String byteToArrayString(byte bByte) {

            int iRet = bByte;

            // System.out.println("iRet="+iRet);

            if (iRet < 0) {

                iRet += 256;

            }

            int iD1 = iRet / 16;

            int iD2 = iRet % 16;

            return strDigits[iD1] + strDigits[iD2];

        }

        // 返回形式只为数字

        private static String byteToNum(byte bByte) {

            int iRet = bByte;

            System.out.println("iRet1=" + iRet);

            if (iRet < 0) {

                iRet += 256;

            }

            return String.valueOf(iRet);

        }

        // 转换字节数组为16进制字串

        private static String byteToString(byte[] bByte) {

            StringBuffer sBuffer = new StringBuffer();

            for (int i = 0; i < bByte.length; i++) {

                sBuffer.append(byteToArrayString(bByte[i]));

            }

            return sBuffer.toString();

        }

        public static String GetMD5Code(String strObj) {

            String resultString = null;

            try {

                resultString = new String(strObj);

                MessageDigest md = MessageDigest.getInstance("MD5");

                // md.digest() 该函数返回值为存放哈希值结果的byte数组

                resultString = byteToString(md.digest(strObj.getBytes()));

            } catch (NoSuchAlgorithmException ex) {

                ex.printStackTrace();

            }

            return resultString;

        }

    }

}
3.打包上传服务器
打包拦截器后,将jar包上传到flume的lib目录下
4.开发flume配置文件
在node03执行
cd /export/servers/apache-flume-1.6.0-cdh5.14.0-bin/conf
vim spool-interceptor-hdfs.confa1.channels = c1
a1.sources = r1
a1.sinks = s1
#channel
a1.channels.c1.type = memory
a1.channels.c1.capacity=100000
a1.channels.c1.transactionCapacity=50000
#source
a1.sources.r1.channels = c1
a1.sources.r1.type = spooldir
a1.sources.r1.spoolDir = /export/servers/intercept
a1.sources.r1.batchSize= 50
a1.sources.r1.inputCharset = UTF-8 a1.sources.r1.interceptors =i1 i2
a1.sources.r1.interceptors.i1.type =cn.itcast.iterceptor.CustomParameterInterceptor$Builder
a1.sources.r1.interceptors.i1.fields_separator=\\u0009
a1.sources.r1.interceptors.i1.indexs =0,1,3,5,6
a1.sources.r1.interceptors.i1.indexs_separator =\\u002c
a1.sources.r1.interceptors.i1.encrypted_field_index =0
a1.sources.r1.interceptors.i2.type = org.apache.flume.interceptor.TimestampInterceptor$Builder
#sink
a1.sinks.s1.channel = c1
a1.sinks.s1.type = hdfs
a1.sinks.s1.hdfs.path =hdfs://192.168.52.100:8020/flume/intercept/%Y%m%d
a1.sinks.s1.hdfs.filePrefix = event
a1.sinks.s1.hdfs.fileSuffix = .log
a1.sinks.s1.hdfs.rollSize = 10485760
a1.sinks.s1.hdfs.rollInterval =20
a1.sinks.s1.hdfs.rollCount = 0
a1.sinks.s1.hdfs.batchSize = 1500
a1.sinks.s1.hdfs.round = true
a1.sinks.s1.hdfs.roundUnit = minute
a1.sinks.s1.hdfs.threadsPoolSize = 25
a1.sinks.s1.hdfs.useLocalTimeStamp = true
a1.sinks.s1.hdfs.minBlockReplicas = 1
a1.sinks.s1.hdfs.fileType =DataStream
a1.sinks.s1.hdfs.writeFormat = Text
a1.sinks.s1.hdfs.callTimeout = 60000
a1.sinks.s1.hdfs.idleTimeout =60
5.创建文件夹,上传测试数据
mkdir -p /export/servers/intercept
6.启动flume
bin/flume-ng agent -c conf -f conf/spool-interceptor-hdfs.conf -name a1 -Dflume.root.logger=DEBUG,console
【Hadoop离线基础总结】日志采集框架Flume的更多相关文章
- 日志采集框架Flume
前言 在一个完整的大数据处理系统中,除了hdfs+mapreduce+hive组成分析系统的核心之外,还需要数据采集.结果数据导出.任务调度等不可或缺的辅助系统,而这些辅助工具在hadoop生态体系中 ...
- 日志采集框架 Flume
日志采集框架 Flume 1 概述 Flume是一个分布式.可靠.和高可用的海量日志采集.聚合和传输的系统. Flume可以采集文件,socket数据包等各种形式源数据,又可以将采集到的数据输出到H ...
- 01_日志采集框架Flume简介及其运行机制
离线辅助系统概览: 1.概述: 在一个完整的大数据处理系统中,除了hdfs+mapreduce+hive组成分析系统的核心之外,还需要数据采集.结果数据导出. 任务调度等不可或缺的辅助系统,而这些辅助 ...
- 日志采集框架Flume以及Flume的安装部署(一个分布式、可靠、和高可用的海量日志采集、聚合和传输的系统)
Flume支持众多的source和sink类型,详细手册可参考官方文档,更多source和sink组件 http://flume.apache.org/FlumeUserGuide.html Flum ...
- Flume日志采集框架的使用
文章作者:foochane 原文链接:https://foochane.cn/article/2019062701.html Flume日志采集框架 安装和部署 Flume运行机制 采集静态文件到h ...
- flume日志采集框架使用
flume日志采集框架使用 本次学习使用的全部过程均不在集群上,均在本机环境,供学习参考 先决条件: flume-ng-1.6.0-cdh5.8.3.tar 去cloudrea下载flume框架,笔 ...
- 【Hadoop离线基础总结】流量日志分析网站整体架构模块开发
目录 数据仓库设计 维度建模概述 维度建模的三种模式 本项目中数据仓库的设计 ETL开发 创建ODS层数据表 导入ODS层数据 生成ODS层明细宽表 统计分析开发 流量分析 受访分析 访客visit分 ...
- 分布式日志收集框架Flume
分布式日志收集框架Flume 1.业务现状分析 WebServer/ApplicationServer分散在各个机器上 想在大数据平台Hadoop进行统计分析 日志如何收集到Hadoop平台上 解决方 ...
- 【Hadoop离线基础总结】Hue的简单介绍和安装部署
目录 Hue的简单介绍 概述 核心功能 安装部署 下载Hue的压缩包并上传到linux解压 编译安装启动 启动Hue进程 hue与其他框架的集成 Hue与Hadoop集成 Hue与Hive集成 Hue ...
随机推荐
- shell脚本知识
1.提示符变量PS1 修改提示符变量:PS1="[u\@\h \t \w]" 修改环境变量设置文件bash_profile需要使用source或者.加上该文件使之生效 位置参数从1 ...
- 阿里Canal框架数据库同步-实战教程
一.Canal简介: canal是阿里巴巴旗下的一款开源项目,纯Java开发.基于数据库增量日志解析,提供增量数据订阅&消费,目前主要支持了MySQL(也支持mariaDB). 二.背景介绍: ...
- work of 1/4/2016
part 组员 今日工作 工作耗时/h 明日计划 工作耗时/h UI 冯晓云 修改UI增强显示鲁棒 6 完成UI页面切换部分 ...
- 嘿嘿,我就知道面试官接下来要问我 ConcurrentHashMap 底层原理了,看我怎么秀他
前言 上篇文章介绍了 HashMap 源码后,在博客平台广受好评,让本来己经不打算更新这个系列的我,仿佛被打了一顿鸡血.真的,被读者认可的感觉,就是这么奇妙. 然后,有读者希望我能出一版 Concur ...
- G - Messy codeforces1262C
题目大意: 输入n和m,n是n个字符,m是m个前缀.对前缀的规定可以配对的括号.比如(),,((()))等等.在输入n个括号字符,对这个n个字符,通过交换使其满足m个前缀.交换次数不限,规则想当与re ...
- C#开发BIMFACE系列39 网页集成开发3:审图系统中三维模型比对
系列目录 [已更新最新开发文章,点击查看详细] 在建筑施工图审查系统中,设计单位提交设计完成的模型/图纸,审查专家审查模型/图纸.审查过程中如果发现不符合规范的地方,则流程退回到设计单位,设计 ...
- 数据结构(C语言版)---二叉树
1.二叉树:任意一个结点的子结点个数最多两个,且子结点的位置不可更改,二叉树的子树有左右之分. 1)分类:(1)一般二叉树(2)满二叉树:在不增加树的层数的前提下,无法再多添加一个结点的二叉树就是满二 ...
- [Yii2] 快速套模板,加载JS,CSS(HTML标签<base>)
刚开始学,弄了好久,不知道怎么加载JS.CSS,以及怎么不加载YII2自带的模板!其实真的好简单! 补: 其实是我垃圾,YII2默认访问路径是WEB,所以把style文件放到web下就能加载! 首先把 ...
- 设计模式-原型模式(Prototype)【重点:浅复制与深复制】
讲故事 最近重温了一下星爷的<唐伯虎点秋香>,依然让我捧腹不已,幻想着要是我也能有一名秋香如此的侍女,夫复何求呀,带着这个美好的幻想沉沉睡去... 突然想到,我是一名程序猿呀,想要什么对象 ...
- Java如何遍历二维数据
/* 需求:二维数组遍历 外循环控制的是二维数组的长度,其实就是一维数组的个数. 内循环控制的是一维数组的长度.*/class Array2Test { public static void main ...