
Spring Security(二) —— Guides
摘要: 原创出处 https://www.cnkirito.moe/spring-security-2/ 「老徐」欢迎转载,保留摘要,谢谢!
上一篇文章《Spring Security(一)–Architecture Overview》,我们介绍了Spring Security的基础架构,这一节我们通过Spring官方给出的一个guides例子,来了解Spring Security是如何保护我们的应用的,之后会对进行一个解读。
2 Spring Security Guides
2.1 引入依赖
 <dependencies>

     <dependency>

         <groupId>org.springframework.boot</groupId>

         <artifactId>spring-boot-starter-web</artifactId>

     </dependency>

     <dependency>

         <groupId>org.springframework.boot</groupId>

         <artifactId>spring-boot-starter-security</artifactId>

     </dependency>

     <dependency>

         <groupId>org.springframework.boot</groupId>

         <artifactId>spring-boot-starter-thymeleaf</artifactId>

     </dependency>

 </dependencies>
2.2 创建一个不受安全限制的web应用由于我们集成了springboot,所以不需要显示的引入Spring Security文档中描述core,config依赖,只需要引入spring-boot-starter-security即可。
这是一个首页,不受安全限制
src/main/resources/templates/home.html
 <!DOCTYPE html>

 <html xmlns="http://www.w3.org/1999/xhtml" xmlns:th="http://www.thymeleaf.org" xmlns:sec="http://www.thymeleaf.org/thymeleaf-extras-springsecurity3">

     <head>

         <title>Spring Security Example</title>

     </head>

     <body>

         <h1>Welcome!</h1>

         <p>Click <a th:href="@{/hello}">here</a> to see a greeting.</p>

     </body>

 </html>
src/main/resources/templates/hello.html这个简单的页面上包含了一个链接,跳转到”/hello”。对应如下的页面
 <!DOCTYPE html>

 <html xmlns="http://www.w3.org/1999/xhtml" xmlns:th="http://www.thymeleaf.org"

       xmlns:sec="http://www.thymeleaf.org/thymeleaf-extras-springsecurity3">

     <head>

         <title>Hello World!</title>

     </head>

     <body>

         <h1>Hello world!</h1>

     </body>

 </html>
 @Configuration

 public class MvcConfig extends WebMvcConfigurerAdapter {

     @Override

     public void addViewControllers(ViewControllerRegistry registry) {

         registry.addViewController("/home").setViewName("home");

         registry.addViewController("/").setViewName("home");

         registry.addViewController("/hello").setViewName("hello");

         registry.addViewController("/login").setViewName("login");

     }

 }
2.3 配置Spring Security接下来配置Spring MVC,使得我们能够访问到页面。
一个典型的安全配置如下所示:
 @Configuration

 @EnableWebSecurity <1>

 public class WebSecurityConfig extends WebSecurityConfigurerAdapter { <1>

     @Override

     protected void configure(HttpSecurity http) throws Exception {

         http <2>

             .authorizeRequests()

                 .antMatchers("/", "/home").permitAll()

                 .anyRequest().authenticated()

                 .and()

             .formLogin()

                 .loginPage("/login")

                 .permitAll()

                 .and()

             .logout()

                 .permitAll();

     }

     @Autowired

     public void configureGlobal(AuthenticationManagerBuilder auth) throws Exception {

         auth <3>

             .inMemoryAuthentication()

                 .withUser("admin").password("admin").roles("USER");

     }

 }
<2> configure(HttpSecurity)定义了哪些URL路径应该被拦截,如字面意思所描述:”/“, “/home”允许所有人访问,”/login”作为登录入口,也被允许访问,而剩下的”/hello”则需要登陆后才可以访问。<1> @EnableWebSecurity注解使得SpringMVC集成了Spring Security的web安全支持。另外,WebSecurityConfig配置类同时集成了WebSecurityConfigurerAdapter,重写了其中的特定方法,用于自定义Spring Security配置。整个Spring Security的工作量,其实都是集中在该配置类,不仅仅是这个guides,实际项目中也是如此。
<3> configureGlobal(AuthenticationManagerBuilder)在内存中配置一个用户,admin/admin分别是用户名和密码,这个用户拥有USER角色。
我们目前还没有登录页面,下面创建登录页面:
 <!DOCTYPE html>

 <html xmlns="http://www.w3.org/1999/xhtml" xmlns:th="http://www.thymeleaf.org"

       xmlns:sec="http://www.thymeleaf.org/thymeleaf-extras-springsecurity3">

     <head>

         <title>Spring Security Example </title>

     </head>

     <body>

         <div th:if="${param.error}">

             Invalid username and password.

         </div>

         <div th:if="${param.logout}">

             You have been logged out.

         </div>

         <form th:action="@{/login}" method="post">

             <div><label> User Name : <input type="text" name="username"/> </label></div>

             <div><label> Password: <input type="password" name="password"/> </label></div>

             <div><input type="submit" value="Sign In"/></div>

         </form>

     </body>

 </html>
最后,我们为hello.html添加一些内容,用于展示用户信息。这个Thymeleaf模板提供了一个用于提交用户名和密码的表单,其中name=”username”,name=”password”是默认的表单值,并发送到“/ login”。 在默认配置中,Spring Security提供了一个拦截该请求并验证用户的过滤器。 如果验证失败,该页面将重定向到“/ login?error”,并显示相应的错误消息。 当用户选择注销,请求会被发送到“/ login?logout”。
<!DOCTYPE html>

<html xmlns="http://www.w3.org/1999/xhtml" xmlns:th="http://www.thymeleaf.org"

      xmlns:sec="http://www.thymeleaf.org/thymeleaf-extras-springsecurity3">

    <head>

        <title>Hello World!</title>

    </head>

    <body>

        <h1 th:inline="text">Hello [[${#httpServletRequest.remoteUser}]]!</h1>

        <form th:action="@{/logout}" method="post">

            <input type="submit" value="Sign Out"/>

        </form>

    </body>

</html>
2.4 添加启动类我们使用Spring Security之后,HttpServletRequest#getRemoteUser()可以用来获取用户名。 登出请求将被发送到“/ logout”。 成功注销后,会将用户重定向到“/ login?logout”。
@SpringBootApplication

public class Application {

    public static void main(String[] args) throws Throwable {

        SpringApplication.run(Application.class, args);

    }

}
访问首页http://localhost:8080/:2.5 测试
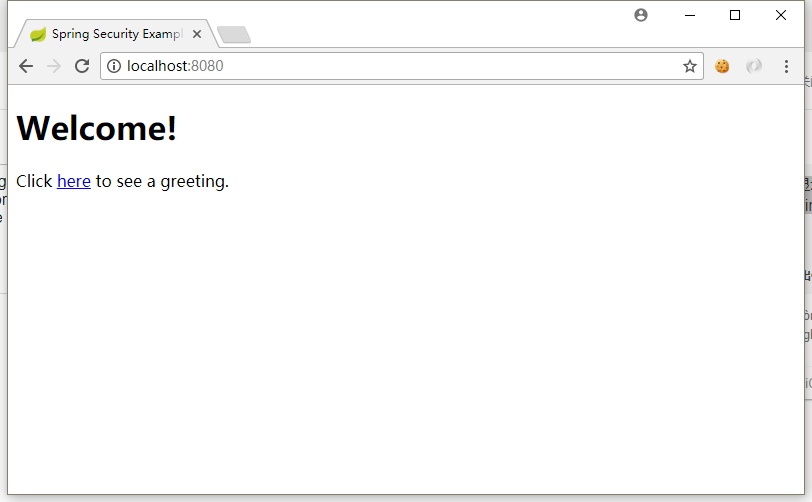 home.html
点击here,尝试访问受限的页面:/hello,由于未登录,结果被强制跳转到登录也/login:
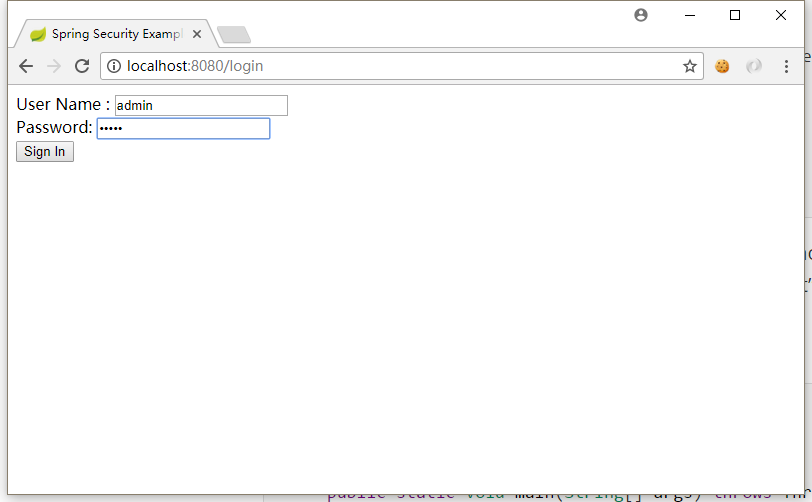 login.html
输入正确的用户名和密码之后,跳转到之前想要访问的/hello:
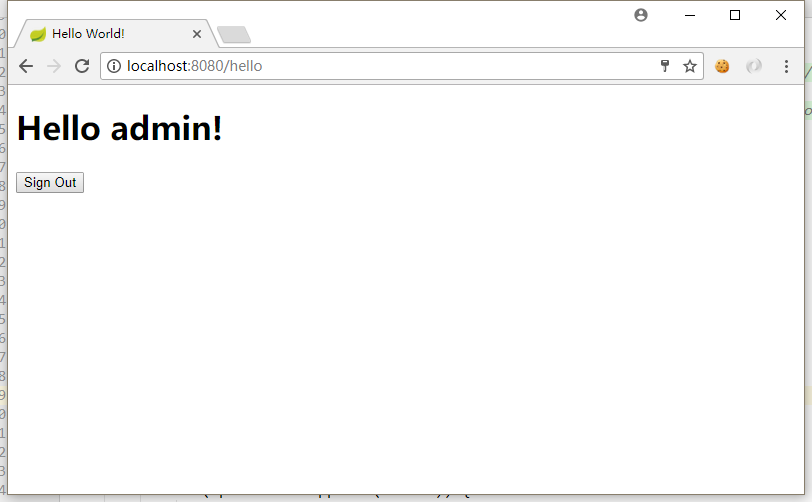 hello.html
点击Sign out退出按钮,访问:/logout,回到登录页面:
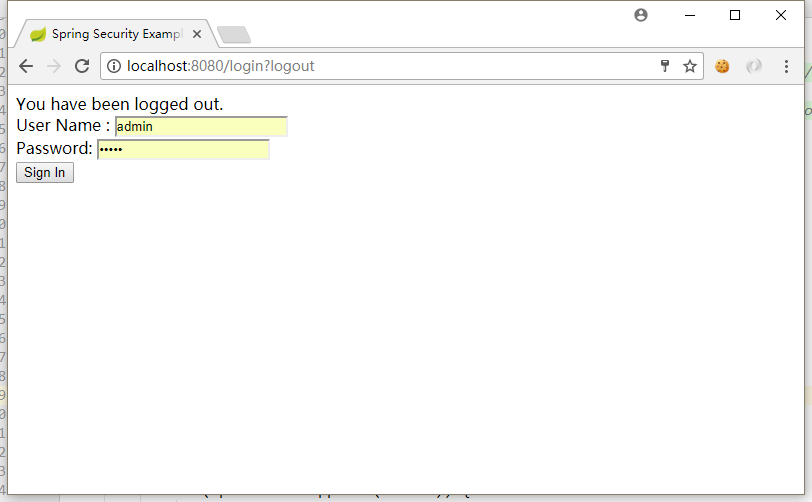 logout.html
Spring Security 无法登陆,报错:There is no PasswordEncoder mapped for the id “null”
网上百度了一下发现这是因为Spring security 5.0中新增了多种加密方式,也改变了密码的格式。
要想我们的项目还能够正常登陆,需要修改一下configure中的代码。我们要将前端传过来的密码进行某种方式加密,spring security 官方推荐的是使用bcrypt加密方式。那么如何对密码加密呢,只需要在configure方法里面指定一下。
修改后是这样的:
protected void configure(AuthenticationManagerBuilder auth) throws Exception {

//inMemoryAuthentication 从内存中获取

auth.inMemoryAuthentication().passwordEncoder(new BCryptPasswordEncoder()).withUser("user1").password(new BCryptPasswordEncoder().encode("123456")).roles("USER");

}
在inMemoryAuthentication()后面多了".passwordEncoder(new BCryptPasswordEncoder())",这相当于登陆时用BCrypt加密方式对用户密码进行处理。以前的".password("123456")" 变成了 ".password(new BCryptPasswordEncoder().encode("123456"))" ,这相当于对内存中的密码进行Bcrypt编码加密。比对时一致,说明密码正确,允许登陆。
如果你现在用的也是从内存中取密码,那么按照上面这么修改后应该会成功登录没有问题的。
如果你用的是在数据库中存储用户名和密码,那么一般是要在用户注册时就使用BCrypt编码将用户密码加密处理后存储在数据库中。并且修改configure()方法,加入".passwordEncoder(new BCryptPasswordEncoder())",保证用户登录时使用bcrypt对密码进行处理再与数据库中的密码比对。如下:
//注入userDetailsService的实现类

auth.userDetailsService(userService).passwordEncoder(new BCryptPasswordEncoder());
Spring Security(二) —— Guides的更多相关文章
- Spring Security(四) —— 核心过滤器源码分析
摘要: 原创出处 https://www.cnkirito.moe/spring-security-4/ 「老徐」欢迎转载,保留摘要,谢谢! 4 过滤器详解 前面的部分,我们关注了Spring Sec ...
- Spring Security(三) —— 核心配置解读
摘要: 原创出处 https://www.cnkirito.moe/spring-security-3/ 「老徐」欢迎转载,保留摘要,谢谢! 3 核心配置解读 上一篇文章<Spring Secu ...
- 学习Spring Security OAuth认证(一)-授权码模式
一.环境 spring boot+spring security+idea+maven+mybatis 主要是spring security 二.依赖 <dependency> <g ...
- 基于Spring Boot+Spring Security+JWT+Vue前后端分离的开源项目
一.前言 最近整合Spring Boot+Spring Security+JWT+Vue 完成了一套前后端分离的基础项目,这里把它开源出来分享给有需要的小伙伴们 功能很简单,单点登录,前后端动态权限配 ...
- 【Spring Security】二、数据库管理用户权限
一 引入相关的jar包 这个例子用的是mysql数据库和c3p0开源的jdbc连接池,在项目的pom.xml中引入jar包 <!-- Mysql --> <dependency> ...
- Spring Security(二)
Spring Security(二) 注:凡是源码部分,我已经把英文注释去掉了,有兴趣的同学可以在自己项目里进去看看.:-) 定义用户认证逻辑 用户登录成功后,用户的信息会被 Security 封装在 ...
- Spring Security教程(二):通过数据库获得用户权限信息
上一篇博客中,Spring Security教程(一):初识Spring Security,我把用户信息和权限信息放到了xml文件中,这是为了演示如何使用最小的配置就可以使用Spring Securi ...
- [转]Spring Security学习总结二
原文链接: http://www.blogjava.net/redhatlinux/archive/2008/08/20/223148.html http://www.blogjava.net/red ...
- Spring Security 自定义登录认证(二)
一.前言 本篇文章将讲述Spring Security自定义登录认证校验用户名.密码,自定义密码加密方式,以及在前后端分离的情况下认证失败或成功处理返回json格式数据 温馨小提示:Spring Se ...
随机推荐
- Java实现 蓝桥杯算法提高 求最大值
算法提高 求最大值 时间限制:1.0s 内存限制:256.0MB 问题描述 给n个有序整数对ai bi,你需要选择一些整数对 使得所有你选定的数的ai+bi的和最大.并且要求你选定的数对的ai之和非负 ...
- Java实现 蓝桥杯VIP 算法训练 友好数
有两个整数,如果每个整数的约数和(除了它本身以外)等于对方,我们就称这对数是友好的.例如: 9的约数和有:1+3=4 4的约数和有:1+2=3 所以9和4不是友好的. 220的约数和有:1 2 4 5 ...
- Java实现蓝桥杯日志统计
标题:日志统计 小明维护着一个程序员论坛.现在他收集了一份"点赞"日志,日志共有N行.其中每一行的格式是: ts id 表示在ts时刻编号id的帖子收到一个"赞" ...
- Java实现 LeetCode 133 克隆图
133. 克隆图 给你无向 连通 图中一个节点的引用,请你返回该图的 深拷贝(克隆). 图中的每个节点都包含它的值 val(int) 和其邻居的列表(list[Node]). class Node { ...
- Arrays.binarySearch和Collections.binarySearch的详细用法
概述 binarysearch为在指定数组中查找指定值得索引值,该值在范围内找得到则返回该值的索引值,找不到则返回该值的插入位置,如果该值大于指定范围最大值则返回-(maxlength+1),而: i ...
- Java实现第十届蓝桥杯最大降雨量
试题 E: 最大降雨量 本题总分:15 分 [问题描述] 由于沙之国长年干旱,法师小明准备施展自己的一个神秘法术来求雨. 这个法术需要用到他手中的 49 张法术符,上面分别写着 1 至 49 这 49 ...
- Vue-Cli4.x配置文件路径别名
一.目录结构 二.配置方法 提示:和package.json同级新建vue.config.js文件(可选文件,默认没有创建). const path = require('path');//引入pat ...
- 利用 Powershell 编写简单的浏览器脚本
生活中有很多事情是低效益,重复性.比如每天上某些网站,先登录再签到打卡,比如每隔一段时间清理回收站的文件等等.一个成熟的软件工程师应该想到用软件解决他. 对于这些简单的小任务,一般用脚本实现.比如Py ...
- 使用JFreeChart生成条形图
1. 准备工作 下载JFreeChart,我使用的版本为1.0.19,相关内容参见JFreeChart,下载链接为https://sourceforge.net/projects/jfreechart ...
- pycharm 配置 git 方法
1.打开pycharm ,点击 file——Default-setting——version control 2.配置github账号密码 3.Path to Git executable中填写git ...