Docker 安装 Nginx 负载均衡配置
Docker 安装
# 1)安装依赖包
yum install -y yum-utils device-mapper-persistent-data lvm2

# 2)添加Docker软件包源(否则doker安装的不是新版本)
yum-config-manager \
--add-repo \
https://download.docker.com/linux/centos/docker-ce.repo

# 3)安装Docker CE
yum install -y docker-ce

# 4)启动Docker服务并设置开机启动
systemctl start docker
systemctl enable docker

# 5)测试docker是否安装成功(hello-world是官方提供的一个测试镜像)
docker run hello-world

# 6)查看docker基本信息
docker info
docker version

# 7)下载Nginx镜像
docker run -itd nginx
docker简单使用(创建一个ngixn容器)
# 1、创建一个nginx容器
 docker run -it nginx

 # 2、查看docker运行的容器(可以获取到这个容器的id)
 docker ps

 # 3、访问这个容器
 # 进入这个nginx容器(进入的文件系统和宿主机是完全隔离的,有自己独立的文件系统)
 docker exec -it 73877e65c07d bash

 # 4、查看当前容器的 IP
 docker inspect 73877e65c07d   # 73877e65c07d是通过docekr ps查看到的容器ID
 curl 172.17.0.2               # 测试这个nginx容器是否可以访问
Nginx负载均衡配置
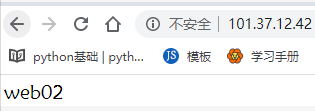
# 使用docker搭建第一台nginx服务
[root@linux-node4 ~]# docker container run -d --name web01 -p 81:80 nginx
测试访问:http://192.168.56.14:81/   # 可以在浏览器输入自己的地址,访问到Nginx页面
root@c58a7f1fb89d:/# docker exec -it web01 bash
root@c58a7f1fb89d:/# echo web01 > /usr/share/nginx/html/index.html
# 使用docker搭建第二台nginx服务
[root@linux-node4 ~]# docker container run -d --name web02 -p 82:80 nginx
测试访问:http://192.168.56.14:82/     # 可以在浏览器输入自己的地址,访问到Nginx页面root@a3440d30f27c:/# docker exec -it web02 bash
root@a3440d30f27c:/# echo web02 > /usr/share/nginx/html/index.html
默认轮训(在真实主机中安装nginx并配置负载均衡)
[root@izbp19kniw9k2ljqdjmld5z ~]# cd /etc/nginx/conf.d
[root@izbp19kniw9k2ljqdjmld5z conf.d]# vim default.conf
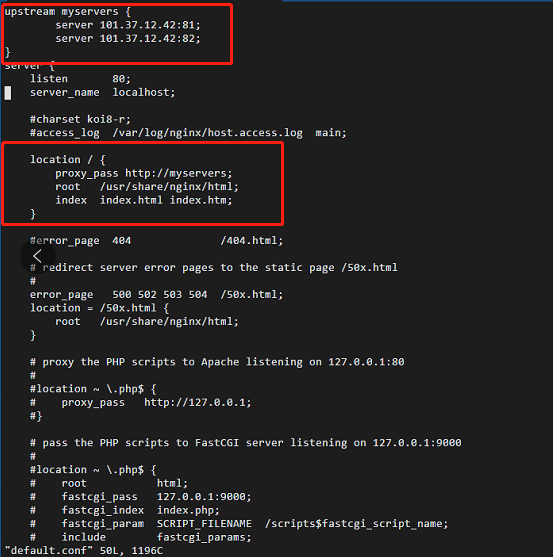
# upstream是自己写的,一定要放在server外面,切记端口号是自己的
upstream myservers {
    server 192.168.56.14:81;
    server 192.168.56.14:82;
}

 # server其实默认已经有一个,只需要修改location中配置,指定转发代理即可
server {
    location / {
       proxy_pass http://myservers;
    }
}
# 配置好以后保存执行下面这俩条命令即可:
# 重启:systemctl restart nginx
# 开启   systemctl start nginx

# 简单的配置就OK了!
Nginx 配置文件注释
#运行用户

user nobody;

#启动进程,通常设置成和cpu的数量相等

worker_processes  1;

#全局错误日志及PID文件

#error_log  logs/error.log;

#error_log  logs/error.log  notice;

#error_log  logs/error.log  info;

#pid        logs/nginx.pid;

#工作模式及连接数上限

events {

    #epoll是多路复用IO(I/O Multiplexing)中的一种方式,

    #仅用于linux2.6以上内核,可以大大提高nginx的性能

    use   epoll;

    #单个后台worker process进程的最大并发链接数

    worker_connections  1024;

    # 并发总数是 worker_processes 和 worker_connections 的乘积

    # 即 max_clients = worker_processes * worker_connections

    # 在设置了反向代理的情况下,max_clients = worker_processes * worker_connections / 4  为什么

    # 为什么上面反向代理要除以4,应该说是一个经验值

    # 根据以上条件,正常情况下的Nginx Server可以应付的最大连接数为:4 * 8000 = 32000

    # worker_connections 值的设置跟物理内存大小有关

    # 因为并发受IO约束,max_clients的值须小于系统可以打开的最大文件数

    # 而系统可以打开的最大文件数和内存大小成正比,一般1GB内存的机器上可以打开的文件数大约是10万左右

    # 我们来看看360M内存的VPS可以打开的文件句柄数是多少:

    # $ cat /proc/sys/fs/file-max

    # 输出 34336

    # 32000 < 34336,即并发连接总数小于系统可以打开的文件句柄总数,这样就在操作系统可以承受的范围之内

    # 所以,worker_connections 的值需根据 worker_processes 进程数目和系统可以打开的最大文件总数进行适当地进行设置

    # 使得并发总数小于操作系统可以打开的最大文件数目

    # 其实质也就是根据主机的物理CPU和内存进行配置

    # 当然,理论上的并发总数可能会和实际有所偏差,因为主机还有其他的工作进程需要消耗系统资源。

    # ulimit -SHn 65535

}

http {

    #设定mime类型,类型由mime.type文件定义

    include    mime.types;

    default_type  application/octet-stream;

    #设定日志格式

    log_format  main  '$remote_addr - $remote_user [$time_local] "$request" '

                      '$status $body_bytes_sent "$http_referer" '

                      '"$http_user_agent" "$http_x_forwarded_for"';

    access_log  logs/access.log  main;

    #sendfile 指令指定 nginx 是否调用 sendfile 函数(zero copy 方式)来输出文件,

    #对于普通应用,必须设为 on,

    #如果用来进行下载等应用磁盘IO重负载应用,可设置为 off,

    #以平衡磁盘与网络I/O处理速度,降低系统的uptime.

    sendfile     on;

    #tcp_nopush     on;

    #连接超时时间

    #keepalive_timeout  0;

    keepalive_timeout  65;

    tcp_nodelay     on;

    #开启gzip压缩

    gzip  on;

    gzip_disable "MSIE [1-6].";

    #设定请求缓冲

    client_header_buffer_size    128k;

    large_client_header_buffers  4 128k;

    #设定虚拟主机配置

    server {

        #侦听80端口

        listen    80;

        #定义使用 www.nginx.cn访问

        server_name  www.nginx.cn;

        #定义服务器的默认网站根目录位置

        root html;

        #设定本虚拟主机的访问日志

        access_log  logs/nginx.access.log  main;

        #默认请求

        location / {

            #定义首页索引文件的名称

            index index.php index.html index.htm;

        }

        # 定义错误提示页面

        error_page   500 502 503 504 /50x.html;

        location = /50x.html {

        }

        #静态文件,nginx自己处理

        location ~ ^/(images|javascript|js|css|flash|media|static)/ {

            #过期30天,静态文件不怎么更新,过期可以设大一点,

            #如果频繁更新,则可以设置得小一点。

            expires 30d;

        }

        #PHP 脚本请求全部转发到 FastCGI处理. 使用FastCGI默认配置.

        location ~ .php$ {

            fastcgi_pass 127.0.0.1:9000;

            fastcgi_index index.php;

            fastcgi_param  SCRIPT_FILENAME  $document_root$fastcgi_script_name;

            include fastcgi_params;

        }

        #禁止访问 .htxxx 文件

            location ~ /.ht {

            deny all;

        }

    }

}
Nginx配置举例
user  work;

worker_processes 8;

worker_rlimit_nofile 65535;

error_log  logs/error.log warn;

#error_log  logs/error.log  notice;

#error_log  logs/error.log  info;

pid        logs/nginx.pid;

events {

    use epoll;

    worker_connections  65535;

}

# load modules compiled as Dynamic Shared Object (DSO)

#

#dso {

#    load ngx_http_fastcgi_module.so;

#    load ngx_http_rewrite_module.so;

#}

http {

    include       mime.types;

    default_type  application/octet-stream;

    server_names_hash_bucket_size 128;

    sendfile        on;

    tcp_nopush      on;

    tcp_nodelay     on;

    fastcgi_connect_timeout 5;

    fastcgi_send_timeout 10;

    fastcgi_read_timeout 10;

    fastcgi_buffer_size 64k;

    fastcgi_buffers 4 64k;

    fastcgi_busy_buffers_size 128k;

    fastcgi_temp_file_write_size 128k;

    #keepalive_timeout  0;

    keepalive_timeout  60;

    keepalive_requests 1024;

    client_header_buffer_size 4k;

    large_client_header_buffers 4 32k;

    client_max_body_size 10m;

    client_body_buffer_size 512k;

    client_body_timeout 600;

    client_header_timeout 600;

    send_timeout 600;

    proxy_connect_timeout   1000ms;

    proxy_send_timeout      2000000ms;

    proxy_read_timeout      2000000ms;

    proxy_buffers           64 8k;

    proxy_busy_buffers_size    128k;

    proxy_temp_file_write_size 64k;

    proxy_redirect off;

    #proxy_next_upstream off ;

    gzip on;

    gzip_min_length 1k;

    gzip_buffers 4 16k;

    gzip_http_version 1.0;

    gzip_comp_level 2;

    gzip_types text/plain application/x-javascript text/css application/xml;

    gzip_vary on;

    add_header X-Frame-Options "ALLOW-FROM  http://cloud.njsig.cn";

    proxy_set_header X-Real-IP $remote_addr;

    proxy_set_header X-Real-Port $remote_port;

    proxy_set_header Host $host;

    proxy_set_header X-Forwarded-For $proxy_add_x_forwarded_for;

    log_format  main  '$remote_addr - $remote_user [$time_local] "$request" '

        '$status $body_bytes_sent "$http_referer" "$http_cookie" "$http_user_agent" '

        '$request_time $remote_addr $server_addr $upstream_addr $host '

        '"$http_x_forwarded_for" $upstream_response_time';

    set_real_ip_from 10.0.0.0/8;

    real_ip_header X-Real-IP;

    #example

#     server {

#        listen 8000;

#        server_name www;

#        access_log logs/access.log  main;

#        location / {

#            proxy_pass http://127.0.0.1:8001;

#        }

#

#

#      }

    include vhosts/*.conf;

    }
nginx/conf/vhosts/opwf.conf django项目简单配置
server {

        listen 80;

        server_name aaa.test.com bbb.test.com;

        access_log  /home/work/nginx/logs/opwf_access.log main;

        location / {

            proxy_pass http://127.0.0.1:8001;

        }
}
nginx/conf/vhosts/opwf.conf django项目简单配置
server {

        listen 80;

        server_name ccc.test.com;

        access_log  /home/work/nginx/logs/nj1_access.log main;

        root /home/work/project/frontopwf/dist;

        location / {

                try_files $uri $uri/ @router;
        }

        location @router {

                rewrite ^.*$ /index.html last;
        }
}
# 可以在浏览器输入自己的地址,访问到Nginx页面
Docker 安装 Nginx 负载均衡配置的更多相关文章
- Docker容器Nginx负载均衡配置、check及stub模块安装
Nginx是一款高性能的HTTP和反向代理.负载均衡web服务器.本次在Docker容器中部署三个tomcat,Nginx代理三个tomcat服务(以下称节点)来模拟实现负载均衡效果,配置check模 ...
- nginx安装及负载均衡配置
Nginx (“engine x”) 是一个高性能的 HTTP 和 反向代理 服务器,也是一个 IMAP/POP3/SMTP 代理服务器. Nginx 是由 Igor Sysoev 为俄罗斯访问量第二 ...
- Nginx负载均衡配置简单配置方法
http://www.jb51.net/article/121235.htm Nginx作为负载均衡服务器,用户请求先到达nginx,再由nginx根据负载配置将请求转发至不同的Web服务器.下面通过 ...
- nginx高性能WEB服务器系列之六--nginx负载均衡配置+健康检查
nginx系列友情链接:nginx高性能WEB服务器系列之一简介及安装https://www.cnblogs.com/maxtgood/p/9597596.htmlnginx高性能WEB服务器系列之二 ...
- Mall电商项目总结(二)——nginx负载均衡配置和策略
1. nginx配置文件 用户在浏览器上输入,http://www.xwld.site/ 实际上是在访问服务器80端口,nginx 监听80端口,将用户的请求转发到8080和9080端口 . upst ...
- Tomcat服务部署与Nginx负载均衡配置
一.中间键产品介绍 目前来说IBM的WebSphere,Oracle的Weblogic占据了市场上java语言Web站点的部分份额,该两种软件都是商业化的软件,由于性能优越,可靠性高等优点应用于大型互 ...
- Tomcat集群,Nginx集群,Tomcat+Nginx 负载均衡配置,Tomcat+Nginx集群
Tomcat集群,Nginx集群,Tomcat+Nginx 负载均衡配置,Tomcat+Nginx集群 >>>>>>>>>>>> ...
- Nginx负载均衡配置实例详解
负载均衡是我们大流量网站要做的一个东西,下面我来给大家介绍在Nginx服务器上进行负载均衡配置方法,希望对有需要的同学有所帮助哦. 负载均衡 先来简单了解一下什么是负载均衡,单从字面上的意思来理解就可 ...
- Nginx负载均衡配置实例详解(转)
负载均衡是我们大流量网站要做的一个东西,下面我来给大家介绍在Nginx服务器上进行负载均衡配置方法,希望对有需要的同学有所帮助哦. 负载均衡 先来简单了解一下什么是负载均衡,单从字面上的意思来理解就可 ...
随机推荐
- 爬虫基本库request使用—爬取猫眼电影信息
使用request库和正则表达式爬取猫眼电影信息. 1.爬取目标 猫眼电影TOP100的电影名称,时间,评分,等信息,将结果以文件存储. 2.准备工作 安装request库. 3.代码实现 impor ...
- 基础篇五:Nginx的目录和基础配置
Yum安装目录:yum的方式安装 rpm -ql nginx 下面开始安装目录详解
- day45-多线程(server和多个client通信)
#server: import socket from threading import Thread def func(conn): conn.send(b'hello client') ret = ...
- 关于Java杂项知识总结
JVM内存结构 JVM在运行时把从操作系统申请到的内存分为若干区域,主要有栈.堆和方法区,方便Java程序使用 堆内存 使用new关键字创建出来的对象都存储在堆内存中 方法区 被加载的类的信息存储在方 ...
- 跨域问题与SpringBoot解决方案
什么是跨域? 定义:浏览器从一个域名的网页取请求另一个域名下的东西.通俗点说,浏览器直接从A域访问B域中的资源是不被允许的,如果想要访问,就需要进行一步操作,这操作就叫"跨域".例 ...
- bzoj1076 奖励关(概率dp)(状态压缩)
BZOJ 1076 [SCOI2008]奖励关 Description 你正在玩你最喜欢的电子游戏,并且刚刚进入一个奖励关.在这个奖励关里,系统将依次随机抛出k次宝物,每次你都可以选择吃或者不吃(必须 ...
- PostgreSQL 安装之 CentOS 7 x64 RPM 安装
PostgresQL 安装环境 一.CentOS 7 安装 1. 环境说明 CentOS7 PosgreSQL 11.2 2. 在线安装 到目前为止(2019-08-10),CentOS7 默认携带了 ...
- Halcon算子含义
1.1 Gaussian-Mixture-Models 1.add_sample_class_gmm 功能:把一个训练样本添加到一个高斯混合模型的训练数据上. 2.classify_class_gmm ...
- 1022 D进制的A+B (20 分)
题目:1022 D进制的A+B (20 分) 思路: 首先根据A.B的取值范围,可知A+B不过2^31,所以转换成进制数时的最长长度为31. 转换成进制的数存进数组,然后反向输出. 要注意和为0的情况 ...
- 转:Zabbix 监控sqlserver
一:Zabbix监控sqlserver 方法一: 1.思路整理 1.在zabbix server上安装Freetds.unixODBC.unixODBC-devel使其能够访问SQL Server数据 ...