
ASP.NET Core 2.2 基础知识(六) 配置(内含MySql+EF)
先上一段代码,了解一下 .NET Core 配置数据的结构.
新建一个 控制台项目,添加一个文件 json.json ,文件内容如下:
{

  "country": "cn",

  "person": {

    "id": 1,

    "address": {

      "addName": "chengdu"

    }

  }

}
控制台代码:
        private static void Main(string[] args)

        {

            ConfigurationBuilder builder = new ConfigurationBuilder();

            builder.AddJsonFile(path: @"E:\xxx\my\core\VS2017\MyConfig\Demo2\json.json", optional: false, reloadOnChange: true);

            IConfigurationRoot config = builder.Build();

            Console.WriteLine(config["country"]);//cn

            Console.WriteLine(config["person:id"]);//

            Console.WriteLine(config["person:address:addname"]);//chengdu

            Console.ReadKey();//修改 json.json 文件中 "id":2

            Console.WriteLine(config["person:id"]);//2

            Console.ReadKey();

        }
AddJsonFile 方法有多个重载,上面只给出了其中一个,3个参数分别表示:
path:文件的物理路径;
optional: xml 文档是这样写的:Whether the file is optional. 该文件是否可选.true 表示可选,即如果该文件不存在,不会抛出异常,下面的所有显示都为空;false 表示不可选,即如果该文件不存在,会抛出异常.
reloadOnChange:如果文件修改了,是否重新加载.
配置提供程序
ASP.NET Core 常用的共有6种配置提供程序 :
- 命令行配置提供程序
- 环境变量配置提供程序
- 文件配置提供程序
- Key-per-file配置提供程序
- 内存配置提供程序
- 自定义配置提供程序
一.命令行配置提供程序 : AddCommandLine
1.新建一个 WebAPI 项目,新建一个 TestController
    [Route("api/[controller]")]

    [ApiController]

    public class TestController : ControllerBase

    {

        private readonly IConfiguration _config;

        public TestController(IConfiguration configuration)

        {

            _config = configuration;

        }

        public string Get()

        {

            //读取配置数据中 Key 为 CommandLineKey 的值,如果没有这个 Key,则返回默认值: defaultValue
       //读取配置文件的方法后面会单独讲.

            return _config.GetValue("CommandLineKey","defaultValue");

        }

    }
2.修改 CreateWebHostBuilder 方法
    public class Program

    {

        public static void Main(string[] args)

        {

            CreateWebHostBuilder(args).Build().Run();

        }

        public static IWebHostBuilder CreateWebHostBuilder(string[] args)

        {

            var config = new ConfigurationBuilder().AddCommandLine(args).Build();

            var hostBuilder = WebHost.CreateDefaultBuilder(args);

            return hostBuilder.UseConfiguration(config).UseStartup<Startup>();

        }

    }
3.测试:
1)不传参数
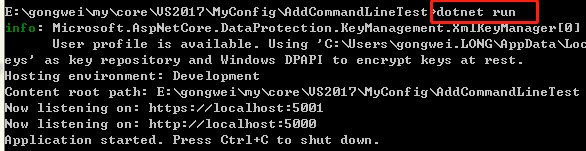
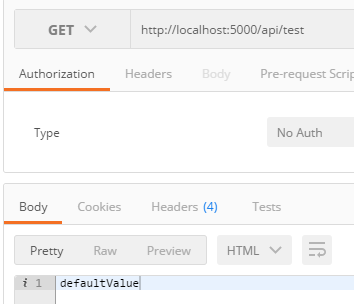
2)传入参数
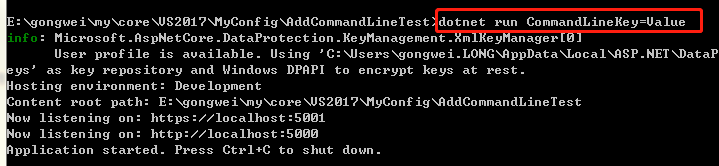
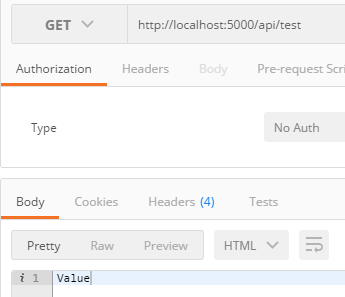
传参的格式有多种:
dotnet run CommandLineKey1=Value1
dotnet run --CommandLineKey2=Value2
dotnet run --CommandLineKey3 Value3
dotnet run /CommandLineKey4=Value4
dotnet run /CommandLineKey5 Value5
此外,传入的以单横杠"-"或者双横杠"--"作为前缀的 Key 支持替换:
    public class Program

    {

        public static void Main(string[] args)

        {

            CreateWebHostBuilder(args).Build().Run();

        }

        public static IWebHostBuilder CreateWebHostBuilder(string[] args)

        {

            Dictionary<string, string> switchMapping = new Dictionary<string, string>

            {

                {"-key", "CommandLineKey"},

                {"--key", "CommandLineKey"},

            };

            IConfigurationRoot config = new ConfigurationBuilder().AddCommandLine(args, switchMapping).Build();

            return WebHost.CreateDefaultBuilder().UseConfiguration(config).UseStartup<Startup>();

        }

    }
测试图:


两种情况都会显示

实际上,在 2.X 版本,CreateDefaultBuilder(args) 方法内部已经调用了 AddCommandLine(args) 方法,我们不需要再调一次了.源码(部分)如下:

二.环境变量配置提供程序 : AddEnvironmentVariables
在 2.X 版本,CreateDefaultBuilder(args) 方法内部已经调用了 AddEnvironmentVariables() 方法,我们不需要再调一次了.源码(部分)如下:
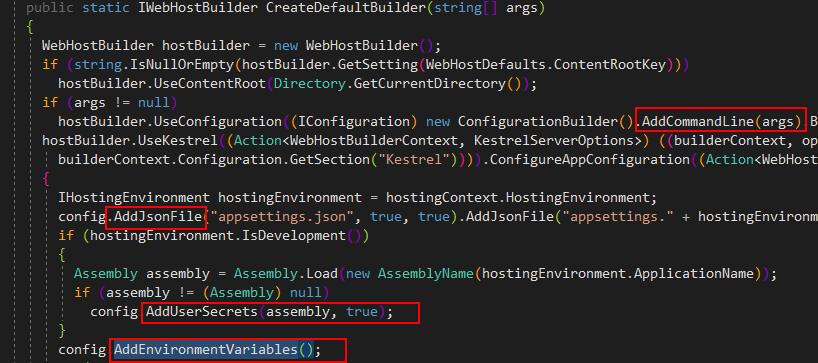
其实,红框框起来的方法都是配置提供程序.
那么,环境变量到底有哪些呢?哪里可以看呢?
新建如下控制器:
    [Route("api/[controller]/[action]")]

    [ApiController]

    public class TestController : ControllerBase

    {

        private readonly IConfiguration _config;

        public TestController(IConfiguration configuration)

        {

            _config = configuration;

        }

        public IEnumerable<KeyValuePair<string, string>> GetAll()

        {

            return _config.AsEnumerable();

        }

        public string Get(string key)

        {

            return _config.GetValue(key, "defaultValue");

        }

    }
太多了,只截了其中一小部分:
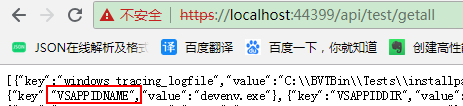
我们试试查询红框标注的环境变量:

三.文件配置提供程序 : AddJsonFile , AddIniFile , AddXmlFile
以 AddJsonFile 为例讲解,其他两个都差不多.
从上面的源码截图中我们已经看到,在使用 CreateDefaultBuilder 方法初始化新的 WebHostBuilder 时,会自动调用 AddJsonFile 两次,依次从下面两个文件加载配置:
appsettings.json : 首先读取该文件.
appsettings.{Environment}.json : 再读取此文件,该文件中的配置会替代 appsettings.json 文件中的值.
示例: (红色部分是自己加的)
appsettings.json:
{

  "Logging": {

    "LogLevel": {

      "Default": "Warning"

    }

  },

  "AllowedHosts": "*",

  "FirstSection": {

    "SecondSection": "hello world"

  }

}
appsettings.{Environment}.json:
{

  "Logging": {

    "LogLevel": {

      "Default": "Debug",

      "System": "Information",

      "Microsoft": "Information"

    }

  },

  "FirstSection": {

    "SecondSection": "fuck u"

  }

}
请求结果:

下面我们来创建自己的配置文件:
在当前项目下新建一个 jsonconfig.json 文件:
{

  "id": ,

  "name": "wjire"

}
CreateWebHostBuilder 方法修改如下:
        public static IWebHostBuilder CreateWebHostBuilder(string[] args)

        {

            IWebHostBuilder hostBuilder = WebHost.CreateDefaultBuilder(args);

            return hostBuilder.ConfigureAppConfiguration((context, builder) =>

                {

                    builder.AddJsonFile(Path.Combine(context.HostingEnvironment.ContentRootPath, "jsonconfig.json"),

                        true, true);

                }).UseStartup<Startup>();

        }
图就不上了...
附:
AddIniFile 配置文件:
[section0]

key0=value

key1=value

[section1]

subsection:key=value

[section2:subsection0]

key=value

[section2:subsection1]

key=value
AddXmlFile 配置文件
<?xml version="1.0" encoding="UTF-8"?>

<configuration>

<section0>

<key0>value</key0>

<key1>value</key1>

</section0>

<section1>

<key0>value</key0>

<key1>value</key1>

</section1>

</configuration>
四.Key-per-file 配置提供程序 AddKeyPerFile
这个提供程序有点特别,它是将文件名(含扩展名)作为 Key,文件内容作为 Value.
示例:
在当前项目下新建一个 filename.txt 文件,文件内容就一句话: hello world
        public static IWebHostBuilder CreateWebHostBuilder(string[] args)

        {

            IWebHostBuilder hostBuilder = WebHost.CreateDefaultBuilder(args);

            return hostBuilder.ConfigureAppConfiguration((context, builder) =>

                {

                    //param1:文件所在目录的物理路径

                    //param2:该文件是否可选

                    builder.AddKeyPerFile(context.HostingEnvironment.ContentRootPath, true);

                }).UseStartup<Startup>();

        }
控制器如下:
    [Route("api/[controller]/[action]")]

    [ApiController]

    public class TestController : ControllerBase

    {

        private readonly IConfiguration _config;

        public TestController(IConfiguration configuration)

        {

            _config = configuration;

        }

        public string Get(string key)

        {

            return _config.GetValue(key, "defaultValue");

        }

    }

五. 内存配置提供程序 AddInMemoryCollection
这个很简单,直接上图:
        public static IWebHostBuilder CreateWebHostBuilder(string[] args)

        {

            Dictionary<string, string> memoryCollection = new Dictionary<string, string>

            {

                {"id","" },

                {"name","wjire" }

            };

            IWebHostBuilder hostBuilder = WebHost.CreateDefaultBuilder(args);

            return hostBuilder.ConfigureAppConfiguration((context, builder) =>

            {

                builder.AddInMemoryCollection(memoryCollection);

            }).UseStartup<Startup>();

        }

六.自定义配置提供程序
该示例演示了如果使用EF创建从数据库(MySql)读取配置的提供程序.
第一步:安装 MySqlEF

第二步:创建数据库表:
CREATE TABLE `myconfigs` (

  `Id` varchar() NOT NULL DEFAULT '',

  `value` varchar() NOT NULL DEFAULT '',

  PRIMARY KEY (`Id`)

) ENGINE=InnoDB DEFAULT CHARSET=utf8;
第三步:创建实体类
    public class MyConfig

    {

        public string Id { get; set; }

        public string Value { get; set; }

    }
第四步:创建数据库上下文
    public class MyConfigContext : DbContext

    {

        public MyConfigContext(DbContextOptions<MyConfigContext> options) : base(options)

        {

        }

        public DbSet<MyConfig> MyConfigs { get; set; }

    }
第五步:创建配置数据源
    public class MyConfigSource : IConfigurationSource

    {

        private readonly Action<DbContextOptionsBuilder> _optionsAction;

        public MyConfigSource(Action<DbContextOptionsBuilder> optionsAction)

        {

            _optionsAction = optionsAction;

        }

        public IConfigurationProvider Build(IConfigurationBuilder builder)

        {

            return new MyConfigProvider(_optionsAction);

        }

    }
第六步:创建配置数据源提供器
    public class MyConfigProvider : ConfigurationProvider

    {

        private Action<DbContextOptionsBuilder> OptionsAction { get; }

        public MyConfigProvider(Action<DbContextOptionsBuilder> optionsAction)

        {

            OptionsAction = optionsAction;

        }

        //从数据库读取配置

        public override void Load()

        {

            DbContextOptionsBuilder<MyConfigContext> builder = new DbContextOptionsBuilder<MyConfigContext>();

            OptionsAction(builder);

            using (MyConfigContext dbContext = new MyConfigContext(builder.Options))

            {

                //Data 是基类 ConfigurationProvider 的属性,用来存储配置数据源的.

                Data = !dbContext.MyConfigs.Any()//判断表是否有数据

                    ? CreateAndSaveDefaultValues(dbContext)//如果没有数据,则添加一些数据,存储到配置数据源中.

                    : dbContext.MyConfigs.ToDictionary(c => c.Id, c => c.Value);//如果有数据,读取出来,存储到配置数据源中.

            }

        }

        private static IDictionary<string, string> CreateAndSaveDefaultValues(MyConfigContext dbContext)

        {

            Dictionary<string, string> configValues = new Dictionary<string, string>

            {

                { "", "refuge" },

                { "", "" },

                { "", "chengdu" }

            };

            dbContext.MyConfigs.AddRange(configValues.Select(kvp => new MyConfig

            {

                Id = kvp.Key,

                Value = kvp.Value

            }).ToArray());

            dbContext.SaveChanges();

            return configValues;

        }

    }
第七步:创建扩展方法,对外公开自定义的数据提供程序
    public static class MyConfigExtension

    {

        public static IConfigurationBuilder AddCustomConfigurationProviderApp(this IConfigurationBuilder builder, Action<DbContextOptionsBuilder> optionsAction)

        {

            return builder.Add(new MyConfigSource(optionsAction));

        }

    }
第八步:创建测试用的控制器
    [Route("api/[controller]/[action]")]

    [ApiController]

    public class TestController : ControllerBase

    {

        private readonly IConfiguration _config;

        public TestController(IConfiguration configuration)

        {

            _config = configuration;

        }

        //查询所有

        public IEnumerable<KeyValuePair<string, string>> GetAll()

        {

            return _config.AsEnumerable();

        }

        //查询某个key

        public string Get(string key)

        {

            return _config.GetValue(key, "defaultValue");

        }

    }
第九步:调用自定义配置提供程序
    public class Program

    {

        public static void Main(string[] args)

        {

            CreateWebHostBuilder(args).Build().Run();

        }

        public static IWebHostBuilder CreateWebHostBuilder(string[] args)

        {

            IWebHostBuilder hostBuilder = WebHost.CreateDefaultBuilder(args);

            return hostBuilder.ConfigureAppConfiguration((context, builder) =>

                {

                    builder.AddCustomConfigurationProviderApp(options => options.UseMySql("Server=localhost;Database=test;User=root"));

                }).UseStartup<Startup>();

        }

    }
测试结果:
1)查询所有,可以看到,我们新增的配置数据已经加到系统中了;(看右边的滚动条就知道总共有很多很多配置...)

2)查询特定key
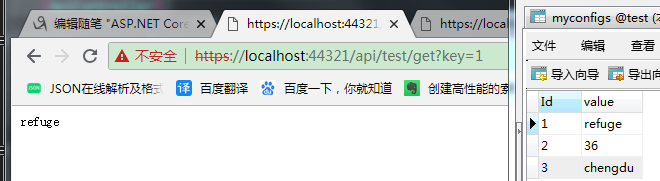
如果使用该方式提供配置数据,需要注意以下两点:
1.提供程序在启动时就将数据库表读入配置,不会基于每个key查询数据库;
2.应用启动后,更新数据库,配置不会更新.
上面讲了如果提供配置数据,下面讲获取配置的几种常用方法:
一.GetValue 上面已经演示过了,这里不再重复.只把常用的重载方法列出来
GetValue<T>("key") 如果 key 不存在,则会抛异常;
GetValue<T>("key",T default) 如果 key 不存在,则返回默认值
二. T Get<T>()
对于下面这个 json 文件:
{

  "name": "refuge",

  "age": ,

  "address": {

    "city": "chengdu"

  }

}
定义一个实体:
    public class Person

    {

        public string Name { get; set; }

        public int Age { get; set; }

        public Address Address { get; set; }

    }

    public class Address

    {

        public string City { get; set; }

    }
控制器:
    [Route("api/[controller]/[action]")]

    [ApiController]

    public class TestController : ControllerBase

    {

        private readonly IConfiguration _config;

        public TestController(IConfiguration configuration)

        {

            _config = configuration;

        }
      public string Get()

        {

            var person = _config.Get<Person>();

            return JsonConvert.SerializeObject(person);

        }

    }
调用结果:
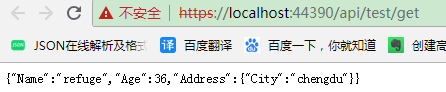
但是这种方式,个人持反对态度,因为存储在系统中的配置数据有很多很多,上述方法相当于读取所有配置数据来反序列化.
三.GetSection
讲该方法之前,有必要再熟悉一下配置在系统中的存储结构到底是怎么样的.
对于上面那个 json 文件:name": "refuge",
"age": 36,

  "address": {

    "city": "chengdu"

  }

}
将其读入配置后,存储的结构如下:
{"key":"name","value":"refuge"}

{"key":"age","value":"36"}

{"key":"address","value":null} //通过查询所有配置,确实有这一行,这意味着想通过 GetValue<string>("address") 反序列化为对象是不可能的...
{"key":"address:city","value":"chengdu"}]
对于上面这些配置,"refuge" 和 "36" 是可以通过第一个方法 GetValue<string>("name") , GetValue<string>("age") 来获取.

而 "chengdu" 只能用 GetValue<string>("address:city") 方法获取了.

因此,要通过该方法把上述json文件的内容转成 Person 对象,则需要对 json 文件进行修改,添加一个 "person" 节点:
{

  "person": {

    "name": "refuge",

    "age": ,

    "address": {

      "city": "chengdu"

    }

  }

}
Action:
        public string Get()

        {

            //方法一:

            {

                Person person = _config.GetSection("person").Get<Person>();

                return JsonConvert.SerializeObject(person);

            }

            //方法二:

            {

                //Person person = new Person();

                //_config.GetSection("person").Bind(person);

                //return JsonConvert.SerializeObject(person);

            }

        }
方法一明显要帅气得多!
问题又来了,如果我只想反序列化 "address" 节点的值,怎么办呢?下面这个方法可以完成.
四.GetChildren
Action:
        public string Get()

        {

                IConfigurationSection firstChildSection = _config.GetSection("person").GetChildren().First();

                Address address = firstChildSection.Get<Address>();

                return JsonConvert.SerializeObject(address);

        }

貌似完了.
2019年1月6日补充:
上面提到的全是从当前项目加载配置,ASP.NET Core 2.0 提供了从外部程序集加载配置的方法
需要实现该接口:
  public interface IHostingStartup

  {

    void Configure(IWebHostBuilder builder);

  }
示例:
新建类库 : ExternalAssembly
namespace ExternalAssembly

{

    public class ExternalConfig : IHostingStartup

    {

        public void Configure(IWebHostBuilder builder)

        {

            Dictionary<string, string> memoryCollection = new Dictionary<string, string>

            {

                {"id","" },

                {"name","refuge"}

            };

            builder.ConfigureAppConfiguration((context, configBuilder) =>

                {

                    configBuilder.AddInMemoryCollection(memoryCollection);

                });

        }

    }

}
这里要特别注意:
ConfigureAppConfiguration 方法需要安装nuget包:

创建一个 WebAPI 项目,添加对上述类库的引用,并在 Program 类中添加对该类库的调用声明(红色标注):
using Microsoft.AspNetCore;

using Microsoft.AspNetCore.Hosting;

[assembly: HostingStartup(typeof(ExternalAssembly.ExternalConfig))]

namespace Demo5

{

    public class Program

    {

        public static void Main(string[] args)

        {

            CreateWebHostBuilder(args).Build().Run();

        }

        public static IWebHostBuilder CreateWebHostBuilder(string[] args)

        {

            return WebHost.CreateDefaultBuilder(args).UseStartup<Startup>();

        }

    }

}
图就不上了.
ASP.NET Core 2.2 基础知识(六) 配置(内含MySql+EF)的更多相关文章
- [ASP.NET Core开发实战]基础篇06 配置
配置,是应用程序很重要的组成部分,常常用于提供信息,像第三方应用登录钥匙.上传格式与大小限制等等. ASP.NET Core提供一系列配置提供程序读取配置文件或配置项信息. ASP.NET Core项 ...
- ASP.NET Core 2.2 基础知识(十六) SignalR 概述
我一直觉得学习的最好方法就是先让程序能够正常运行,才去学习他的原理,剖析他的细节. 就好像这个图: 所以,我们先跟着官方文档,创建一个 SignalR 应用: https://docs.microso ...
- ASP.NET Core 2.2 基础知识(十八) 托管和部署 概述
为了方便演示,以 .NET Core 控制台应用程序讲解. 我们新建一个控制台应用程序,安装 "Newtonsoft.Json" Nuget 包,然后右键点击该项目,选择" ...
- ASP.NET Core 2.2 基础知识(十二) 发送 HTTP 请求
可以注册 IHttpClientFactory 并将其用于配置和创建应用中的 HttpClient 实例. 这能带来以下好处: 提供一个中心位置,用于命名和配置逻辑 HttpClient 实例. 例如 ...
- ASP.NET Core 2.2 基础知识(十四) WebAPI Action返回类型(未完待续)
要啥自行车,直接看手表 //返回基元类型 public string Get() { return "hello world"; } //返回复杂类型 public Person ...
- ASP.NET Core 2.2 基础知识(十三) WebAPI 概述
我们先创建一个 WebAPI 项目,看看官方给的模板到底有哪些东西 官方给出的模板: [Route("api/[controller]")] [ApiController] pub ...
- ASP.NET Core 2.2 基础知识(十一) ASP.NET Core 模块
ASP.NET Core 应用与进程内的 HTTP 服务器实现一起运行.该服务器实现侦听 HTTP 请求,并在一系列请求功能被写到 HttpContext 时,将这些请求展现到应用中. ASP.NET ...
- ASP.NET Core 2.2 基础知识(十) Web服务器 - Kestrel
ASP.NET Core 应用与进程内的 HTTP 服务器实现一起运行.该服务器实现侦听 HTTP 请求,并在一系列请求功能被写到 HttpContext 时,将这些请求展现到应用中. ASP.NET ...
- ASP.NET Core 2.2 基础知识(九) 使用托管服务实现后台任务
在 ASP.NET Core 中,后台任务作为托管服务实现.托管服务是一个类,而且必须实现 IHostedService 接口,该接口定义了两个方法: StartAsync(CancellationT ...
随机推荐
- pb_ds
#include<ext/pb_ds/priority_queue.hpp>#define ll long long#define pa pair<ll,int>using n ...
- BZOJ 3629 JLOI2014 聪明的燕姿 约数和+DFS
根据约数和公式来拆s,最后再把答案乘出来,我们发先这样的话递归层数不会太大每层枚举次数也不会太多,然而我们再来个剪枝就好了 #include<cstdio> #include<ios ...
- BZOJ 2707: [SDOI2012]走迷宫 拓扑+高斯消元+期望概率dp+Tarjan
先Tarjan缩点 强连通分量里用高斯消元外面直接转移 注意删掉终点出边和拓扑 #include<cstdio> #include<cstring> #include<a ...
- [SDOI2011]消防/[NOIP2007] 树网的核
消防 题目描述 某个国家有n个城市,这n个城市中任意两个都连通且有唯一一条路径,每条连通两个城市的道路的长度为zi(zi<=1000). 这个国家的人对火焰有超越宇宙的热情,所以这个国家最兴旺的 ...
- Codeforces Round #526 (Div. 2) D. The Fair Nut and the Best Path
D. The Fair Nut and the Best Path 题目链接:https://codeforces.com/contest/1084/problem/D 题意: 给出一棵树,走不重复的 ...
- 测试数据库DG搭建为正式库以后做准备
Data guard 部署 1.系统准备(备库只需建立数据库软件) 两台操作系统 oracle linux 7 Node1 172.16.70.191 Node2 172.16.70.192 Orac ...
- git上传本地项目
1.(先进入项目文件夹)通过命令 git init 把这个目录变成git可以管理的仓库 git init 2.把文件添加到版本库中,使用命令 git add .添加到暂存区里面去,不要忘记后面的小数点 ...
- Junit使用的超简单介绍
Junit使用的超简单介绍 前言:我对Junit了解的并不多,只是今天突然听到有人提到了它,而且现在时间还早,所以我觉得我不妨更一篇关于Junit4的超级超级简单的用法,全当是为了省去看官网demo的 ...
- vivo面试学习3(git和svn的区别)
git和svn有什么区别? svn: 系统特点: 1).集中式版本控制系统(存在一个中央版本库,所有开发人员所使用的代码都是来源于版本库,提交代码也是这个中央版本库) 2).企业内部并行集中开发 3) ...
- bzoj3223 文艺平衡树 codevs3303 翻转区间
splay模版题吧 只有区间翻转 至于为什么要把须翻转区间旋到根 因为查找一个区间可以先找出他左端点左边第一个点和右端点x右边第一个点y 然后将x旋到根节点 y旋到x的右儿子 这样x的右边的点就是所有 ...