
Maven私服nexus
部署私服 xenus 下载https://www.sonatype.com/download‐oss‐sonatype
我下载了两个版本的nexus:
nexus-3.13.0-01-unix.tar.gz
nexus-3.14.0-04-unix.tar.gz
主要是第一个版本不兼容
配置好jdk环境
 [root@localhost nexus-3.14.0-04]# java -version
 java version "1.8.0_181"
 Java(TM) SE Runtime Environment (build 1.8.0_181-b13)
 Java HotSpot(TM) 64-Bit Server VM (build 25.181-b13, mixed mode)
解压安装启动
[root@localhost opt]# tar -xvf nexus-3.14.0-04-unix.tar.gz
[root@localhost opt]# cd nexus-3.14.0-04
[root@localhost nexus-3.14.0-04]# sh bin/nexus start
WARNING: ************************************************************
WARNING: Detected execution as "root" user. This is NOT recommended!
WARNING: ************************************************************
Starting nexus
[root@localhost nexus-3.14.0-04]# ss -tanpl |grep 8081 ### 这里启动nexus很慢,需要耐心等几分钟........
LISTEN 0 50 *:8081 *:* users:(("java",pid=2051,fd=787))
[root@localhost nexus-3.14.0-04]# ps -ef |grep nexus
root 2051 1 95 22:10 pts/0 00:00:16 /usr/lib/jvm/java-1.8.0-openjdk-1.8.0.201.b09-2.el7_6.x86_64/jre/bin/java -server
-Dinstall4j.jvmDir=/usr/lib/jvm/java-1.8.0-openjdk-1.8.0.201.b09-2.el7_6.x86_64/jre -Dexe4j.moduleName=/opt/nexus-3.14.0-04/bin/nexus -XX:+UnlockDiagnosticVMOptions -Dinstall4j.launcherId=245 -Dinstall4j.swt=false -Di4jv=0 -Di4jv=0 -Di4jv=0 -Di4jv=0 -Di4jv=0 -Xms1200M -Xmx1200M -XX:MaxDirectMemorySize=2G -XX:+UnlockDiagnosticVMOptions -XX:+UnsyncloadClass -XX:+LogVMOutput -XX:LogFile=../sonatype-work/nexus3/log/jvm.log -XX:-OmitStackTraceInFastThrow -Djava.net.preferIPv4Stack=true -Dkaraf.home=. -Dkaraf.base=. -Dkaraf.etc=etc/karaf -Djava.util.logging.config.file=etc/karaf/java.util.logging.properties -Dkaraf.data=../sonatype-work/nexus3 -Djava.io.tmpdir=../sonatype-work/nexus3/tmp -Dkaraf.startLocalConsole=false -Di4j.vpt=true -classpath /opt/nexus-3.14.0-04/.install4j/i4jruntime.jar:/opt/nexus-3.14.0-04/lib/boot/nexus-main.jar:/opt/nexus-3.14.0-04/lib/boot/org.apache.karaf.main-4.0.9.jar:/opt/nexus-3.14.0-04/lib/boot/org.osgi.core-6.0.0.jar:/opt/nexus-3.14.0-04/lib/boot/org.apache.karaf.diagnostic.boot-4.0.9.jar:/opt/nexus-3.14.0-04/lib/boot/org.apache.karaf.jaas.boot-4.0.9.jar com.install4j.runtime.launcher.UnixLauncher start 9d17dc87 org.sonatype.nexus.karaf.NexusMain
root 2134 1412 0 22:10 pts/0 00:00:00 grep --color=auto nexus
访问测试:
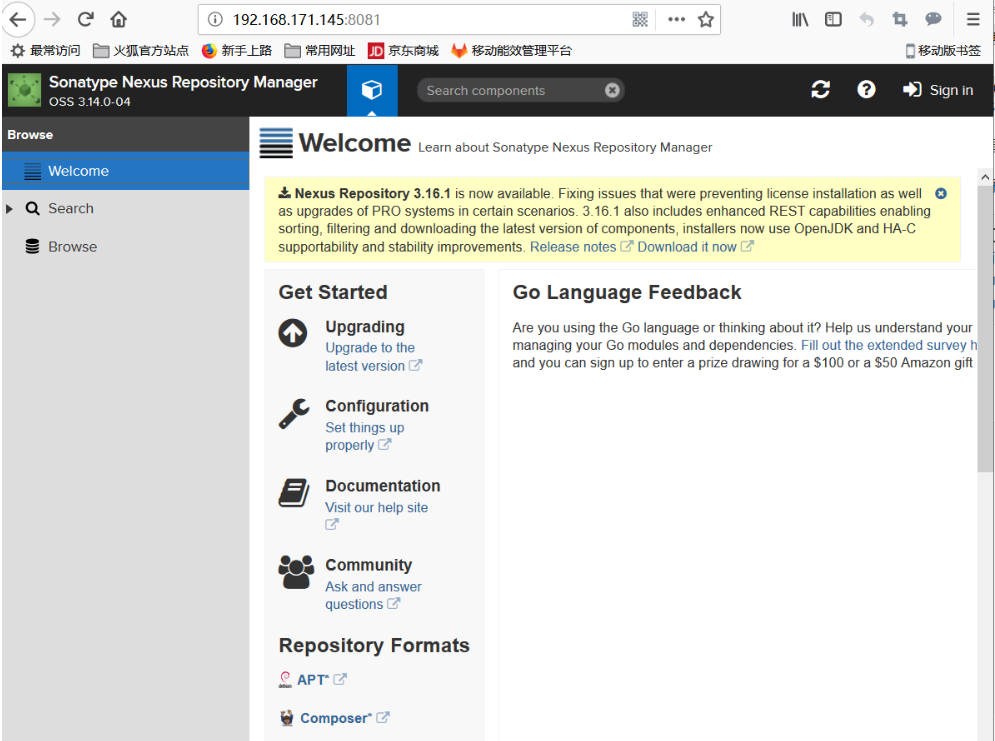
ip:8081

登录账户和密码 ip:8081 admin admin123
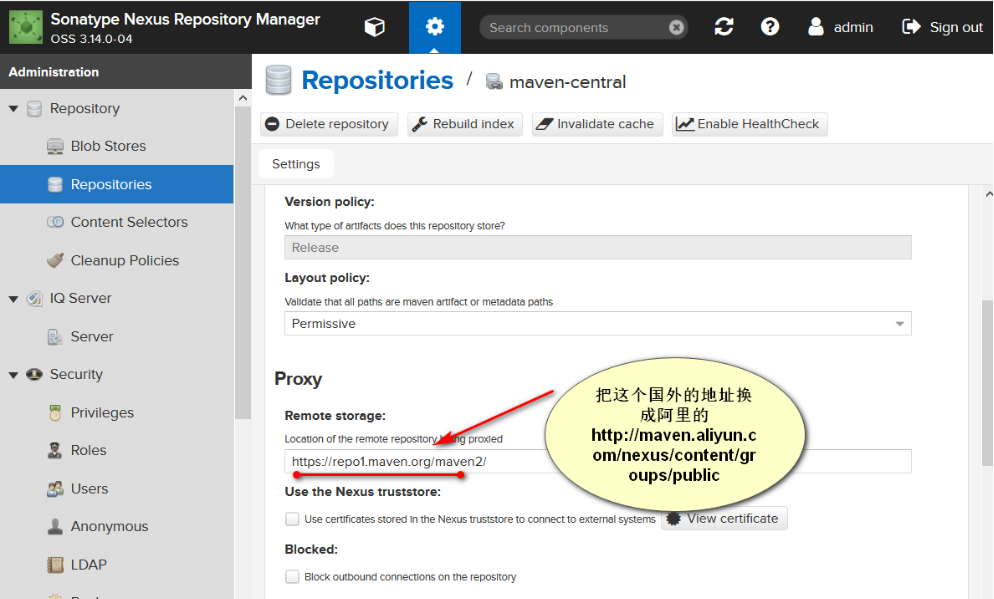
点击设置,进入仓库管理,换国内的阿里云仓库地址


 <mirror>
 <id>nexus-aliyun</id>
 <mirrorOf>*</mirrorOf>
 <name>Nexus aliyun</name>
 <url>http://maven.aliyun.com/nexus/content/groups/public</url>
 </mirror>
将上述http部分复制到下面你的proxy位置代替国外的仓库地址,之后save。

此时去maven的全局配置下配置文件


[root@localhost jeesns]# cd /usr/local/maven/conf
 [root@localhost conf]# ll
 total 16
 drwxr-xr-x. 2 root root    37 Nov 11  2015 logging
 -rw-r--r--. 1 root root 10404 Apr 18 14:31 settings.xml
 -rw-r--r--. 1 root root  3649 Nov 11  2015 toolchains.xml
 [root@localhost conf]# cp settings.xml  settings.xml.bak
 [root@localhost conf]# vim settings.xml #删除了之前的标签
 第一段要添加的内容
 134      <id>my-nexus-releases</id>
 135      <username>admin</username>
 136      <password>admin123</password>
 137      </server>
 138      <server>
 139      <id>my-nexus-snapshot</id>
 140      <username>admin</username>
 141      <password>admin123</password>
 142      </server>
 143   </servers>
 第二段要添加的内容
 157     <mirror>
 158   <id>nexus</id>
 159   <mirrorOf>*</mirrorOf>
 160   <url>http://192.168.171.144:8081/repository/maven-public/</url>
 161   </mirror>
 第三段要添加的内容
 262 <profile>
 263   <id>nexus</id>
 264   <repositories>
 265     <repository>
 266       <id>central</id>
 267       <url>http://192.168.171.145:8081/repository/maven-public/</url>
 268       <releases><enabled>true</enabled></releases>
 269       <snapshots><enabled>true</enabled></snapshots>
 270     </repository>
 271   </repositories>
 272  <pluginRepositories>
 273     <pluginRepository>
 274       <id>central</id>
 275       <url>http://192.168.171.145:8081/repository/maven-public/</url>
 276       <releases><enabled>true</enabled></releases>
 277       <snapshots><enabled>true</enabled></snapshots>
 278     </pluginRepository>
 279   </pluginRepositories>
 280 </profile>
 第四段要添加的内容(激活)
 291 <activeProfiles>
 292 <activeProfile>nexus</activeProfile>
 293 </activeProfiles>
如果之前有数据就删了,否则创建过程中会失败
 [root@localhost conf]# cd /opt/jeesns
 [root@localhost jeesns]# rm -rf .m2/  ## 删除原来的生成数据
 [root@localhost jeesns]# mvn package
 [INFO] ------------------------------------------------------------------------
 [INFO] Reactor Build Order:
 [INFO]
 [INFO] jeesns
 [INFO] jeesns-core
 [INFO] jeesns-model
 [INFO] jeesns-dao
 [INFO] jeesns-common
 [INFO] jeesns-service
 [INFO] jeesns-web
 [INFO]
 [INFO] ------------------------------------------------------------------------
 [INFO] Building jeesns 1.3
 [INFO] ------------------------------------------------------------------------
 [INFO]
 [INFO] ------------------------------------------------------------------------
 [INFO] Building jeesns-core 1.3
 [INFO] ------------------------------------------------------------------------
 Downloading: http://192.168.171.145:8081/repository/maven-public/org/apache/maven/plugins/maven-resources-plugin/2.6/maven-resources-plugin-2.6.pom
 Downloaded: http://192.168.171.145:8081/repository/maven-public/org/apache/maven/plugins/maven-resources-plugin/2.6/maven-resources-plugin-2.6.pom (0 B at 0.0 KB/sec)
 maven-public/org/apache/maven/maven-parent/22/maven-parent-22.pom (0 B at 0.0 KB/sec)
 ....................   #####  看地址就知道从自己的服务器上下载数据了
 ..........
 [INFO] jeesns-common ...................................... SUCCESS [  0.113 s]
 [INFO] jeesns-service ..................................... SUCCESS [  0.139 s]
 [INFO] jeesns-web ......................................... SUCCESS [ 23.021 s]
 [INFO] ------------------------------------------------------------------------
 [INFO] BUILD SUCCESS
 [INFO] ------------------------------------------------------------------------
 [INFO] Total time: 31.238 s
 [INFO] Finished at: 2019-04-22T23:21:05+08:00
 [INFO] Final Memory: 13M/32M
 [INFO] ------------------------------------------------------------------------
完成......................
Maven私服nexus的更多相关文章
- Centos 基础开发环境搭建之Maven私服nexus
hmaster 安装nexus及启动方式 /usr/local/nexus-2.6.3-01/bin ./nexus status Centos 基础开发环境搭建之Maven私服nexus . 软件 ...
- Ubuntu server下搭建Maven私服Nexus
Ubuntu server下搭建Maven私服Nexus Maven私服Nexus的作用,主要是为了节省资源,在内部作为maven开发资源共享服务器来使用. 1.下载 通过root用户进去Ubuntu ...
- maven私服nexus安装
maven私服nexus安装 1.nexus特性 1.1.nexus私服实际上是一个javaEE的web 系统 1.2.作用:用来管理一个公司所有的jar包,实现项目jar包的版本统一 1.3.jar ...
- Maven私服Nexus的搭建
# Maven私服Nexus的搭建 ## 私服存在的合理性 Maven中的依赖是从服务器仓库中下载的,Maven的仓库只有两大类: - 1) 本地仓库 - 2) 远程仓库,其中在远程仓库中又分成了3种 ...
- maven私服nexus搭建(windows)
1.下载nexus 地址:https://www.sonatype.com/download-oss-sonatype 下载相应版本的zip包. 2.安装nexus 下载完成后,解压到本地任意目录. ...
- maven私服nexus清理释放磁盘空间
应用背景: 自建的maven私服(或者叫私仓)nexus在使用过程中,因很多服务不断迭代更新上传jar包至nexus中,底层存放在一个叫Blob Stores的存储中,最近发现该存储已增大至好几百G, ...
- 持续集成之三:Maven私服Nexus使用
环境 Red Hat Enterprise Linux Server release 7.3 (Maipo) jdk1.7.0_80 apache-tomcat-7.0.90 mysql-5.7.23 ...
- 持续集成之三:搭建Maven私服Nexus
安装环境 Red Hat Enterprise Linux Server release 7.3 (Maipo) jdk1.7.0_80 apache-tomcat-7.0.90 mysql-5.7. ...
- Maven私服Nexus详解
maven的仓库只有两大类:1.本地仓库 2.远程仓库,在远程仓库中又分成了3种:2.1 中央仓库 2.2 私服 2.3 其它公共库. 私服是一种特殊的远程仓库,它是架设在局域网内的仓库服务,私服代理 ...
- Linux下搭建maven私服Nexus 3.2.1-01
1. 私服介绍私服是指私有服务器,是架设在局域网的一种特殊的远程仓库,目的是代理远程仓库及部署第三方构建.有了私服之后,当 Maven 需要下载构件时,直接请求私服,私服上存在则下载到本地仓库:否则, ...
随机推荐
- Callable Future接口的设计原理
我们都知道Callable接口作为任务给线程池来执行,可以通过Future对象来获取返回值,他们背后的实现原理是什么?通过总结背后的实现原理有助于我们深入的理解相关技术,做到触类旁通和举一反三. 文章 ...
- web安全之机器学习入门——3.1 KNN/k近邻
目录 sklearn.neighbors.NearestNeighbors 参数/方法 基础用法 用于监督学习 检测异常操作(一) 检测异常操作(二) 检测rootkit 检测webshell skl ...
- poj 3126 Prime Path bfs
题目链接:http://poj.org/problem?id=3126 Prime Path Time Limit: 1000MS Memory Limit: 65536K Total Submi ...
- Linux中硬链接和软链接的区别
看了这篇文章之后,豁然开朗.直接放链接,感谢作者的分享. https://www.ibm.com/developerworks/cn/linux/l-cn-hardandsymb-links/#ico ...
- 获取window.location.href中传的值,并且转换成json数据使用
做个记录保存一下,以免以后再次用到忘记了. function locVal(){ var url=window.location.href; if (url.indexOf('?')==-1)retu ...
- nginx高级用法汇总
1,nginx限制IP访问,允许IP访问 1.1 模块:nginx_http_access_module 注意:检测顺序是按配置顺序进行的,匹配首条规则将会被使用,所以要注意在配置文件配置的顺序. a ...
- 循环调用dll库的界面时,首次正常,再次无响应
消息循环错误: 在为使用CPaintManagerUI::MessageLoop()的情况下退出,但却发送了PostQuitMessage(0).
- orm单表查询和模糊查询
一.单表查询 1. 返回queryset对象的查询 all() 以列表形式返回全部queryset对象 filter(**kwargs) 筛选 exclude(**kwargs) 排除 reverse ...
- Spring学习-01
一.Srping 一个轻量级DI.IOC.AOP的容器框架 DI:依赖注入 IOC:控制反转 AOP:面向切面 二.构造器注入 Constructor-arg 属性:index/name/type/r ...
- oracle odbc mysql 字段不全
主要是字段集不对,mysql的字符集默认设置为utf8,odbc才是unicode编码连接,无法转发.选择ansi连接方式即可.