
ActiveMQ详细入门使用教程
ActiveMQ介绍
MQ是消息中间件,是一种在分布式系统中应用程序借以传递消息的媒介,常用的有ActiveMQ,RabbitMQ,kafka。ActiveMQ是Apache下的开源项目,完全支持JMS1.1和J2EE1.4规范的JMS Provider实现。
特点:
1、支持多种语言编写客户端
2、对spring的支持,很容易和spring整合
3、支持多种传输协议:TCP,SSL,NIO,UDP等
4、支持AJAX
消息形式:
1、点对点(queue)
2、一对多(topic)
ActiveMQ安装
我这里提供一个安装好的虚拟机:http://download.csdn.net/download/liuyuanq123/10217892
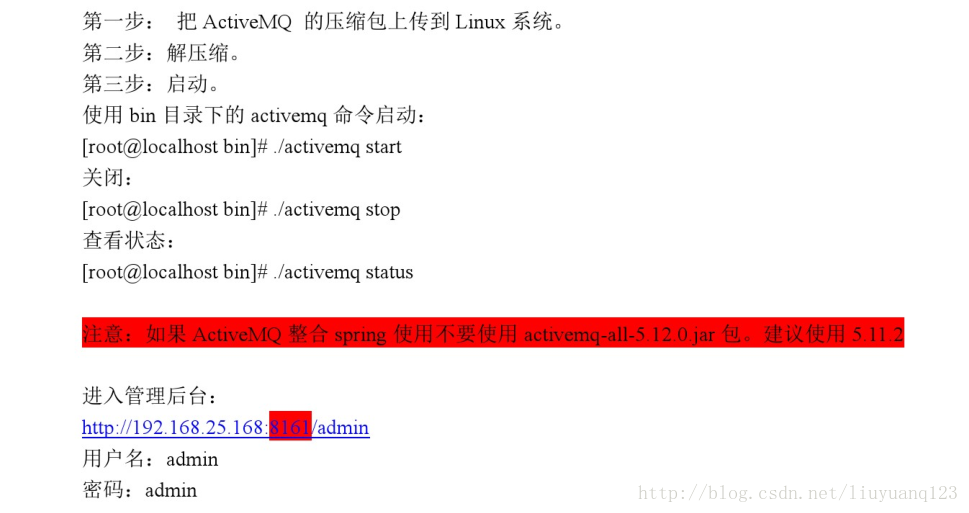
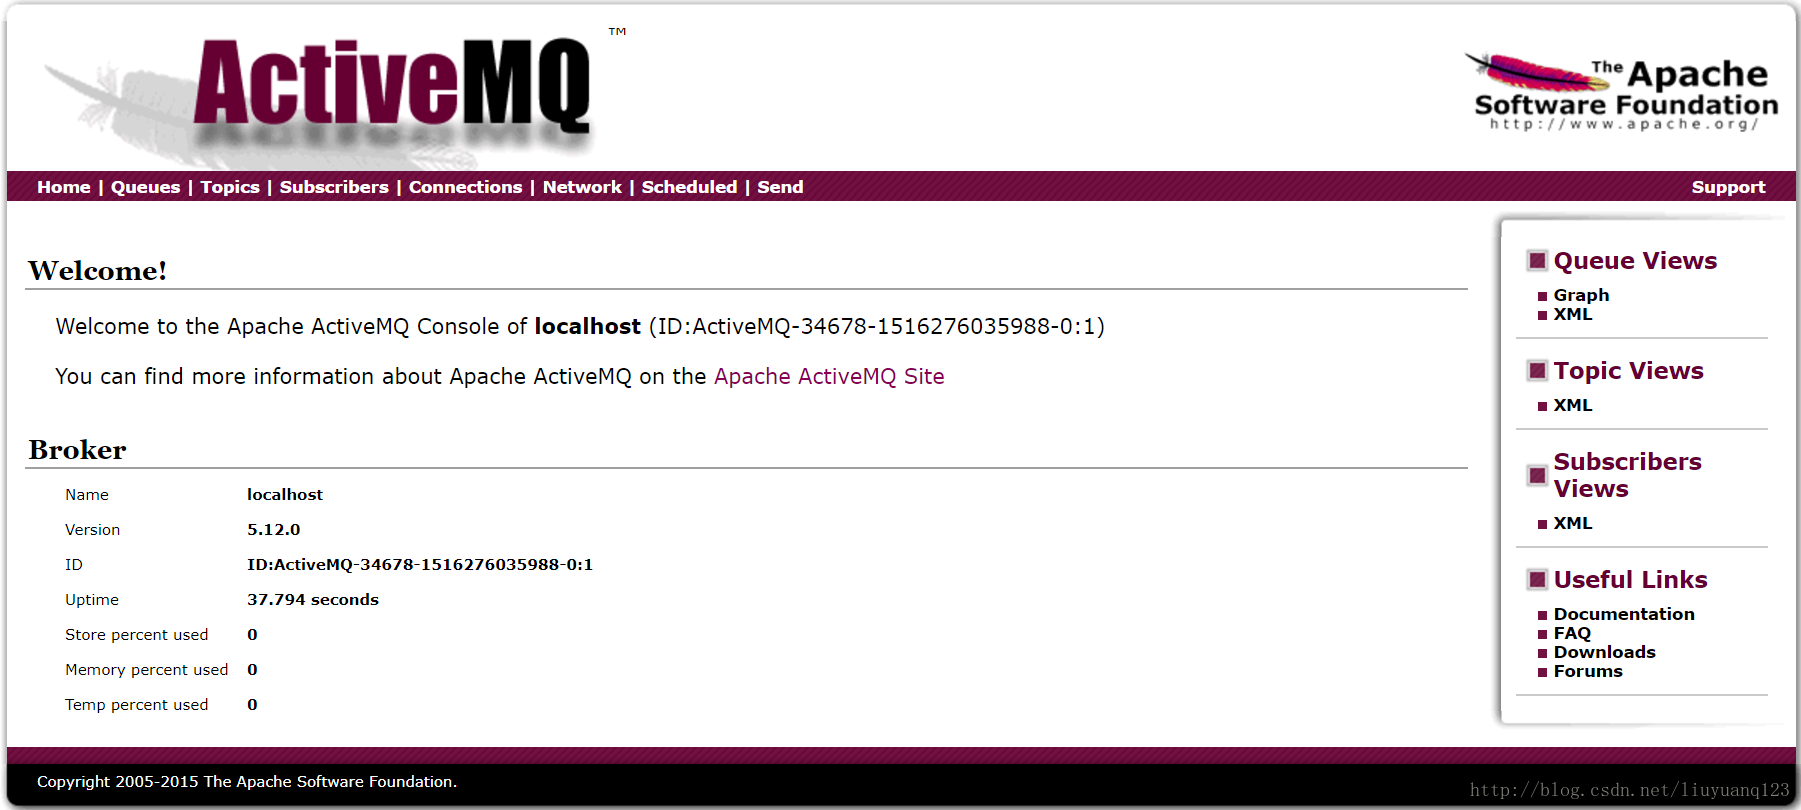
服务器运行后,我们可以直接访问到activeMQ的界面:
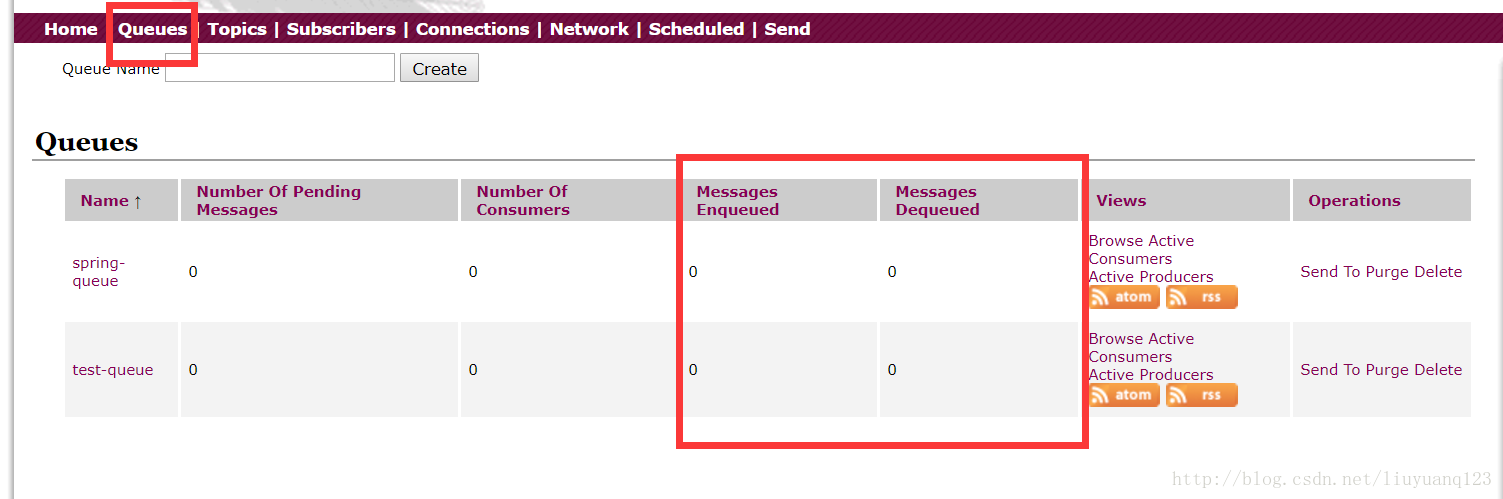
然后点击queues可以看到现在没有一条消息:
ActiveMQ测试
编写一个测试类对ActiveMQ进行测试,首先得向pom文件中添加ActiveMQ相关的jar包:
     <dependency>

         <groupId>org.apache.activemq</groupId>

         <artifactId>activemq-all</artifactId>

    </dependency>
queue的发送代码如下:
    public void testMQProducerQueue() throws Exception{

        //1、创建工厂连接对象,需要制定ip和端口号

        ConnectionFactory connectionFactory = new ActiveMQConnectionFactory("tcp://192.168.156.44:61616");

        //2、使用连接工厂创建一个连接对象

        Connection connection = connectionFactory.createConnection();

        //3、开启连接

        connection.start();

        //4、使用连接对象创建会话(session)对象

        Session session = connection.createSession(false, Session.AUTO_ACKNOWLEDGE);

        //5、使用会话对象创建目标对象,包含queue和topic(一对一和一对多)

        Queue queue = session.createQueue("test-queue");

        //6、使用会话对象创建生产者对象

        MessageProducer producer = session.createProducer(queue);

        //7、使用会话对象创建一个消息对象

        TextMessage textMessage = session.createTextMessage("hello!test-queue");

        //8、发送消息

        producer.send(textMessage);

        //9、关闭资源

        producer.close();

        session.close();

        connection.close();

    }
接收代码:
  public void TestMQConsumerQueue() throws Exception{

        //1、创建工厂连接对象,需要制定ip和端口号

        ConnectionFactory connectionFactory = new ActiveMQConnectionFactory("tcp://192.168.156.44:61616");

        //2、使用连接工厂创建一个连接对象

        Connection connection = connectionFactory.createConnection();

        //3、开启连接

        connection.start();

        //4、使用连接对象创建会话(session)对象

        Session session = connection.createSession(false, Session.AUTO_ACKNOWLEDGE);

        //5、使用会话对象创建目标对象,包含queue和topic(一对一和一对多)

        Queue queue = session.createQueue("test-queue");

        //6、使用会话对象创建生产者对象

        MessageConsumer consumer = session.createConsumer(queue);

        //7、向consumer对象中设置一个messageListener对象,用来接收消息

        consumer.setMessageListener(new MessageListener() {

            @Override

            public void onMessage(Message message) {

                // TODO Auto-generated method stub

                if(message instanceof TextMessage){

                    TextMessage textMessage = (TextMessage)message;

                    try {

                        System.out.println(textMessage.getText());

                    } catch (JMSException e) {

                        // TODO Auto-generated catch block

                        e.printStackTrace();

                    }

                }

            }

        });

        //8、程序等待接收用户消息

        System.in.read();

        //9、关闭资源

        consumer.close();

        session.close();

        connection.close();

    }
然后当我们运行queue发送的时候可以看到队列里已经有一条消息了,但没有发送出去:
然后在运行queue 的接收端,可以看到消息已经发出了:
接着对topic进行测试,发送代码如下:



public void TestTopicProducer() throws Exception{

        //1、创建工厂连接对象,需要制定ip和端口号

        ConnectionFactory connectionFactory = new ActiveMQConnectionFactory("tcp://192.168.156.44:61616");

        //2、使用连接工厂创建一个连接对象

        Connection connection = connectionFactory.createConnection();

        //3、开启连接

        connection.start();

        //4、使用连接对象创建会话(session)对象

        Session session = connection.createSession(false, Session.AUTO_ACKNOWLEDGE);

        //5、使用会话对象创建目标对象,包含queue和topic(一对一和一对多)

        Topic topic = session.createTopic("test-topic");

        //6、使用会话对象创建生产者对象

        MessageProducer producer = session.createProducer(topic);

        //7、使用会话对象创建一个消息对象

        TextMessage textMessage = session.createTextMessage("hello!test-topic");

        //8、发送消息

        producer.send(textMessage);

        //9、关闭资源

        producer.close();

        session.close();

        connection.close();

    }
接收代码:
    public void TestTopicConsumer() throws Exception{

        //1、创建工厂连接对象,需要制定ip和端口号

        ConnectionFactory connectionFactory = new ActiveMQConnectionFactory("tcp://192.168.156.44:61616");

        //2、使用连接工厂创建一个连接对象

        Connection connection = connectionFactory.createConnection();

        //3、开启连接

        connection.start();

        //4、使用连接对象创建会话(session)对象

        Session session = connection.createSession(false, Session.AUTO_ACKNOWLEDGE);

        //5、使用会话对象创建目标对象,包含queue和topic(一对一和一对多)

        Topic topic = session.createTopic("test-topic");

        //6、使用会话对象创建生产者对象

        MessageConsumer consumer = session.createConsumer(topic);

        //7、向consumer对象中设置一个messageListener对象,用来接收消息

        consumer.setMessageListener(new MessageListener() {

            @Override

            public void onMessage(Message message) {

                // TODO Auto-generated method stub

                if(message instanceof TextMessage){

                    TextMessage textMessage = (TextMessage)message;

                    try {

                        System.out.println(textMessage.getText());

                    } catch (JMSException e) {

                        // TODO Auto-generated catch block

                        e.printStackTrace();

                    }

                }

            }

        });

        //8、程序等待接收用户消息

        System.in.read();

        //9、关闭资源

        consumer.close();

        session.close();

        connection.close();

    }
然后运行topic发送:
可以看到消息已经发送出去。再运行topic接收:
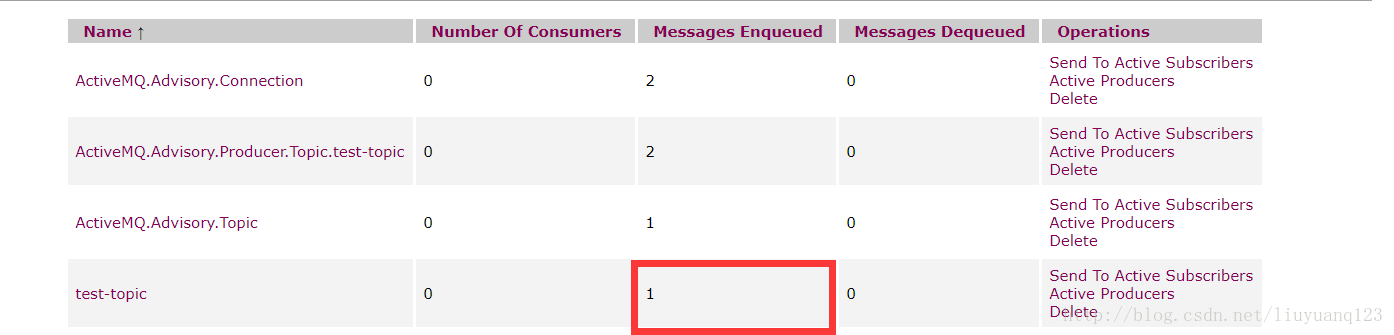
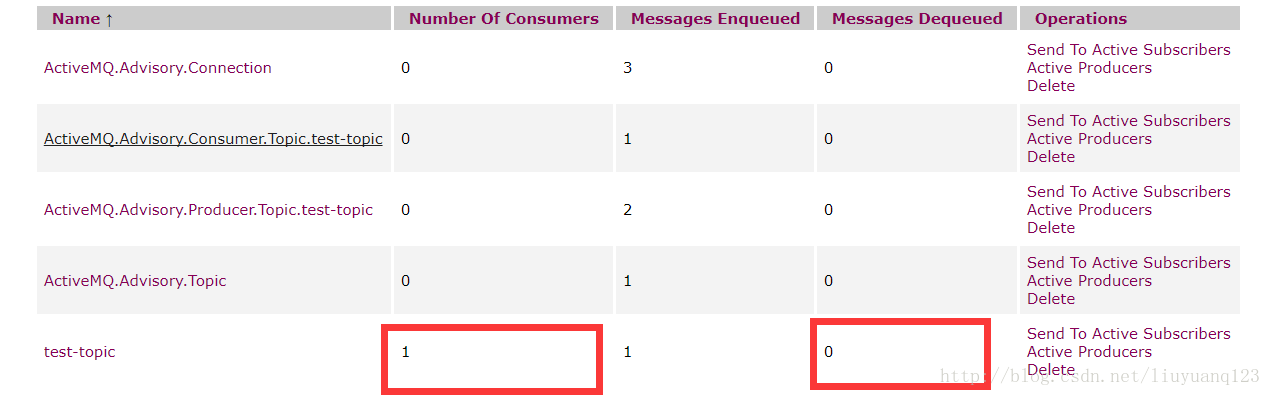
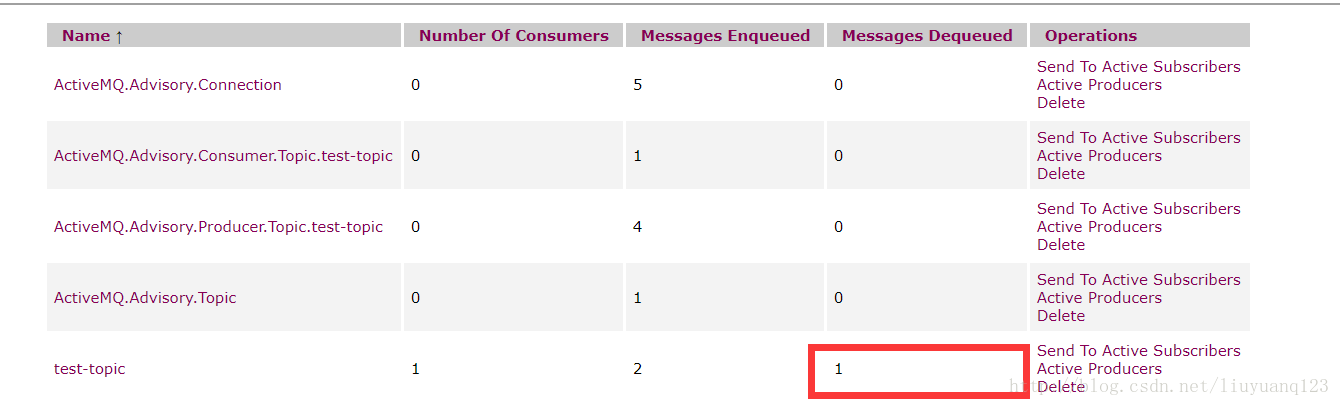
可以看到有了一个消费者,但是没有接收的消息,这是因为正常情况下我们的topic消息不会再服务器持久化,所以要先打开消费者,再打开生产者,这个时候我们再运行生产者发送一条消息看到消息已经接收到了:

ActiveMQ整合spring及项目中运用
activeMQ与spring看一整合到一起使用,除了添加ActiveMQ相关的jar包外,还需要添加spring的jar包:
    <dependency>

        <groupId>org.springframework</groupId>

        <artifactId>spring-context</artifactId>

    </dependency>
然后编写applicationContext-activemq.xml文件,
代码如下:
<?xml version="1.0" encoding="UTF-8"?>

<beans xmlns="http://www.springframework.org/schema/beans"

    xmlns:context="http://www.springframework.org/schema/context" xmlns:p="http://www.springframework.org/schema/p"

    xmlns:aop="http://www.springframework.org/schema/aop" xmlns:tx="http://www.springframework.org/schema/tx"

    xmlns:dubbo="http://code.alibabatech.com/schema/dubbo"

    xmlns:xsi="http://www.w3.org/2001/XMLSchema-instance"

    xsi:schemaLocation="http://www.springframework.org/schema/beans http://www.springframework.org/schema/beans/spring-beans-4.2.xsd

    http://www.springframework.org/schema/context http://www.springframework.org/schema/context/spring-context-4.2.xsd

    http://www.springframework.org/schema/aop http://www.springframework.org/schema/aop/spring-aop-4.2.xsd http://www.springframework.org/schema/tx http://www.springframework.org/schema/tx/spring-tx-4.2.xsd

    http://code.alibabatech.com/schema/dubbo http://code.alibabatech.com/schema/dubbo/dubbo.xsd

    http://www.springframework.org/schema/util http://www.springframework.org/schema/util/spring-util-4.2.xsd">

    <!-- 配置能够产生connection的connectionfactory,由JMS对应的服务厂商提供 -->

    <bean id="tagertConnectionFactory" class="org.apache.activemq.ActiveMQConnectionFactory">

        <constructor-arg name="brokerURL" value="tcp://192.168.156.44:61616"/>

    </bean>

    <!-- 配置spring管理真正connectionfactory的connectionfactory,相当于spring对connectionfactory的一层封装 -->

    <bean id="connectionFactory" class="org.springframework.jms.connection.SingleConnectionFactory">

        <property name="targetConnectionFactory" ref="tagertConnectionFactory"/>

    </bean>

    <!-- 配置生产者 -->

    <!-- Spring使用JMS工具类,可以用来发送和接收消息 -->

    <bean id="jmsTemplate" class="org.springframework.jms.core.JmsTemplate">

        <!-- 这里是配置的spring用来管理connectionfactory的connectionfactory -->

        <property name="connectionFactory" ref="connectionFactory"/>

    </bean>

    <!-- 配置destination -->

    <!-- 队列目的地 -->

    <bean id="queueDestination" class="org.apache.activemq.command.ActiveMQQueue">

        <constructor-arg value="spring-queue"/>

    </bean>

    <!-- 话题目的地 -->

    <bean id="itemAddTopic" class="org.apache.activemq.command.ActiveMQTopic">

        <constructor-arg value="item-add-topic"/>

    </bean>

</beans>
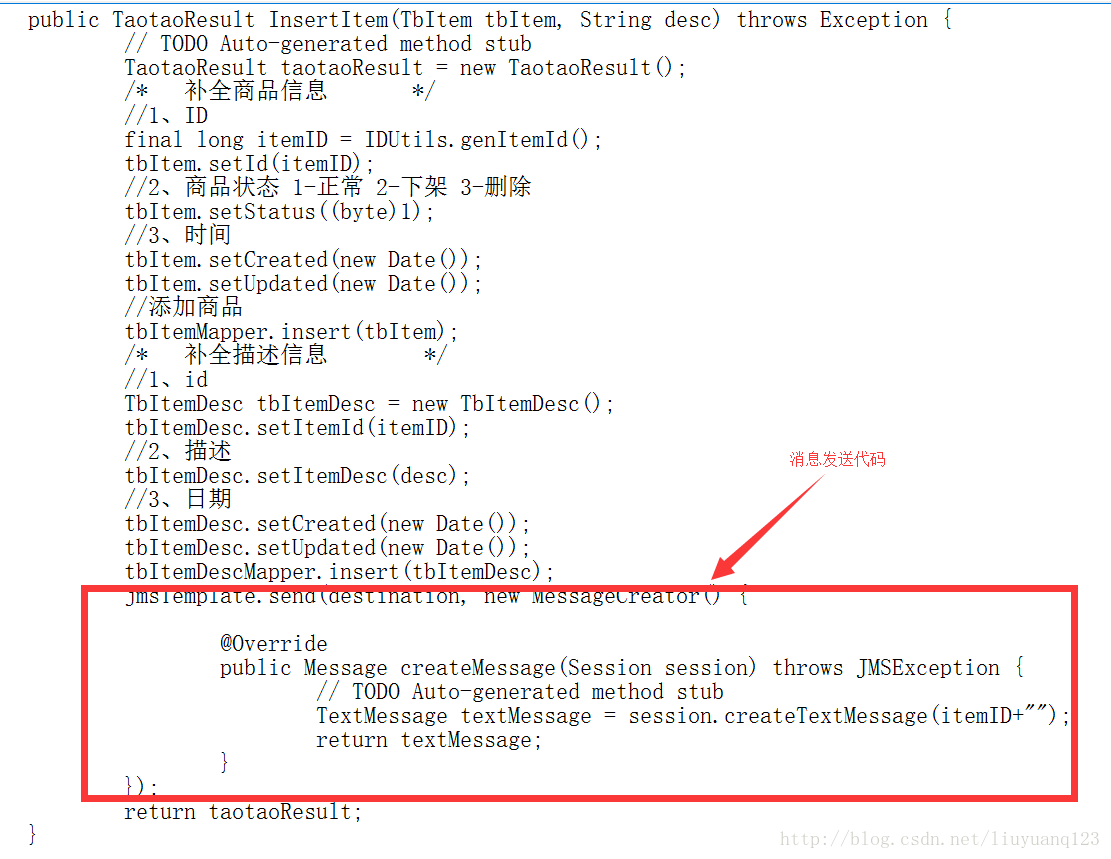
然后在我们淘淘商城中,商品添加到数据库的时候,对应也要添加数据到我们的solr索引中,所以生产者应该在插入数据后创建:
当然,在xml文件中配置好的jmstemplate和destination也要注入进来:
    @Autowired

    private JmsTemplate jmsTemplate;

    @Resource(name="itemAddTopic")

    private Destination destination;
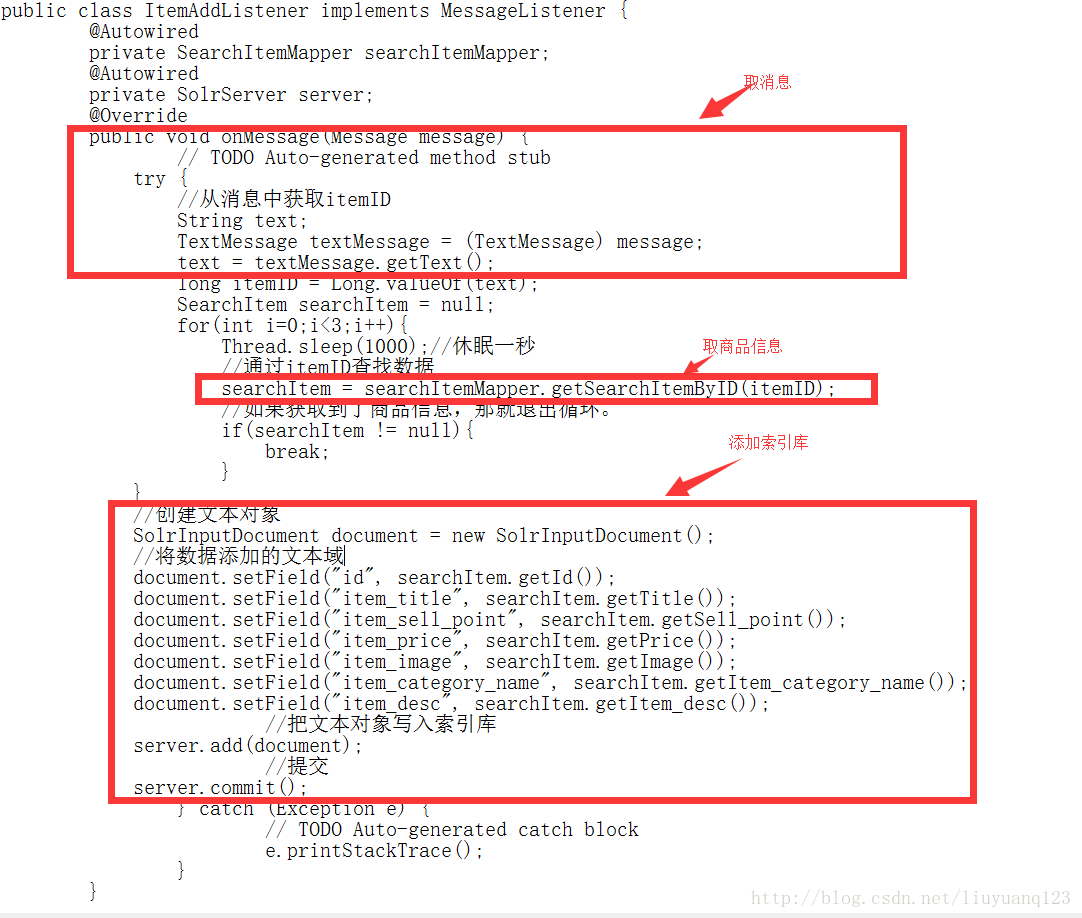
然后消费者应该写在我们的搜索工程中,首先添加spring和activeMQ的jar包,然后配置xml文件,再编写一个监听器,当接收到消息时,就讲数据存入索引库,xml文件代码如下:
<?xml version="1.0" encoding="UTF-8"?>

<beans xmlns="http://www.springframework.org/schema/beans"

    xmlns:context="http://www.springframework.org/schema/context" xmlns:p="http://www.springframework.org/schema/p"

    xmlns:aop="http://www.springframework.org/schema/aop" xmlns:tx="http://www.springframework.org/schema/tx"

    xmlns:dubbo="http://code.alibabatech.com/schema/dubbo"

    xmlns:xsi="http://www.w3.org/2001/XMLSchema-instance"

    xsi:schemaLocation="http://www.springframework.org/schema/beans http://www.springframework.org/schema/beans/spring-beans-4.2.xsd

    http://www.springframework.org/schema/context http://www.springframework.org/schema/context/spring-context-4.2.xsd

    http://www.springframework.org/schema/aop http://www.springframework.org/schema/aop/spring-aop-4.2.xsd http://www.springframework.org/schema/tx http://www.springframework.org/schema/tx/spring-tx-4.2.xsd

    http://code.alibabatech.com/schema/dubbo http://code.alibabatech.com/schema/dubbo/dubbo.xsd

    http://www.springframework.org/schema/util http://www.springframework.org/schema/util/spring-util-4.2.xsd">

    <!-- 配置能够产生connection的connectionfactory,由JMS对应的服务厂商提供 -->

    <bean id="tagertConnectionFactory" class="org.apache.activemq.ActiveMQConnectionFactory">

        <constructor-arg name="brokerURL" value="tcp://192.168.156.44:61616"/>

    </bean>

    <!-- 配置spring管理真正connectionfactory的connectionfactory,相当于spring对connectionfactory的一层封装 -->

    <bean id="connectionFactory" class="org.springframework.jms.connection.SingleConnectionFactory">

        <property name="targetConnectionFactory" ref="tagertConnectionFactory"/>

    </bean>

    <!-- 配置destination -->

    <!-- 队列目的地 -->

    <bean id="queueDestination" class="org.apache.activemq.command.ActiveMQQueue">

        <constructor-arg value="spring-queue"/>

    </bean>

    <!-- 话题目的地 -->

    <bean id="itemAddTopic" class="org.apache.activemq.command.ActiveMQTopic">

        <constructor-arg value="item-add-topic"/>

    </bean>

    <!-- 配置监听器 -->

    <bean id="myListener" class="com.taotao.search.listener.MyListener"/>

    <bean id="itemAddListener" class="com.taotao.search.listener.ItemAddListener"/>

    <!-- 系统监听器 -->

<!--    <bean class="org.springframework.jms.listener.DefaultMessageListenerContainer">

        <property name="connectionFactory" ref="connectionFactory"/>

        <property name="destination" ref="queueDestination"/>

        <property name="messageListener" ref="myListener"/>

    </bean> -->

    <bean class="org.springframework.jms.listener.DefaultMessageListenerContainer">

        <property name="connectionFactory" ref="connectionFactory"/>

        <property name="destination" ref="itemAddTopic"/>

        <property name="messageListener" ref="itemAddListener"/>

    </bean>

</beans>
接收消息代码:
最后同时打开测试即可。
转载地址:https://blog.csdn.net/liuyuanq123/article/details/79109218
ActiveMQ介绍
MQ是消息中间件,是一种在分布式系统中应用程序借以传递消息的媒介,常用的有ActiveMQ,RabbitMQ,kafka。ActiveMQ是Apache下的开源项目,完全支持JMS1.1和J2EE1.4规范的JMS Provider实现。
特点:
1、支持多种语言编写客户端
2、对spring的支持,很容易和spring整合
3、支持多种传输协议:TCP,SSL,NIO,UDP等
4、支持AJAX
消息形式:
1、点对点(queue)
2、一对多(topic)
ActiveMQ安装
我这里提供一个安装好的虚拟机:http://download.csdn.net/download/liuyuanq123/10217892
服务器运行后,我们可以直接访问到activeMQ的界面:
然后点击queues可以看到现在没有一条消息:
ActiveMQ测试
编写一个测试类对ActiveMQ进行测试,首先得向pom文件中添加ActiveMQ相关的jar包:
     <dependency>

         <groupId>org.apache.activemq</groupId>

         <artifactId>activemq-all</artifactId>

</dependency> - 1
- 2
- 3
- 4
queue的发送代码如下:
    public void testMQProducerQueue() throws Exception{

        //1、创建工厂连接对象,需要制定ip和端口号

        ConnectionFactory connectionFactory = new ActiveMQConnectionFactory("tcp://192.168.156.44:61616");

        //2、使用连接工厂创建一个连接对象

        Connection connection = connectionFactory.createConnection();

        //3、开启连接

        connection.start();

        //4、使用连接对象创建会话(session)对象

        Session session = connection.createSession(false, Session.AUTO_ACKNOWLEDGE);

        //5、使用会话对象创建目标对象,包含queue和topic(一对一和一对多)

        Queue queue = session.createQueue("test-queue");

        //6、使用会话对象创建生产者对象

        MessageProducer producer = session.createProducer(queue);

        //7、使用会话对象创建一个消息对象

        TextMessage textMessage = session.createTextMessage("hello!test-queue");

        //8、发送消息

        producer.send(textMessage);

        //9、关闭资源

        producer.close();

        session.close();

        connection.close();

}- 1
- 2
- 3
- 4
- 5
- 6
- 7
- 8
- 9
- 10
- 11
- 12
- 13
- 14
- 15
- 16
- 17
- 18
- 19
- 20
- 21
- 22
接收代码:
    public void TestMQConsumerQueue() throws Exception{

        //1、创建工厂连接对象,需要制定ip和端口号

        ConnectionFactory connectionFactory = new ActiveMQConnectionFactory("tcp://192.168.156.44:61616");

        //2、使用连接工厂创建一个连接对象

        Connection connection = connectionFactory.createConnection();

        //3、开启连接

        connection.start();

        //4、使用连接对象创建会话(session)对象

        Session session = connection.createSession(false, Session.AUTO_ACKNOWLEDGE);

        //5、使用会话对象创建目标对象,包含queue和topic(一对一和一对多)

        Queue queue = session.createQueue("test-queue");

        //6、使用会话对象创建生产者对象

        MessageConsumer consumer = session.createConsumer(queue);

        //7、向consumer对象中设置一个messageListener对象,用来接收消息

        consumer.setMessageListener(new MessageListener() {

            @Override

            public void onMessage(Message message) {

                // TODO Auto-generated method stub

                if(message instanceof TextMessage){

                    TextMessage textMessage = (TextMessage)message;

                    try {

                        System.out.println(textMessage.getText());

                    } catch (JMSException e) {

                        // TODO Auto-generated catch block

                        e.printStackTrace();

                    }

                }

            }

        });

        //8、程序等待接收用户消息

        System.in.read();

        //9、关闭资源

        consumer.close();

        session.close();

        connection.close();

}- 1
- 2
- 3
- 4
- 5
- 6
- 7
- 8
- 9
- 10
- 11
- 12
- 13
- 14
- 15
- 16
- 17
- 18
- 19
- 20
- 21
- 22
- 23
- 24
- 25
- 26
- 27
- 28
- 29
- 30
- 31
- 32
- 33
- 34
- 35
- 36
- 37
然后当我们运行queue发送的时候可以看到队列里已经有一条消息了,但没有发送出去:
然后在运行queue 的接收端,可以看到消息已经发出了:
接着对topic进行测试,发送代码如下:
    public void TestTopicProducer() throws Exception{

        //1、创建工厂连接对象,需要制定ip和端口号

        ConnectionFactory connectionFactory = new ActiveMQConnectionFactory("tcp://192.168.156.44:61616");

        //2、使用连接工厂创建一个连接对象

        Connection connection = connectionFactory.createConnection();

        //3、开启连接

        connection.start();

        //4、使用连接对象创建会话(session)对象

        Session session = connection.createSession(false, Session.AUTO_ACKNOWLEDGE);

        //5、使用会话对象创建目标对象,包含queue和topic(一对一和一对多)

        Topic topic = session.createTopic("test-topic");

        //6、使用会话对象创建生产者对象

        MessageProducer producer = session.createProducer(topic);

        //7、使用会话对象创建一个消息对象

        TextMessage textMessage = session.createTextMessage("hello!test-topic");

        //8、发送消息

        producer.send(textMessage);

        //9、关闭资源

        producer.close();

        session.close();

        connection.close();

}- 1
- 2
- 3
- 4
- 5
- 6
- 7
- 8
- 9
- 10
- 11
- 12
- 13
- 14
- 15
- 16
- 17
- 18
- 19
- 20
- 21
- 22
接收代码:
    public void TestTopicConsumer() throws Exception{

        //1、创建工厂连接对象,需要制定ip和端口号

        ConnectionFactory connectionFactory = new ActiveMQConnectionFactory("tcp://192.168.156.44:61616");

        //2、使用连接工厂创建一个连接对象

        Connection connection = connectionFactory.createConnection();

        //3、开启连接

        connection.start();

        //4、使用连接对象创建会话(session)对象

        Session session = connection.createSession(false, Session.AUTO_ACKNOWLEDGE);

        //5、使用会话对象创建目标对象,包含queue和topic(一对一和一对多)

        Topic topic = session.createTopic("test-topic");

        //6、使用会话对象创建生产者对象

        MessageConsumer consumer = session.createConsumer(topic);

        //7、向consumer对象中设置一个messageListener对象,用来接收消息

        consumer.setMessageListener(new MessageListener() {

            @Override

            public void onMessage(Message message) {

                // TODO Auto-generated method stub

                if(message instanceof TextMessage){

                    TextMessage textMessage = (TextMessage)message;

                    try {

                        System.out.println(textMessage.getText());

                    } catch (JMSException e) {

                        // TODO Auto-generated catch block

                        e.printStackTrace();

                    }

                }

            }

        });

        //8、程序等待接收用户消息

        System.in.read();

        //9、关闭资源

        consumer.close();

        session.close();

        connection.close();

}- 1
- 2
- 3
- 4
- 5
- 6
- 7
- 8
- 9
- 10
- 11
- 12
- 13
- 14
- 15
- 16
- 17
- 18
- 19
- 20
- 21
- 22
- 23
- 24
- 25
- 26
- 27
- 28
- 29
- 30
- 31
- 32
- 33
- 34
- 35
- 36
- 37
然后运行topic发送:
可以看到消息已经发送出去。再运行topic接收:
可以看到有了一个消费者,但是没有接收的消息,这是因为正常情况下我们的topic消息不会再服务器持久化,所以要先打开消费者,再打开生产者,这个时候我们再运行生产者发送一条消息看到消息已经接收到了:
ActiveMQ整合spring及项目中运用
activeMQ与spring看一整合到一起使用,除了添加ActiveMQ相关的jar包外,还需要添加spring的jar包:
    <dependency>

        <groupId>org.springframework</groupId>

        <artifactId>spring-context</artifactId>

</dependency> - 1
- 2
- 3
- 4
然后编写applicationContext-activemq.xml文件,
代码如下:
<?xml version="1.0" encoding="UTF-8"?>

<beans xmlns="http://www.springframework.org/schema/beans"

    xmlns:context="http://www.springframework.org/schema/context" xmlns:p="http://www.springframework.org/schema/p"

    xmlns:aop="http://www.springframework.org/schema/aop" xmlns:tx="http://www.springframework.org/schema/tx"

    xmlns:dubbo="http://code.alibabatech.com/schema/dubbo"

    xmlns:xsi="http://www.w3.org/2001/XMLSchema-instance"

    xsi:schemaLocation="http://www.springframework.org/schema/beans http://www.springframework.org/schema/beans/spring-beans-4.2.xsd

    http://www.springframework.org/schema/context http://www.springframework.org/schema/context/spring-context-4.2.xsd

    http://www.springframework.org/schema/aop http://www.springframework.org/schema/aop/spring-aop-4.2.xsd http://www.springframework.org/schema/tx http://www.springframework.org/schema/tx/spring-tx-4.2.xsd

    http://code.alibabatech.com/schema/dubbo http://code.alibabatech.com/schema/dubbo/dubbo.xsd

    http://www.springframework.org/schema/util http://www.springframework.org/schema/util/spring-util-4.2.xsd">

    <!-- 配置能够产生connection的connectionfactory,由JMS对应的服务厂商提供 -->

    <bean id="tagertConnectionFactory" class="org.apache.activemq.ActiveMQConnectionFactory">

        <constructor-arg name="brokerURL" value="tcp://192.168.156.44:61616"/>

    </bean>

    <!-- 配置spring管理真正connectionfactory的connectionfactory,相当于spring对connectionfactory的一层封装 -->

    <bean id="connectionFactory" class="org.springframework.jms.connection.SingleConnectionFactory">

        <property name="targetConnectionFactory" ref="tagertConnectionFactory"/>

    </bean>

    <!-- 配置生产者 -->

    <!-- Spring使用JMS工具类,可以用来发送和接收消息 -->

    <bean id="jmsTemplate" class="org.springframework.jms.core.JmsTemplate">

        <!-- 这里是配置的spring用来管理connectionfactory的connectionfactory -->

        <property name="connectionFactory" ref="connectionFactory"/>

    </bean>

    <!-- 配置destination -->

    <!-- 队列目的地 -->

    <bean id="queueDestination" class="org.apache.activemq.command.ActiveMQQueue">

        <constructor-arg value="spring-queue"/>

    </bean>

    <!-- 话题目的地 -->

    <bean id="itemAddTopic" class="org.apache.activemq.command.ActiveMQTopic">

        <constructor-arg value="item-add-topic"/>

    </bean>

</beans> - 1
- 2
- 3
- 4
- 5
- 6
- 7
- 8
- 9
- 10
- 11
- 12
- 13
- 14
- 15
- 16
- 17
- 18
- 19
- 20
- 21
- 22
- 23
- 24
- 25
- 26
- 27
- 28
- 29
- 30
- 31
- 32
- 33
- 34
- 35
- 36
然后在我们淘淘商城中,商品添加到数据库的时候,对应也要添加数据到我们的solr索引中,所以生产者应该在插入数据后创建:
当然,在xml文件中配置好的jmstemplate和destination也要注入进来:
    @Autowired

    private JmsTemplate jmsTemplate;

    @Resource(name="itemAddTopic")

private Destination destination;- 1
- 2
- 3
- 4
然后消费者应该写在我们的搜索工程中,首先添加spring和activeMQ的jar包,然后配置xml文件,再编写一个监听器,当接收到消息时,就讲数据存入索引库,xml文件代码如下:
<?xml version="1.0" encoding="UTF-8"?>

<beans xmlns="http://www.springframework.org/schema/beans"

    xmlns:context="http://www.springframework.org/schema/context" xmlns:p="http://www.springframework.org/schema/p"

    xmlns:aop="http://www.springframework.org/schema/aop" xmlns:tx="http://www.springframework.org/schema/tx"

    xmlns:dubbo="http://code.alibabatech.com/schema/dubbo"

    xmlns:xsi="http://www.w3.org/2001/XMLSchema-instance"

    xsi:schemaLocation="http://www.springframework.org/schema/beans http://www.springframework.org/schema/beans/spring-beans-4.2.xsd

    http://www.springframework.org/schema/context http://www.springframework.org/schema/context/spring-context-4.2.xsd

    http://www.springframework.org/schema/aop http://www.springframework.org/schema/aop/spring-aop-4.2.xsd http://www.springframework.org/schema/tx http://www.springframework.org/schema/tx/spring-tx-4.2.xsd

    http://code.alibabatech.com/schema/dubbo http://code.alibabatech.com/schema/dubbo/dubbo.xsd

    http://www.springframework.org/schema/util http://www.springframework.org/schema/util/spring-util-4.2.xsd">

    <!-- 配置能够产生connection的connectionfactory,由JMS对应的服务厂商提供 -->

    <bean id="tagertConnectionFactory" class="org.apache.activemq.ActiveMQConnectionFactory">

        <constructor-arg name="brokerURL" value="tcp://192.168.156.44:61616"/>

    </bean>

    <!-- 配置spring管理真正connectionfactory的connectionfactory,相当于spring对connectionfactory的一层封装 -->

    <bean id="connectionFactory" class="org.springframework.jms.connection.SingleConnectionFactory">

        <property name="targetConnectionFactory" ref="tagertConnectionFactory"/>

    </bean>

    <!-- 配置destination -->

    <!-- 队列目的地 -->

    <bean id="queueDestination" class="org.apache.activemq.command.ActiveMQQueue">

        <constructor-arg value="spring-queue"/>

    </bean>

    <!-- 话题目的地 -->

    <bean id="itemAddTopic" class="org.apache.activemq.command.ActiveMQTopic">

        <constructor-arg value="item-add-topic"/>

    </bean>

    <!-- 配置监听器 -->

    <bean id="myListener" class="com.taotao.search.listener.MyListener"/>

    <bean id="itemAddListener" class="com.taotao.search.listener.ItemAddListener"/>

    <!-- 系统监听器 -->

<!--    <bean class="org.springframework.jms.listener.DefaultMessageListenerContainer">

        <property name="connectionFactory" ref="connectionFactory"/>

        <property name="destination" ref="queueDestination"/>

        <property name="messageListener" ref="myListener"/>

    </bean> -->

    <bean class="org.springframework.jms.listener.DefaultMessageListenerContainer">

        <property name="connectionFactory" ref="connectionFactory"/>

        <property name="destination" ref="itemAddTopic"/>

        <property name="messageListener" ref="itemAddListener"/>

    </bean>

</beans> - 1
- 2
- 3
- 4
- 5
- 6
- 7
- 8
- 9
- 10
- 11
- 12
- 13
- 14
- 15
- 16
- 17
- 18
- 19
- 20
- 21
- 22
- 23
- 24
- 25
- 26
- 27
- 28
- 29
- 30
- 31
- 32
- 33
- 34
- 35
- 36
- 37
- 38
- 39
- 40
- 41
- 42
- 43
- 44
接收消息代码:
最后同时打开测试即可。
ActiveMQ详细入门使用教程的更多相关文章
- ActiveMQ详细入门教程系列(一)
一.什么是消息中间件 两个系统或两个客户端之间进行消息传送,利用高效可靠的消息传递机制进行平台无关的数据交流,并基于数据通信来进行分布式系统的集成.通过提供消息传递和消息排队模型,它可以在分布式环境下 ...
- gulp详细入门教程
本文链接:http://www.ydcss.com/archives/18 gulp详细入门教程 简介: gulp是前端开发过程中对代码进行构建的工具,是自动化项目的构建利器:她不仅能对网站资源进行优 ...
- ant使用指南详细入门教程
这篇文章主要介绍了ant使用指南详细入门教程,本文详细的讲解了安装.验证安装.使用方法.使用实例.ant命令等内容,需要的朋友可以参考下 一.概述 ant 是一个将软件编译.测试.部署等步骤联系在一起 ...
- gulp详细入门教程(转载)
本文转载自: gulp详细入门教程
- Step by Step 真正从零开始,TensorFlow详细安装入门图文教程!帮你完成那个最难的从0到1
摘要: Step by Step 真正从零开始,TensorFlow详细安装入门图文教程!帮你完成那个最难的从0到1 安装遇到问题请文末留言. 悦动智能公众号:aibbtcom AI这个概念好像突然就 ...
- <转载>ant使用指南详细入门教程 http://www.jb51.net/article/67041.htm
这篇文章主要介绍了ant使用指南详细入门教程,本文详细的讲解了安装.验证安装.使用方法.使用实例.ant命令等内容,需要的朋友可以参考下 一.概述 ant 是一个将软件编译.测试.部署等步骤联系在一起 ...
- SVN入门图解教程(超详细)
SVN入门图解教程(超详细) 一.总结 一句话总结: 二.SVN入门教程 1. 什么是SVN SVN全名Subversion,即版本控制系统.SVN与CVS一样,是一个跨平台的软件,支持大多数常见的操 ...
- Docker最详细入门教程
Docker原理.详细入门教程 https://blog.csdn.net/deng624796905/article/details/86493330 阮一峰Docker入门讲解 http://ww ...
- Kibana详细入门教程
Kibana详细入门教程 目录 一.Kibana是什么 二.如何安装 三.如何加载自定义索引 四.如何搜索数据 五.如何切换中文 六.如何使用控制台 七.如何使用可视化 八.如何使用仪表盘 一.K ...
随机推荐
- Fence Repair POJ - 3253 哈夫曼思想 优先队列
题意:给出一段无限长的棍子,切一刀需要的代价是棍子的总长,例如21切一刀 变成什么长度 都是代价21 列如7切成5 和2 也是代价7题解:可以利用霍夫曼编码的思想 短的棍子就放在底层 长的尽量切少一次 ...
- 【XSY1905】【XSY2761】新访问计划 二分 树型DP
题目描述 给你一棵树,你要从\(1\)号点出发,经过这棵树的每条边至少一次,最后回到\(1\)号点,经过一条边要花费\(w_i\)的时间. 你还可以乘车,从一个点取另一个点,需要花费\(c\)的时间. ...
- 【XSY2679】修墙 最短路
题目描述 有一个\((n+1)\times (m+1)\)的网格,每条边都有一个边权.有一些格子是城市.你要用一个环圈住所有城市,要求环上所有边的边权和最小.重合的边边权算多次.保证左上角\((1,1 ...
- Linux 通过Shell 查找问题进程 [转]
背景介绍: 最近公司服务器不太稳定,总是在凌晨某个时段突发高负载情况,因为客观环境比较复杂,所以很难猜测出到底是哪个进程出现了问题,加之故障发生时,通常我在睡觉,等我被报警短信吵醒,通过公司 VPN ...
- python 去重
List: listA = ['python','python','言','是','一','门','动','态','语','言'] print sorted(set(listA), key = lis ...
- iis默认文档
环境 W10 IIS10 输入网址后,显示一个默认首页,在IIS中,一般指定一个根目录下的文件例如index.html 如果要指定子目录下的文件, 例如让 /home/index.html 这个文件成 ...
- 「SCOI2014」方伯伯运椰子 解题报告
「SCOI2014」方伯伯运椰子 可以看出是分数规划 然后我们可以看出其实只需要改变1的流量就可以了,因为每次改变要保证流量守恒,必须流成一个环,在正负性确定的情况下,变几次是无所谓的. 然后按照套路 ...
- 题解 P4512 【【模板】多项式除法】
题目地址 前言 原理有大佬写了 所以蒟蒻只讲下本题的代码细节 我看懂的大佬博客:博客地址 因为可能知道了大致的步骤还有很多细的地方不理解导致写的时候要花很久并且看到大佬们好像都是用递归写的希望能有帮助 ...
- 【linux】vim常用操作及vim插件的安装使用
vim是linux下一个非常好用的文本编辑器,在linux下开发的人员要熟练掌握vim常用命令. 1. 打开在第n行 vim +143 filename.txt 2. 只读模式打开 vim -R / ...
- 2017蓝桥杯 省赛D题(方格分割)
6x6的方格,沿着格子的边线剪开成两部分.要求这两部分的形状完全相同. 如图:p1.png, p2.png, p3.png 就是可行的分割法. 试计算:包括这3种分法在内,一共有多少种不同的分割 ...