eclipse 安装TestNg
通过eclipse安装TestNg,过程如下:
1.点击help-->Install New Software

2.打开如下窗口,点击add,name自定义输入,Location中输入http://beust.com/eclipse,点击add

3.下面的窗口中等待加载后,会出现TestNG,全部勾选,点击下一步,后面一路点击下一步,最后一步选择我同意,点击finish,等待安装即可。

遇到的问题
在安装的过程中报错,报错内容如下:
An error occurred while collecting items to be installed
session context was:(profile=_Users_macbook_Applications_eclipse_Eclipse.app_Contents_Eclipse, phase=org.eclipse.equinox.internal.p2.engine.phases.Collect, operand=, action=).
No repository found containing: osgi.bundle,com.beust.jcommander,1.72.0
No repository found containing: osgi.bundle,com.beust.jcommander.source,1.72.0
No repository found containing: osgi.bundle,org.apache-extras.beanshell.bsh,2.0.0.b6
No repository found containing: osgi.bundle,org.apache-extras.beanshell.bsh.source,2.0.0.b6
No repository found containing: osgi.bundle,org.testng,6.14.3.r201802240500
No repository found containing: osgi.bundle,org.testng.eclipse,6.14.3.201902250526
No repository found containing: org.eclipse.update.feature,org.testng.eclipse,6.14.3.201902250526
No repository found containing: osgi.bundle,org.testng.eclipse.maven,6.14.3.201902250526
No repository found containing: org.eclipse.update.feature,org.testng.eclipse.maven.feature,6.14.3.201902250526
No repository found containing: org.eclipse.update.feature,org.testng.p2.feature,6.14.3.r201802240500
No repository found containing: osgi.bundle,org.testng.source,6.14.3.r201802240500
No repository found containing: osgi.bundle,org.yaml.snakeyaml,1.17.0
No repository found containing: osgi.bundle,org.yaml.snakeyaml.source,1.17.0
上网搜了一圈,原因是因为缺少依赖的jar包引起的。
解决方法:
上网搜索jcommander的1.72版本jar包,下载完成后,在eclipse中导入外部依赖jar包
1.选择一个工程,点击右键,选择BuildPath-->Configure Build Path
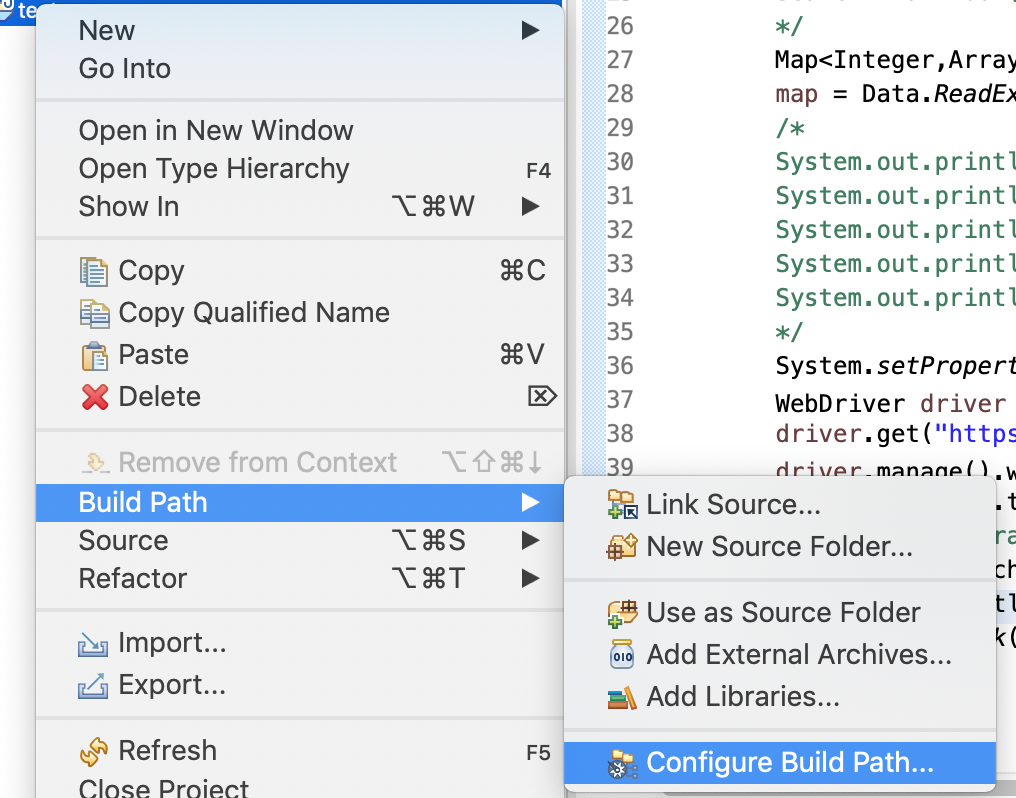
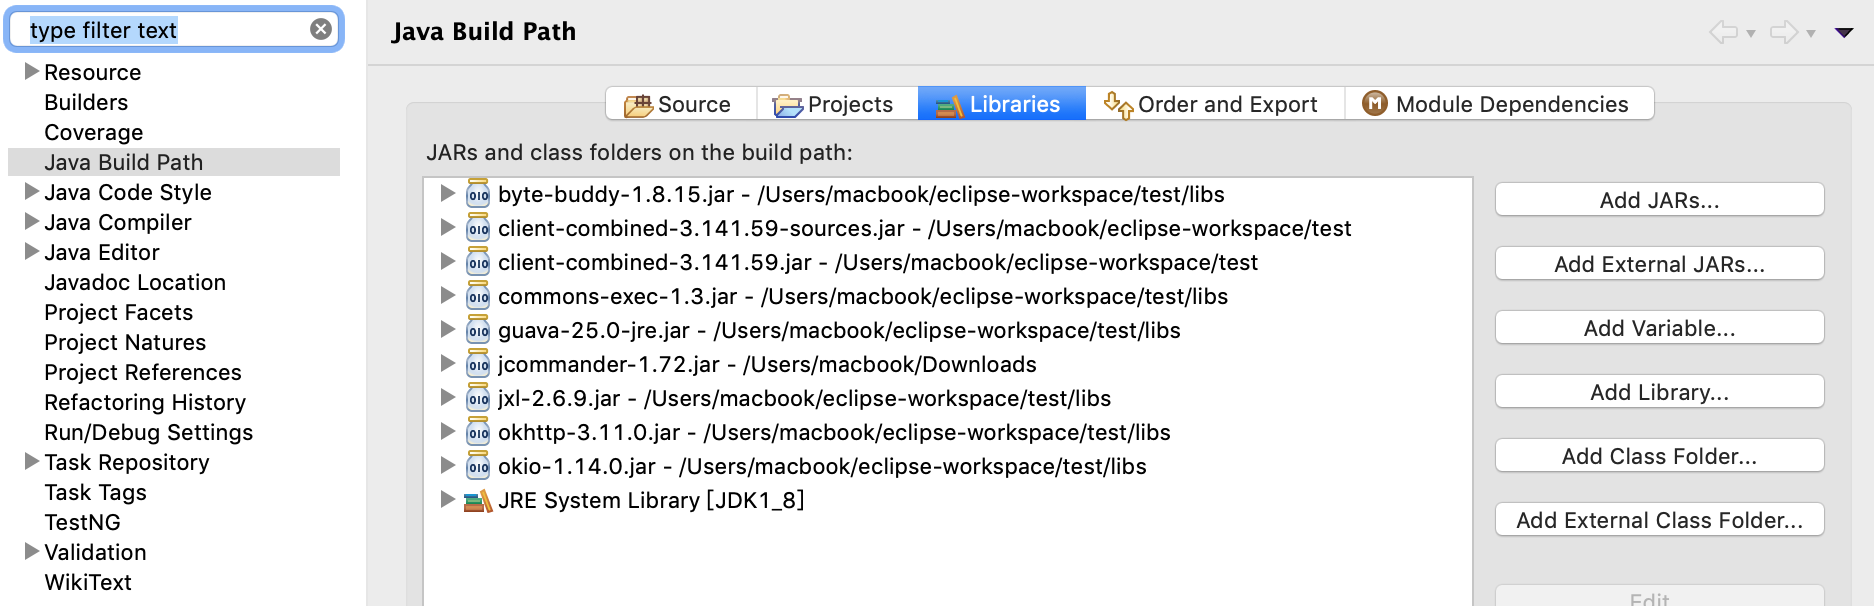
2.点击Add External JARs...,选择下载的jar,添加完成后,点击右下角的Apply即可。
3.添加完依赖jar包后,重新按照上面的步骤安装一遍即可。
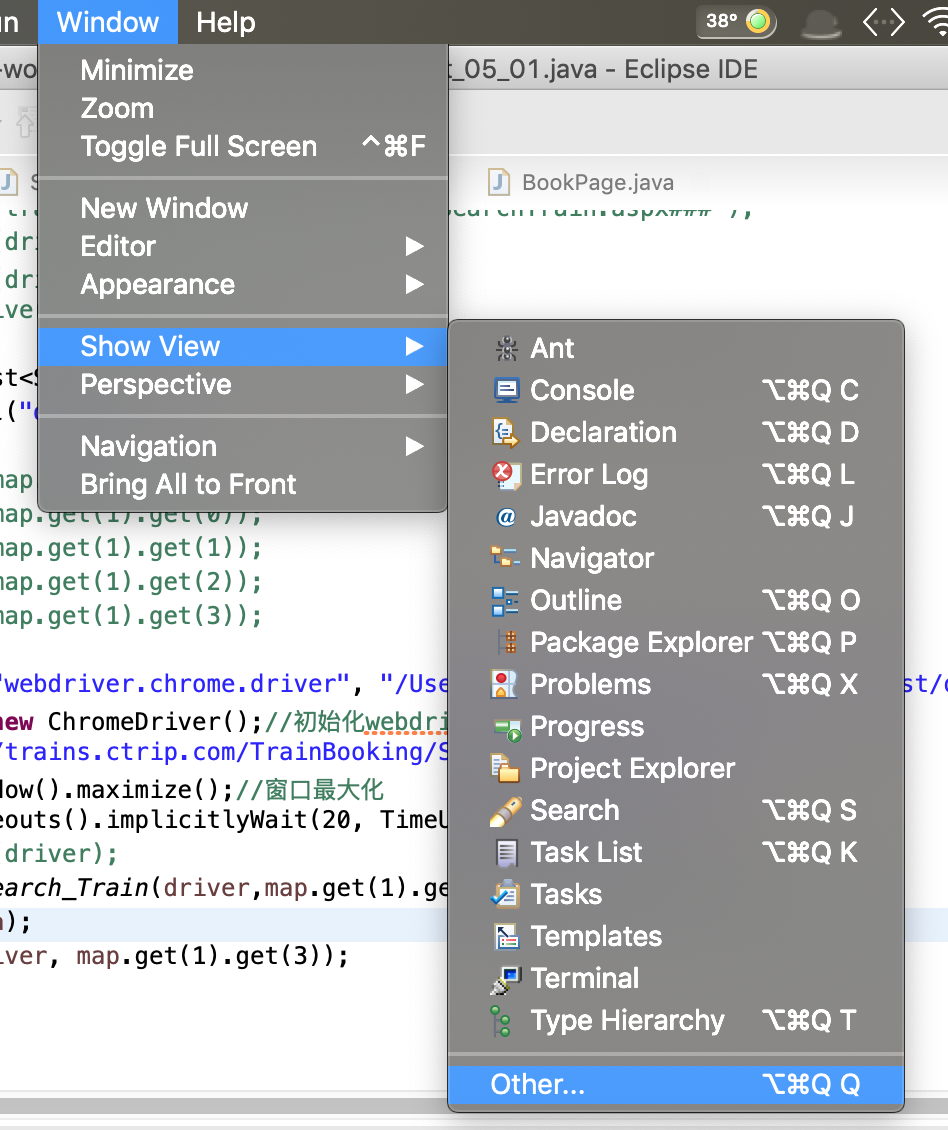
4.安装完成后,重启eclipse,安装成功验证:点击Window-->Show View-->Other;java中出现TestNG,即安装成功。
eclipse 安装TestNg的更多相关文章
- Eclipse安装TestNG插件
TestNG按照其文档的定义是: TestNG是一个测试框架,其灵感来自JUnit和NUnit的,但引入了一些新的功能,使其功能更强大,使用更方便. TestNG是一个开源自动化测试框架;TestNG ...
- Eclipse安装TestNG
1.在Eclipse中点击Help菜单,选择Install New Software选项,在弹出页面中输入安装地址即可安装. http://beust.com/eclipse 2. 3. 4. 等待T ...
- (转)关于eclipse的TestNG的插件安装方法
背景:最近在学习spring 4.x时候,用到了testNG的测试方法,发现需要在eclipse安装testNG插件才能够正常进行单元测试. 1 插件安装 今天在配置eclipse+selenium+ ...
- 1--Selenium环境准备--Eclipse 添加Testng插件
Eclipse安装TestNG TestNG官网地址:http://testng.org/ 1.离线安装TestNG插件: 受网络等因素影响,在线安装方式速度比较慢,可以通过如下方式离线安装TestN ...
- Eclipse中安装TestNG插件
在Eclipse中安装TestNG也像安装其他插件一样非常方便,如下: 选择菜单:Help->Install New Software,然后在弹出窗口中的“Work with”中输入地址: ht ...
- 安装TestNG在eclipse中的插件
两种方法可以安装TestNG Eclipse插件: 第一种,离线安装 TestNG Eclipse插件下载地址http://testng.org/doc/download.html. 下载下来以后,放 ...
- 在eclipse中安装TestNG
https://www.cnblogs.com/baixiaozheng/p/4989856.html 1.可借助Eclipse的Marketplace来安装TestNG Eclipse插件 a.打开 ...
- 1、在Eclipse中安装TestNG(离线方式)
1.TestNG安装包:链接: https://pan.baidu.com/s/1UXZlJfrp8LM-6XmDLzVXKg 密码: 46y2 2.安装教程: (1).下载testNG 离线安装包[ ...
- eclipse中testNG的两种安装方式
今天给大家带来两种关于testNG中的安装方式:1.在线安装(本人亲测有效!!!)2.离线安装 一.在线安装testNG插件的步骤: 1.给大家提供一个testNG在线的安装的地址:http://dl ...
随机推荐
- Tomcat 调优测试
测试环境: OS: Ubuntu14.04 64位 (运行在Docker1.9) CPU: Intel i3 双核四线程 Mem: 8G Tomcat版本: Tomcat8.5 Java SDK版本: ...
- ASP.NET MVC5入门指南(2)*入门介绍*创建您的第一个应用
开始吧 首先安装Visual Studio 2017.然后,打开Visual Studio. Visual Studio是一个IDE或集成开发环境.就像使用Microsoft Word编写文档一样,您 ...
- promethus监控gpu并编写自定义grafana可视化页面模板
###监控gpu url:https://github.com/NVIDIA/gpu-monitoring-tools/tree/master/exporters/prometheus-dcgm 实际 ...
- VUE: 移动端长按弹出确认删除地址(后面测试发现IOS有BUG,后面有更新随笔,更新后的亲测有效)
收货地址的删除方式可能有很多种,我目前见过的暂时只有两种(1.在编辑页删除 2.长按某一条收货地址弹出是否删除地址) 在开发的项目上要求第二种删除方法,于是记录一下我写的代码 ~ 1.首先,在移动端 ...
- EntityManager的基本方法
1.Persistence 主要用来获取EntityManagerFactory的实例; 通过静态方法:createEntityManagerFactory 来实现: 该方法有两个重载版本: ...
- java 项目 文件关系 扫描 注释注入(3)
@RequestParam和@PathVariable用法小结 https://www.cnblogs.com/helloworld-hyyx/p/5295514.html(copy) @Reque ...
- php+列出目录文件
用过浏览器的开发人员都对大文件上传与下载比较困扰,之前遇到了一个php文件夹上传下载的问题,无奈之下自己开发了一套文件上传控件,在这里分享一下.希望能对你有所帮助.此控件PC全平台支持包括mac,li ...
- hdu 5733 tetrahedron 四面体内切球球心公式
tetrahedron Time Limit: 2000/1000 MS (Java/Others) Memory Limit: 65536/65536 K (Java/Others)Total ...
- Codeforces 1054D Changing Array 贪心+异或和
题意 给一个长度为\(n\)的位数为\(k\)的整数数列\(a\),一次操作可将任意\(a_i\)取反,问经过任意次操作后最多有多少个区间异或和不为\(0\) 分析 求出前缀异或和,区间异或和为\(0 ...
- linux 动态库文件stripped属性理解
[file命令not stripped] UNIX下*.o和*.so文件显示的stripped和not stripped是什么意思? 表示符号表是否被清除. 在centos 6.2下用file命令查看 ...