
【Mac + Python + Selenium】之获取验证码图片code并进行登录
自己新总结了一篇文章,对代码进行了优化,另外附加了静态图片提取文字方法,两篇文章可以结合着看:《【Python】Selenium自动化测试之动态识别验证码图片方法(附静态图片文字获取)》
初稿代码,可以忽略不计(自己留着看)


#!/usr/bin/env python

# -*- coding: utf-8 -*-

# @Time    : 2020/01/15 13:27

# @Author  : zc

# @File    : 115test.py

from selenium import webdriver

from selenium.webdriver.common.by import By

from time import sleep

from PIL import Image,ImageEnhance

import pytesseract

imgPath1 = "/Users/zhangc/zh/111/test/img/识别失败图片.png"

imgPath = "/Users/zhangc/zh/111/test/img/img.png"

driver = webdriver.Chrome("/Users/zhangc/zh/111/test/chromedriver")

def remove(string):

    return string.replace(" ","")

def open(code):

    url = 'http://192.168.2.213:9100'

    driver.get(url)

    driver.maximize_window()

    login(code)

def login(code):

    if (code == "") | (len(remove(code)) != 4):

        getCodeImg()

    else:

        # 输入用户名

        telephone = driver.find_element(By.NAME,"telephone")

        telephone.clear()

        telephone.send_keys("13642040631")

        # 输入密码

        password = driver.find_element(By.NAME,"password")

        password.clear()

        password.send_keys("123456")

        # 输入验证码

        code_loc = driver.find_element(By.NAME,"code")

        code_loc.clear()

        code_loc.send_keys(code)

        # 点击登录按钮

        button = driver.find_element(By.XPATH,"//button[@type='button']")

        button.click()

        try:

            # 后台获取验证码校验内容

            text1 = driver.find_element(By.CSS_SELECTOR, ".el-message__content").text

            print(text1)

            while text1 == "":

                button.click()

                text1

            # 前台获取验证码校验内容

            text2 = driver.find_element(By.CSS_SELECTOR, ".el-el-form-item__error").text

            print(text2)

            if text1 == "验证码不正确":

                print("验证码不正确")

                driver.find_element(By.XPATH, "//div[@class='divIdentifyingCode']/img").click()

                getCodeImg()

                code2 = test()

                login(code2)

            elif text2 == "请输入正确的验证码":

                print("请输入正确的验证码")

                driver.find_element(By.XPATH, "//div[@class='divIdentifyingCode']/img").click()

                getCodeImg()

                code2 = test()

                login(code2)

            else:

                print("登陆成功!")

        except:

            print("进入首页!!!!")

            pass

def getCodeImg():

    '''获取code图片'''

    size2 = driver.get_window_size()

    print("页面的总size:"+str(size2))

    img_el = driver.find_element(By.XPATH,"//div[@class='divIdentifyingCode']/img")

    # 获取图片的坐标

    location = img_el.location

    print("页面坐标点的size:"+str(location))

    # 获取图片的大小

    size = img_el.size

    print("验证码的size:"+str(size))

    left = location['x']/size2['width']

    top = location['y']/size2['height']

    right = (location['x'] + size['width'])/size2['width']

    bottom = (location['y'] + size['height'])/size2['height']

    print(left,top,right,bottom)

    # 截图操作

    driver.get_screenshot_as_file(imgPath)

    imgSize = Image.open(imgPath).size

    print("截图的size:"+str(imgSize))

    sleep(2)

    img = Image.open(imgPath).crop((left*imgSize[0],

                                    top*imgSize[1]+100,

                                    right*imgSize[0]+20,

                                    bottom*imgSize[1]+150))

    img = img.convert('L')             #转换模式:L | RGB

    img = ImageEnhance.Contrast(img)#增强对比度

    img = img.enhance(2.0)             #增加饱和度

    img.save(imgPath)

def test():

    img2 = Image.open(imgPath)

    code = pytesseract.image_to_string(img2).strip()

    print("=============输出的验证码为:"+remove(code))

    while (code == "") | (len(remove(code)) != 4):

        # 重新获取验证码

        driver.find_element(By.XPATH, "//div[@class='divIdentifyingCode']/img").click()

        getCodeImg()

        img2 = Image.open(imgPath)

        code = pytesseract.image_to_string(img2).strip()

        if code == "":

            print("code获取为空值=================")

            continue

        elif len(remove(code)) != 4:

            print("code获取不是4位数字=============")

            continue

        else:

            print("识别成功!")

            # break

        break

    print("=============输出的验证码为:" + remove(code))

    return remove(code)

if __name__ == '__main__':

    code = ""

    open(code)

    code1 = test()

    login(code1)

# 页面的总size:{'width': 1206, 'height': 1129}

# 页面坐标点的size:{'x': 961, 'y': 518}

# 验证码的size:{'height': 28, 'width': 70}

# 0.796849087893864 0.4588131089459699 0.8548922056384743 0.48361381753764393

# 截图的size:(2412, 1950)
====================下面看正文=========================
之前有个问题一直在困扰着我,如何获取验证码的值
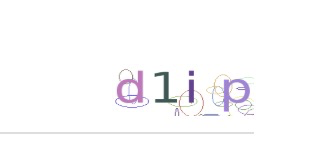
后来查询大神们的文章得知:
用pytesseract库来读取图片的文字。
先安装两个库:
# python有着更加优雅的方式调用系统的tesseract工具,首先安装pytesseract模块;pytesseract是对tesseract的封装,要和PIL联合使用

# 安装pytesseract

sudo pip install pytesseract

# 安装图片处理器PIL

pip install pillow
好了接下来看看我是怎么一步一步实现的吧
第一步、保存验证码图片
核心代码:
getCodeImg()方法
import pytesseract

from selenium import webdriver

from selenium.webdriver.common.by import By

from time import sleep

from PIL import Image,ImageEnhance

class LoginCode(object):

    # 用户名框元素

    telephone_loc = (By.NAME,"telephone")

    # 密码框元素

    password_loc = (By.NAME,"password")

    # 验证码框元素

    code_loc = (By.NAME,"code")

    # 登录按钮元素

    button_loc = (By.XPATH,"//button[@type='button']")

    # 验证码图片元素

    img_el_loc = (By.XPATH, "//div[@class='divIdentifyingCode']/img")

    # 验证码错误提示元素

    codeErrMsg_loc = (By.CSS_SELECTOR, ".el-message__content")

    imgPath = "/Users/zhangc/zh/111/test/img/img.png"

    driver = webdriver.Chrome("/Users/zhangc/zh/111/test/chromedriver")

    def find_element(self,*loc):

        # 实验得知方法中的参数loc↑加上*,定位会更稳定

        '''定位单个元素'''

        return self.driver.find_element(*loc)


   # 核心代码↓

    def getCodeImg(self):

        '''获取验证码图片'''

        # 验证码图片的元素定位

        img_el = self.find_element(*self.img_el_loc)

        # 获取整个浏览器的size

        chromeSize = self.driver.get_window_size()

        print("页面的总size:"+str(chromeSize))
        # 页面的总size:{'width': 1202, 'height': 1129}

        # 获取图片的坐标

        self.location = img_el.location

        print("页面坐标点的size:"+str(self.location))
     # 页面坐标点的size:{'x': 959, 'y': 518} x:指的图片左边距;y:指的图片上边距


        # 获取图片的大小

        imgSize = img_el.size

        print("验证码的size:"+str(imgSize))
      # 验证码的size:{'height': 28, 'width': 70}
     # 左边距占整个浏览器的百分比
     left = self.location['x']/chromeSize['width']
     # 上边距占整个浏览器的百分比

        top = self.location['y']/chromeSize['height']

     # 右边距占整个浏览器的百分比

        right = (self.location['x'] + imgSize['width'])/chromeSize['width']

     # 下边距占整个浏览器的百分比

        bottom = (self.location['y'] + imgSize['height'])/chromeSize['height']

     print(left,top,right,bottom)
     # 0.7978369384359401 0.4588131089459699 0.8560732113144759 0.48361381753764393

        # 浏览器截屏操作

        self.driver.get_screenshot_as_file(self.imgPath)

        screenshotImgSize = Image.open(self.imgPath).size

        print("截图的size:"+str(screenshotImgSize))
     # 截图的size:(2404, 1950)    宽:2404,高:1950

        sleep(2)

        # 从文件读取截图,截取验证码位置再次保存

        img = Image.open(self.imgPath).crop((

            # left*screenshotImgSize[0],

            # top*screenshotImgSize[1]+100,

            # right*screenshotImgSize[0]+20,

            # bottom*screenshotImgSize[1]+150
# 左边距百分比*截图的高≈截图左边距,再加上微调的距离+350
            left * screenshotImgSize[1]+350,
       # 上边距百分比*截图的高≈截图左边距,再加上微调的距离-100

            top * screenshotImgSize[0]-100,
       # 右边距百分比*截图的宽≈截图上边距,再加上微调的距离+400

            right * screenshotImgSize[1]+400,
        # 下边距百分比*截图的高≈截图右边距,再加上微调的距离-50

            bottom * screenshotImgSize[0]-50

        ))

        img = img.convert('L')                              # 转换模式:L | RGB

        img = ImageEnhance.Contrast(img)                    # 增强对比度

        img = img.enhance(2.0)                              # 增加饱和度

        img.save(self.imgPath)                              # 再次保存图片
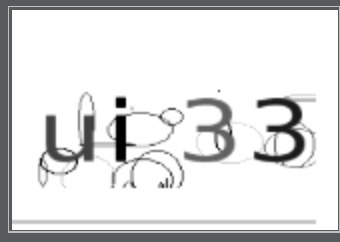
获取页面中验证码图片的截图:
第二步、循环获取验证码截图的code
为什么要循环获取呢,一次获取不就可以了吗,原因是图片识别文字不准确,经常会识别为空或者不是4位数的值。
所以要循环做判断,下面上代码:
核心方法是:
①getCode():先获取图片code值
②loopGetCode():如果获取的code值不符合条件,循环判断获取正确的图片code值
import pytesseract

from selenium import webdriver

from selenium.webdriver.common.by import By

from time import sleep

from PIL import Image,ImageEnhance

class LoginCode(object):

    # 用户名框元素

    telephone_loc = (By.NAME,"telephone")

    # 密码框元素

    password_loc = (By.NAME,"password")

    # 验证码框元素

    code_loc = (By.NAME,"code")

    # 登录按钮元素

    button_loc = (By.XPATH,"//button[@type='button']")

    # 验证码图片元素

    img_el_loc = (By.XPATH, "//div[@class='divIdentifyingCode']/img")

    # 验证码错误提示元素

    codeErrMsg_loc = (By.CSS_SELECTOR, ".el-message__content")

    imgPath = "/Users/zhangc/zh/111/test/img/img.png"

    driver = webdriver.Chrome("/Users/zhangc/zh/111/test/chromedriver")

    def remove(self,string):

        '''字符串去除空格'''

        return string.replace(" ","")

    def find_element(self,*loc):

        # 实验得知方法中的参数loc↑加上*,定位会更稳定

        '''定位单个元素'''

        return self.driver.find_element(*loc)


   # 核心代码↓

    def getCode(self):

        '''获取图片的code'''

        # 再次读取识别验证码

        img = Image.open(self.imgPath)

        code = pytesseract.image_to_string(img).strip()

        print("=============输出的验证码为:" + self.remove(code))

        return code


   # 核心代码↓

    def loopGetCode(self):

        '''循环判断获取正确的图片code'''

        code = self.remove(self.getCode())

        # 循环前获取code字数

        codeNumBf = len(code)

        # 如果获取图片的code值为空或者不满足4位数进行循环

        while (code == "") | (codeNumBf != 4):

            # 重新获取验证码

            self.find_element(*self.img_el_loc).click()

            self.getCodeImg()       # 获取验证码图片

            code = self.remove(self.getCode())

            # 循环后获取code字数

            codeNumAf = len(code)

            if code == "":

                print("code获取为空值=================")

                continue

            elif codeNumAf != 4:

                print("code获取不是4位数字=============")

                continue

            else:

                print("识别成功!")

            # 识别成功退出循环

            break

        print("=============输出的验证码为:" + code)

        # 输出满足条件的code

        return code
三、进行登录操作并判断验证码正确性
为什么登陆操作时还要判断验证码正确性呢,因为还是图片识别文字不准确,虽然识别出4位数但是并不是验证码图片中的值,所以需要再次判断,如果验证码错误就重新获取验证码的值。
核心代码:
login():登录操作
import pytesseract

from selenium import webdriver

from selenium.webdriver.common.by import By

from time import sleep

from PIL import Image,ImageEnhance

class LoginCode(object):

    # 用户名框元素

    telephone_loc = (By.NAME,"telephone")

    # 密码框元素

    password_loc = (By.NAME,"password")

    # 验证码框元素

    code_loc = (By.NAME,"code")

    # 登录按钮元素

    button_loc = (By.XPATH,"//button[@type='button']")

    # 验证码图片元素

    img_el_loc = (By.XPATH, "//div[@class='divIdentifyingCode']/img")

    # 验证码错误提示元素

    codeErrMsg_loc = (By.CSS_SELECTOR, ".el-message__content")

    imgPath = "/Users/zhangc/zh/111/test/img/img.png"

    driver = webdriver.Chrome("/Users/zhangc/zh/111/test/chromedriver")

    def open(self):

        '''打开浏览器'''

        url = 'http://192.168.2.213:9100'

        self.driver.get(url)

        self.driver.maximize_window()

        self.driver.implicitly_wait(10)

        # 获取验证码图片

        self.getCodeImg()

   # 核心代码↓

    def login(self,code):

        '''进行登录操作'''

        # 输入用户名

        telephone = self.find_element(*self.telephone_loc)

        telephone.clear()

        telephone.send_keys("13642040631")

        # 输入密码

        password = self.find_element(*self.password_loc)

        password.clear()

        password.send_keys("123456")

        # 输入验证码

        code_loc = self.find_element(*self.code_loc)

        code_loc.clear()

        code_loc.send_keys(code)

        # 点击登录按钮

        button = self.find_element(*self.button_loc)

        button.click()

        sleep(0.5)

        try:

            # 后台获取验证码校验内容

            codeErrMsg = self.find_element(*self.codeErrMsg_loc).text

            print("打印后台:"+codeErrMsg)

            if codeErrMsg == "验证码不正确":

                print("验证码不正确111")

                self.find_element(*self.img_el_loc).click()

                self.getCodeImg()

                self.loopGetCode_action()

            else:

                print("登陆成功!")

        except:

            print("进入首页!!!!")

            pass

   # 核心相关代码↓

    def loopGetCode_action(self):

        '''循环验证code的正确性'''

        resultCode = self.loopGetCode()

        self.login(resultCode)

   # 核心相关代码↓

    def login_action(self):

        '''执行验证码登录操作'''

        # 打开浏览器并获取验证码图片

        self.open()

        self.loopGetCode_action()
以上三步就是完整获取图片文字的方法了,虽然有点多但是都是必不可少的步骤。
==========================================================
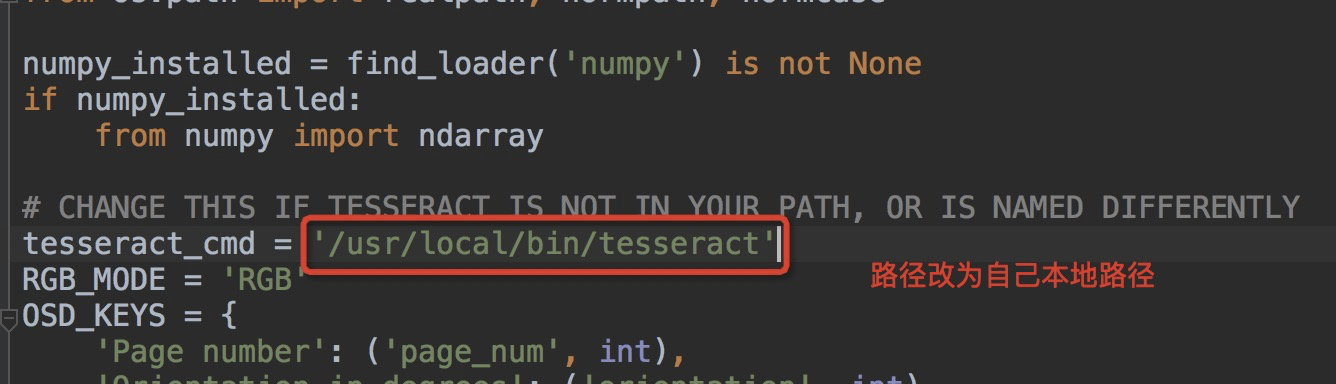
注:需要安装tesseract,不然会提示:
# CHANGE THIS IF TESSERACT IS NOT IN YOUR PATH, OR IS NAMED DIFFERENTLY
pytesseract.pytesseract.TesseractNotFoundError: tesseract is not installed or it's not in your path
未找到tesseract的路径,需要进入pytesseract.py文件
# Mac安装tesseract

brew install --with-training-tools tesseract

# 查看版本

tesseract -v

tesseract 4.0.0

 leptonica-1.77.0

  libgif 5.1.4 : libjpeg 9c : libpng 1.6.36 : libtiff 4.0.10 : zlib 1.2.11 : libwebp 1.0.2 : libopenjp2 2.3.0

 Found AVX2

 Found AVX

 Found SSE

# 查看安装路径

which tesseract

/usr/local/bin/tesseract
==========================================================
下面上完整代码:
#!/usr/bin/env python

# -*- coding: utf-8 -*-

# @Time    : 2020/01/15 13:27

# @Author  : zc

# @File    : 115test.py

import pytesseract

from selenium import webdriver

from selenium.webdriver.common.by import By

from time import sleep

from PIL import Image,ImageEnhance

class LoginCode(object):

    # 用户名框元素

    telephone_loc = (By.NAME,"telephone")

    # 密码框元素

    password_loc = (By.NAME,"password")

    # 验证码框元素

    code_loc = (By.NAME,"code")

    # 登录按钮元素

    button_loc = (By.XPATH,"//button[@type='button']")

    # 验证码图片元素

    img_el_loc = (By.XPATH, "//div[@class='divIdentifyingCode']/img")

    # 验证码错误提示元素

    codeErrMsg_loc = (By.CSS_SELECTOR, ".el-message__content")

    imgPath = "/Users/zhangc/zh/111/test/img/img.png"

    driver = webdriver.Chrome("/Users/zhangc/zh/111/test/chromedriver")

    def remove(self,string):

        '''字符串去除空格'''

        return string.replace(" ","")

    def find_element(self,*loc):

        # 实验得知方法中的参数loc↑加上*,定位会更稳定

        '''定位单个元素'''

        return self.driver.find_element(*loc)

    def open(self):

        '''打开浏览器'''

        url = 'http://192.168.2.213:9100'

        self.driver.get(url)

        self.driver.maximize_window()

        self.driver.implicitly_wait(10)

        # 获取验证码图片

        self.getCodeImg()

    def getCodeImg(self):

        '''获取验证码图片'''

        # 验证码图片的元素定位

        img_el = self.find_element(*self.img_el_loc)

        # 获取整个浏览器的size

        chromeSize = self.driver.get_window_size()

        print("页面的总size:"+str(chromeSize))

        # 页面的总size:{'width': 1202, 'height': 1129}

        # 获取图片的坐标

        self.location = img_el.location

        print("页面坐标点的size:"+str(self.location))

        # 页面坐标点的size:{'x': 959, 'y': 518} x:指的图片左边距;y:指的图片上边距

        # 获取图片的大小

        imgSize = img_el.size

        print("验证码的size:"+str(imgSize))

        # 验证码的size:{'height': 28, 'width': 70}

        # 左边距占整个浏览器的百分比

        left = self.location['x']/chromeSize['width']

        # 上边距占整个浏览器的百分比

        top = self.location['y']/chromeSize['height']

        # 右边距占整个浏览器的百分比

        right = (self.location['x'] + imgSize['width'])/chromeSize['width']

        # 下边距占整个浏览器的百分比

        bottom = (self.location['y'] + imgSize['height'])/chromeSize['height']

        print(left,top,right,bottom)

        # 0.7978369384359401 0.4588131089459699 0.8560732113144759 0.48361381753764393

        # 浏览器截屏操作

        self.driver.get_screenshot_as_file(self.imgPath)

        screenshotImgSize = Image.open(self.imgPath).size

        print("截图的size:"+str(screenshotImgSize))

        # 截图的size:(2404, 1950)    宽:2404,高:1950

        sleep(2)

        # 从文件读取截图,截取验证码位置再次保存

        img = Image.open(self.imgPath).crop((

            # left*screenshotImgSize[0],

            # top*screenshotImgSize[1]+100,

            # right*screenshotImgSize[0]+20,

            # bottom*screenshotImgSize[1]+150

            # 左边距百分比*截图的高≈截图左边距,再加上微调的距离+350

            left * screenshotImgSize[1]+350,

            # 上边距百分比*截图的宽≈截图上边距,再加上微调的距离-100

            top * screenshotImgSize[0]-100,

            # 右边距百分比*截图的高≈截图右边距,再加上微调的距离+400

            right * screenshotImgSize[1]+400,

            # 上边距百分比*截图的宽≈截图下边距,再加上微调的距离-50

            bottom * screenshotImgSize[0]-50

        ))

        img = img.convert('L')                              # 转换模式:L | RGB

        img = ImageEnhance.Contrast(img)                    # 增强对比度

        img = img.enhance(2.0)                              # 增加饱和度

        img.save(self.imgPath)                              # 再次保存图片

    def getCode(self):

        '''获取图片的code'''

        # 再次读取识别验证码

        img = Image.open(self.imgPath)

        code = pytesseract.image_to_string(img).strip()

        print("=============输出的验证码为:" + self.remove(code))

        return code

    def loopGetCode(self):

        '''循环判断获取正确的图片code'''

        code = self.remove(self.getCode())

        # 循环前获取code字数

        codeNumBf = len(code)

        # 如果获取图片的code值为空或者不满足4位数进行循环

        while (code == "") | (codeNumBf != 4):

            # 重新获取验证码

            self.find_element(*self.img_el_loc).click()

            self.getCodeImg()       # 获取验证码图片

            code = self.remove(self.getCode())

            # 循环后获取code字数

            codeNumAf = len(code)

            if code == "":

                print("code获取为空值=================")

                continue

            elif codeNumAf != 4:

                print("code获取不是4位数字=============")

                continue

            else:

                print("识别成功!")

            # 识别成功退出循环

            break

        print("=============输出的验证码为:" + code)

        # 输出满足条件的code

        return code

    def login(self,code):

        '''进行登录操作'''

        # 输入用户名

        telephone = self.find_element(*self.telephone_loc)

        telephone.clear()

        telephone.send_keys("13642040631")

        # 输入密码

        password = self.find_element(*self.password_loc)

        password.clear()

        password.send_keys("123456")

        # 输入验证码

        code_loc = self.find_element(*self.code_loc)

        code_loc.clear()

        code_loc.send_keys(code)

        # 点击登录按钮

        button = self.find_element(*self.button_loc)

        button.click()

        sleep(0.5)

        try:

            # 后台获取验证码校验内容

            codeErrMsg = self.find_element(*self.codeErrMsg_loc).text

            print("打印后台:"+codeErrMsg)

            if codeErrMsg == "验证码不正确":

                print("验证码不正确111")

                self.find_element(*self.img_el_loc).click()

                self.getCodeImg()

                self.loopGetCode_action()

            else:

                print("登陆成功!")

        except:

            print("进入首页!!!!")

            pass

    def loopGetCode_action(self):

        '''循环验证code的正确性'''

        resultCode = self.loopGetCode()

        self.login(resultCode)

    def login_action(self):

        '''执行验证码登录操作'''

        # 打开浏览器并获取验证码图片

        self.open()

        self.loopGetCode_action()

if __name__ == '__main__':

    LoginCode().login_action()
四、附录
感谢下面的参考文章:
①感谢作者:薛定谔的DBA的《Python selenium自动化识别验证码模拟登录操作(二)》
②感谢作者:大王大大王的《python -使用pytesseract识别验证码中遇到的问题》
③感谢作者:潇雨危栏的《Mac上tesseract-OCR的安装配置》
④感谢作者:anno_ym雨的《【Python】关于键盘键入值、str的与或非问题?【报错:TypeError: unsupported operand type(s) for |: 'str' and 'str'】》
⑤感谢作者:github_39655029的《Python中的条件判断、循环以及循环的终止》
⑥感谢作者:青灯夜游的《Python如何删除字符串中所有空格》
⑦感谢作者:silencement的《python如何跳出while循环》
⑧感谢作者:d0main的《Python读取图片尺寸、图片格式》
⑨感谢作者:奔跑的豆子_的《Python-获取图片的大小》
感谢作者:地空神一 的《python selenium UI自动化解决验证码的4种方法》
【Mac + Python + Selenium】之获取验证码图片code并进行登录的更多相关文章
- python爬虫之获取验证码登陆
#--coding:utf-8#author:wuhao##这里我演示的就是本人所在学校的教务系统#import urllib.requestimport urllib.parseimport rei ...
- Python Selenium Cookie 绕过验证码实现登录
Python Selenium Cookie 绕过验证码实现登录 之前介绍过博客园的通过cookie 绕过验证码实现登录的方法.这里并不多余,会增加分析和另外一种方法实现登录. 1.思路介绍 1.1. ...
- Atitit.获取验证码图片通过web
Atitit.获取验证码图片通过web 1. WebRequest进行较为底层的访问(不推荐) 1 2. WebBrowser截图 1 3. 剪贴板复制法Clipboard(推荐) 1 4. C# 取 ...
- Python+selenium之获取文本值和下拉框选择数据
Python+selenium之获取文本值和下拉框选择数据 一.结合实例进行描述 1. 实例如下所示: #新增标签操作 def func_labels(self): self.driver.find_ ...
- Python+Selenium自动化-获取页面信息
Python+Selenium自动化-获取页面信息 1.获取页面title title:获取当前页面的标题显示的字段 from selenium import webdriver import t ...
- python+selenium进行简单验证码获取
# _*_ coding:utf-8 _*_from PIL import Imagefrom selenium import webdriverimport pytesseractimport ti ...
- selenium验证码处理-获取验证码图片二进流数据转成原图保存
1.因为视频的作者给的代码不完整,只有核心部分的代码. 2.视频作者示例使用的第三方破解12306的脚本网页(失效了) 所以本人无法复现,此次截取部分代码作为理解核心意思(思想方法最重要) 1.面向对 ...
- 使用Python + Selenium破解滑块验证码
在前面一篇博客<使用 Python + Selenium 打造浏览器爬虫>中,我介绍了 Selenium 的基本用法和爬虫开发过程中经常使用的一些小技巧,利用这些写出一个浏览器爬虫已经完全 ...
- python+selenium实现自动识别验证码并登录
最近学习python+selenium实现网站的自动登录,但是遇到需要输入验证码的问题,经过查询百度收获了几种破解验证码的方式. 方式一)从万能的网友那收获了一个小众但非常实用的第3方库ddddocr ...
- Python+Selenium - windows安全中心的弹窗(账号登录)
当出现如下图所示的 Windows安全中心弹窗,需要输入用户名和密码时 如何用Python+selenium跳过这个登录. 步骤: 1.在注册表中三个位置各添加两个东西:iexplore.exe 和 ...
随机推荐
- NXP i.MX 6ULL工业核心板规格书( ARM Cortex-A7,主频792MHz)
1 核心板简介 创龙科技SOM-TLIMX6U是一款基于NXP i.MX 6ULL的ARM Cortex-A7高性能低功耗处理器设计的低成本工业级核心板,主频792MHz,通过邮票孔连接方式引出Eth ...
- .Net Core 访问 appsettings.json
1.添加 NuGet 包 Microsoft.Extensions.Configuration 2.通过注入获取 Configuration 注意:注入获取的必须提前在 StartUp 里面提前注册 ...
- 羊城杯初赛部分misc
羊城杯初赛部分misc Ez_misc i春秋刚考过的CVE,win11截图漏洞CVE-2023-21036(acropalypse) https://github.com/frankthetank- ...
- Java 面向对象编程之InstanceOf关键词和多态
InstanceOf关键字使用,什么是多态 InstanceOf关键字 是Java的一个二元操作符(运算符),也是Java的保留关键字 语法 //如果该object 是该class的⼀个实例,那⼀个实 ...
- Solo 开发者周刊 (第9期):Dawwin首位人工智能编程师或将改变未来?
这里会整合 Solo 社区每周推广内容.产品模块或活动投稿,每周五发布.在这期周刊中,我们将深入探讨开源软件产品的开发旅程,分享来自一线独立开发者的经验和见解.本杂志开源,欢迎投稿. 好文推荐 Daw ...
- 使用ES6中Class实现手写PromiseA+,完美通过官方872条用例
目录 Promise出现的原因 myPromise的实现要点 myPromise的实现 myPromise - 实现简单的同步 myPromise - 增加异步功能 myPromise - 链式调用( ...
- [oeasy]python0101_尾声_PC_wintel_8080_诸神的黄昏_arm_riscv
尾声 回忆上次内容 回顾了 ibm 使用开放架构 用 pc兼容机 战胜了 dec 小型机 apple 个人电脑 触击牺牲打 也破掉了 自己 软硬一体全自主的 金身 借助了 各种 软硬件厂商的 力量 最 ...
- oeasy 教您玩转 linux 之 010301 电子宠物 pet
我们来回顾一下 上一部分我们都讲了什么? 中️文诗词fortune=zh的使用 建立自己的彩色诗词库 通过pip把输出结果交给cowsay或boxes 我们这次讲一讲桌面的一些应用 oneko 我们可 ...
- 题解:P10677 『STA - R6』inkar-usi
背景 把人家鸽了,感觉废了. 分析 这道题刚看到题目的时候很多人会想爆搜,但是因为 \(10^3\) 的数据范围,所以应该去想一想是不是有什么性质. 我们稍微想一想就会发现,题目上提到了可以重复走,那 ...
- 【郝斌C ST】02
自学视频<郝斌C语言自学教程> 10: https://www.bilibili.com/video/BV1os411h77o C语言大纲 - 1.简介 - 2.基本编译知识 - 3.数据 ...