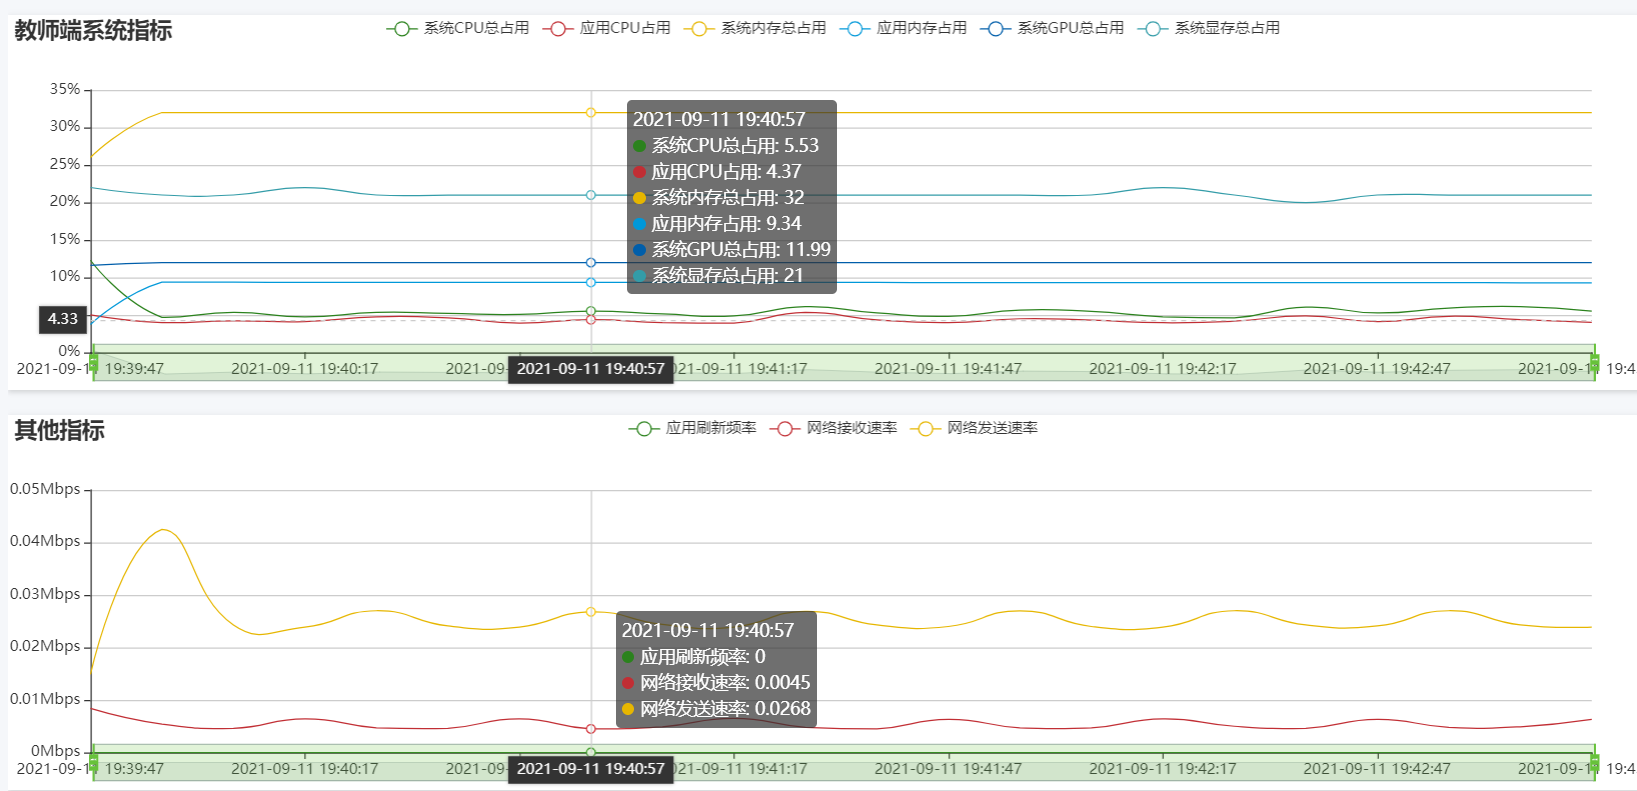
echarts做折线图
先给大家看图
父组件
components: {
},
上面是DOM和组件注册
CPUTotalUsage: '',
Timer: '',
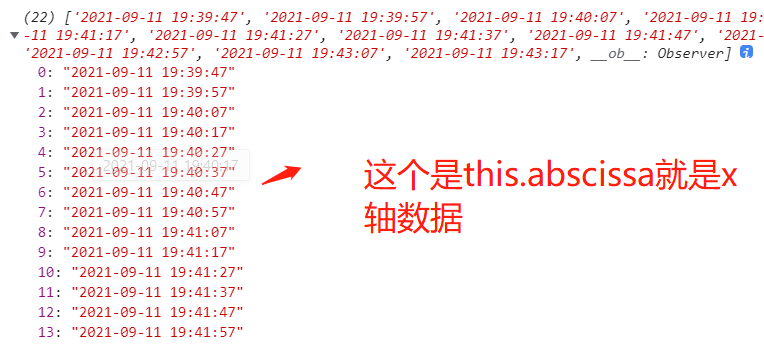
abscissa: [],
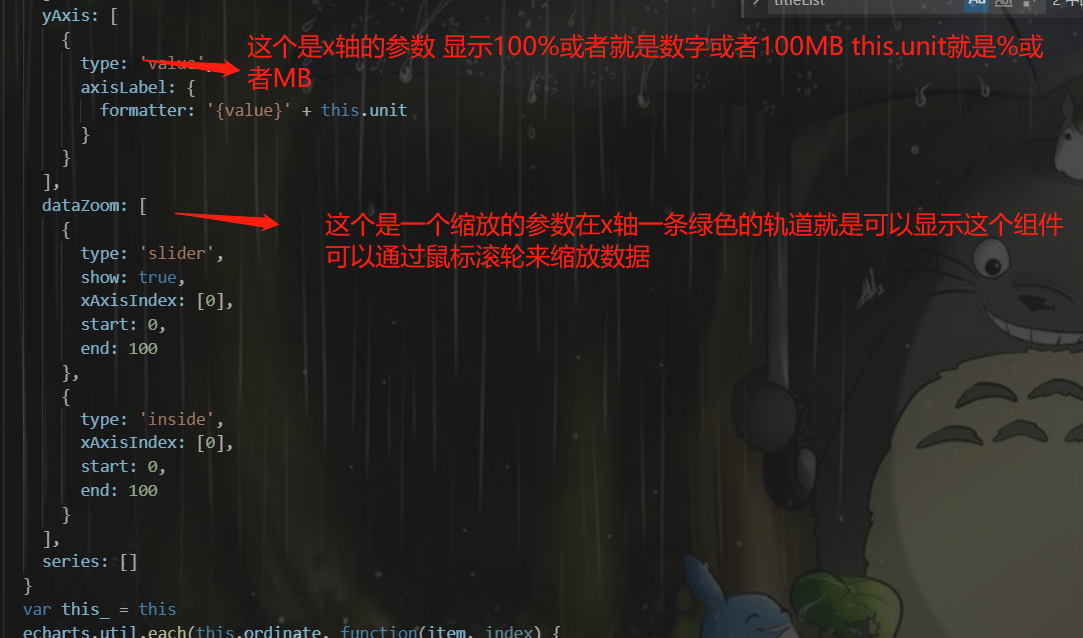
// 折线纵轴单位
unit: ['%', 'Mbps'],
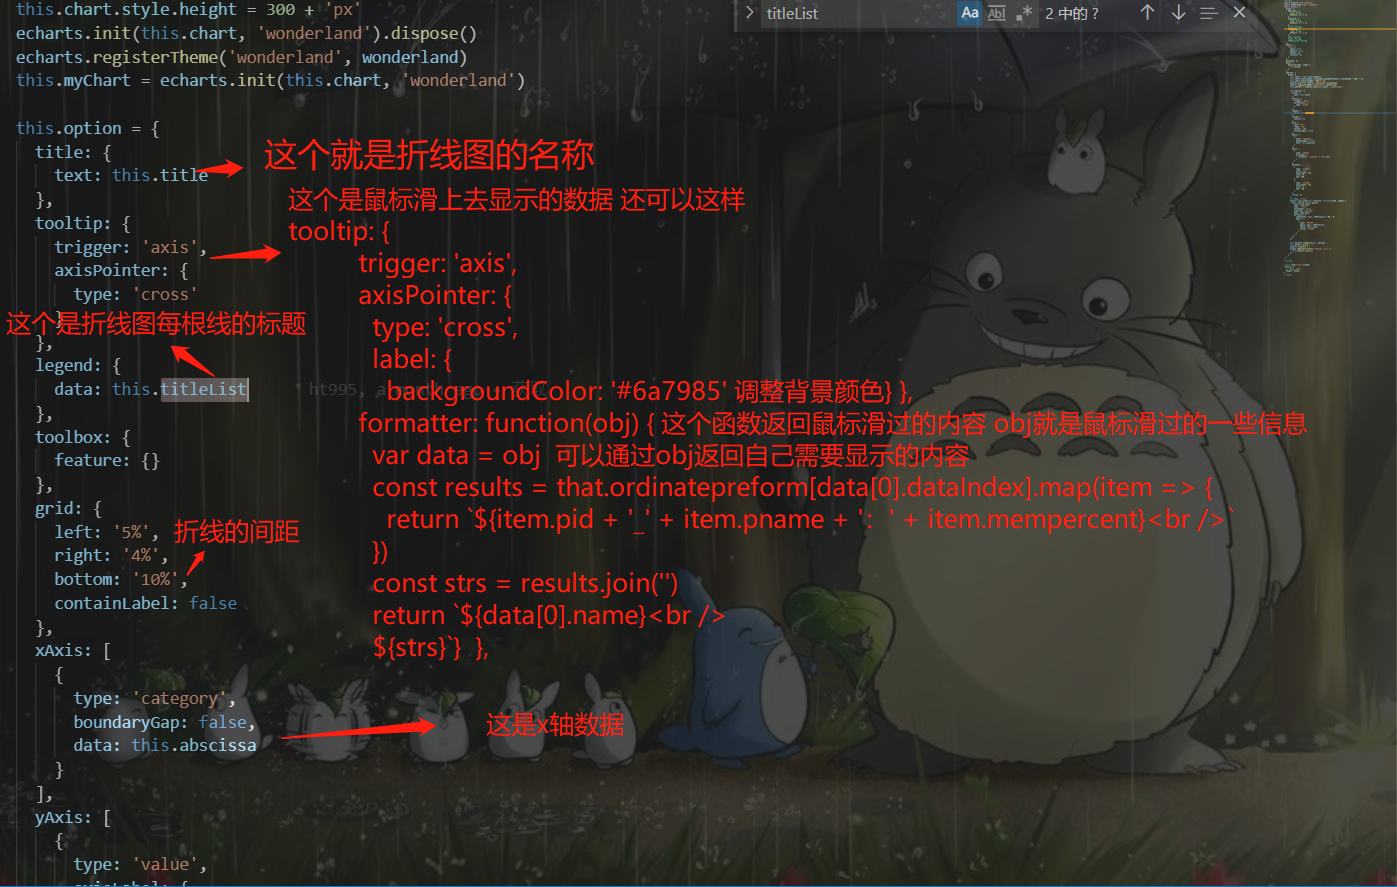
// 折线title
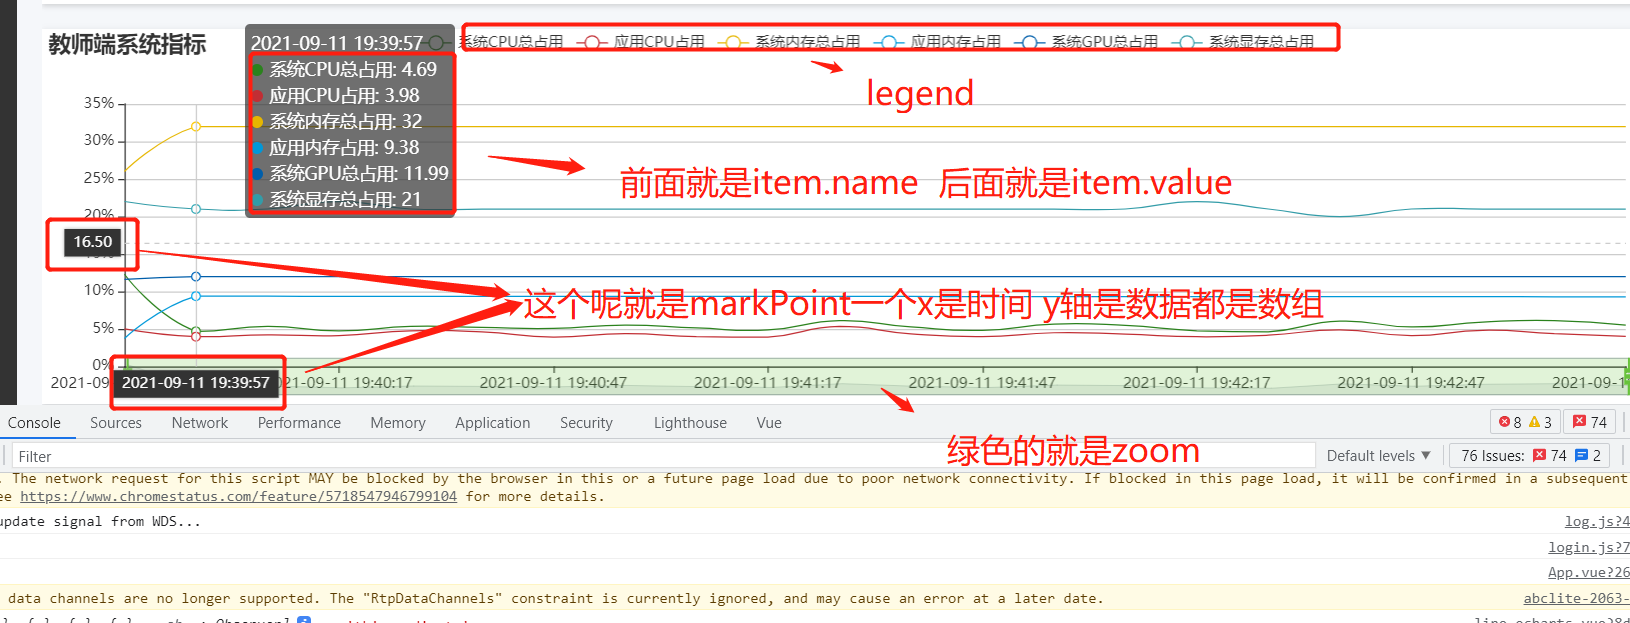
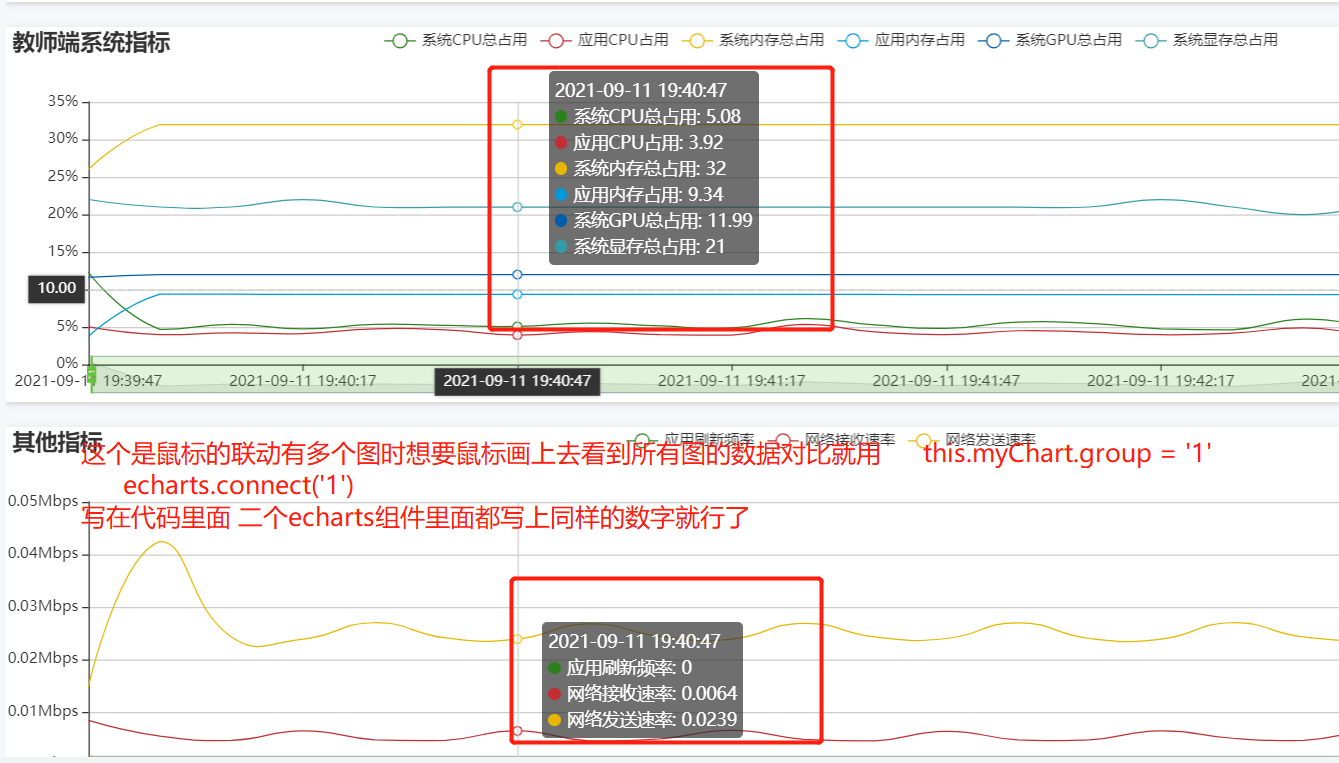
title: ['教师端系统指标', '其他指标', 'TOP5进程占用-CPU', 'TOP5进程占用-内存'],
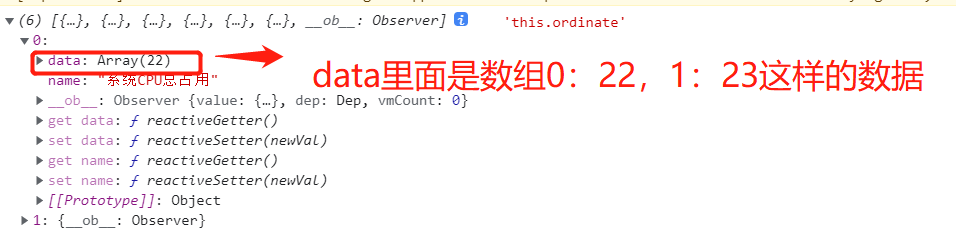
ordinate: [],
上面这些是data里面定义的数据 下面是请求到的数据
我们看下返回的数据都是什么
这是整个接口的返回 我们就取一些数据


这个就是子组件echarts的组件实例


echarts做折线图的更多相关文章
- echarts版本折线图
1.效果如下: 绘制折线图,应该算是说echarts中使用最简单也算使用频率最高的一种功能了吧.根据官网列子能找出规律,只是有些属性对于初接触者来说,会有点陌生,不过仔细阅读一下还是不 ...
- Echarts line折线图使用(vue)
实现 首先引入echarts工具 // vue文件中引入echarts工具 let echarts = require('echarts/lib/echarts') require('echarts/ ...
- ECharts使用—折线图动态加载
最近需求中用到折线图,单线条,多线交错,之前是散点图,用的是另一个 amcharts.js,这个文档也能找的到,回归早本次重点:ECharts 一.首先引入echarts.common.min.js文 ...
- 移动端引用echarts的折线图
移动端写一个图表引用echarts,highcharts插件,本次要找一个能够显示最新数据的折线图,最后只找到显示最大值: 找到echarts的实例:记一下个各功能. <!DOC ...
- echarts实现折线图
前端框架使用的angular,折线图使用echarts实现. 这里实现的折线图只是简单是折线图,折线图显示在table中,不需要xy轴的数据说明. 1. item.component.html < ...
- Echarts案例-折线图
一:先在官网下载 https://www.echartsjs.com/zh/download.html 然后再建立工程,导入这两个包: 写代码: <!DOCTYPE html> <h ...
- echarts自定义折线图横坐标时间间隔踩坑总结
折线图需求:横坐标为时间,要求按一定间隔展示,鼠标移至折线上间隔时间内的数据也可展示 其实很简单的一个配置就可搞定,但在不熟悉echarts配置的情况下,就很懵逼 xAxis: { boundaryG ...
- echarts之折线图介绍及使用
<!DOCTYPE html> <html lang="en"> <head> <meta charset="UTF-8&quo ...
- 使用Echarts实现折线图的一点总结
使用Echarts的一点总结 1.安装,我使用得vue cnpm install echarts --save 2.在入口文件main.js中注册,并使用 // 引入折线图 echarts impor ...
- ECharts绘制折线图
首先看实现好的页面 实现 首先引入echarts工具 // vue文件中引入echarts工具 let echarts = require('echarts/lib/echarts') require ...
随机推荐
- 这些Git事故灾难, 你经历过几个?
前言 关于Git, 相信大家最常用的就是pull和push. 但随着协作规模的提升, 遇到的问题也会越来越多. 本篇文章并不科普一些命令的详细用法, 更多的是分享在工作中遇到的Git场景问题以及踩过的 ...
- 使用JSZip实现在浏览器中操作文件与文件夹
1. 引言 浏览器中如何创建文件夹.写入文件呢? 答曰:可以借助JSZip这个库来实现在浏览器内存中创建文件与文件夹,最后只需下载这个.zip文件,就是最终得结果 类似的使用场景如下: 在线下载很多图 ...
- AI极速批量换脸!Roop-unleashed下载介绍,可直播
要说AI换脸领域,最开始火的项目就是Roop了,Roop-unleashed作为Roop的嫡系分支,不仅继承了前者的强大基因,更是在功能上实现了重大突破与升级 核心特性 1.可以进行高精度的图片.视频 ...
- 【GDKOI 2024 TG Day2】染色(set) 题解
发现我们给一个点染上色后有: 我们称这是一个大小为 1 的十字. 进一步地,我们给这 5 个点再次染上色后有: 我们称这是一个大小为 2 的十字. 同理可得,我们给这 5 个点染上相同的大小为 2 的 ...
- vue的history模式与哈希模式原理
hash模式 <!-- * @Author: dezhao.zhao@hand-china.com * @Date: 2021-10-26 17:52:25 * @Description: -- ...
- iOS 端容器之 WKWebView 那些事
简介: 本文主要是关于在端容器设计开发过程中,WKWebView 使用上遇到的一些问题和解决办法 作者 | 驽良 来源 | 阿里技术公众号 一 背景 熟悉 iOS\macOS Hybrid 混合 ...
- [FAQ] web3js, Error: [number-to-bn] while converting number 0.1 to BN.js instance, error: invalid number value
我们在调用合约方法时,都可以传一些参数的,比如转账金额 value. value 的单位是 wei,这是一个很小的单位,所以一般数值很大. 如果误把 ether 当成 wei 传参,就会报标题中的错误 ...
- [FAQ] web3js, Error: Please pass numbers as strings or BN objects to avoid precision errors.
我们在调用合约方法时,都可以传一些参数的,比如转账金额 value. value 的单位是 wei,这是一个很小的单位,所以一般数值很大. 注意,把 ether 转 wei 需要先把 ether 的值 ...
- dotnet 6 使用 HttpWebRequest 进行 POST 文件将占用大量内存
我有用户给我报告一个内存不足的问题,经过了调查,找到了依然是使用已经被标记过时的 HttpWebRequest 进行文件推送,推送过程中,由于 System.Net.RequestStream 将会完 ...
- win10 uwp 选择文本转语音的机器人
在 UWP 里,可以非常方便将某个文本转换为音频语音,转换时,将会根据输入的内容以及本机所安装的语言库选择一位机器人帮忙将输入的文本转换为语音.本文来告诉大家如何切换文本转语音的机器人,例如从默认的女 ...