
Create and format Word documents using R software and Reporters package
- http://www.sthda.com/english/wiki/create-and-format-word-documents-using-r-software-and-reporters-package
- Install and load the ReporteRs R package
- Create a simple Word document
- Add a table of contents into a Word document
- Infos
Word document is one of the file formats widely used by many people, including researchers, for editing their text and tracking changes between different authors.
There are different solutions to generate a Word document from R software :
- R2wd package : unfortunately it depends on statconnDCOM or RDCOMClient servers, and works on Windows only.
- knitr + rmarkdown + pandoc : this is an easy way to quickly create a Word report but the output is very basic.
- ReporteRs package, by David Gohel, provides easy to use functions to write and format Word documents. It can be also used to generate Word document from a template file with logos, fonts, etc. ReporteRs is Java-based solution, so it works on Windows, Linux and Mac OS systems.
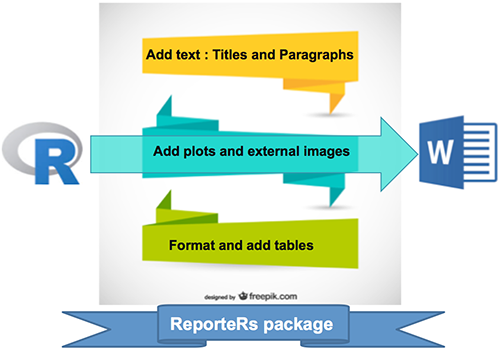
The aim of this R tutorial is to show you how to easily and quickly export outputs (including data table, plots, paragraphs of text and R scripts) from R statistical software to a Microsoft Word document (.docx file format) using ReporteRs package.
Install and load the ReporteRs R package
ReporteRs can be installed and loaded as follow :
install.packages('ReporteRs') # Install

library('ReporteRs') # Load
Note that ReporteRs requires Java (>= 1.6) ; make sure you have an installed JRE
The version of Java installed on your computer, can be checked with this R code :
system("java -version")Create a simple Word document
Word document can be created using the docx() function. Then, contents can be added to the document using the functions below:
- addTitle: Add a title
- addParagraph: Add paragraphs of text
- addFlexTable: Add a table
- addPlot: Add a plot generated in R
- addImage: Add external images
- addTOC: Add a table of contents
- addRScript: highlight and add R code
- addMarkdown: Add markdown
- addPageBreak: Add a page break
After adding contents, you have to use the writeDoc() function to write the Word document into a .docx file.
Add texts : title and paragraphs of texts
Texts can be added as a title or a paragraph using the R functions addTitle() or addParagraph(). A simplified format of these functions are :
addTitle(doc, value, level=1) # Add titles

addParagraph(doc, value) # Add a paragraph of texts- doc : docx object.
- value : the text to add as a title or a paragraph.
- level : an integer specifying the heading level. e.g : 1 for title1, 2 for title2, 3 for title3, etc.
addTitle() and addParagraph() functions can be used as follow :
library(ReporteRs)

# Create a word document to contain R outputs

doc <- docx()

# Add a title to the document

doc <- addTitle(doc, "Simple Word document", level=1)

# Add a paragraph of text into the Word document

doc <- addParagraph(doc, "This simple Word document is created using R software and ReporteRs package. It contains just a simple text.")

# Add a sub title

doc <- addTitle(doc, "What is R language?", level = 2)

doc <- addParagraph(doc, "R is a language and environment for statistical computing and graphics. R provides a wide variety of statistical and graphical techniques, and is highly extensible.")

doc <- addTitle(doc, "What is ReporteRs", level = 2)

doc <- addParagraph(doc, "ReporteRs is a package to write and format easily a Word document from R software.")

# Write the Word document to a file

writeDoc(doc, file = "r-reporters-simple-word-document.docx")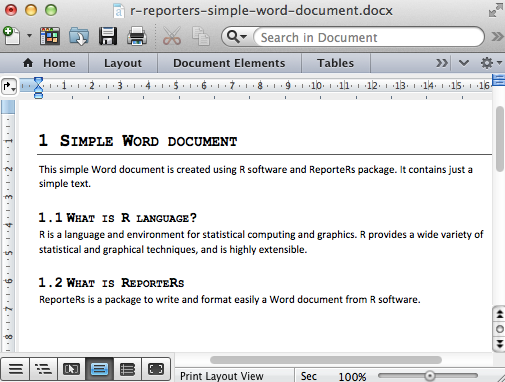
Format the text of a Word document using R software
Text properties : font, color, size
Among the text properties available in a Word document, there are :
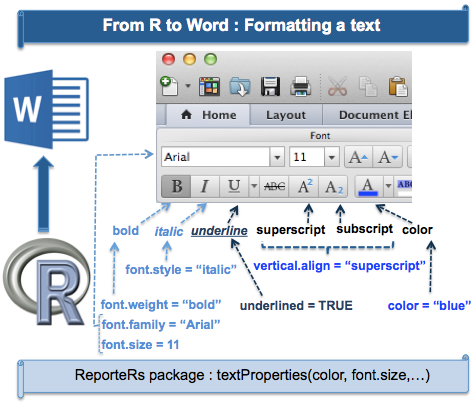
font family (e.g : “Arial”), font size (e.g : 11), font weight (e.g: bold), font style (e.g : italic), underlined text, vertical align(superscript, subscript) and color (e.g: “blue”).
These properties are shown in the figure below :
 .
.
This section describes how to format and write a Word document using R software
Change the global font size and font family
The default font size and font family can be changed as follow :
options( "ReporteRs-fontsize" = 12,

         "ReporteRs-default-font" = "Arial")
Note that, this changing will be applied to the whole content of the Word document. An example is shown in the next section.
Change the appearance of a “Piece Of Text” (pot)
 .
.
The function pot() [Pieces Of Text] is used to format text chunks before adding into the document. pot() function can be also used to create a hyperlink and a footnote. A simplified format is :
pot(value="", format = textProperties())- value : the text to be formatted
- format : the properties to use for formatting the text
The possible values for the parameter format are the following functions :
- textProperties() : the text formatting properties
- textBold() : shortcut for bold text
- textItalic() : shortcut for italic text
- textBoldItalic() : shortcut for bold-italic text
- textNormal() : shortcut for normal text
The arguments for these functions are :
- color : font color; e.g : color=“#000000” or color = “black”.
- font.size : a integer indicating the font size.
- font.weight : the font weight. Possible values are “normal” or “bold”.
- font.style : the font style. Possible values are “normal” or “italic”.
- underlined : a logical value specifying if the text should be underlined.
- font.family : the font family; e.g : “Arial”.
- vertical.align : a character indicating font vertical alignments. Expected values are “baseline”" or “subscript” or “superscript”. Default value is baseline.
- shading.color : background color of the text (e.g “#000000” or “black”)
pot() function can be used as follow :
# Formatted text

my_text <- 'This is a ' +

         pot('formatted text', textProperties(color="blue")) +

        ' created using' + pot('ReporteRs', textBold()) + 'package'

# Create a hyperlynk

my_link <- pot( 'Click here to visit STHDA website!',

          hyperlink = 'http://www.sthda.com/english',

          format=textBoldItalic(color = '#428BCA', underline = TRUE ))
The R code below creates a Word document containing a formatted text and a hyperlink :
doc <- docx()

# Change the default font size and font family

options('ReporteRs-fontsize'=12, 'ReporteRs-default-font'='Arial')

# Add a formatted paragraph of texts

#++++++++++++++++++++++++++++++

doc <- addTitle(doc, "Formatted text", level=1)

# Define a style to highlight a text

highlight_style <- textProperties(color='#1163A5',font.size = 20,

                font.weight = 'bold', font.family = 'Courier New' )

my_text = 'This ' + pot('Word document', highlight_style) +

  ' is created using' +

  pot(' R software', textProperties(color="red", font.size=18)) +

  ' and'+

  pot(' ReporteRs', textBoldItalic(color="#F0A91B", underlined=TRUE)) + ' package.'

doc <- addParagraph(doc, my_text)

# Add a hyperlink

doc <- addTitle(doc, "STHDA Web site", level=1)

my_link <- pot('Click here to visit STHDA web site!',

          hyperlink = 'http://www.sthda.com/english',

          format=textBoldItalic(color = 'blue', underline = TRUE ))

doc <- addParagraph(doc, my_link)

# Write the Word document to a file

writeDoc(doc, file = "r-reporters-formatted-word-document.docx")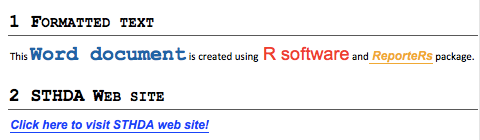
Add plots and images
The functions addPlot() and addImage() can be used for adding a plot or an external image to the document. addPlot() works with all R plots (base graphics, lattice, ggplot2 and grid).
The format of these 2 functions are :
# Add plots

# fun : R plotting function

# ... : other arguments to pass to the plotting function

addPlot(doc, fun, ...)

# Add images

# filename : path to the external image

addImage(doc, filename)
The R code below creates a Word document containing an introduction, a box plot, a histogram and an image (downloaded from STHDA web site).
doc <- docx() # Create a Word document

# Add a title

doc <- addTitle(doc, "Word document with plots and Images",

                level = 1)

# Add an introduction

doc <- addTitle(doc, "Introduction", level = 2)

doc = addParagraph(doc, value ="This Word document is created using R software and ReporteRs package. The goal of this section is to show you how to add plots and images into a Word document. This can be done easily using the functions addPlot() and addImages().")

# Add a box plot

doc <- addTitle(doc, "Box plot using R software", level = 2)

boxplotFunc<-function(){

  boxplot(len ~ dose, data = ToothGrowth,

      col = rainbow(3), main = "Guinea Pigs' Tooth Growth",

      xlab = "Vitamin C dose mg", ylab = "tooth length")

}

doc <- addPlot(doc, boxplotFunc)

doc <- addPageBreak(doc) # Go to the next page

# Add a histogram

doc <- addTitle(doc, "Histogram plot", level = 2)

doc <- addPlot(doc, function() hist(iris$Sepal.Width, col="lightblue"))

# Change point size of plotted text (in pixels, default = 12)

doc <- addTitle(doc, "Histogram with pointsize = 18", level = 2)

doc <- addPlot(doc, function() hist(iris$Sepal.Width,col="lightblue"), pointsize=18)

# Add an image

# +++++++++++++++++++++++++++

# download an image from STHDA web site

download.file(url="http://www.sthda.com/sthda/RDoc/figure/easy-ggplot2/ggplot2-histogram-demo.png",

              destfile="ggplot2-histogram-demo.png", quiet=TRUE)

doc <- addTitle(doc, "Image from STHDA web site", level = 2)

doc <- addImage(doc, "ggplot2-histogram-demo.png")

# Write the Word document to a file

writeDoc(doc, file = "r-reporters-word-document-with-plot.docx")
The Word document created by the R code above is available here : R software and ReporteRs package - Word document containing plots
Note that, for addPlot() function, you can use the arguments width and height to specify the plot width and height in inches (default values are 6 X 6)
Another optional argument of addPlot() function is par.properties which value can be parRight(), parLeft(), parJustify() for the plot alignments:
doc <- addPlot( doc = doc, fun = function(){

    barplot( 1:5, par.properties = parCenter() )}

)- For addImage() function, the allowed file formats are PNG, WMF, JPEG and GIF images..
Add a table
The function addFlexTable() is used to add a simple or customized table.
- The first step is to create a table using one of the functions below :
- FlexTable() to create a ‘flexible’ table which can be easily formatted
- vanilla.table() which is shortcut to quickly produce a nice FlexTable
- The second step is to add the created table into the Word document using addFlexTable() function as follow :
# doc : docx object

# flextable : FlexTable object

addFlexTable(doc, flextable)
Add a simple table
doc <- docx()

data<-iris[1:5, ]

# Add a first table : Default table

doc <- addTitle(doc, "Default table")

doc <- addFlexTable( doc, FlexTable(data))

doc <- addParagraph(doc, c("", "")) # 2 line breaks

# Add a second table, theme : vanilla table

doc <- addTitle(doc, "Vanilla table")

doc <- addFlexTable( doc, vanilla.table(data))

writeDoc(doc, file = "r-reporters-word-document-add-table.docx")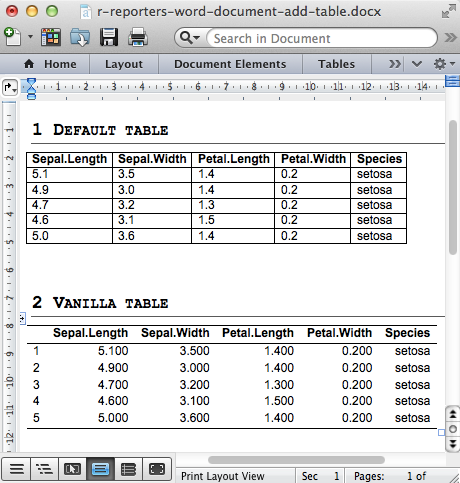
Add a zebra striped table
setZebraStyle() function can be used to color odd and even rows differently; for example, odd rows in gray color and even rowsin white color.
doc <- docx()

data<-iris[1:5, ]

# Zebra striped tables

doc <- addTitle(doc, "Zebra striped tables")

MyFTable <- vanilla.table(data)

MyFTable <- setZebraStyle(MyFTable, odd = '#eeeeee', even = 'white')

doc <- addFlexTable( doc, MyFTable)

writeDoc(doc, file = "r-reporters-word-document-zebra.docx")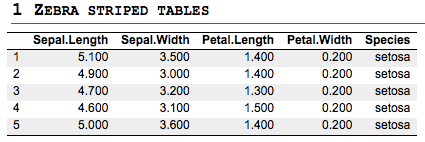
Add lists : ordered and unordered lists
Ordered and unordered lists can be added using addParagraph() function as follow :
doc = addParagraph(doc,

  value = c('Item 1', "Item 2", "Item 3")

par.properties = parProperties(list.style = 'ordered', level = 1 )- value : a set of texts to be added as a list
- par.properties : the paragraph formatting properties
- list.style : possible values are ‘unordered’ and ‘ordered’
- level : a numeric value indicating the level of the item to be added in the list
Add simple lists
doc <- docx()

# Ordered list

doc <- addTitle(doc, "Ordered List")

doc <- addParagraph(doc, value= c("Item 1", "Item 2", "Item 3"),

          par.properties =  parProperties(list.style = 'ordered'))

# Unordered list

doc <- addTitle(doc, "Unordered List")

doc <- addParagraph(doc, value= c("Item 1", "Item 2", "Item 3"),

          par.properties =  parProperties(list.style = 'unordered'))

writeDoc(doc, file = "r-reporters-word-document-lists.docx")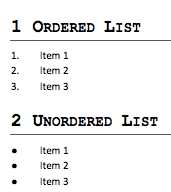
Add multi-level lists
To simplify the code, we’ll first define some levels to be used for creating multi-level lists.
doc <- docx()

# Define some levels for ordered lists (ol)

ol1 = parProperties(list.style = "ordered", level = 1)

ol2 = parProperties(list.style = "ordered", level = 2)

# Define some levels for unordered lists (ul)

ul1 = parProperties(list.style = "unordered", level = 1)

ul2 = parProperties(list.style = "unordered", level = 2)

# Multi-lvel ordered list

doc <- addTitle(doc, "Ordered List")

doc <- addParagraph(doc, value= "Item 1", par.properties =  ol1)

doc <- addParagraph(doc, value= "Item 1.1", par.properties =  ol2)

doc <- addParagraph(doc, value= "Item 1.2", par.properties =  ol2)

doc <- addParagraph(doc, value= "Item 2", par.properties =  ol1)

# Multi-lvel unordered list

doc <- addTitle(doc, "Unordered List")

doc <- addParagraph(doc, value= "Item 1", par.properties =  ul1)

doc <- addParagraph(doc, value= "Item 1.1", par.properties =  ul2)

doc <- addParagraph(doc, value= "Item 1.2", par.properties =  ul2)

doc <- addParagraph(doc, value= "Item 2", par.properties =  ul1)

writeDoc(doc, file = "r-reporters-word-document-multilevel-lists.docx")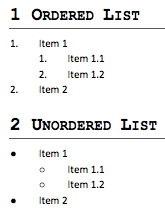
Add a footnote to a Word document
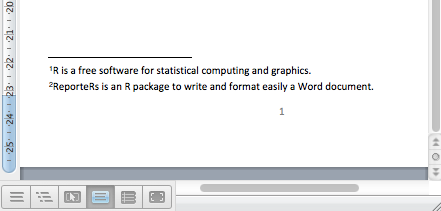
A footnote is a set of paragraphs written at the bottom of the Word document.
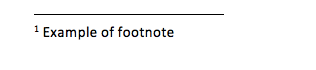
The steps for adding a footnote into a document are :
- Create a footnote object using the function Footnote()
- Add a text to the footnote using the function addParagraph()
library(ReporteRs)

doc <- docx()

# create footnotes

footnote1 <- Footnote( ) # footnote1 about R

footnote1 <- addParagraph(footnote1, "R is a free software for statistical computing and graphics.")

footnote2 <- Footnote( ) # footnote2 about ReporteRs package

footnote2 <- addParagraph(footnote2, "ReporteRs is an R package to write and format easily a Word document.")

# Use the footnotes when writing a paragraph into the document

doc <- addTitle(doc, "Word document with a footnote", level=1)

doc <- addParagraph(doc,

      "This Word document is created using " +

      pot("R software", footnote=footnote1)+ " and "+

      pot("ReporteRs", footnote=footnote2) +" package."

      )

writeDoc(doc, file = "r-reporters-word-document-footnote.docx")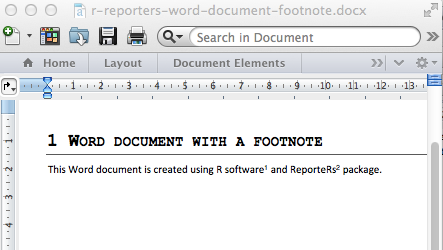
Add R scripts
The function addRScript() can be used as follow :
doc <- docx()

r_code <- 'summary(cars$dist)

x <- rnorm(100)

hist(x)

'

# Change the backgroud-color

doc <- addRScript(doc, text = r_code,

    par.properties= parProperties(shading.color = 'gray90'))

writeDoc(doc, file = "r-reporters-word-add-r-code.docx")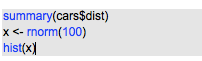
Add a table of contents into a Word document
To add a table of contents, the function addTOC() can be used.
Note that, when a table of content (TOC) is added into a Word document, a message box is displayed when opening the file for the first time. This message asks if you want to update TOC entries. This is not an error and you should click ‘Yes’ to update TOC entries. You should save the document to avoid this to happen the next time.
doc <- docx() # Create a Word document

# Add a title

doc <- addTitle(doc, "Create a Word document with TOC", level = 1)

# Add a table of contents

doc <- addTOC(doc)

doc <- addPageBreak(doc) # go to the next page

# Add an introduction

doc <- addTitle(doc, "Introduction", level = 2)

doc = addParagraph(doc, value ="This Word document is created using R software and ReporteRs package. The goal of this section is to show you how to add a table of contents into a Word document. This can be done easily using the function addTOC.")

# Add a box plot

doc <- addTitle(doc, "Box plot using R software", level = 2)

boxplotFunc<-function(){

  boxplot(len ~ dose, data = ToothGrowth,

      col = rainbow(3), main = "Guinea Pigs' Tooth Growth",

      xlab = "Vitamin C dose mg", ylab = "tooth length")

}

doc <- addPlot(doc, boxplotFunc)

doc <- addPageBreak(doc) # go to the next page

# Add plots

#+++++++++++++++++++++

doc <- addTitle(doc, "Basic plots using R software", level = 2)

doc <- addParagraph(doc, "R is a free software for plotting and data analysis. This chapter contains examples of graphs generated using R.")

# Add a histogram

doc <- addTitle(doc, "Histogram", level = 3)

doc <- addPlot(doc, function() hist(iris$Sepal.Width,

                                  col="lightblue"))

doc <- addPageBreak(doc) # go to the next page

# Add a bar plot

doc <- addTitle(doc, "Bar plot", level = 3)

doc <- addPlot(doc, function() barplot(VADeaths))

# Write the Word document to a file

writeDoc(doc, file = "r-reporters-word-document-toc.docx")
The Word document created by the R code above is available here : R software and ReporteRs package - Word document with a table of contents
Infos
This analysis has been performed using R (ver. 3.1.0).
You can read more about ReporteRs and download the source code at the following link :
GitHub (David Gohel): ReporteRs
Show me some love with the like buttons below... Thank you and please don't forget to share and comment below!!
Create and format Word documents using R software and Reporters package的更多相关文章
- Interop.Word Documents.Open is null
问题描述 程序在Windows Server 2012 R2调用Word组件正常,但是换到Windows Server 2008 R2之后,程序异常. 代码 Microsoft.Office.Inte ...
- a note of R software write Function
Functionals “To become significantly more reliable, code must become more transparent. In particular ...
- ggplot2 texts : Add text annotations to a graph in R software
http://www.sthda.com/english/wiki/ggplot2-texts-add-text-annotations-to-a-graph-in-r-software Instal ...
- 数据库CRUD操作:C:create创建(添加)、R:read读取、U:update:修改、D:delete删除;高级查询
1.注释语法:--,#2.后缀是.sql的文件是数据库查询文件3.保存查询4.在数据库里面 列有个名字叫字段 行有个名字叫记录5.一条数据即为表的一行 CRUD操作:create 创建(添加)re ...
- IIS 调用Microsoft.Office.Interop.Word.Documents.Open 返回为null
控制面板->管理工具->组件服务->计算机->我的电脑->DCom配置->找到Microsoft Word文档 之后 单击属性打开此应用程序的属性对话框. 2. 单 ...
- Let's Format Css Documents
每次想参考一些好看网站的时候,打开css文档都是一行的,琢磨了下就自己写了块短短的代码,各路Java大神别笑我呀.^_^ 复制粘贴控制台的输出就好了.(瞬间觉得跟上大神的脚步了←_←) package ...
- R 报错:package ‘***’ is not available (for R version ****) 的解决方案
R 安装sparklyr,ggplot2等包出现如下warning package '****' is not available (for R version 3.0.2) 系统环境 ubuntu1 ...
- Asynchronous and Distributed Programming in R with the Future Package
Every now and again someone comes along and writes an R package that I consider to be a 'game change ...
- 基于R数据分析之常用Package讲解系列--1. data.table
利用data.table包变形数据 一. 基础概念 data.table 这种数据结构相较于R中本源的data.frame 在数据处理上有运算速度更快,内存运用更高效,可认为它是data.frame ...
随机推荐
- Android4.0 主线程不能访问网络异常解决办法
从两个方面说下这个问题: 1. 不让访问网络的原因 2. 解决该问题的办法 不让访问网络的原因: 由于对于网络状况的不可预见性,很有可能在网络访问的时候造成阻塞,那么这样一来我们的主线程UI线程 就会 ...
- [转载]Request、Request.Form和Request.QueryString的区别
Request.Request.Form和Request.QueryString的区别 request本身是一个系统的静态对象,本身也可以作为数组调用,比如request("abc" ...
- 记账本微信小程序开发二
新建一个微信小程序项目 熟悉软件各种操作.
- 前端框架VUE----组件的创建
vue的核心基础就是组件的使用,玩好了组件才能将前面学的基础更好的运用起来.组件的使用更使我们的项目解耦合.更加符合vue的设计思想MVVM. 那接下来就跟我看一下如何在一个Vue实例中使用组件吧! ...
- ltp-fcntl36 偶尔出现fail unexpected data offset 20928 value 94
每次出错的都是和posix相关先把结论说了: fn_ofd_w和fn_ofd_r的SAFE_FCNTL参数F_OFD_SETLKW fn_posix_w和fn_posix_r的SAFE_FCNTL参数 ...
- 看起来像是break的考量
代码运用了if+break: package day20181008; import java.util.Scanner; public class ZuoYe01 { public static v ...
- markdown 换行
基本语法 basic grammar line break
- android样式之按钮&&图片
在drawable-hdpi中添加xml文件 <?xml version="1.0" encoding="utf-8"?> <selector ...
- Centos7,配置防火墙,开启端口
原文链接:https://blog.csdn.net/u013410747/article/details/61696178 适用于CentOS 7 64位的指令: .查看已开放的端口(默认不开放任何 ...
- 浅谈k短路算法
An Old but Classic Problem 给定一个$n$个点,$m$条边的带正权有向图.给定$s$和$t$,询问$s$到$t$的所有权和为正路径中,第$k$短的长度. Notice 定义两 ...