【Ray Tracing The Next Week 超详解】 光线追踪2-8 Volume
Preface
今天有两个东东,一个是体积烟雾,一个是封面图
下一篇我们总结项目代码
Chapter 8:Volumes
我们需要为我们的光线追踪器添加新的物体——烟、雾,也称为participating media。 我们还需要补充一个材质——次表面散射材质,它有点像物体内的浓雾。
体渲染通常的做法是,在体的内部有很多随机表面,来实现散射的效果。比如一束烟可以表示为,在这束烟的内部任意位置,都可以存在一个面,以此来实现烟、雾
对于一个恒定密度体,一条光线通过其中的时候,在烟雾体中传播的时候也会发生散射,光线在烟雾体中能传播多远,也是由烟雾体的密度决定的,密度越高,光线穿透性越差,光线传播的距离也越短。从而实现烟雾的透光性。
引用书中一张图(光线可穿透可散射)
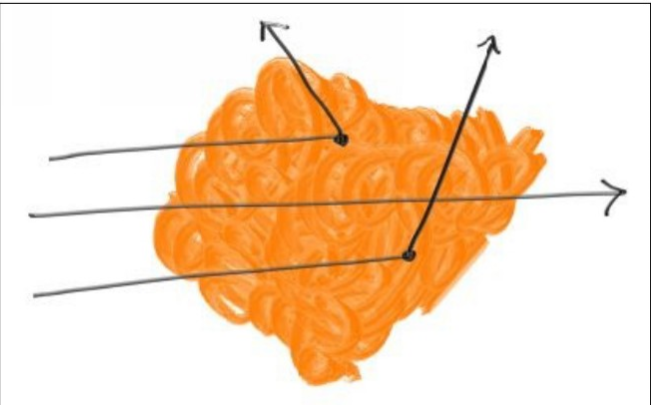
当光线通过体积时,它可能在任何点散射。 光线在任何小距离dL中散射的概率为:
概率= C * dL,其中C与体积的光密度成比例。
对于恒定体积,我们只需要密度C和边界。
/// isotropic.hpp

// -----------------------------------------------------

// [author]        lv

// [begin ]        2019.1

// [brief ]        the isotropic-class for the ray-tracing project

//                from the 《ray tracing the next week》

// -----------------------------------------------------

#pragma once

namespace rt

{

class isotropic :public material

    {

public:

    isotropic(texture* tex) :_albedo(tex) {  }

    virtual bool scatter(const ray& InRay, const hitInfo& info, rtvec& attenuation, ray& scattered)const override

        {

        scattered = ray(info._p, lvgm::random_unit_sphere());

        attenuation = _albedo->value(info._u, info._v, info._p);

        return true;

        }

private:

    texture * _albedo;

    };

} // rt namespace
这个材质的散射原理和漫反射磨砂材质的大同小异,均属于碰撞点转换为新视点,沿任意方向发射新的视线,只不过漫反射的视线方向向量指向外相切球体表面,而isotropic的视线方向指向以碰撞点为球心的单位球体表面
区别就在于
漫反射的散射光线不可能指到物体内部,它一定是散射到表面外部(视线方向指向外切球体表面)
isotropic材质的散射光线可以沿原来的方向一往前,以此视线透光性
因为烟雾内部只是颗粒而不存在真正不可穿透的几何实体,所以漫反射实体不可穿透,只能散射到表面外部,而烟雾可穿透
接下来我们看一下烟雾体
/// constant_medium.hpp

// -----------------------------------------------------

// [author]        lv

// [begin ]        2019.1

// [brief ]        the constant_dedium-class for the ray-tracing project

//                from the 《ray tracing the next week》

// -----------------------------------------------------

#pragma once

namespace rt

{

class constant_medium :public intersect

    {

public:

    constant_medium(intersect* p, rtvar d, texture* tex);

    virtual bool hit(const ray& sight, rtvar t_min, rtvar t_max, hitInfo& info)const override;

    virtual aabb getbox()const override;

private:

    intersect* _item;

    rtvar _density;    //烟雾密度

    material* _materialp;

    };

inline constant_medium::constant_medium(intersect* p, rtvar d, texture* tex)

    :_item(p)

    ,_density(d)

    ,_materialp(new isotropic(tex))

    {

    }

aabb constant_medium::getbox()const

    {

    return _item->getbox();

    }

bool constant_medium::hit(const ray& sight, rtvar t_min, rtvar t_max, hitInfo& info)const

    {

    hitInfo info1, info2;

    if (_item->hit(sight, -rtInf(), rtInf(), info1)) {

        if (_item->hit(sight, info1._t + 0.0001, rtInf(), info2)) {

            if (info1._t < t_min)

                info1._t = t_min;

            if (info2._t > t_max)

                info2._t = t_max;

            if (info1._t >= info2._t)

                return false;

            if (info1._t < )

                info1._t = ;

            float distance_inside_boundary = (info2._t - info1._t)*sight.direction().normal();

            float hit_distance = -( / _density)*log(lvgm::rand01());

            if (hit_distance < distance_inside_boundary) {

                info._t = info1._t + hit_distance / sight.direction().normal();

                info._p = sight.go(info._t);

                info._n = rtvec(, , );  // arbitrary

                info._materialp = _materialp;

                return true;

                }

            }

        }

    return false;

    }

} // rt namespace
hit函数里面是一些边界合法性检测
场景测试代码
intersect* cornell_smoke()

{

    intersect ** list = new intersect*[];

    int cnt = ;

    material* red = new lambertian(new constant_texture(rtvec(0.65, 0.05, 0.05)));

    material * blue = new lambertian(new constant_texture(rtvec(0.05, 0.05, 0.73)));

    material* white = new lambertian(new constant_texture(rtvec(0.73, 0.73, 0.73)));

    material* green = new lambertian(new constant_texture(rtvec(0.12, 0.45, 0.15)));

    material* light = new areaLight(new constant_texture(rtvec(, , )));

    list[cnt++] = new xz_rect(, , , , , light);

    list[cnt++] = new flip_normal(new xz_rect(, , , , , light));

    list[cnt++] = new flip_normal(new yz_rect(, , , , , green));

    list[cnt++] = new yz_rect(, , , , , red);

    list[cnt++] = new flip_normal(new xz_rect(, , , , , white));

    list[cnt++] = new xz_rect(, , , , , white);

    list[cnt++] = new flip_normal(new xy_rect(, , , , , blue));

    intersect* box1 = new translate(new rotate_y(new box(rtvec(), rtvec(, , ), white), -), rtvec(, , ));

    intersect* box2 = new translate(new rotate_y(new box(rtvec(), rtvec(, , ), white), ), rtvec(, , ));

    list[cnt++] = new constant_medium(box2, 0.006, new constant_texture(rtvec(0.8, 0.58, .)));

    list[cnt++] = new constant_medium(box1, 0.008, new constant_texture(rtvec(0.9, 0.2, 0.72)));

    return new intersections(list, cnt);

}
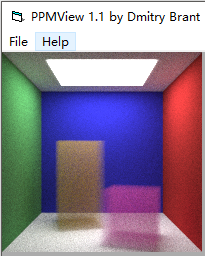
下面是效果:sample -> 1000
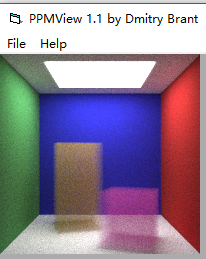
注释 // arbitrary处为随机方向,之前为(1,0,0)
我觉得改为(rand01(),rand01(),rand01())较为合适,下面是改之后的效果
Chapter 9:A Scene Testing All New Features
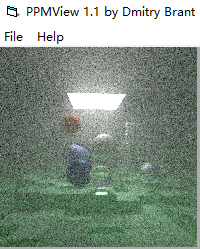
最后的封面图是这样一个场景:
体积雾:有一个蓝色的次表面散射球体,但是这个东西并没有单独实现,而是把它包裹在了一个玻璃球内。
体积雾:整个场景是由层薄薄的雾气笼盖着的
长方体:地面是一堆随机长方体
玻璃球:一个作为蓝色烟雾的容器,一个是单纯的玻璃球
映射纹理:地球纹理球体
过程纹理:柏林噪声纹理球体
运动模糊球体:有一个棕色的运动球体
镜面球体:银白色的镜面球
区域光照:顶部是一个长方形的区域光源
其他未说明材质的都是漫反射
渲染器中剩下的最大缺陷是没有阴影射线,但这就是为什么我们容易获得焦散和次表面散射效果的原因。
下面是渲染代码,关于相机参数设置还需等待渲染结果出来才能公布
VS四开,渲染了一天还没完,我也实属无奈
intersect* finalScene()

{

    int nb = ;

    intersect ** list = new intersect*[];

    intersect ** boxlist = new intersect*[];

    intersect ** boxlist2 = new intersect*[];

    material * white = new lambertian(new constant_texture(rtvec(0.73, 0.73, 0.73)));

    material * ground = new lambertian(new constant_texture(rtvec(0.48, 0.83, 0.53)));

    int b = ;

    for (int i = ; i < nb; ++i)

        for (int j = ; j < nb; ++j)

        {

            rtvar w = ;

            rtvar x0 = - + i*w;

            rtvar z0 = - + j*w;

            rtvar y0 = ;

            rtvar x1 = x0 + w;

            rtvar y1 =  * (lvgm::rand01() + 0.01);

            rtvar z1 = z0 + w;

            boxlist[b++] = new box(rtvec(x0, y0, z0), rtvec(x1, y1, z1), ground);

        }

    int l = ;

    list[l++] = new bvh_node(boxlist, b, , );

    material * light = new areaLight(new constant_texture(rtvec(, , )));

    list[l++] = new xz_rect(, , , , , light);

    rtvec center(, , );

    list[l++] = new moving_sphere(center, center + rtvec(, , ), , , , new lambertian(new constant_texture(rtvec(0.7, 0.3, 0.1))));

    list[l++] = new sphere(rtvec(, , ), , new dielectric(1.5));

    list[l++] = new sphere(rtvec(, , ), , new metal(new constant_texture(rtvec(0.8, 0.8, 0.9)), 10.0));

    intersect * boundary = new sphere(rtvec(, , ), , new dielectric(1.5));

    list[l++] = boundary;

    list[l++] = new constant_medium(boundary, 0.2, new constant_texture(rtvec(0.2, 0.4, 0.9)));

    boundary = new sphere(rtvec(), , new dielectric(1.5));

    list[l++] = new constant_medium(boundary, 0.0011, new constant_texture(rtvec(., ., .)));

    int x, y, n;

    unsigned char * tex = stbi_load("earthmap.jpg", &x, &y, &n, );

    material * emat = new lambertian(new image_texture(tex, x, y));

    list[l++] = new sphere(rtvec(, , ), , emat);

    texture * pertext = new noise_texture(0.1);

    list[l++] = new sphere(rtvec(, , ), , new lambertian(pertext));

    int ns = ;

    for (int j = ; j < ns; ++j)

        boxlist2[j] = new sphere(rtvec( * lvgm::rand01(),  * lvgm::rand01(), lvgm::rand01()), , white);

    list[l++] = new translate(new rotate_y(new bvh_node(boxlist2, ns, , ), ), rtvec(-, , ));

    return new intersections(list, l);

}
/-----------------------更新线-------------------------------/
对应的相机参数

效果
其中,薄雾效果太重了,雾气参数应该小一点,大约在1e-4左右较好
vfov可能太大了,45°应该更好一点吧
镜头应该更靠近些
感谢您的阅读,生活愉快~
【Ray Tracing The Next Week 超详解】 光线追踪2-8 Volume的更多相关文章
- 【Ray Tracing The Next Week 超详解】 光线追踪2-9
我们来整理一下项目的代码 目录 ----include --hit --texture --material ----RTdef.hpp ----ray.hpp ----camera.hpp ---- ...
- 【Ray Tracing The Next Week 超详解】 光线追踪2-6 Cornell box
Chapter 6:Rectangles and Lights 今天,我们来学习长方形区域光照 先看效果 light 首先我们需要设计一个发光的材质 /// light.hpp // ------- ...
- 【Ray Tracing in One Weekend 超详解】 光线追踪1-4
我们上一篇写了Chapter5 的第一个部分表面法线,那么我们来学剩下的部分,以及Chapter6. Chapter5:Surface normals and multiple objects. 我们 ...
- 【Ray Tracing The Next Week 超详解】 光线追踪2-7 任意长方体 && 场景案例
上一篇比较简单,很久才发是因为做了一些好玩的场景,后来发现这一章是专门写场景例子的,所以就安排到了这一篇 Preface 这一篇要介绍的内容有: 1. 自己做的光照例子 2. Cornell box画 ...
- 【Ray Tracing The Next Week 超详解】 光线追踪2-5
Chapter 5:Image Texture Mapping 先看效果: 我们之前的纹理是利用的是撞击点p处的位置信息,比如大理石纹理 而我们今天的图片映射纹理采用2D(u,v)纹理坐标来进行. 在 ...
- 【Ray Tracing in One Weekend 超详解】 光线追踪1-8 自定义相机设计
今天,我们来学习如何设计自定义位置的相机 ready 我们只需要了解我们之前的坐标体系,或者说是相机位置 先看效果 Chapter10:Positionable camera 这一章我们直接用概念 ...
- 【Ray Tracing The Next Week 超详解】 光线追踪2-4 Perlin noise
Preface 为了得到更好的纹理,很多人采用各种形式的柏林噪声(该命名来自于发明人 Ken Perlin) 柏林噪声是一种比较模糊的白噪声的东西:(引用书中一张图) 柏林噪声是用来生成一些看似杂乱 ...
- 【Ray Tracing The Next Week 超详解】 光线追踪2-3
Preface 终于到了激动人心的纹理章节了 然鹅,看了下,并不激动 因为我们之前就接触过 当初有一个 attenuation 吗? 对了,这就是我们的rgb分量过滤器,我们画出的红色.蓝色.绿色等 ...
- 【Ray Tracing The Next Week 超详解】 光线追踪2-2
Chapter 2:Bounding Volume Hierarchies 今天我们来讲层次包围盒,乍一看比较难,篇幅也多,但是咱们一步一步来,相信大家应该都能听懂 BVH 和 Perlin text ...
随机推荐
- 快速创建SpringBoot2.x应用之工具类自动创建web应用、SpringBoot2.x的依赖默认Maven版本
快速创建SpringBoot2.x应用之工具类自动创建web应用简介:使用构建工具自动生成项目基本架构 1.工具自动创建:http://start.spring.io/ 2.访问地址:http://l ...
- Java ArrayList类
ArrayList对象可以用于存储一个对象列表 例子: ArrayList<String> list = new ArrayList<String>() 例子: public ...
- java 多线程一
java 多线程一 java 多线程二 java 多线程三 java 多线程四 java 多线程实现的几种方式: 1.extends Thread 2.implements Runnable 3.im ...
- win10 + ubuntu双系统详细安装过程
由于搞深度学习,电脑跟不上,换了一台神舟战神Z8,于是装一个ubuntu双系统,没想到几乎花了一天,还花了80个软妹币找人帮忙,蓝瘦,现在写下来供大家参考: 不得不说,win10 + ubuntu双系 ...
- getOutputStream与getWriter方法
getOutputStream方法用于返回Servlet引擎创建的字节输出流对象,Servlet程序可以按字节形式输出响应正文.getWriter方法用于返回Servlet引擎创建的字符输出流对象,S ...
- oracle move 释放 表空间
使用sqlplus 操作 alter table TEST_TB1 move storage(initial 64K); alter table TEST_TB1 move ; select SEG ...
- Hyper-V虚拟机上安装一个图形界面的Linux系统
这件事情呢,一直想干但又觉得太陌生和麻烦,无奈现在到了非装不可的时候,只好硬着头皮去装.在此之前,我不懂什么叫做虚拟机,linux也接触甚少.经过3天的折腾,终于装好了带有图形界面的linux(字符版 ...
- ubuntu系统初始化网络及mysql配置
安装系统时需要安装open-ssh服务软件,否则无法远程连接 1.修改root密码 # sudo passwd 输入密码即可 切换到root用户,需要输入刚才的root密码 # su - 2.配置网络 ...
- AS 中 Plugin for Gradle 和 Gradle 之间的版本对应关系
Plugin for Gradle 和 Gradle 之间的版本对应关系 来源:https://developer.android.com/studio/releases/gradle-plugin. ...
- uva12436 回头再做一次
线段树维护等差数列,结点维护首项+公差即可 #include <cstdio> #include <cstring> #include <algorithm> us ...