kube-router代替kube-proxy+calico
使用kubeadm安装kubernetes,并使用kube-router代替kube-proxy+calico网络。
即:kube-router providing service proxy, firewall and pod networking.
版本:kubernetes v1.20.0
安装kubernetes集群
升级linux系统内核,关闭swap,关闭防火墙,调整内核参数等自己做。
主要安装命令
yum install kubectl-1.20.0-0.x86_64 kubeadm-1.20.0-0.x86_64 kubelet-1.20.0-0.x86_64
kubeadm init --kubernetes-version=1.20.0 --apiserver-advertise-address=192.168.100.80 --image-repository registry.aliyuncs.com/google_containers --pod-network-cidr=10.244.0.0/16
[root@k8s-master ~]# kubeadm init --kubernetes-version=1.20.0 --apiserver-advertise-address=192.168.100.80 --image-repository registry.aliyuncs.com/google_containers --pod-network-cidr=10.244.0.0/16
[init] Using Kubernetes version: v1.20.0
[preflight] Running pre-flight checks
[WARNING IsDockerSystemdCheck]: detected "cgroupfs" as the Docker cgroup driver. The recommended driver is "systemd". Please follow the guide at https://kubernetes.io/docs/setup/cri/
[WARNING Hostname]: hostname "k8s-master" could not be reached
[WARNING Hostname]: hostname "k8s-master": lookup k8s-master on 192.168.100.96:53: no such host
[preflight] Pulling images required for setting up a Kubernetes cluster
[preflight] This might take a minute or two, depending on the speed of your internet connection
[preflight] You can also perform this action in beforehand using 'kubeadm config images pull'
[certs] Using certificateDir folder "/etc/kubernetes/pki"
[certs] Generating "ca" certificate and key
[certs] Generating "apiserver" certificate and key
[certs] apiserver serving cert is signed for DNS names [k8s-master kubernetes kubernetes.default kubernetes.default.svc kubernetes.default.svc.cluster.local] and IPs [10.96.0.1 192.168.100.80]
[certs] Generating "apiserver-kubelet-client" certificate and key
[certs] Generating "front-proxy-ca" certificate and key
[certs] Generating "front-proxy-client" certificate and key
[certs] Generating "etcd/ca" certificate and key
[certs] Generating "etcd/server" certificate and key
[certs] etcd/server serving cert is signed for DNS names [k8s-master localhost] and IPs [192.168.100.80 127.0.0.1 ::1]
[certs] Generating "etcd/peer" certificate and key
[certs] etcd/peer serving cert is signed for DNS names [k8s-master localhost] and IPs [192.168.100.80 127.0.0.1 ::1]
[certs] Generating "etcd/healthcheck-client" certificate and key
[certs] Generating "apiserver-etcd-client" certificate and key
[certs] Generating "sa" key and public key
[kubeconfig] Using kubeconfig folder "/etc/kubernetes"
[kubeconfig] Writing "admin.conf" kubeconfig file
[kubeconfig] Writing "kubelet.conf" kubeconfig file
[kubeconfig] Writing "controller-manager.conf" kubeconfig file
[kubeconfig] Writing "scheduler.conf" kubeconfig file
[kubelet-start] Writing kubelet environment file with flags to file "/var/lib/kubelet/kubeadm-flags.env"
[kubelet-start] Writing kubelet configuration to file "/var/lib/kubelet/config.yaml"
[kubelet-start] Starting the kubelet
[control-plane] Using manifest folder "/etc/kubernetes/manifests"
[control-plane] Creating static Pod manifest for "kube-apiserver"
[control-plane] Creating static Pod manifest for "kube-controller-manager"
[control-plane] Creating static Pod manifest for "kube-scheduler"
[etcd] Creating static Pod manifest for local etcd in "/etc/kubernetes/manifests"
[wait-control-plane] Waiting for the kubelet to boot up the control plane as static Pods from directory "/etc/kubernetes/manifests". This can take up to 4m0s
[apiclient] All control plane components are healthy after 13.002683 seconds
[upload-config] Storing the configuration used in ConfigMap "kubeadm-config" in the "kube-system" Namespace
[kubelet] Creating a ConfigMap "kubelet-config-1.20" in namespace kube-system with the configuration for the kubelets in the cluster
[upload-certs] Skipping phase. Please see --upload-certs
[mark-control-plane] Marking the node k8s-master as control-plane by adding the labels "node-role.kubernetes.io/master=''" and "node-role.kubernetes.io/control-plane='' (deprecated)"
[mark-control-plane] Marking the node k8s-master as control-plane by adding the taints [node-role.kubernetes.io/master:NoSchedule]
[bootstrap-token] Using token: 68mv1r.5ljn91n2yms71dth
[bootstrap-token] Configuring bootstrap tokens, cluster-info ConfigMap, RBAC Roles
[bootstrap-token] configured RBAC rules to allow Node Bootstrap tokens to get nodes
[bootstrap-token] configured RBAC rules to allow Node Bootstrap tokens to post CSRs in order for nodes to get long term certificate credentials
[bootstrap-token] configured RBAC rules to allow the csrapprover controller automatically approve CSRs from a Node Bootstrap Token
[bootstrap-token] configured RBAC rules to allow certificate rotation for all node client certificates in the cluster
[bootstrap-token] Creating the "cluster-info" ConfigMap in the "kube-public" namespace
[kubelet-finalize] Updating "/etc/kubernetes/kubelet.conf" to point to a rotatable kubelet client certificate and key
[addons] Applied essential addon: CoreDNS
[addons] Applied essential addon: kube-proxy Your Kubernetes control-plane has initialized successfully! To start using your cluster, you need to run the following as a regular user: mkdir -p $HOME/.kube
sudo cp -i /etc/kubernetes/admin.conf $HOME/.kube/config
sudo chown $(id -u):$(id -g) $HOME/.kube/config Alternatively, if you are the root user, you can run: export KUBECONFIG=/etc/kubernetes/admin.conf You should now deploy a pod network to the cluster.
Run "kubectl apply -f [podnetwork].yaml" with one of the options listed at:
https://kubernetes.io/docs/concepts/cluster-administration/addons/ Then you can join any number of worker nodes by running the following on each as root: kubeadm join 192.168.100.80:6443 --token 68mv1r.5ljn91n2yms71dth \
--discovery-token-ca-cert-hash sha256:2a29deaa942a7eacb055f608caa686d9c59cb34abb0365b32c22d959b2327dc8
[root@k8s-master ~]# rm -rf .kube/
[root@k8s-master ~]# mkdir -p $HOME/.kube
[root@k8s-master ~]# sudo cp -i /etc/kubernetes/admin.conf $HOME/.kube/config
[root@k8s-master ~]# sudo chown $(id -u):$(id -g) $HOME/.kube/config
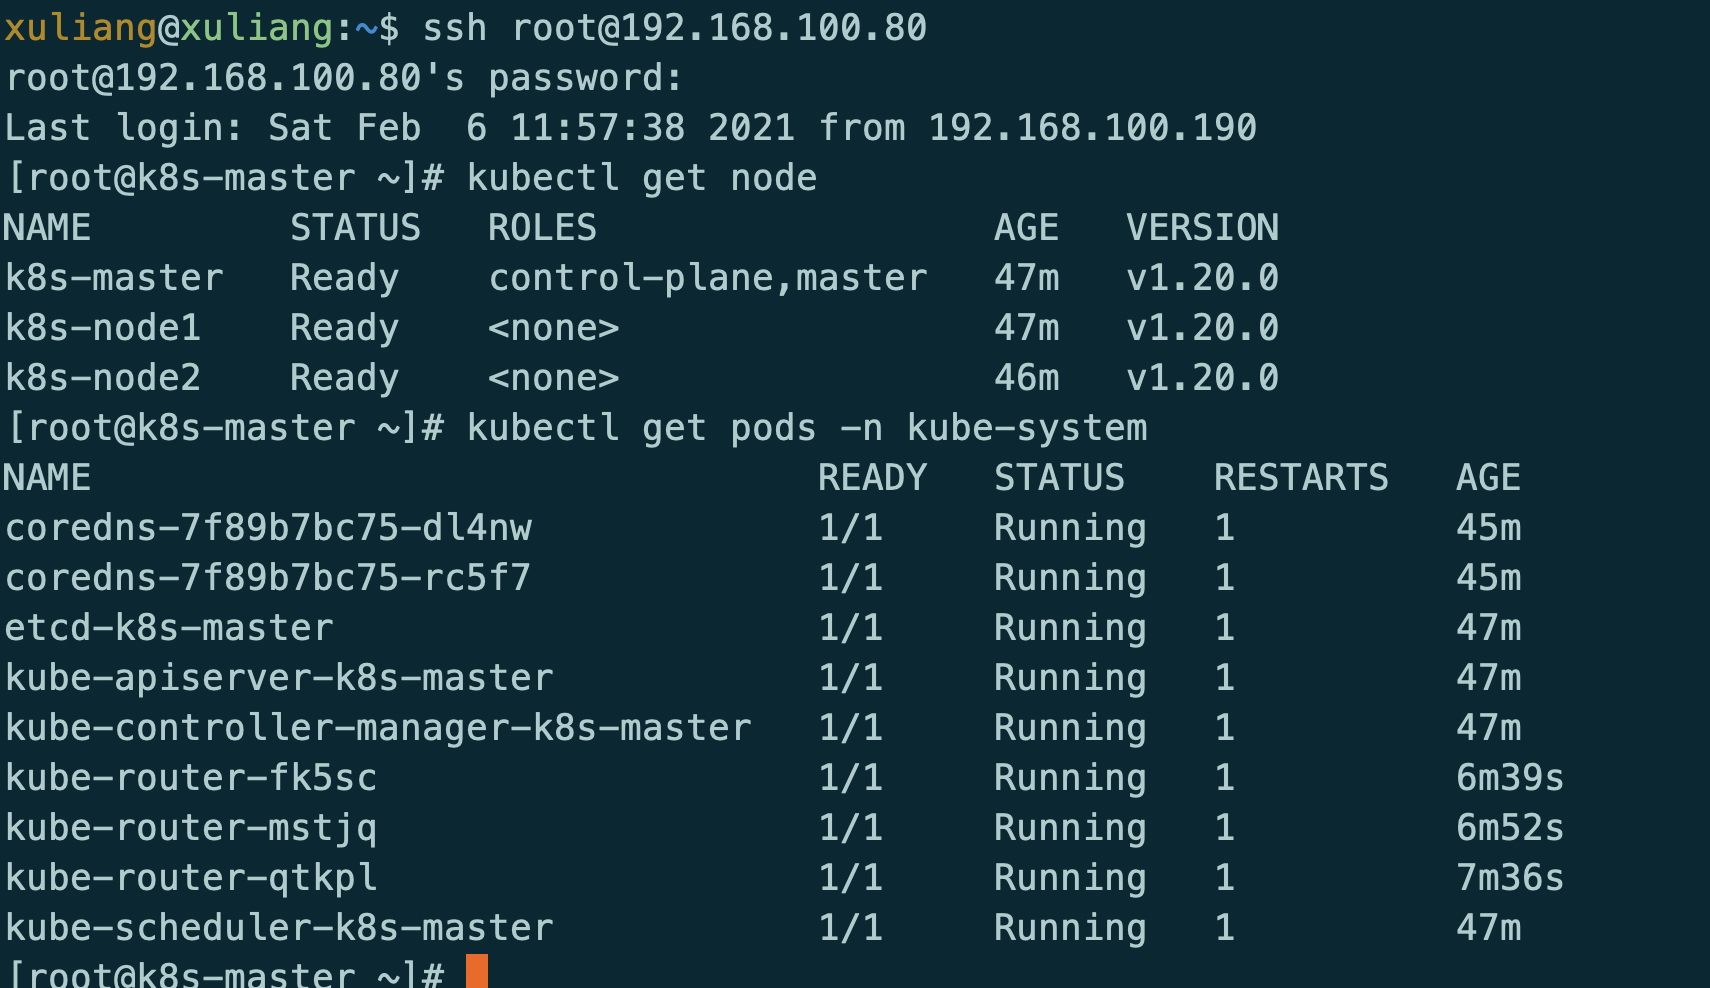
[root@k8s-master ~]# kubectl get node
安装完成后

安装网络
源文件地址:https://github.com/cloudnativelabs/kube-router/blob/master/daemonset/kubeadm-kuberouter.yaml
kubectl apply -f kubeadm-kuberouter.yaml


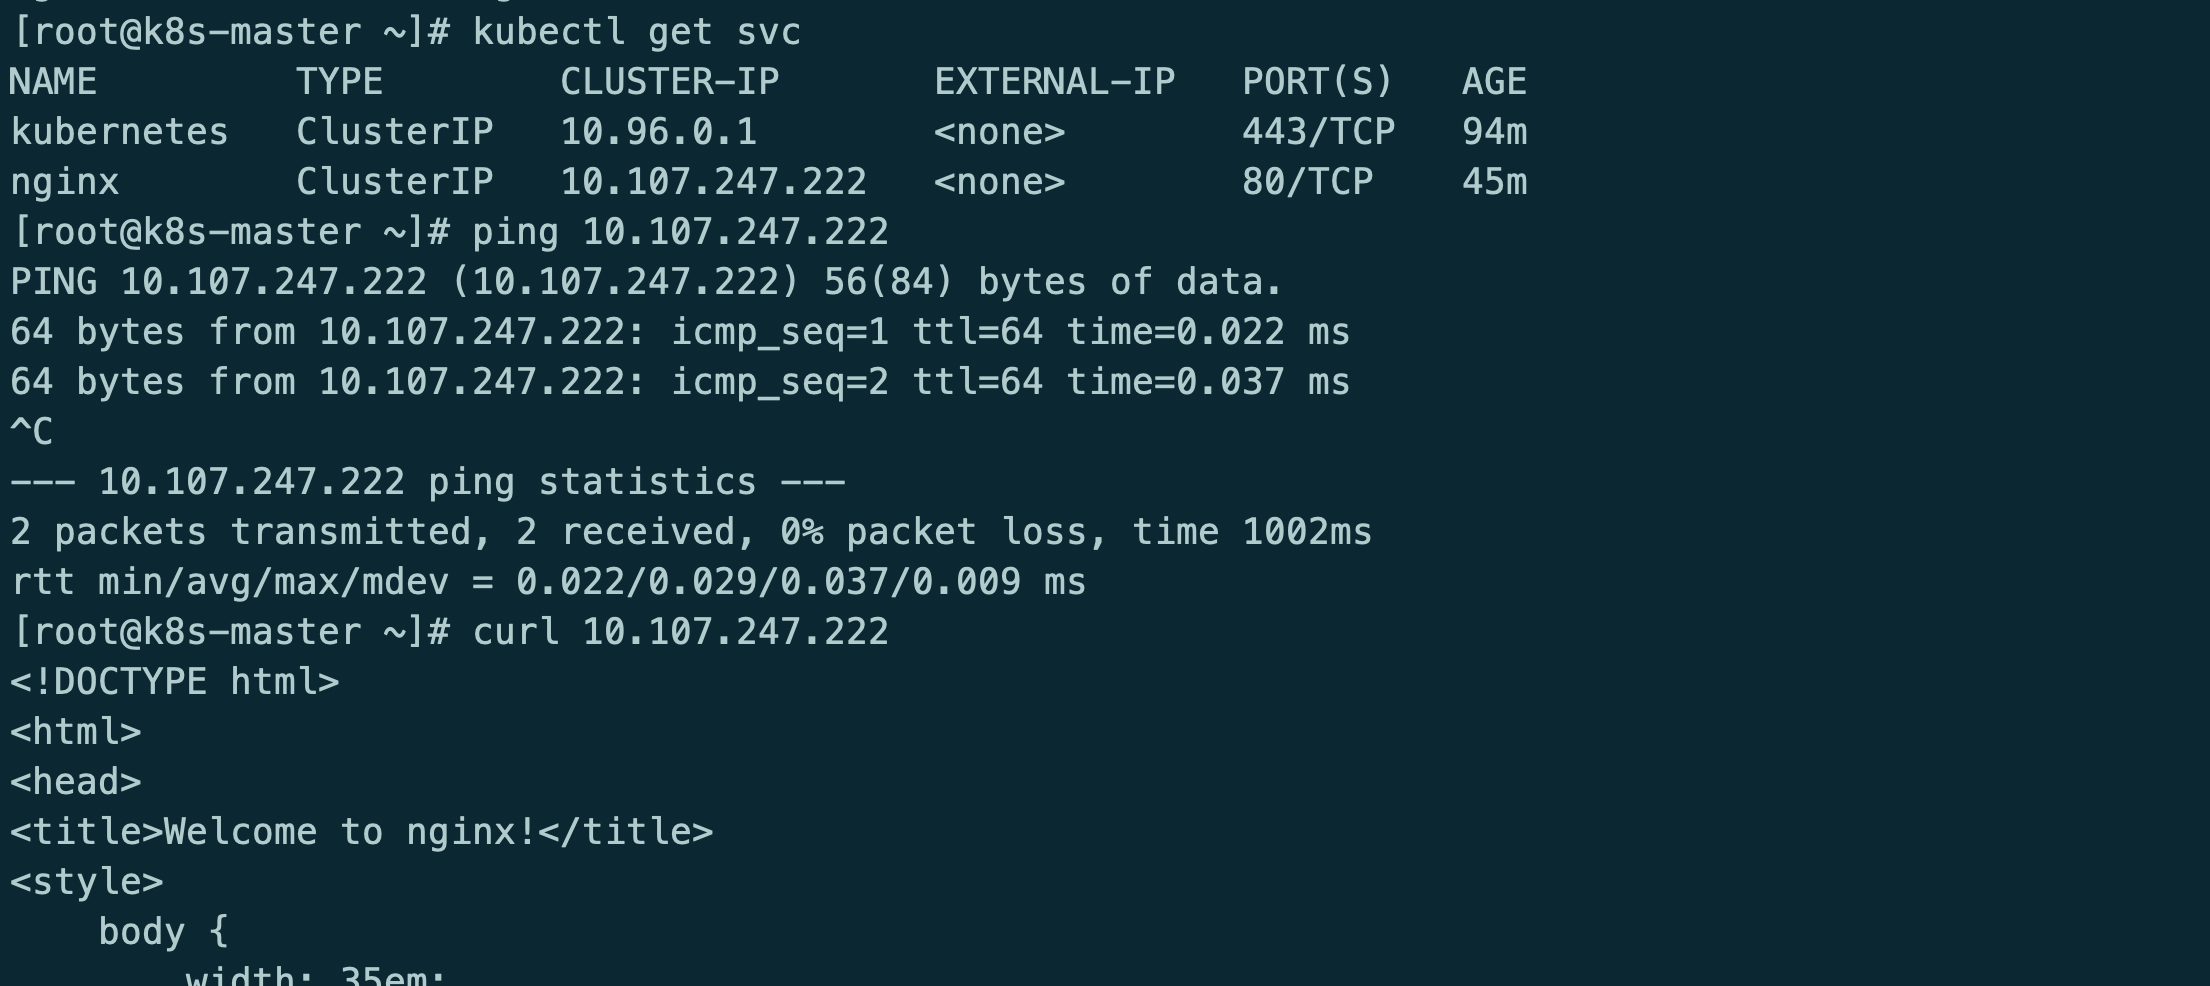
安装服务测试
kubectl run nginx --image=nginx --expose --port=80 --image-pull-policy='IfNotPresent'
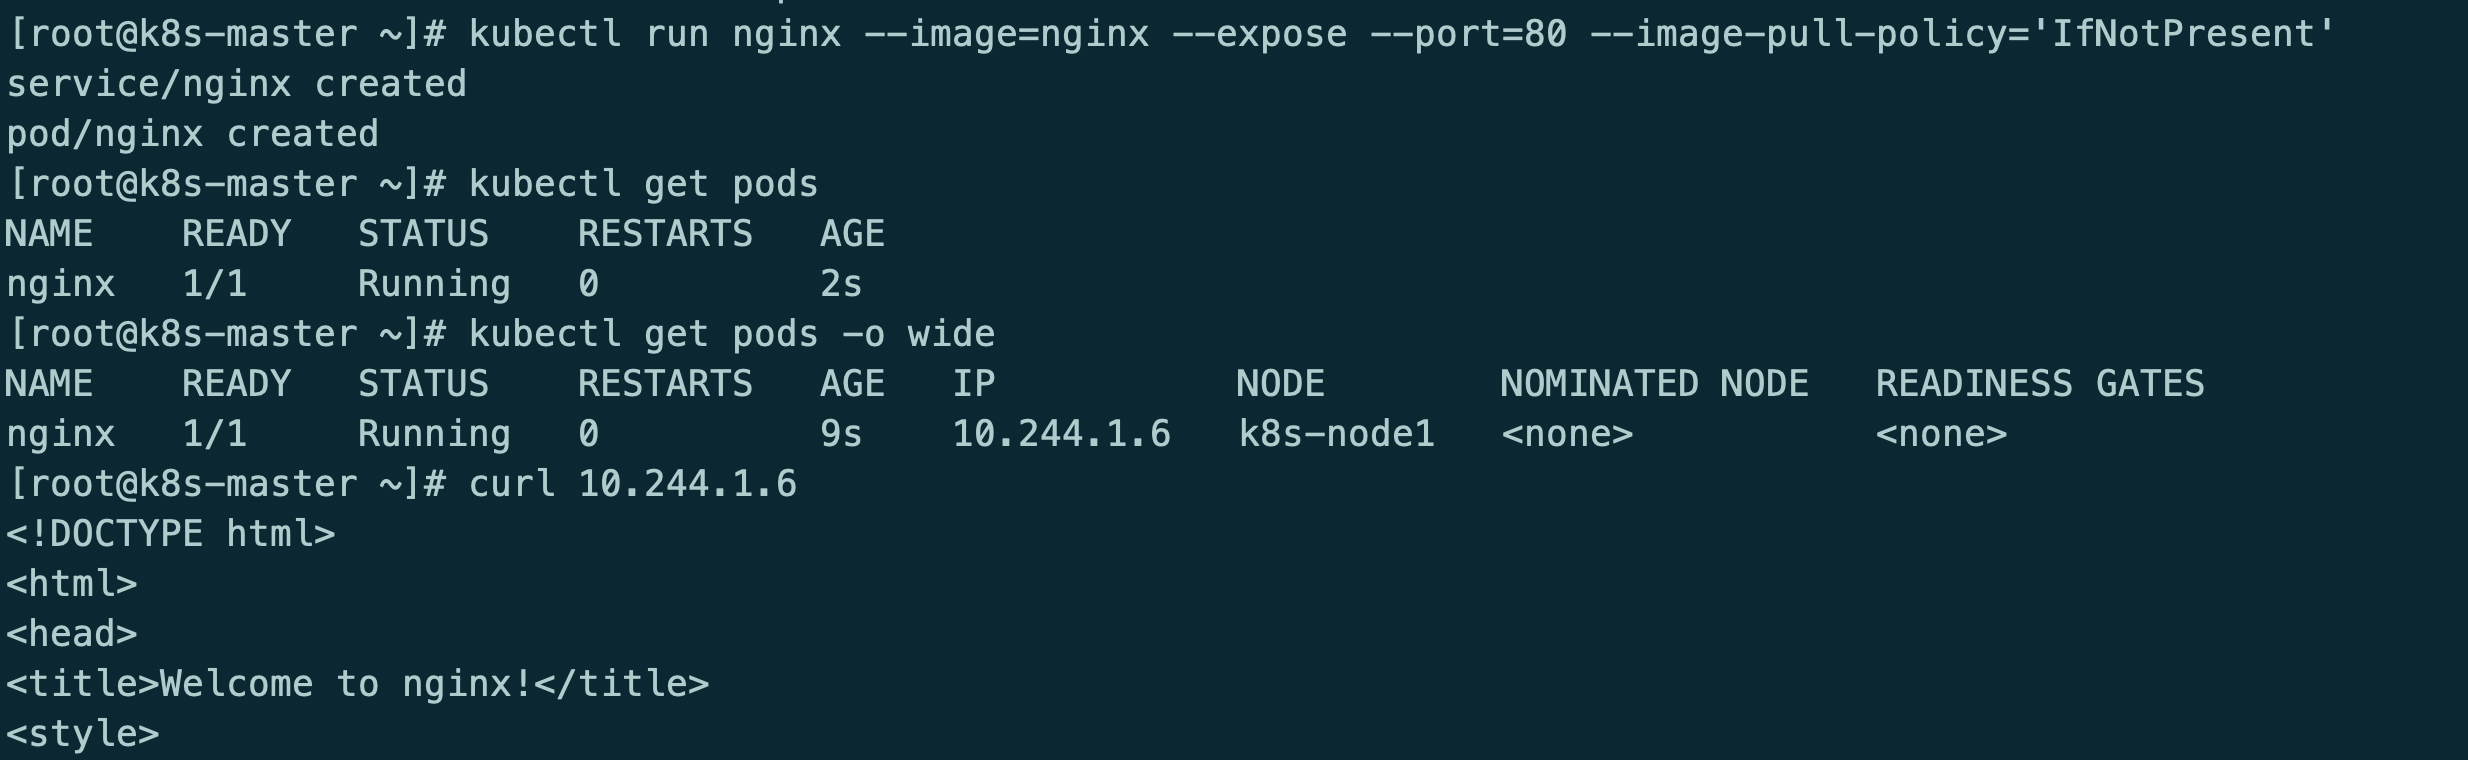
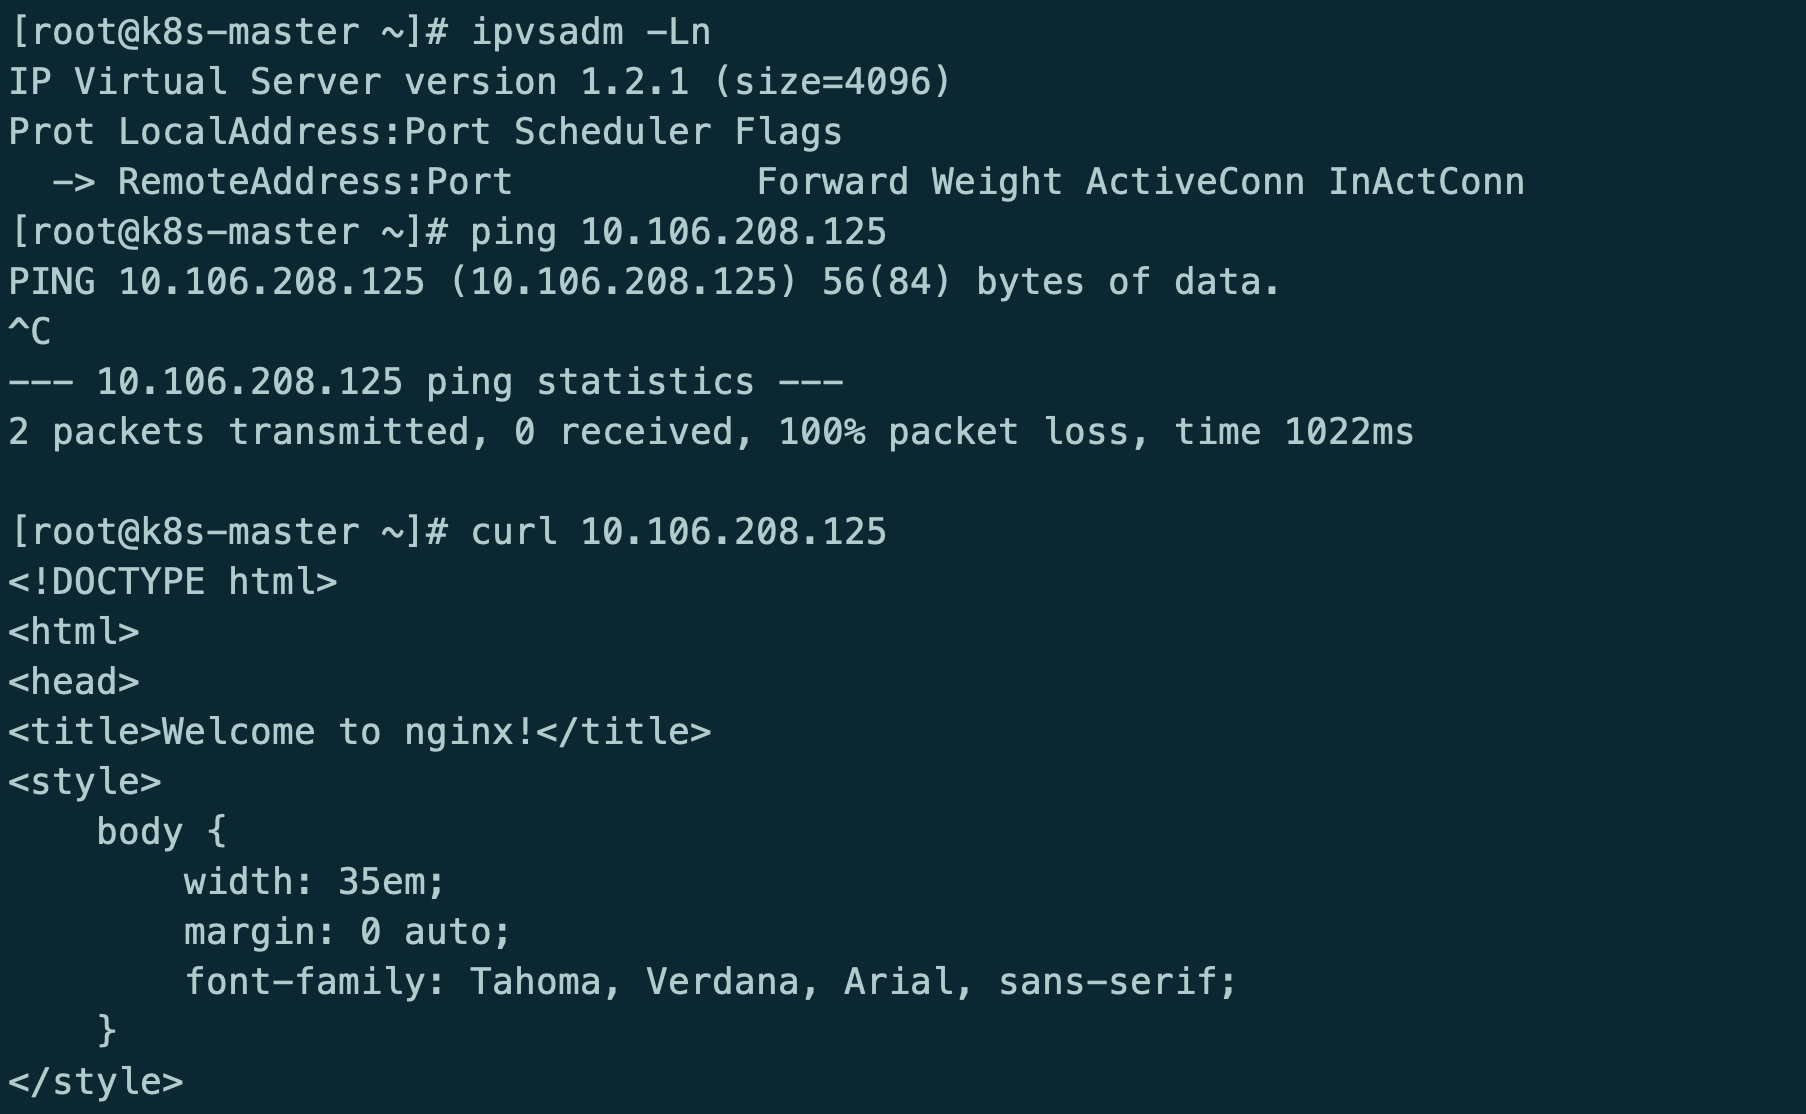
此时kube-router只提供网络功能,kube-proxy提供的service和防火墙策略
kube-router providing service proxy, firewall and pod networking.
参考地址:https://github.com/cloudnativelabs/kube-router/blob/master/docs/kubeadm.md
kubectl delete -f kubeadm-kuberouter.yaml
kubectl apply -f kubeadm-kuberouter-all-features.yaml
kubectl -n kube-system delete ds kube-proxy
docker run --privileged -v /lib/modules:/lib/modules --net=host registry.aliyuncs.com/google_containers/kube-proxy:v1.20.0 kube-proxy --cleanup
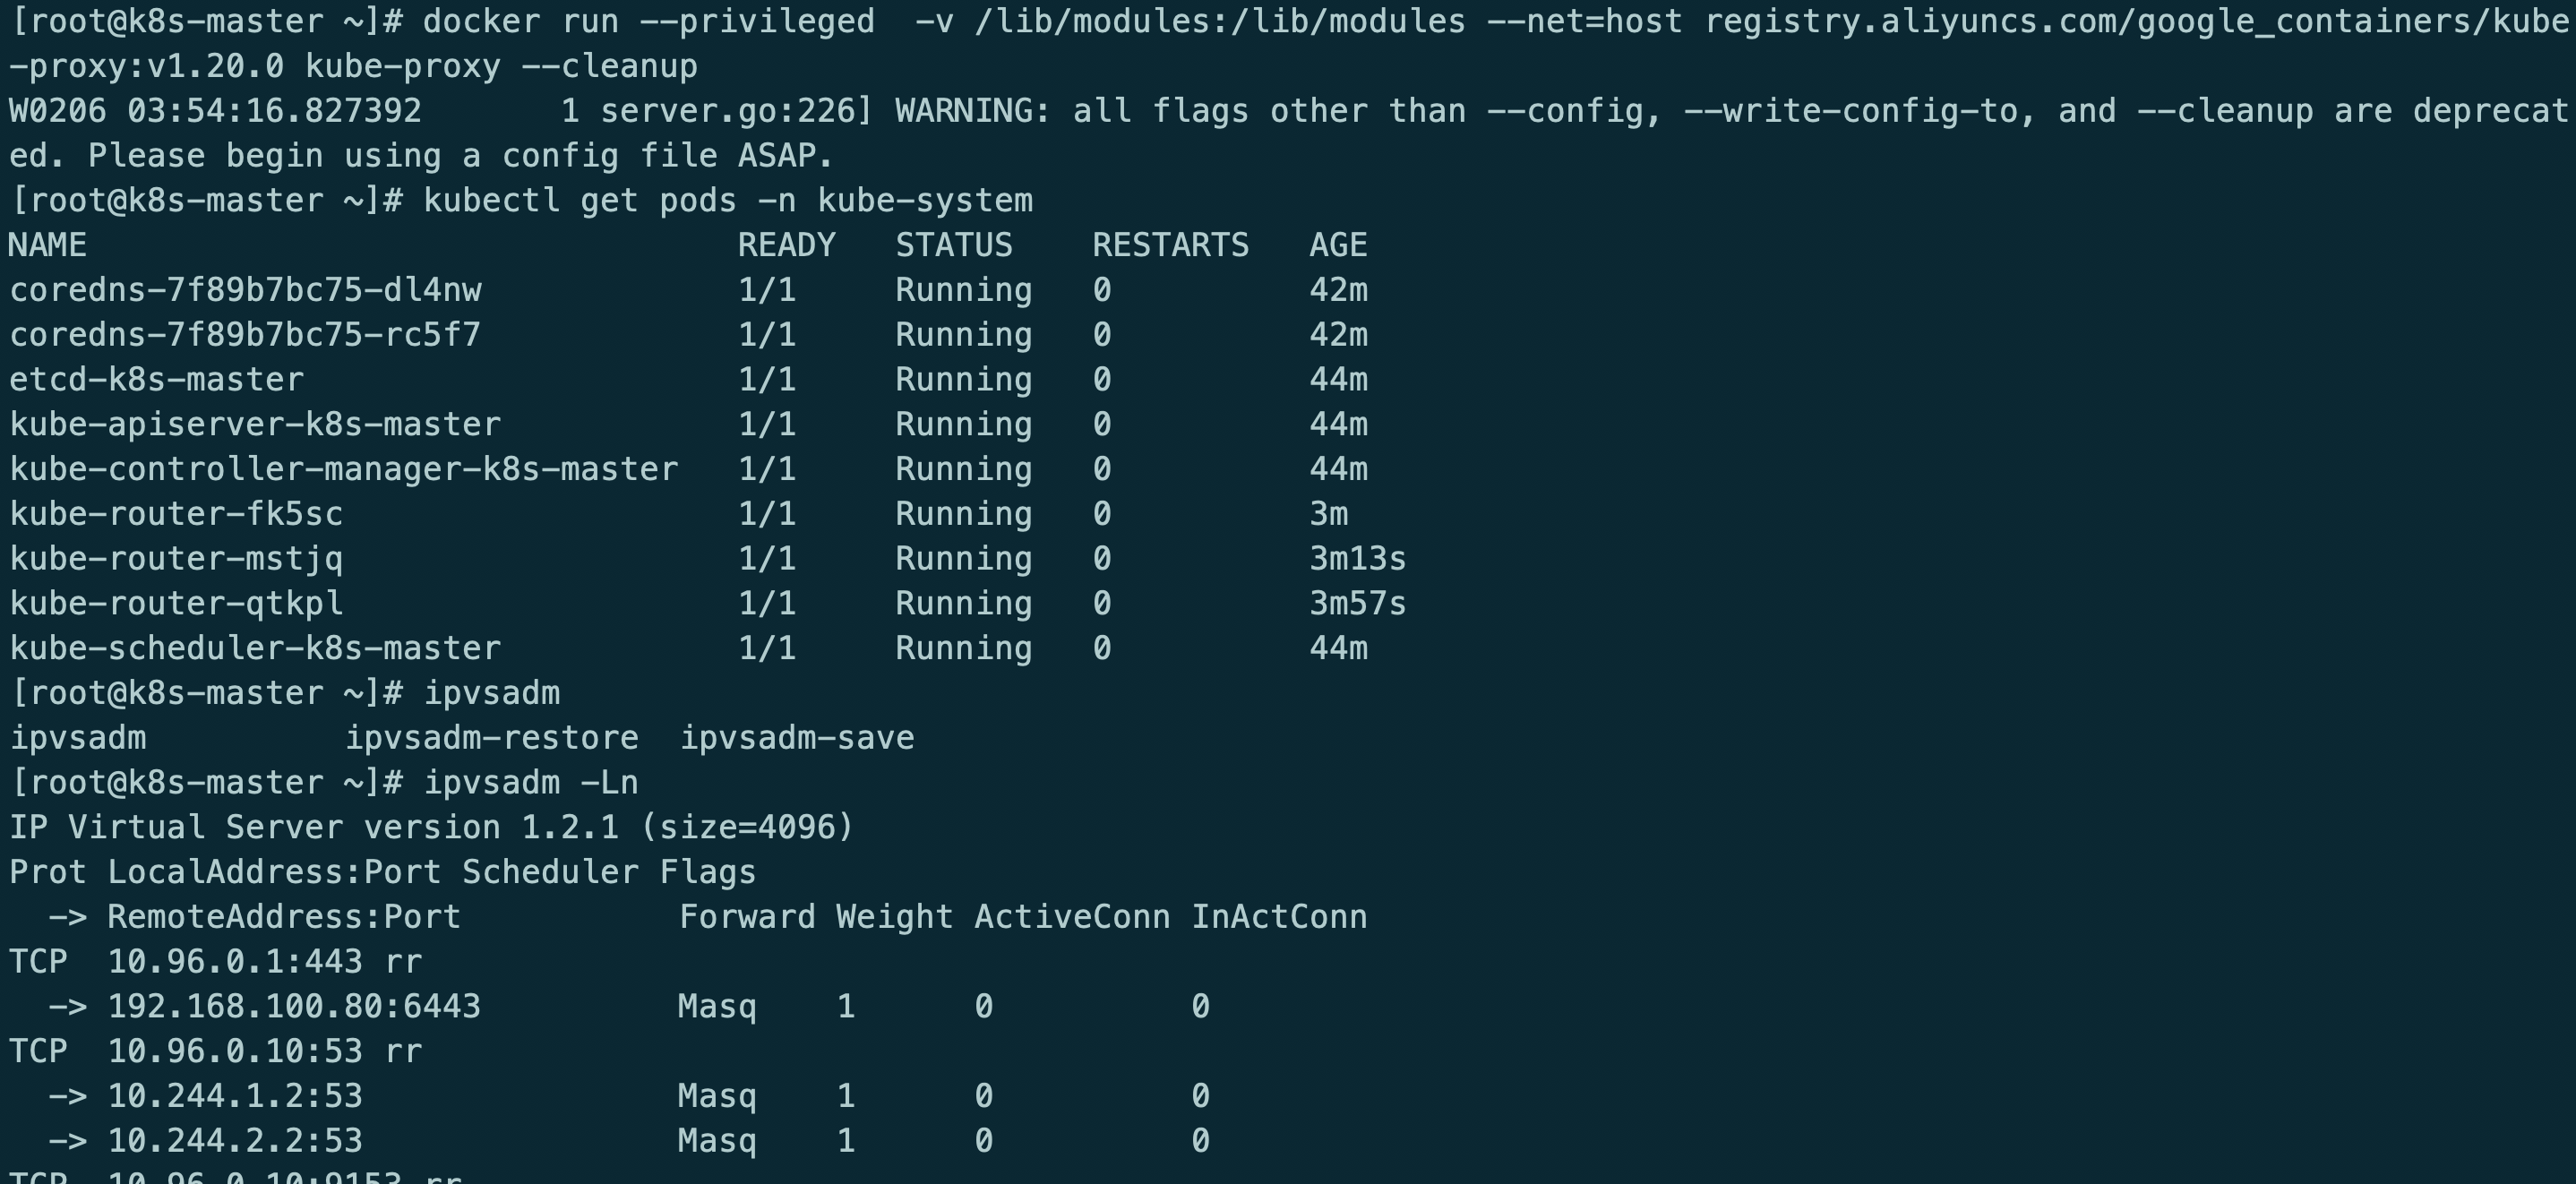
kube-router模式使用ipvs rr策略
最后在重启服务器
测试服务
格式化集群
kubectl drain k8s-master --delete-local-data --force --ignore-daemonsets
kubectl drain k8s-node1 --delete-local-data --force --ignore-daemonsets
kubectl drain k8s-node2 --delete-local-data --force --ignore-daemonsets
kubectl delete node k8s-master
rm -rf /etc/cni/net.d/10-kuberouter.conflist
kubeadm reset
iptables -F && iptables -t nat -F && iptables -t mangle -F && iptables -X
ipvsadm -C
reboot
kube-router代替kube-proxy+calico的更多相关文章
- 《kubernetes + .net core 》dev ops部分
目录 1.kubernetes 预备知识 1.1 集群资源 1.1.1 role 1.1.2 namespace 1.1.3 node 1.1.4 persistent volume 1.1.5 st ...
- k8s集群部署(2)
一.利用ansible部署kubernetes准备阶段 1.集群介绍 基于二进制方式部署k8s集群和利用ansible-playbook实现自动化:二进制方式部署有助于理解系统各组件的交互原理和熟悉组 ...
- k8s1.20环境搭建部署(二进制版本)
1.前提知识 1.1 生产环境部署K8s集群的两种方式 kubeadm Kubeadm是一个K8s部署工具,提供kubeadm init和kubeadm join,用于快速部署Kubernetes集群 ...
- kubernetes入门之skydns
部署kubernetes dns服务 kubernetes可以为pod提供dns内部域名解析服务.其主要作用是为pod提供可以直接通过service的名字解析为对应service的ip的功能. 部署k ...
- CNCF CloudNative Landscape
cncf landscape CNCF Cloud Native Interactive Landscape 1. App Definition and Development 1. Database ...
- kubectl version报did you specify the right host or port
现象: [root@localhost shell]# kubectl version Client Version: version.Info{Major:", GitVersion:&q ...
- centos7.5单机yum安装kubernetes
1.系统配置 centos7.5 docker 1.13.1 centos7下安装docker 2.关闭防火墙,selinux,swapoff systemctl disable firewalld ...
- 二进制方式部署Kubernetes 1.6.0集群(开启TLS)
本节内容: Kubernetes简介 环境信息 创建TLS加密通信的证书和密钥 下载和配置 kubectl(kubecontrol) 命令行工具 创建 kubeconfig 文件 创建高可用 etcd ...
- kubernetes 集群安全配置
版本:v1.10.0-alpha.3 openssl genrsa -out ca.key 2048 openssl req -x509 -new -nodes -key ca.key -subj & ...
- kubernetes1.5.2集群部署过程--安全模式
使用https安全模式部署kubernetes集群,能保证集群通讯安全.有效限制非授权用户访问.但部署比非安全模式复杂的多. 本文为etcd.kubernetes集群中各个组件配置证书认证,所有组件通 ...
随机推荐
- BigDecimalUtil:对double类型的数据进行处理(加减乘除、四舍五入、类型转换、比较两个值的大小)
该工具类所在的包:import java.math.BigDecimal; 项目中使用该工具类的相关代码: // 如果Output表中已经存在该节点(插入数据的节点)的信息,则修改Output表中的这 ...
- ValidationUtils 验证工具
package com.appnirman.vaidationutils;import android.content.Context;import java.util.regex.Matcher;i ...
- go语言-csp模型-并发通道
[前言]go语言的并发机制以及它所使用的CSP并发模型 一.CSP并发模型 CSP模型是上个世纪七十年代提出的,用于描述两个独立的并发实体通过共享的通讯 channel(管道)进行通信的并发模型. C ...
- C#实现JWT无状态验证的实战应用
前言 本文主要介绍JWT的实战运用. 准备工作 首先我们创建一个Asp.Net的,包含MVC和WebApi的Web项目. 然后使用Nuget搜索JWT,安装JWT类库,如下图. 设计思路 这里我们简单 ...
- JUC-ThreadLocalRandom
目录 Radndom类的局限性 ThreadLocalRandom 这个类是在JDK7中新增的随机数生成器,它弥补了Random类在多线程下的缺陷. Radndom类的局限性 在JDK7之前包括现在j ...
- vue打开新窗口并且实现传参,有图有真相
我要实现的功能是打开一个新窗口用来展示新页面,而且需要传参数,并且参数不能显示在地址栏里面,而且当我刷新页面的时候,传过来的参数不能丢失,要一直存在,除非我手动关闭这个新窗口,即浏览器的标签页. 通过 ...
- InterJ idea 回滚提交的代码
如果你要回滚到这一次提交 ctrl shift k 提交 选force push 那么你的代码就回滚到你所想要的这次提交记录了
- C# 基础 - 文件对话框
using System.Windows.Forms; ... /// <summary> /// 选择保存文件的名称以及路径 取消返回 空""; /// </s ...
- python-实现双链表
双链表和单链表进行比较的优点与不同 节点多了一个前驱指针域 在很多基本操作上,多了一种选择,因为双链表可以向前进行移动寻位 如果给每个节点添加一个对应的下标,那么在寻找节点时,我们可以使用二分发来进行 ...
- (4)MySQL进阶篇SQL优化(常用SQL的优化)
1.概述 前面我们介绍了MySQL中怎么样通过索引来优化查询.日常开发中,除了使用查询外,我们还会使用一些其他的常用SQL,比如 INSERT.GROUP BY等.对于这些SQL语句,我们该怎么样进行 ...