
使用consul实现分布式服务注册和发现--redis篇
安装consul client

consul 客户端检脚本

=============================================================================================

在192.168.56.122服务器上

=============================================================================================

1、安装redis

yum intstall redis -y

2、配置redis  为主

cat >/etc/redis.conf<<EOF

bind 192.168.56.122 127.0.0.1

protected-mode yes

port 6379

tcp-backlog 511

timeout 0

tcp-keepalive 300

daemonize yes

supervised no

pidfile /var/run/redis_6379.pid

loglevel notice

logfile /var/log/redis/redis.log

databases 16

save 900 1

save 300 10

save 60 10000

stop-writes-on-bgsave-error yes

rdbcompression yes

rdbchecksum yes

dbfilename dump.rdb

dir /var/lib/redis

slave-serve-stale-data yes

slave-read-only yes

repl-diskless-sync no

repl-diskless-sync-delay 5

repl-disable-tcp-nodelay no

slave-priority 100

requirepass password

appendonly no

appendfilename "appendonly.aof"

appendfsync everysec

no-appendfsync-on-rewrite no

auto-aof-rewrite-percentage 100

auto-aof-rewrite-min-size 64mb

aof-load-truncated yes

lua-time-limit 5000

slowlog-log-slower-than 10000

slowlog-max-len 128

latency-monitor-threshold 0

notify-keyspace-events ""

hash-max-ziplist-entries 512

hash-max-ziplist-value 64

list-max-ziplist-size -2

list-compress-depth 0

set-max-intset-entries 512

zset-max-ziplist-entries 128

zset-max-ziplist-value 64

hll-sparse-max-bytes 3000

activerehashing yes

client-output-buffer-limit normal 0 0 0

client-output-buffer-limit slave 256mb 64mb 60

client-output-buffer-limit pubsub 32mb 8mb 60

hz 10

aof-rewrite-incremental-fsync yes

EOF

3、启动redis

service redis start

4、配置consul服务

[root@MySQL-slave /etc/consul]# cat >redis-master.json<<EOF

{

  "service": [

  {

    "name": "6379-redis-m",

    "tags": ["master"],

    "address": "192.168.56.132",

    "port": 6379,

    "checks": [

      {

        "args": ["/data/consul/check_master.sh","0"],

        "interval": "5s"

      }

    ]

  }

 ]

}

EOF

[root@MySQL-slave /etc/consul]# cat >redis-slave.json<<EOF

{

  "service": [

  {

    "name": "6379-redis-s",

    "tags": ["slave"],

    "address": "192.168.56.132",

    "port": 6379,

    "checks": [

      {

        "args": ["/data/consul/check_slave.sh","0"],

        "interval": "5s"

      }

    ]

  }

 ]

}

EOF

5、主从检测脚本

[root@tomcat103 17:30:04 consul]/#cat  >/data/consul/check_master.sh<<EOF

#!/bin/bash

/usr/bin/redis-cli -h 127.0.0.1 -p 6379 -a password info | grep role:master

a=$?

if [ $a == 1 ];then

  exit 2

fi

EOF

[root@tomcat103 17:30:18 consul]/#cat >/data/consul/check_slave.sh<<EOF

#!/bin/bash

/usr/bin/redis-cli -h 127.0.0.1 -p 6379 -a password info | grep role:slave

a=$?

if [ $a == 1 ];then

  exit 2

fi

EOF

更改启动命令

nohup /usr/local/bin/consul agent -config-dir=/etc/consul -rejoin -enable-script-checks=true &

====================================================================

在192.168.56.122服务器上

====================================================================

1、安装redis

yum intstall redis -y

2、配置192.168.56.132上为192.168.56.122 redis的从

cat >/etc/redis.conf<<EOF

bind 192.168.56.132 127.0.0.1

protected-mode yes

port 6379

tcp-backlog 511

timeout 0

tcp-keepalive 300

daemonize yes

supervised no

pidfile /var/run/redis_6379.pid

loglevel notice

logfile /var/log/redis/redis.log

databases 16

save 900 1

save 300 10

save 60 10000

stop-writes-on-bgsave-error yes

rdbcompression yes

rdbchecksum yes

dbfilename dump.rdb

dir /var/lib/redis

slaveof 192.168.56.122 6379

masterauth password

slave-serve-stale-data yes

slave-read-only yes

repl-diskless-sync no

repl-diskless-sync-delay 5

repl-disable-tcp-nodelay no

slave-priority 100

requirepass password

appendonly no

appendfilename "appendonly.aof"

appendfsync everysec

no-appendfsync-on-rewrite no

auto-aof-rewrite-percentage 100

auto-aof-rewrite-min-size 64mb

aof-load-truncated yes

lua-time-limit 5000

slowlog-log-slower-than 10000

slowlog-max-len 128

latency-monitor-threshold 0

notify-keyspace-events ""

hash-max-ziplist-entries 512

hash-max-ziplist-value 64

list-max-ziplist-size -2

list-compress-depth 0

set-max-intset-entries 512

zset-max-ziplist-entries 128

zset-max-ziplist-value 64

hll-sparse-max-bytes 3000

activerehashing yes

client-output-buffer-limit normal 0 0 0

client-output-buffer-limit slave 256mb 64mb 60

client-output-buffer-limit pubsub 32mb 8mb 60

hz 10

aof-rewrite-incremental-fsync yes

EOF


3、配置consul服务

主从检测脚本

[root@tomcat103 17:30:04 consul]/#cat  >/data/consul/check_master.sh<<EOF

#!/bin/bash

/usr/bin/redis-cli -h 127.0.0.1 -p 6379 -a password info | grep role:master

a=$?

if [ $a == 1 ];then

  exit 2

fi

EOF

[root@tomcat103 17:30:18 consul]/#cat >/data/consul/check_slave.sh<<EOF

#!/bin/bash

/usr/bin/redis-cli -h 127.0.0.1 -p 6379 -a password info | grep role:slave

a=$?

if [ $a == 1 ];then

  exit 2

fi

EOF

4、consul配置文件

[root@MySQL-slave /etc/consul]# cat >/etc/consul/consul_config.json<<EOF

{

    "advertise_addr": "192.168.56.132",

    "bind_addr": "192.168.56.132",

    "domain": "consul",

    "datacenter": "consul-cluster",

    "data_dir": "/data/consul/data",

    "enable_syslog": true,

    "performance": {

      "raft_multiplier": 1

    },

    "dns_config": {

        "allow_stale": true,

        "max_stale": "15s"

    },

    "retry_join": [

        "192.168.56.120",

        "192.168.56.121",

        "192.168.56.122"

    ],

    "retry_interval": "10s",

    "skip_leave_on_interrupt": true,

    "leave_on_terminate": false,

    "ports": {

        "dns": 53,

        "http": 80

    },

    "rejoin_after_leave": true,

    "addresses": {

        "http": "0.0.0.0",

        "dns": "0.0.0.0"

    }

}

EOF

[root@MySQL-slave /etc/consul]# cat >/etc/consul/redis-master.json<<EOF

{

  "service": [

  {

    "name": "6379-redis-m",

    "tags": ["master"],

    "address": "192.168.56.132",

    "port": 6379,

    "checks": [

      {

        "args": ["/data/consul/check_master.sh","0"],

        "interval": "5s"

      }

    ]

  }

 ]

}

EOF

[root@MySQL-slave /etc/consul]# cat >/etc/consul/redis-slave.json<<EOF

{

  "service": [

  {

    "name": "6379-redis-s",

    "tags": ["slave"],

    "address": "192.168.56.132",

    "port": 6379,

    "checks": [

      {

        "args": ["/data/consul/check_slave.sh","0"],

        "interval": "5s"

      }

    ]

  }

 ]

}

EOF

5、启动consul客户端服务

 nohup consul agent -config-dir /etc/consul/ -data-dir /data/consul/data -enable-script-checks=true -ui &


6、 在122服务器上ping 域名

测试高可用性

ping 6379-redis-m.service.consul

ping 6379-redis-s.service.consul

(推荐使用dig @192.168.56.120 -p 53 6379-redis-m.service.consul 命令测试 )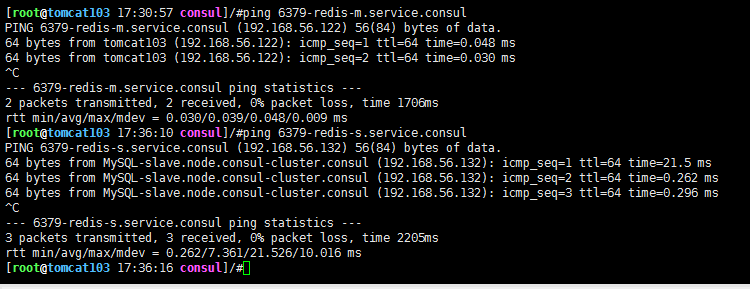
==================================================================================

更改两个服务器redis配置

 互换主从角色

在122上打开着两行注释

slaveof 192.168.56.132 6379

masterauth password

重启redis

service redis restart

在132上

#slaveof 192.168.56.122 6379

#masterauth password

重启服务

service redis restart


重新测试域名对应的数据库主从地址

 ping 6379-redis-m.service.consul

 ping 6379-redis-s.service.consul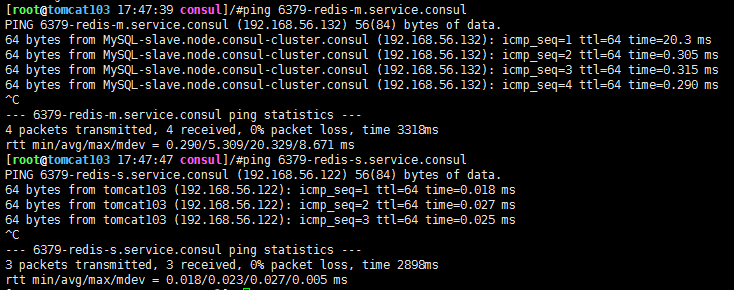
至此consul通过脚本自动发现redis主从高可用完成
使用consul实现分布式服务注册和发现--redis篇的更多相关文章
- 分布式服务注册和发现consul 简要介绍
Consul是HashiCorp公司推出的开源工具,用于实现分布式系统的服务发现与配置.与其他分布式服务注册与发现的方案,Consul的方案更"一站式",内置了服务注册与发现框 架 ...
- Docker+Consul+Registrator 实现服务注册与发现
Docker+Consul+Registrator实现服务注册与发现 逻辑图 实现nginx节点自动化加入容器IP代理 1.三台Consul agent server作为高可用通过Consul Tem ...
- 温故知新,.Net Core遇见Consul(HashiCorp),实践分布式服务注册与发现
什么是Consul 参考 https://www.consul.io https://www.hashicorp.com 使用Consul做服务发现的若干姿势 ASP.NET Core 发布之后通过命 ...
- .Net Core 商城微服务项目系列(二):使用Ocelot + Consul构建具备服务注册和发现功能的网关
1.服务注册 在上一篇的鉴权和登录服务中分别通过NuGet引用Consul这个包,同时新增AppBuilderExtensions类: public static class AppBuilderEx ...
- SpringCloud核心教程 | 第三篇:服务注册与发现 Eureka篇
Spring Cloud简介 Spring Cloud是一个基于Spring Boot实现的云应用开发工具,它为基于JVM的云应用开发中涉及的配置管理.服务发现.断路器.智能路由.微代理.控制总线.全 ...
- Consul之:服务注册与发现
一.服务的管理(注册与发现)有三种方式: 1:通过配置文件的方式静态注册2:通过HTTP API接口来动态注册(spring cloud使用方式,spring cloud中使用的是consul api ...
- Spring Cloud 之 Consul 知识点:服务注册与发现(类似工具:Eureka、ZooKeeper、Etcd)
资料 网址 springcloud(十三):注册中心 Consul 使用详解 http://ityouknow.com/springcloud/2018/07/20/spring-cloud-cons ...
- Spring Boot + Spring Cloud 构建微服务系统(一):服务注册和发现(Consul)
使用Consul提供注册和发现服务 什么是 Consul Consul 是 HashiCorp 公司推出的开源工具,用于实现分布式系统的服务发现与配置.与其它分布式服务注册与发现的方案,Consul ...
- 服务注册和发现(Consul)
使用Consul提供注册和发现服务 什么是 Consul Consul 是 HashiCorp 公司推出的开源工具,用于实现分布式系统的服务发现与配置.与其它分布式服务注册与发现的方案,Consul ...
随机推荐
- 解决SELinux导致Apache更改端口后无法启动的问题
systemctl start httpd # 将Apache的默认端口改为90后,启动Apache时提示失败 systemctl status httpd # 查看Apache的状态 可 ...
- 项目Alpha冲刺(团队)-第十天冲刺
格式描述 课程名称:软件工程1916|W(福州大学) 作业要求:项目Alpha冲刺(团队) 团队名称:为了交项目干杯 作业目标:描述第十天冲刺的项目进展.问题困难.心得体会 队员姓名与学号 队员学号 ...
- VS2012 VS2010 VTK引入设置
1.C/C++ ---> 附加包含的目录 F:/VTK61/VTK-6.1.0/SLN/Filters/Sources F:/VTK61/VTK-6.1.0/VTK-6.1.0/Filters/ ...
- 洛谷 P3518 [POI2011] SEJ-Strongbox 题解
思路: 首先先将每个输入的数据与n的最大公约数求出(因为如果a[i]是密码,那么所有a[i]与n最大公约数的倍数也是密码:于是如果a[i]不是密码,那么所有a[i]与n最大公约数的倍数也都不是密码)再 ...
- pkgconfig
# tree hiredis/ hiredis/└── usr └── local ├── include │ └── hiredis │ ├── adapters │ │ ├── a ...
- java 数组遍历(方法内部的代码)
//数组遍历(依次输出数组中的每一个元素)二维数组: int[][] arr={{1,2},{3,4,5},{6,7}}; for(int i=0;i<arr.length;i++){ for( ...
- cube.js 学习(十一)cube + gitbase 分析git 代码
这个是一个简单的demo,使用gitbase+cube 分析git 仓库代码 需求 我们平时使用的gitlab,或者gogs 等git 仓库管理工具,有自己的管理强项,但是对于分析上可能就不是那么强大 ...
- oracle的一些状态查询
- matrix67中适合程序员的例子
交互式证明:http://www.matrix67.com/blog/archives/6572 捡石子游戏(移动皇后问题):http://www.matrix67.com/blog/archives ...
- 【loj3045】【ZJOI2019】开关
题目 \(n\)个开关,一开始处于关闭状态,你需要将他们按成\(s\)状态,按成了之后就停止操作; 每次按下开关的i概率为\(\frac{p_i}{\sum_{i=1}^{n}p_i}\) ,问期望步 ...