Consul之:服务注册与发现
一、服务的管理(注册与发现)有三种方式:
1:通过配置文件的方式静态注册
2:通过HTTP API接口来动态注册(spring cloud使用方式,spring cloud中使用的是consul api)
3:使用consul client或consul api(程序)实现服务的注册和发现(Java非spring boot,cloud项目)
1.1、通过配置文件的方式静态注册
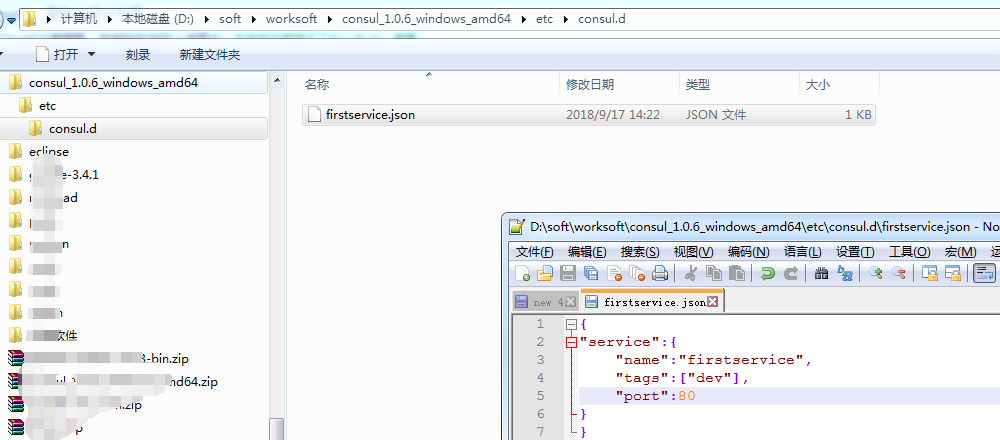
1.1.1、创建文件夹/etc/consul.d,
说明:.d表示一系列配置文件的存放目录(directory)

1.1.2、创建服务并写入上述文件夹中的一个文件

说明:
- 一个服务我们会配置为json格式:比如上述的单引号之间的形式
- 一个服务会写在一个json文件中
注意:如果上述文件夹没有权限进行操作,先改变文件夹权限,
我在window上,演示:
1.1.3、先启动consul进程,带上config-dir参数
切换屏幕-->
window上:D:\soft\worksoft\consul_1.0.6_windows_amd64>consul agent -dev -config-dir etc/consul.d/

说明:
- 根据-config-dir指定根据服务注册的目录中的文件来启动服务。
1.2:通过HTTP API接口来动态注册
直接调用/v1/agent/service/register接口注册即可,需要注意的是:http method为PUT提交方式
如:
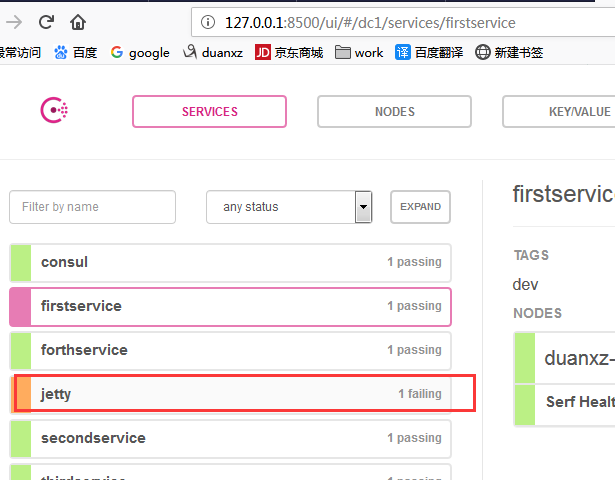
curl -X PUT -d '{"id": "jetty","name": "jetty","address": "192.168.1.200","port": 8080,"tags": ["dev"],"checks": [{"http": "http://192.168.1.104:9020/health","interval": "5s"}]}' http://192.168.1.100:8500/v1/agent/service/register
注意,这种方式,和上面的注册方式有一点不一样,body的参数,是上面service的值,这点需要注意。
结果:
1.3:使用Consul client或Consul api实现服务的注册和发现(Java非spring boot,spring cloud项目)
1.3.1、使用Consul Client
首先加入consul client的依赖
<dependency>

    <groupId>com.orbitz.consul</groupId>

    <artifactId>consul-client</artifactId>

    <version>0.15.1</version>

</dependency>
主类:ConsulClientDemo.java
package com.dxz.Consul_client;

import java.util.List;

import com.google.common.net.HostAndPort;

import com.orbitz.consul.AgentClient;

import com.orbitz.consul.Consul;

import com.orbitz.consul.HealthClient;

import com.orbitz.consul.model.agent.ImmutableRegCheck;

import com.orbitz.consul.model.agent.ImmutableRegistration;

import com.orbitz.consul.model.health.ServiceHealth;

public class ConsulClientDemo {

    static Consul consul = Consul.builder().withHostAndPort(HostAndPort.fromString("localhost:8500")).withPing(false).build();

    /**

     * 服务注册

     */

    public static void serviceRegister() {

        AgentClient agent = consul.agentClient();

        //健康检测

        ImmutableRegCheck check = ImmutableRegCheck.builder().http("http://localhost:9020/health").interval("5s").build();

        ImmutableRegistration.Builder builder = ImmutableRegistration.builder();

        builder.id("consul-server3").name("consul-server").addTags("v1").address("localhost").port(8080).addChecks(check);

        agent.register(builder.build());

    }

    /**

     * 服务获取

     */

    public static void serviceGet() {

        HealthClient client = consul.healthClient();

        String name = "consul-server";

        //获取所有服务

        System.out.println(client.getAllServiceInstances(name).getResponse().size());

        //获取所有正常的服务(健康检测通过的)

        List<ServiceHealth> responses = client.getHealthyServiceInstances(name).getResponse();

        for(ServiceHealth sh : responses ) {

            System.out.println(sh.getService());

        }

    }

    public static void main(String[] args) {

        serviceRegister();

        serviceGet();

        System.exit(0);

    }

}
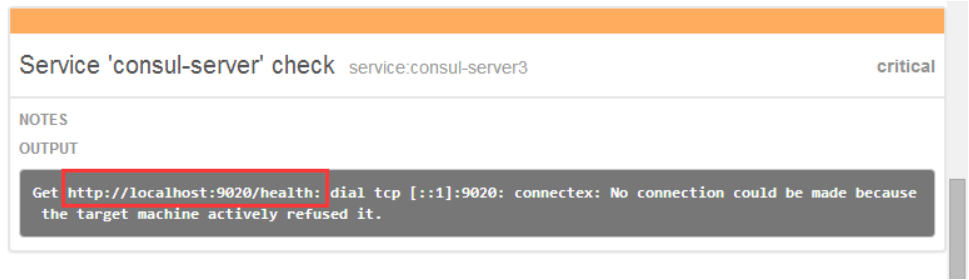
上面的注册后,看consul控制台如下:

1.3.2、使用Consul API
当然了,还可以使用如下consul api
        <dependency>

            <groupId>com.ecwid.consul</groupId>

            <artifactId>consul-api</artifactId>

            <version>1.2.2</version>

        </dependency>
主类:ConsulApiDemo.java

package com.dxz.Consul_client;

import java.util.List;

import java.util.Map;

import com.ecwid.consul.v1.ConsulClient;

import com.ecwid.consul.v1.ConsulRawClient;

import com.ecwid.consul.v1.agent.model.Service;

import com.ecwid.consul.v1.health.model.HealthService;

public class ConsulApiDemo {

    public static void serviceApiGet() {

         ConsulRawClient client = new ConsulRawClient("localhost", 8500);

         ConsulClient consul = new ConsulClient(client);

         //获取所有服务

         Map<String, Service> map = consul.getAgentServices().getValue();

         List<HealthService> list = consul.getHealthServices("consul-server", false, null).getValue();

         System.out.println(map.size()+"," +map);

         System.out.println("list" + list);

    }

    public static void main(String[] args) {

        serviceApiGet();

        System.exit(0);

    }

}
启动时的日志片段:
6,map={application=Service{id='application', service='application', tags=[], address='192.168.5.6', port=8080}, consul=Service{id='consul', service='consul', tags=[], address='', port=8300}, consul-client1=Service{id='consul-client1', service='consul-client', tags=[], address='DESKTOP-PPSFCNC', port=8501}, consul-server1=Service{id='consul-server1', service='consul-server', tags=[], address='DESKTOP-PPSFCNC', port=8503}, consul-server2=Service{id='consul-server2', service='consul-server', tags=[], address='DESKTOP-PPSFCNC', port=8504}, consul-server3=Service{id='consul-server3', service='consul-server', tags=[v1], address='localhost', port=8080}}

3,list=[HealthService{node=Node{node='DESKTOP-PPSFCNC', address='127.0.0.1'}, service=Service{id='consul-server1', service='consul-server', tags=[], address='DESKTOP-PPSFCNC', port=8503}, checks=[Node{node='DESKTOP-PPSFCNC', checkId='serfHealth', name='Serf Health Status', status=PASSING, notes='', output='Agent alive and reachable', serviceId='', serviceName=''}, Node{node='DESKTOP-PPSFCNC', checkId='service:consul-server1', name='Service 'consul-server' check', status=CRITICAL, notes='', output='parse http://DESKTOP-PPSFCNC:8503${management.contextPath}/health: invalid character "{" in host name', serviceId='consul-server1', serviceName='consul-server'}]}, HealthService{node=Node{node='DESKTOP-PPSFCNC', address='127.0.0.1'}, service=Service{id='consul-server2', service='consul-server', tags=[], address='DESKTOP-PPSFCNC', port=8504}, checks=[Node{node='DESKTOP-PPSFCNC', checkId='serfHealth', name='Serf Health Status', status=PASSING, notes='', output='Agent alive and reachable', serviceId='', serviceName=''}, Node{node='DESKTOP-PPSFCNC', checkId='service:consul-server2', name='Service 'consul-server' check', status=CRITICAL, notes='', output='parse http://DESKTOP-PPSFCNC:8504${management.contextPath}/health: invalid character "{" in host name', serviceId='consul-server2', serviceName='consul-server'}]}, HealthService{node=Node{node='DESKTOP-PPSFCNC', address='127.0.0.1'}, service=Service{id='consul-server3', service='consul-server', tags=[v1], address='localhost', port=8080}, checks=[Node{node='DESKTOP-PPSFCNC', checkId='serfHealth', name='Serf Health Status', status=PASSING, notes='', output='Agent alive and reachable', serviceId='', serviceName=''}, Node{node='DESKTOP-PPSFCNC', checkId='service:consul-server3', name='Service 'consul-server' check', status=CRITICAL, notes='', output='Get http://localhost:9020/health: dial tcp [::1]:9020: connectex: No connection could be made because the target machine actively refused it.', serviceId='consul-server3', serviceName='consul-server'}]}]
其中,spring cloud 使用的就是第二种consul api。
二、服务查询
两种查询方式:DNS和HTTP
2.1、DNS:

访问的服务名字:
- tag.servicename.service.consul tag和servicename都是创建服务的时候配置的
- DNS访问的端口是8600
2.2、HTTP:
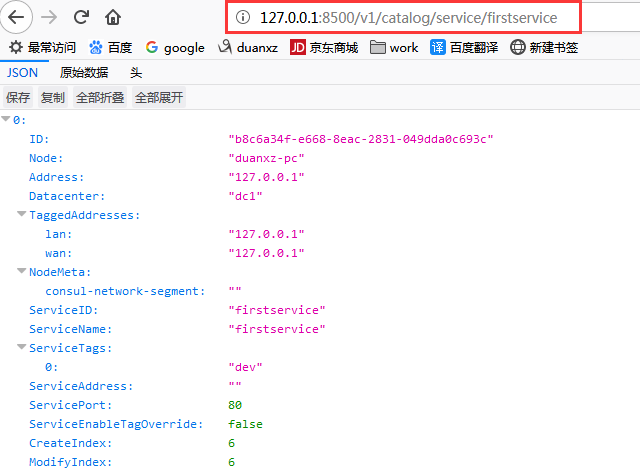
说明:
- 访问的路径:host:port/版本号/catalog/service/服务名
- Address:用于指定一个特定service的IP地址,默认情况下,使用的是该service使用的agent。
consul client的命令行演示
一、启动consul server
在安装好consul的ubuntu虚拟机上启动consul server,以server方式启动:
D:\soft\worksoft\consul_1.0.6_windows_amd64>consul agent -ui -server -data-dir=/data -bootstrap-expect 1 -bind 10.200.110.100
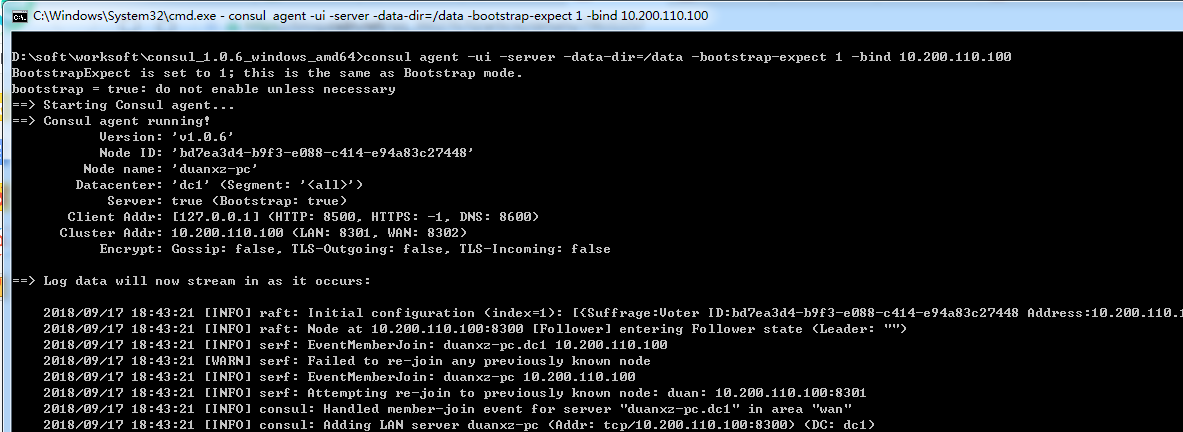
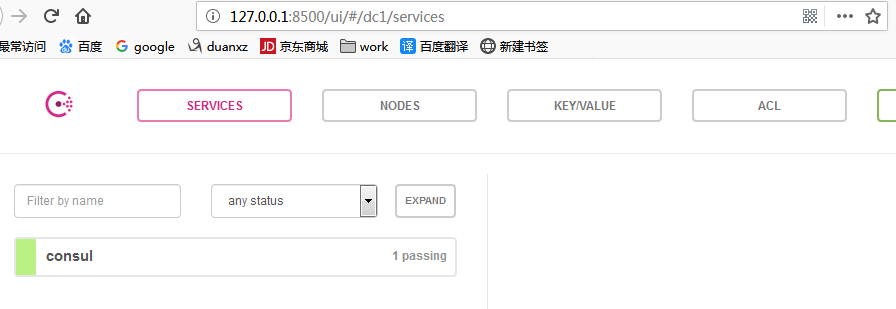
使用-ui参数启动server成功后,可以在浏览器中输入:http://localhost:8500/ui 看到如下界面
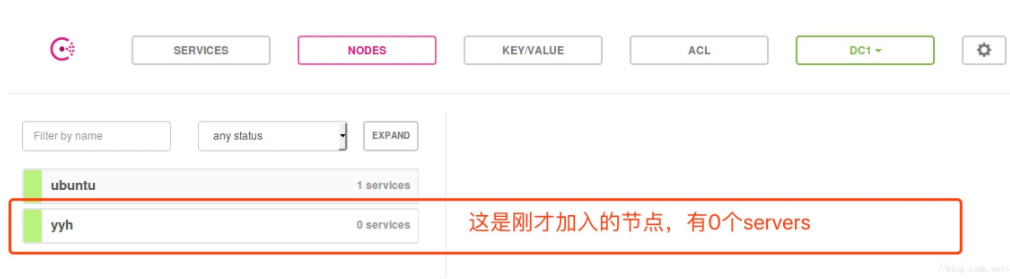
二、启动consul client
在本机上启动consul client
consul agent -data-dir /data -node=duan -advertise=10.200.110.13 -join=10.200.110.100
加入server节点成功后的截图如下
此时在web ui中查看节点,会发现多了一个节点,但是没有任何服务
示例:多个服务注册的情况
4.1、每一个服务注册到一个文件
假设现在又创建了一个secondservice服务,我会将该服务写入secondservice.json文件中去,如下:

使用http去访问:

说明:按照服务名去访问。
4.2、多个服务写在同一个json文件中

说明:
- 放在services中而不是service里(上边的单文件单服务是放在service里的)
- 多个服务放在一个数组里边
使用http去访问:

说明:按照服务名去访问。
注意:在实际开发中,微服务数量众多,
如果每个文件都放在一个文件里,文件会非常多,不好!
如果所有微服务都放在一个文件里,文件太大,也不好!
所以,需要二者结合。例如,假设有100个微服务,放在10个json文件中去,每个json文件存放10个服务。
Consul之:服务注册与发现的更多相关文章
- .netcore consul实现服务注册与发现-集群完整版
原文:.netcore consul实现服务注册与发现-集群完整版 一.Consul的集群介绍 Consul Agent有两种运行模式:Server和Client.这里的Server和Clien ...
- .netcore consul实现服务注册与发现-单节点部署
原文:.netcore consul实现服务注册与发现-单节点部署 一.Consul的基础介绍 Consul是HashiCorp公司推出的开源工具,用于实现分布式系统的服务发现与配置.与其他分 ...
- .netcore consul实现服务注册与发现-集群部署
一.Consul的集群介绍 Consul Agent有两种运行模式:Server和Client.这里的Server和Client只是Consul集群层面的区分,与搭建在Cluster之上的应用服务无关 ...
- Spring Cloud Consul 实现服务注册和发现
Spring Cloud 是一个基于 Spring Boot 实现的云应用开发工具,它为基于 JVM 的云应用开发中涉及的配置管理.服务发现.断路器.智能路由.微代理.控制总线.全局锁.决策竞选.分布 ...
- Consul初探-服务注册和发现
前言 经过上一篇的学习,现在已经来到了服务注册发现环节:Consul 的核心功能就是服务注册和发现,Consul 客户端通过将自己注册到 Consul 服务器集群,然后等待调用方去发现服务,实现代理转 ...
- 一个故事,一段代码告诉你如何使用不同语言(Golang&C#)提供相同的能力基于Consul做服务注册与发现
目录 引言 什么是微服务 传统服务 微服务 什么是服务注册与服务发现 为什么要使用不同的语言提供相同的服务能力 服务协调器 服务注册 Golang C#(.NetCore3.1) 服务发现 通过Htt ...
- 简单RPC框架-基于Consul的服务注册与发现
*:first-child { margin-top: 0 !important; } body>*:last-child { margin-bottom: 0 !important; } /* ...
- Spring Cloud Consul使用——服务注册与发现(注册中心)
整理自该文章 一.Consul 服务端接下来我们开发 Consul 的服务端,创建一个 spring-cloud-consul-producer 项目 1.添加依赖包 <dependencies ...
- spring boot2X整合Consul一服务注册与发现
Consul 是HashiCorp公司推出的开源工具,用于实现分布式系统的服务发现与配置. 关键特性: 服务注册/发现 数据强一致性保证 多数据中心 健康检查 key/value存储 1.下载 htt ...
- python使用consul进行服务注册和发现
阅读目录 一.安装启动consul 二.python服务注册 三.golang服务注册 四.通过API的方式获取信息 回到顶部 一.安装启动consul 1.通过docker快速安装 #获取docke ...
随机推荐
- 『OpenCV3』滤波器边缘检测
一.原理简介 边缘检测原理 - Sobel, Laplace, Canny算子 X方向Sobel算子 -1 -2 -1 0 0 0 1 2 1 Y方向Sobel算子 -1 0 1 -2 0 2 -1 ...
- PAT 1081 Rational Sum
1081 Rational Sum (20 分) Given N rational numbers in the form numerator/denominator, you are suppo ...
- html5(四) canvas
http://www.cnblogs.com/Gyoung/archive/2013/04/08/2994515.html
- Java IO编程全解(二)——传统的BIO编程
前面讲到:Java IO编程全解(一)——Java的I/O演进之路 网络编程的基本模型是Client/Server模型,也就是两个进程之间进行相互通信,其中服务端提供位置信息(绑定的IP地址和监听端口 ...
- rest_framework 之视图
1. 继承ModelSerilizer,直接指定要序列化的表模型 MySerializers.py from app import models # 继承ModelSerilizer,直接指定要序列化 ...
- python -- 面向对象-成员
1.成员 在类中,你能写的所有内容都是类的成员 2.变量 1.实例变量:由对象去访问的变量,一般使用是 对象 . 属性 class Person: def __in ...
- js获取子元素的内容
<div class="aaa1"> <div class="">123</div> <span>2222< ...
- angularjs checkbox
<!DOCTYPE html><html lang="en"><head> <meta charset="UTF-8" ...
- SQL的decode()函数
decode()函数简介: 主要作用:将查询结果翻译成其他值(即以其他形式表现出来,以下举例说明): 使用方法: Select decode(columnname,值1,翻译值1,值2,翻译值2,.. ...
- letCode-2
letCode第二题题目如下: 给出两个 非空 的链表用来表示两个非负的整数.其中,它们各自的位数是按照 逆序 的方式存储的,并且它们的每个节点只能存储 一位 数字. 如果,我们将这两个数相加起来,则 ...