
springboot jpa操作redis
SpringBoot使用Redis缓存
(1)pom.xml引入jar包,如下:
        <dependency>

            <groupId>org.springframework.boot</groupId>

            <artifactId>spring-boot-starter-data-redis</artifactId>

        </dependency>
(2)修改项目启动类,增加注解@EnableCaching,开启缓存功能,如下:

package springboot;

import org.springframework.boot.SpringApplication;

import org.springframework.boot.autoconfigure.SpringBootApplication;

import org.springframework.cache.annotation.EnableCaching;

import org.springframework.scheduling.annotation.EnableScheduling;

@SpringBootApplication

@EnableScheduling

@EnableCaching

public class SpringbootApplication{

    public static void main(String[] args) {

        SpringApplication.run(SpringbootApplication.class, args);

    }

}
(3)application.properties中配置Redis连接信息,如下:
# Redis数据库索引(默认为0)

spring.redis.database=0

# Redis服务器地址

spring.redis.host=172.31.19.222

# Redis服务器连接端口

spring.redis.port=6379

# Redis服务器连接密码(默认为空)

spring.redis.password=

# 连接池最大连接数(使用负值表示没有限制)

spring.redis.pool.max-active=8

# 连接池最大阻塞等待时间(使用负值表示没有限制)

spring.redis.pool.max-wait=-1

# 连接池中的最大空闲连接

spring.redis.pool.max-idle=8

# 连接池中的最小空闲连接

spring.redis.pool.min-idle=0

# 连接超时时间(毫秒)

spring.redis.timeout=0
(4)新建Redis缓存配置类RedisConfig,如下:
package springboot.config;

import org.springframework.beans.factory.annotation.Value;

import org.springframework.cache.CacheManager;

import org.springframework.cache.annotation.CachingConfigurerSupport;

import org.springframework.cache.annotation.EnableCaching;

import org.springframework.context.annotation.Bean;

import org.springframework.context.annotation.Configuration;

import org.springframework.data.redis.cache.RedisCacheManager;

import org.springframework.data.redis.connection.RedisConnectionFactory;

import org.springframework.data.redis.core.RedisTemplate;

import org.springframework.data.redis.core.StringRedisTemplate;

import org.springframework.data.redis.serializer.Jackson2JsonRedisSerializer;

import com.fasterxml.jackson.annotation.JsonAutoDetect;

import com.fasterxml.jackson.annotation.PropertyAccessor;

import com.fasterxml.jackson.databind.ObjectMapper;

/**

 * Redis缓存配置类

 * @author szekinwin

 *

 */

@Configuration

@EnableCaching

public class RedisConfig extends CachingConfigurerSupport{

    @Value("${spring.redis.host}")

    private String host;

    @Value("${spring.redis.port}")

    private int port;

    @Value("${spring.redis.timeout}")

    private int timeout;

    //自定义缓存key生成策略

//    @Bean

//    public KeyGenerator keyGenerator() {

//        return new KeyGenerator(){

//            @Override

//            public Object generate(Object target, java.lang.reflect.Method method, Object... params) {

//                StringBuffer sb = new StringBuffer();

//                sb.append(target.getClass().getName());

//                sb.append(method.getName());

//                for(Object obj:params){

//                    sb.append(obj.toString());

//                }

//                return sb.toString();

//            }

//        };

//    }

    //缓存管理器

    @Bean

    public CacheManager cacheManager(@SuppressWarnings("rawtypes") RedisTemplate redisTemplate) {

        RedisCacheManager cacheManager = new RedisCacheManager(redisTemplate);

        //设置缓存过期时间

        cacheManager.setDefaultExpiration(10000);

        return cacheManager;

    }

    @Bean

    public RedisTemplate<String, String> redisTemplate(RedisConnectionFactory factory){

        StringRedisTemplate template = new StringRedisTemplate(factory);

        setSerializer(template);//设置序列化工具

        template.afterPropertiesSet();

        return template;

    }

     private void setSerializer(StringRedisTemplate template){

            @SuppressWarnings({ "rawtypes", "unchecked" })

            Jackson2JsonRedisSerializer jackson2JsonRedisSerializer = new Jackson2JsonRedisSerializer(Object.class);

            ObjectMapper om = new ObjectMapper();

            om.setVisibility(PropertyAccessor.ALL, JsonAutoDetect.Visibility.ANY);

            om.enableDefaultTyping(ObjectMapper.DefaultTyping.NON_FINAL);

            jackson2JsonRedisSerializer.setObjectMapper(om);

            template.setValueSerializer(jackson2JsonRedisSerializer);

     }

}
(5)新建UserMapper,如下:
package springboot.dao;

import org.apache.ibatis.annotations.Delete;

import org.apache.ibatis.annotations.Insert;

import org.apache.ibatis.annotations.Mapper;

import org.apache.ibatis.annotations.Param;

import org.apache.ibatis.annotations.Select;

import org.apache.ibatis.annotations.Update;

import org.springframework.cache.annotation.CacheConfig;

import org.springframework.cache.annotation.CacheEvict;

import org.springframework.cache.annotation.CachePut;

import org.springframework.cache.annotation.Cacheable;

import springboot.domain.User;

@Mapper

@CacheConfig(cacheNames = "users")

public interface UserMapper {

    @Insert("insert into user(name,age) values(#{name},#{age})")

    int addUser(@Param("name")String name,@Param("age")String age);

    @Select("select * from user where id =#{id}")

    @Cacheable(key ="#p0")

    User findById(@Param("id") String id);

    @CachePut(key = "#p0")

    @Update("update user set name=#{name} where id=#{id}")

    void updataById(@Param("id")String id,@Param("name")String name);

    //如果指定为 true,则方法调用后将立即清空所有缓存

    @CacheEvict(key ="#p0",allEntries=true)

    @Delete("delete from user where id=#{id}")

    void deleteById(@Param("id")String id);

}
@Cacheable将查询结果缓存到redis中,(key="#p0")指定传入的第一个参数作为redis的key。
@CachePut,指定key,将更新的结果同步到redis中
@CacheEvict,指定key,删除缓存数据,allEntries=true,方法调用后将立即清除缓存
(6)service层与controller层跟上一篇整合一样,启动redis服务器,redis服务器的安装与启动可以参考之前的博客,地址如下:
http://www.cnblogs.com/gdpuzxs/p/6623171.html
(7)配置log4j日志信息,如下:
## LOG4J配置

log4j.rootCategory=DEBUG,stdout

## 控制台输出

log4j.appender.stdout=org.apache.log4j.ConsoleAppender

log4j.appender.stdout.layout=org.apache.log4j.PatternLayout

log4j.appender.stdout.layout.ConversionPattern=%d{yyyy-MM-dd HH:mm:ss,SSS} %5p %c{1}:%L - %m%n
(8)验证redis缓存
首先我们向user表总插入一条数据,数据库显示如下:

现在,我们查询一下user表中id=24的数据,观擦控制台输出的信息,如下:
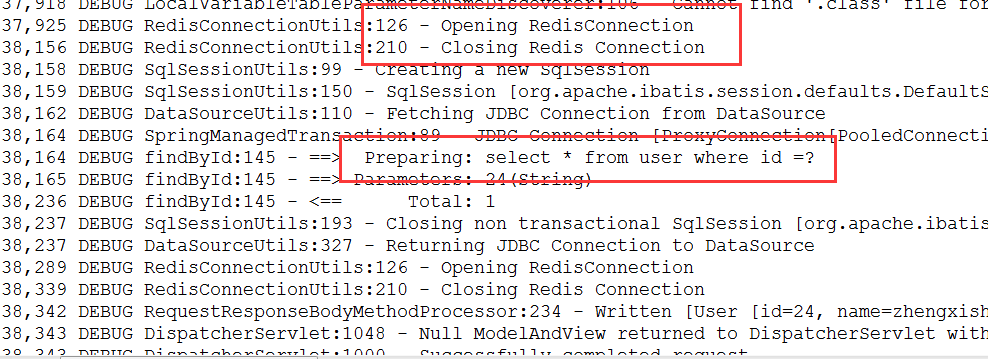
通过控制台输出信息我们可以知道,这次执行了数据库查询,并开启了Redis缓存查询结果。接下来我们再次查询user表中id=24的数据,观察控制台,如下:

通过控制台输出信息我们可以知道,这次并没有执行数据库查询,而是从Redis缓存中查询,并返回查询结果。我们查看redis中的信息,如下:

方法finduser方法使用了注解@Cacheable(key="#p0"),即将id作为redis中的key值。当我们更新数据的时候,应该使用@CachePut(key="#p0")进行缓存数据的更新,否则将查询到脏数据。
springboot jpa操作redis的更多相关文章
- IDEA SpringBoot+JPA+MySql+Redis+RabbitMQ 秒杀系统
先放上github地址:spike-system,可以直接下载完整项目运行测试 SpringBoot+JPA+MySql+Redis+RabbitMQ 秒杀系统 技术栈:SpringBoot, MyS ...
- springboot+jpa+mysql+redis+swagger整合步骤
springboot+jpa+MySQL+swagger框架搭建好之上再整合redis: 在电脑上先安装redis: 一.在pom.xml中引入redis 二.在application.yml里配置r ...
- SpringBoot+Jpa+SpringSecurity+Redis+Vue的前后端分离开源系统
项目简介: eladmin基于 Spring Boot 2.1.0 . Jpa. Spring Security.redis.Vue的前后端分离的后台管理系统,项目采用分模块开发方式, 权限控制采用 ...
- springboot 如何操作redis
1.首先应该引入 依赖 <dependency> <groupId>org.springframework.boot</groupId> <artifactI ...
- springboot+JPA 整合redis
1.导入redis依赖: <dependency> <groupId>org.springframework.boot</groupId> <artifact ...
- 【原】无脑操作:IDEA + maven + Shiro + SpringBoot + JPA + Thymeleaf实现基础授权权限
上一篇<[原]无脑操作:IDEA + maven + Shiro + SpringBoot + JPA + Thymeleaf实现基础认证权限>介绍了实现Shiro的基础认证.本篇谈谈实现 ...
- 【原】无脑操作:IDEA + maven + Shiro + SpringBoot + JPA + Thymeleaf实现基础认证权限
开发环境搭建参见<[原]无脑操作:IDEA + maven + SpringBoot + JPA + Thymeleaf实现CRUD及分页> 需求: ① 除了登录页面,在地址栏直接访问其他 ...
- springboot之使用redistemplate优雅地操作redis
概述 本文内容主要 关于spring-redis 关于redis的key设计 redis的基本数据结构 介绍redis与springboot的整合 sringboot中的redistemplate的使 ...
- redis(Springboot中封装整合redis,java程序如何操作redis的5种基本数据类型)
平常测试redis操作命令,可能用的是cmd窗口 操作redis,记录一下 java程序操作reids, 操作redis的方法 可以用Jedis ,在springboot 提供了两种 方法操作 Red ...
随机推荐
- Codeforces Round #423 (Div. 2)
codeforces 423 A. Restaurant Tables [水题] //注意,一个人选座位的顺序,先去单人桌,没有则去空的双人桌,再没有则去有一个人坐着的双人桌.读清题意. #inclu ...
- WC2018 滚粗记
虽然又考炸了但还是总结一下.. $day0$:没有什么很重要的事.. $day1$:除了听(dong)课(mian)以外没有什么很重要的事.. $day2$:除了听(dong)课(mian)以外没有什 ...
- C 语言实现多态的原理:函数指针
C语言实现多态的原理:函数指针 何为函数指针?答案:C Programming Language. 能够查阅下,从原理上来讲,就是一个内存地址.跳过去运行相应的代码段. 既然如此,在运行时决定跳到哪个 ...
- 实用技巧:利用Excel实现客户档案的统一管理
背景: 一个朋友新开了家门市,生意不错,客源旺盛. 有次我们喝茶时,他透露一个问题,就是客户的档案管理很不理想,都是纸面的,很容易丢失,也不方便查找. 我自诩混迹IT界多年,当然要替好友解决这个小麻烦 ...
- Map使用方法
转:https://www.cnblogs.com/lzq198754/p/5780165.html Java map 详解 - 用法.遍历.排序.常用API等 概要: java.util 中的集合类 ...
- centos7生成密钥及集群之间免密登录
1.在本地生成密钥 命令:ssh-keygen -t dsa -P '' -f ~/.ssh/id_dsa 2.进入.ssh文件夹,创建保存密钥的文件 命令:touch authorized_keys ...
- Relay GraphQL理解
Relay是构建数据驱动 React 应用的js框架. Relay:特性一.声明式:不再使用一个命令式API与数据存储通讯.而是简单的使用RraphQL声明组件数据需求,让Relay理解如何及什么时候 ...
- Lua库-bit32库
Global = Global or {}; local bits = {}; function bits.bxor(num1,num2) local ret=bit32.bxor(num1,num2 ...
- 前端基础-CSS的属性相关设置
一 字体属性 二 文本属性 三 背景属性 四 盒子模型 五 盒子模型各部分详解 一. 字体属性 1.font-weight:文字粗细(表格中*为重点) 取值 描述 normal 默认值,标准粗细 ...
- Oracle数据库新装之后出现的监听程序无法正常启动和运行(Oracle-12514)
修改安装目录下的配置文件 比如:F:\app\admin-PC\product\11.2.0\dbhome_1\network\admin\ 修改这个目录下的listener.ora和tns ...