SpringBoot-运行原理(四)
1.自动配置
(1).pom.xml
在pom文件中
<parent>

    <groupId>org.springframework.boot</groupId>

    <artifactId>spring-boot-starter-parent</artifactId>

    <version>2.2.1.RELEASE</version>

    <relativePath/> <!-- lookup parent from repository -->

</parent>
在它的父工程中,有他的核心依赖
<parent>

    <groupId>org.springframework.boot</groupId>

    <artifactId>spring-boot-dependencies</artifactId>

    <version>2.2.1.RELEASE</version>

    <relativePath>../../spring-boot-dependencies</relativePath>

</parent>
点进去,我们发现,springboot自动帮我们管理了依赖
这只是其中的一小部分,我们在写或者引入有一些依赖的时候,不需要指定版本
(2).启动器
<dependency>

    <groupId>org.springframework.boot</groupId>

    <artifactId>spring-boot-starter-web</artifactId>

</dependency>
springboot-boot-starter:就是spring-boot的场景启动器
这里的 spring-boot-starter-web 帮我们导入了web模块正常运行所依赖的组件;
SpringBoot将所有的功能场景都抽取出来,做成一个个的starter (启动器),只需要在项目中引入这些starter即可,所有相关的依赖都会导入进来 , 我们要用什么功能就导入什么样的场景启动器即可 ;
(3).主程序(启动类)
package com.bao;

import org.springframework.boot.SpringApplication;

import org.springframework.boot.autoconfigure.SpringBootApplication;

@SpringBootApplication

public class Springboot01HelloworldApplication {

    public static void main(String[] args) {

        SpringApplication.run(Springboot01HelloworldApplication.class, args);

    }

}
@SpringBootApplication 来标注一个主程序类 , 说明这是一个Spring Boot应用
run方法: 将Spring应用启动起来
我们看一下@SpringBootApplication注解
//四个标准注解

@Target(ElementType.TYPE)

@Retention(RetentionPolicy.RUNTIME)

@Documented

@Inherited

@SpringBootConfiguration

@EnableAutoConfiguration

@ComponentScan(excludeFilters = { @Filter(type = FilterType.CUSTOM, classes = TypeExcludeFilter.class),

		@Filter(type = FilterType.CUSTOM, classes = AutoConfigurationExcludeFilter.class) })

public @interface SpringBootApplication {

    ......略

}
- @SpringBootConfiguration :SpringBoot的配置类 ,标注在某个类上,表示这是一个SpringBoot的配置类
- @EnableAutoConfiguration : 启用自动配置,这个注解是让Spring Boot配置能够如此简化的关键性注解
- @ComponentScan : 扫描当前主启动类同级的包
点击@SpringBootConfiguration
@Target(ElementType.TYPE)

@Retention(RetentionPolicy.RUNTIME)

@Documented

@Configuration

public @interface SpringBootConfiguration {

	@AliasFor(annotation = Configuration.class)

	boolean proxyBeanMethods() default true;

}
@Configuration : 代表是一个spring配置类
点击
Configuration发现有一个@Component,代表是一个spring组件
点击@EnableAutoConfiguration
@Target(ElementType.TYPE)

@Retention(RetentionPolicy.RUNTIME)

@Documented

@Inherited

@AutoConfigurationPackage

@Import(AutoConfigurationImportSelector.class)

public @interface EnableAutoConfiguration {

	String ENABLED_OVERRIDE_PROPERTY = "spring.boot.enableautoconfiguration";

	/**

	 * Exclude specific auto-configuration classes such that they will never be applied.

	 * @return the classes to exclude

	 */

	Class<?>[] exclude() default {};

	/**

	 * Exclude specific auto-configuration class names such that they will never be

	 * applied.

	 * @return the class names to exclude

	 * @since 1.3.0

	 */

	String[] excludeName() default {};

}
主要是 :
- @AutoConfigurationPackage
- @Import(AutoConfigurationImportSelector.class)两个
AutoConfigurationPackage(自动配置包)
注解的作用是将 添加该注解的类所在的package 作为 自动配置package 进行管理。
主要是Registrar.class
package org.springframework.boot.autoconfigure;

import java.lang.annotation.Documented;

import java.lang.annotation.ElementType;

import java.lang.annotation.Inherited;

import java.lang.annotation.Retention;

import java.lang.annotation.RetentionPolicy;

import java.lang.annotation.Target;

import org.springframework.context.annotation.Import;

@Target(ElementType.TYPE)

@Retention(RetentionPolicy.RUNTIME)

@Documented

@Inherited

//导入选择器

@Import(AutoConfigurationPackages(自动配置注册包).Registrar.class)

public @interface AutoConfigurationPackage {

}
@import :Spring底层注解@import , 给容器中导入一个组件 ,导入的组件由 {Registrar.class} 将主配置类 【即@SpringBootApplication标注的类】的所在包及包下面所有子包里面的所有组件扫描到Spring容器 ;
@Import(AutoConfigurationImportSelector.class)
- Import他的作用是给容器导入组件
- AutoConfigurationImportSelector.class: (自动配置导入选择器)导入哪些组件的选择器
它将所有需要导入的组件以全类名的方式返回 , 这些组件就会被添加到容器中 ;
它会给容器中导入非常多的自动配置类 (xxxAutoConfiguration), 就是给容器中导入这个场景需要的所有组件 , 并配置好这些组件 ;
有了自动配置类 , 免去了我们手动编写配置注入功能组件等的工作;
点击AutoConfigurationImportSelector
有这样的一个方法
protected AutoConfigurationEntry getAutoConfigurationEntry(AutoConfigurationMetadata autoConfigurationMetadata,

                                                           AnnotationMetadata annotationMetadata) {

    if (!isEnabled(annotationMetadata)) {

        return EMPTY_ENTRY;

    }

    AnnotationAttributes attributes = getAttributes(annotationMetadata);

    List<String> configurations = getCandidateConfigurations(annotationMetadata, attributes);

    configurations = removeDuplicates(configurations);

    Set<String> exclusions = getExclusions(annotationMetadata, attributes);

    checkExcludedClasses(configurations, exclusions);

    configurations.removeAll(exclusions);

    configurations = filter(configurations, autoConfigurationMetadata);

    fireAutoConfigurationImportEvents(configurations, exclusions);

    return new AutoConfigurationEntry(configurations, exclusions);

}
其中 getCandidateConfigurations:获取候选配置
//获取所有配置

List<String> configurations =

    getCandidateConfigurations(annotationMetadata, attributes);
点击getCandidateConfigurations
里面的方法
protected List<String> getCandidateConfigurations(AnnotationMetadata metadata, AnnotationAttributes attributes) {

    List<String> configurations = SpringFactoriesLoader.loadFactoryNames(getSpringFactoriesLoaderFactoryClass(),                                                                       getBeanClassLoader());

    //断言非空

    Assert.notEmpty(configurations, "No auto configuration classes found in META-INF/spring.factories. If you "

                    + "are using a custom packaging, make sure that file is correct.");

    return configurations;

}
//返回用来加载配置候选的类。标注了EnableAutoConfiguration注解的类(主启动类)

protected Class<?> getSpringFactoriesLoaderFactoryClass() {

    return EnableAutoConfiguration.class;

}
而在
@SpringBootApplication注解中标注了@EnableAutoConfiguration所以就是启动类下的所有资源被导入


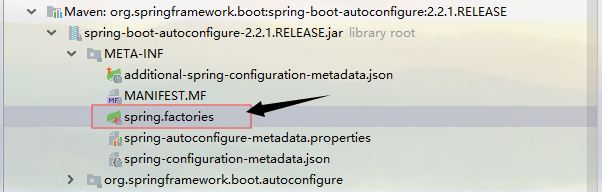
在这里我们发现了META-INF/spring.factories文件.这个就是自动配置的核心文件
我们去springboot的jar中寻找该文件
List<String> configurations = SpringFactoriesLoader.loadFactoryNames

(getSpringFactoriesLoaderFactoryClass(),getBeanClassLoader());
点击loadFactoryNames方法

loadFactoryNames : 获取所有的加载配置
返回的loadSpringFactories
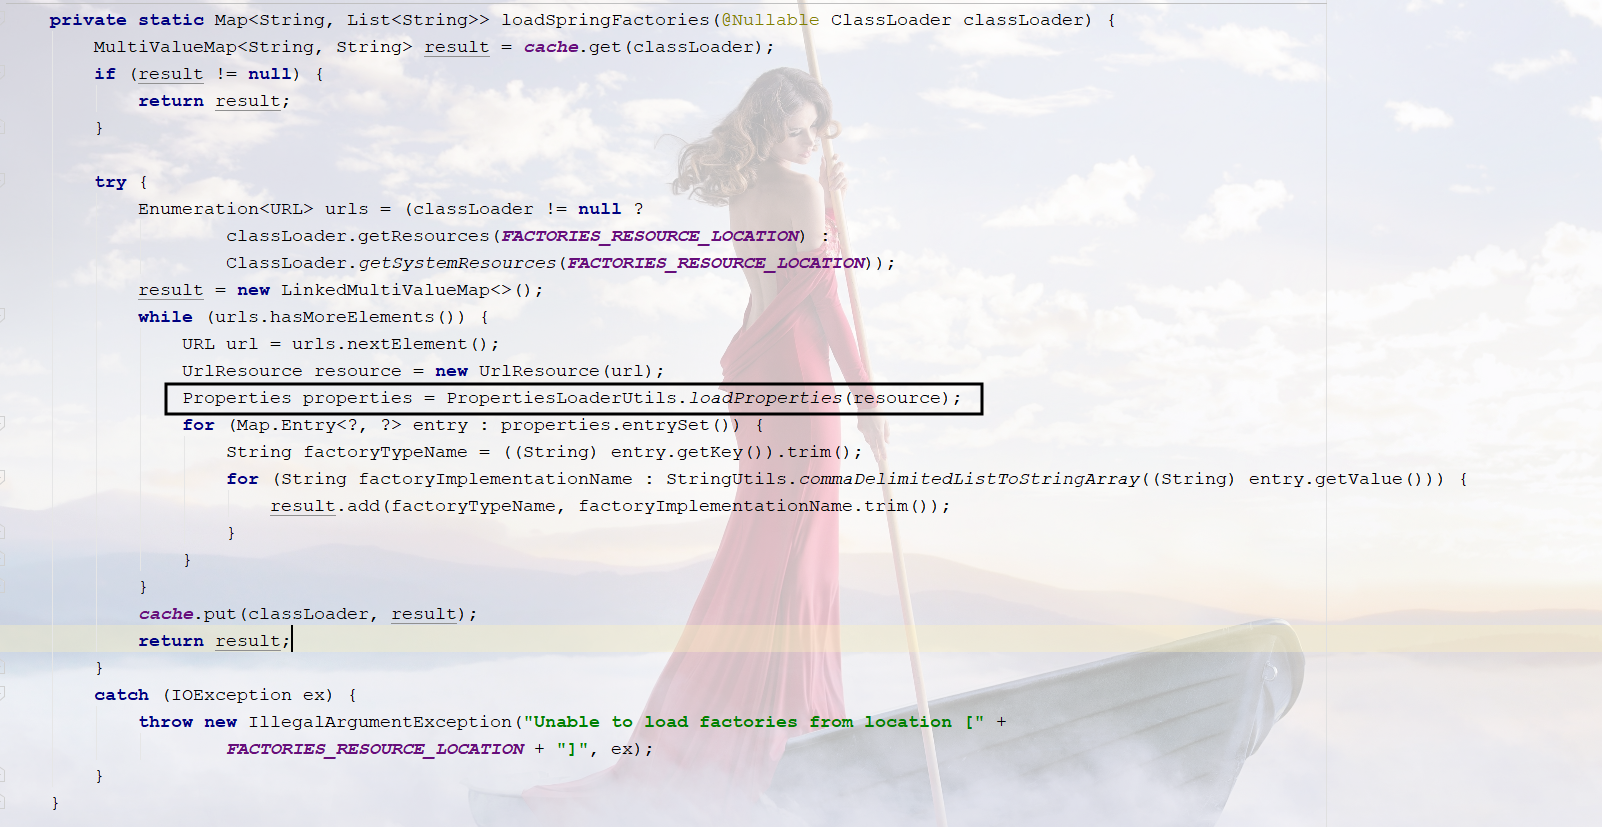
从这些资源中便利了所有的nextElement元素(也可以理解为自动配置)
遍历完成后封装成Properties,供我们使用
//所有资源加载到配置类中

Properties properties = PropertiesLoaderUtils.loadProperties(resource);
获取项目资源:classLoader.getResources(FACTORIES_RESOURCE_LOCATION)

获取系统资源:ClassLoader.getSystemResources(FACTORIES_RESOURCE_LOCATION))
点击FACTORIES_RESOURCE_LOCATION,获取静态资源的位置

从META-INF/spring.factories获取配置文件
需要导入对应的starter才能起作用
例如

由于@ConditionalOnClass的存在,会判断条件成立,才会加载配置这个类
@ConditionalOnXXX如果这里面的条件都满足,才会生效

(4).结论
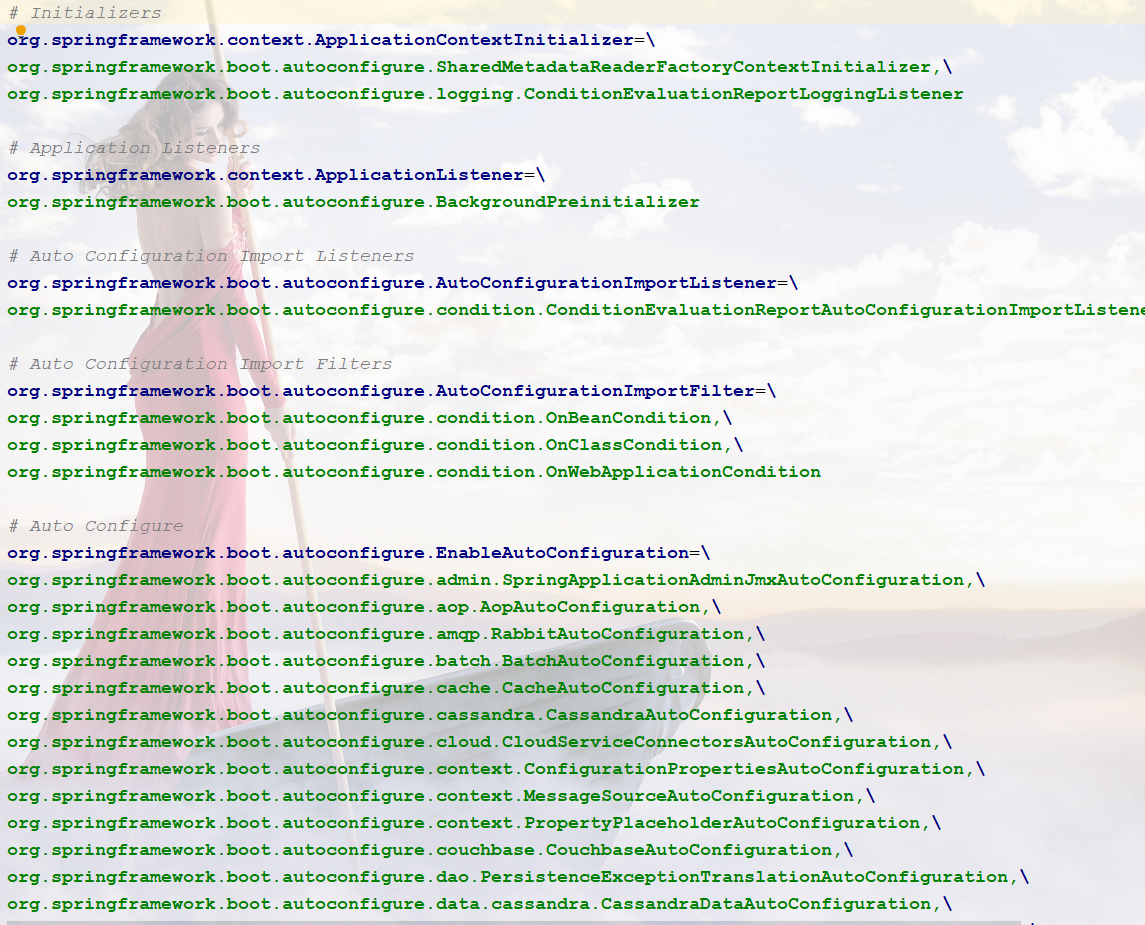
SpringBoot所有的自动配置都在启动类中扫描并加载,也就是spring.factories文件
所有的自动配置类都在这个文件中,但是并不一定生效,要判断条件是否成立,只要导入对应的start,就会有对应的启动器,有了启动器,自动装配就会生效,然后就配置成功了
1.springboot在启动的时候,会从类路径下META-INF/spring.factories文件中获取指定的值
2.将这些自动配置的类导入容器,自动配置类就会生效,帮我们进行自动配置
3.springboot帮我们做了我们以前需要的配置.
4.整个J2EE的整体解决方案和自动配置都在springboot-autoconfigure的jar包中;
5.他会把所有需要导入的组件,以类名的方式返回,这些组件就会被添加到容器
6.容器中也会存在非常多的XxxAutoConfiguration的文件(@Bean),就是这些类给容器中导入了这个场景所需要的所有组件
7.有了自动配置类,就不需要写配置文件
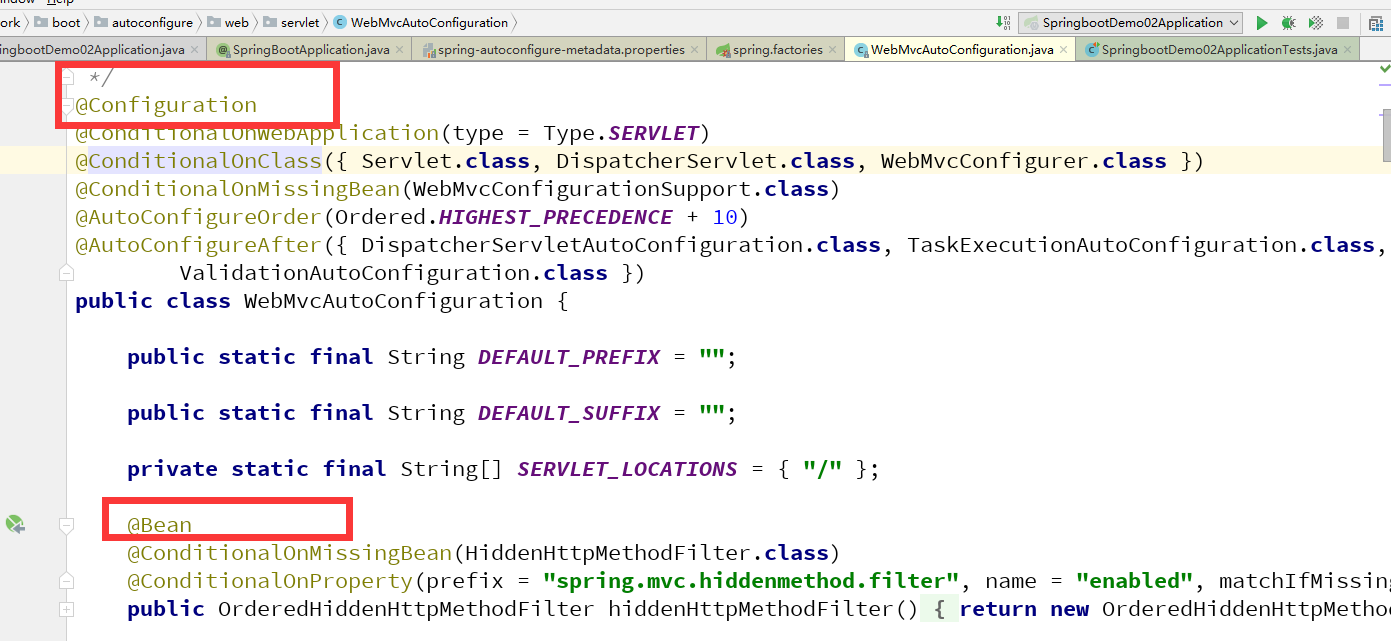
我们找一个打开看看 : WebMvcAutoConfiguration
所以,真正实现是从classpath中搜寻所有的META-INF/spring.factories配置文件 ,并将其中对应的 org.springframework.boot.autoconfigure. 包下的配置项通过反射实例化为对应标注了 @Configuration的JavaConfig形式的IOC容器配置类 , 然后将这些都汇总成为一个实例并加载到IOC容器中。
2.Run
@SpringBootApplication

public class SpringbootDemo02Application {

    public static void main(String[] args) {

        //该方法返回一个ConfigurableApplicationContext对象

        //参数一:应用入口的类     参数类:命令行参数

        SpringApplication.run(SpringbootDemo02Application.class, args);

    }

}
SpringApplication.run分析
分析该方法主要分两部分,一部分是SpringApplication的实例化,二是run方法的执行;
SpringApplication的实例化
1.推断应用的类型是普通的项目还是Web项目
2.查找并加载所有可用初始化器 , 设置到initializers属性中
3.找出所有的应用程序监听器,设置到listeners属性中
4.推断并设置main方法的定义类,找到运行的主类

3.谈谈你对springboot的理解
- 自动装配
- run方法
SpringBoot-运行原理(四)的更多相关文章
- SpringBoot运行原理
如果我们使用的是SpringApplication的静态run方法,那么,这个方法里面首先要创建一个SpringApplication对象实例,然后调用这个创建好的SpringApplication的 ...
- springboot深入学习(二)-----profile配置、运行原理、web开发
一.profile配置 通常企业级应用都会区分开发环境.测试环境以及生产环境等等.spring提供了全局profile配置的方式,使得在不同环境下使用不同的applicaiton.properties ...
- Spring boot运行原理-自定义自动配置类
在前面SpringBoot的文章中介绍了SpringBoot的基本配置,今天我们将给大家讲一讲SpringBoot的运行原理,然后根据原理我们自定义一个starter pom. 本章对于后续继续学习S ...
- SpringBoot:运行原理探究
西部开源-秦疆老师:基于SpringBoot 2.1.6 的博客教程 秦老师交流Q群号: 664386224 未授权禁止转载!编辑不易 , 转发请注明出处!防君子不防小人,共勉! SpringBoot ...
- springboot 的运行原理?
一.@SpringbootApplicaion 是一个组合注解? 在注解中点击查看. 作用:实现自动配置. /* * springboot的运行原理 1. @SpringbootApplicatio ...
- Js基础知识(四) - js运行原理与机制
js运行机制 本章了解一下js的运行原理,了解了js的运行原理才能写出更优美的代码,提高运行效率,还能解决开发中遇到的不理解的问题. 进程与线程 进程是cpu资源分配的最小单位,进程可以包含多个线程. ...
- SpringBoot启动原理及相关流程
一.springboot启动原理及相关流程概览 springboot是基于spring的新型的轻量级框架,最厉害的地方当属自动配置.那我们就可以根据启动流程和相关原理来看看,如何实现传奇的自动配置 二 ...
- SpringBoot-02 运行原理初探
SpringBoot-02 运行原理初探 本篇文章根据b站狂神编写 pom.xml 2.1.父依赖 其中它主要是依赖一个父项目,主要是管理项目的资源过滤及插件! <parent> < ...
- 狂神说SpringBoot02:运行原理初探
狂神说SpringBoot系列连载课程,通俗易懂,基于SpringBoot2.2.5版本,欢迎各位狂粉转发关注学习. 微信公众号:狂神说(首发) Bilibili:狂神说Java(视频) 未经作 ...
- ASP.NET Core 运行原理剖析1:初始化WebApp模版并运行
ASP.NET Core 运行原理剖析1:初始化WebApp模版并运行 核心框架 ASP.NET Core APP 创建与运行 总结 之前两篇文章简析.NET Core 以及与 .NET Framew ...
随机推荐
- 更新linux时候提示“由于没有公钥,无法验证下列签名".
本文链接:https://blog.csdn.net/loovejava/article/details/21837935 新安装的Ubuntu在使用sudo apt-get update更新源码的时 ...
- linux写系统服务的方法
linux写系统服务的方法 2.1 首先编写demo程序:hello.c<pre>#include <stdio.h> # chkconfig: 2345 10 90 main ...
- 对于 TCP 三次握手的理解
假设名叫 A 和 B 的两个人要进行通信,那么他们两人之间,首先要确保通信顺畅. 而确保通信顺畅,就要从 3 个维度,确定 8 个能力 3 个维度分别是: 1.人知道(A 知道.B 知道) 2.人(A ...
- 南开大学校徽及手写字的Tikz源码
话不多说,直接上内容. % ---------------------------------- % !TeX enginee = pdfLaTeX/XeLaTeX % !TeX encoding = ...
- fastjson 1.2.24反序列化导致任意命令执行漏洞分析记录
环境搭建: 漏洞影响版本: fastjson在1.2.24以及之前版本存在远程代码执行高危安全漏洞 环境地址: https://github.com/vulhub/vulhub/tree/master ...
- java版单例模式
单例模式可以说是最常用的设计模式之一,其主要作用就是保证一个类只有一个实例,并且提供一个访问它的全局访问点,严格的控制用户的访问方式. 单例模式又分为懒汉模式和饿汉模式,首先说一下饿汉模式: 饿汉模式 ...
- uniapp打包Android APP
1.uniAPP 将项目打包成,打包成功后格式如下 2.下载相关工具 Android studio(打包成app的工具) 和Hbuilder官方SDK,安装解压响应工具 3. 用 Android st ...
- 快速遍历OpenCV Mat图像数据的多种方法和性能分析 | opencv mat for loop
本文首发于个人博客https://kezunlin.me/post/61d55ab4/,欢迎阅读! opencv mat for loop Series Part 1: compile opencv ...
- html基础——表格练习
最终样式 步骤分析: 标题和报名时间为一块 表格为一块 由图可知,可创建一个七行八列的列表存储数据 首先设置边框的样式,边框 大小,这里是黑色不好看可以设置为天空蓝 可选矿使用<input ty ...
- Golang 指针理解
目录 0x00 指针地址和指针类型 0x01 从指针获取指针指向的值 0x02 使用指针修改值 0x03 返回函数中局部变量 0x04 使用 new() 创建指针 0x05 flag包的指针技术 0x ...