
搭建fastdfs文件服务器
一、安装FastDFS环境
1、跟踪服务器(Tracker Server)
tracker1:192.168.2.134
tracker2:192.168.2.135
2、存储服务器(Storage Server)
storage1:192.168.2.136
storage2:192.168.2.137
storage3:192.168.2.138
storage4:192.168.2.139
3、操作系统:CentOS7
用户:root
数据存储目录:/home/fastdfs
我把所有的安装包下载到/usr/local/softpackages/下,解压到当前目录
[root@tracker1 ~]# ls /usr/local/softpackages/

5e5f3566bbfa57418b5506aaefbe107a42c9fcb1.zip  fastdfs-5.05  fastdfs-nginx-module-master  libfastcommon-1.0.  nginx-1.12.  nginx-1.12..tar.gz  V1.0.7.tar.gz  V5..tar.gz
二、FastDFS基础配置
1、下载安装 libfastcommon
libfastcommon是从 FastDFS 和 FastDHT 中提取出来的公共 C 函数库,基础环境,安装即可 。
① 下载libfastcommon
# wget https://github.com/happyfish100/libfastcommon/archive/V1.0.7.tar.gz
② 解压
# tar -zxvf V1.0.7.tar.gz
# cd libfastcommon-1.0.7
绝对路径
# cd /usr/local/softpackages/libfastcommon-1.0.7
授权
# chmod 755 *
③ 编译、安装
# ./make.sh
# ./make.sh install
可以一条语句:
# ./make.sh && ./make.sh install
[root@tracker1 libfastcommon-1.0.]# pwd

/usr/local/softpackages/libfastcommon-1.0.

[root@tracker1 libfastcommon-1.0.]#

[root@tracker1 libfastcommon-1.0.]# ll

total

-rw-r--r--.  root root  Jun   : HISTORY

-rw-r--r--.  root root   Jun   : INSTALL

-rw-r--r--.  root root  Jun   : libfastcommon.spec

-rw-r--r--.  root root  Jun   : make.sh

-rw-r--r--.  root root   Jun   : README

drwxr-xr-x.  root root  Jun   : src

[root@tracker1 libfastcommon-1.0.]#

[root@tracker1 libfastcommon-1.0.]# chmod  *

[root@tracker1 libfastcommon-1.0.]#

[root@tracker1 libfastcommon-1.0.]# ll

total

-rwxr-xr-x.  root root  Jun   : HISTORY

-rwxr-xr-x.  root root   Jun   : INSTALL

-rwxr-xr-x.  root root  Jun   : libfastcommon.spec

-rwxr-xr-x.  root root  Jun   : make.sh

-rwxr-xr-x.  root root   Jun   : README

drwxr-xr-x.  root root  Jun   : src

[root@tracker1 libfastcommon-1.0.]#

[root@tracker1 libfastcommon-1.0.]# ./make.sh

cc -Wall -D_FILE_OFFSET_BITS= -g -DDEBUG_FLAG -DOS_LINUX -DIOEVENT_USE_EPOLL -c -fPIC -o hash.lo hash.c

cc -Wall -D_FILE_OFFSET_BITS= -g -DDEBUG_FLAG -DOS_LINUX -DIOEVENT_USE_EPOLL -c -fPIC -o chain.lo chain.c

cc -Wall -D_FILE_OFFSET_BITS= -g -DDEBUG_FLAG -DOS_LINUX -DIOEVENT_USE_EPOLL -c -fPIC -o shared_func.lo shared_func.c

cc -Wall -D_FILE_OFFSET_BITS= -g -DDEBUG_FLAG -DOS_LINUX -DIOEVENT_USE_EPOLL -c -fPIC -o ini_file_reader.lo ini_file_reader.c

cc -Wall -D_FILE_OFFSET_BITS= -g -DDEBUG_FLAG -DOS_LINUX -DIOEVENT_USE_EPOLL -c -fPIC -o logger.lo logger.c

cc -Wall -D_FILE_OFFSET_BITS= -g -DDEBUG_FLAG -DOS_LINUX -DIOEVENT_USE_EPOLL -c -fPIC -o sockopt.lo sockopt.c

cc -Wall -D_FILE_OFFSET_BITS= -g -DDEBUG_FLAG -DOS_LINUX -DIOEVENT_USE_EPOLL -c -fPIC -o base64.lo base64.c

cc -Wall -D_FILE_OFFSET_BITS= -g -DDEBUG_FLAG -DOS_LINUX -DIOEVENT_USE_EPOLL -c -fPIC -o sched_thread.lo sched_thread.c

cc -Wall -D_FILE_OFFSET_BITS= -g -DDEBUG_FLAG -DOS_LINUX -DIOEVENT_USE_EPOLL -c -fPIC -o http_func.lo http_func.c

cc -Wall -D_FILE_OFFSET_BITS= -g -DDEBUG_FLAG -DOS_LINUX -DIOEVENT_USE_EPOLL -c -fPIC -o md5.lo md5.c

cc -Wall -D_FILE_OFFSET_BITS= -g -DDEBUG_FLAG -DOS_LINUX -DIOEVENT_USE_EPOLL -c -fPIC -o pthread_func.lo pthread_func.c

cc -Wall -D_FILE_OFFSET_BITS= -g -DDEBUG_FLAG -DOS_LINUX -DIOEVENT_USE_EPOLL -c -fPIC -o local_ip_func.lo local_ip_func.c

cc -Wall -D_FILE_OFFSET_BITS= -g -DDEBUG_FLAG -DOS_LINUX -DIOEVENT_USE_EPOLL -c -fPIC -o avl_tree.lo avl_tree.c

cc -Wall -D_FILE_OFFSET_BITS= -g -DDEBUG_FLAG -DOS_LINUX -DIOEVENT_USE_EPOLL -c -fPIC -o ioevent.lo ioevent.c

cc -Wall -D_FILE_OFFSET_BITS= -g -DDEBUG_FLAG -DOS_LINUX -DIOEVENT_USE_EPOLL -c -fPIC -o ioevent_loop.lo ioevent_loop.c

cc -Wall -D_FILE_OFFSET_BITS= -g -DDEBUG_FLAG -DOS_LINUX -DIOEVENT_USE_EPOLL -c -fPIC -o fast_task_queue.lo fast_task_queue.c

cc -Wall -D_FILE_OFFSET_BITS= -g -DDEBUG_FLAG -DOS_LINUX -DIOEVENT_USE_EPOLL -c -fPIC -o fast_timer.lo fast_timer.c

cc -Wall -D_FILE_OFFSET_BITS= -g -DDEBUG_FLAG -DOS_LINUX -DIOEVENT_USE_EPOLL -c -fPIC -o process_ctrl.lo process_ctrl.c

cc -Wall -D_FILE_OFFSET_BITS= -g -DDEBUG_FLAG -DOS_LINUX -DIOEVENT_USE_EPOLL -c -fPIC -o fast_mblock.lo fast_mblock.c

cc -Wall -D_FILE_OFFSET_BITS= -g -DDEBUG_FLAG -DOS_LINUX -DIOEVENT_USE_EPOLL -c -fPIC -o connection_pool.lo connection_pool.c

cc -Wall -D_FILE_OFFSET_BITS= -g -DDEBUG_FLAG -DOS_LINUX -DIOEVENT_USE_EPOLL -c -o hash.o hash.c

cc -Wall -D_FILE_OFFSET_BITS= -g -DDEBUG_FLAG -DOS_LINUX -DIOEVENT_USE_EPOLL -c -o chain.o chain.c

cc -Wall -D_FILE_OFFSET_BITS= -g -DDEBUG_FLAG -DOS_LINUX -DIOEVENT_USE_EPOLL -c -o shared_func.o shared_func.c

cc -Wall -D_FILE_OFFSET_BITS= -g -DDEBUG_FLAG -DOS_LINUX -DIOEVENT_USE_EPOLL -c -o ini_file_reader.o ini_file_reader.c

cc -Wall -D_FILE_OFFSET_BITS= -g -DDEBUG_FLAG -DOS_LINUX -DIOEVENT_USE_EPOLL -c -o logger.o logger.c

cc -Wall -D_FILE_OFFSET_BITS= -g -DDEBUG_FLAG -DOS_LINUX -DIOEVENT_USE_EPOLL -c -o sockopt.o sockopt.c

cc -Wall -D_FILE_OFFSET_BITS= -g -DDEBUG_FLAG -DOS_LINUX -DIOEVENT_USE_EPOLL -c -o base64.o base64.c

cc -Wall -D_FILE_OFFSET_BITS= -g -DDEBUG_FLAG -DOS_LINUX -DIOEVENT_USE_EPOLL -c -o sched_thread.o sched_thread.c

cc -Wall -D_FILE_OFFSET_BITS= -g -DDEBUG_FLAG -DOS_LINUX -DIOEVENT_USE_EPOLL -c -o http_func.o http_func.c

cc -Wall -D_FILE_OFFSET_BITS= -g -DDEBUG_FLAG -DOS_LINUX -DIOEVENT_USE_EPOLL -c -o md5.o md5.c

cc -Wall -D_FILE_OFFSET_BITS= -g -DDEBUG_FLAG -DOS_LINUX -DIOEVENT_USE_EPOLL -c -o pthread_func.o pthread_func.c

cc -Wall -D_FILE_OFFSET_BITS= -g -DDEBUG_FLAG -DOS_LINUX -DIOEVENT_USE_EPOLL -c -o local_ip_func.o local_ip_func.c

cc -Wall -D_FILE_OFFSET_BITS= -g -DDEBUG_FLAG -DOS_LINUX -DIOEVENT_USE_EPOLL -c -o avl_tree.o avl_tree.c

cc -Wall -D_FILE_OFFSET_BITS= -g -DDEBUG_FLAG -DOS_LINUX -DIOEVENT_USE_EPOLL -c -o ioevent.o ioevent.c

cc -Wall -D_FILE_OFFSET_BITS= -g -DDEBUG_FLAG -DOS_LINUX -DIOEVENT_USE_EPOLL -c -o ioevent_loop.o ioevent_loop.c

cc -Wall -D_FILE_OFFSET_BITS= -g -DDEBUG_FLAG -DOS_LINUX -DIOEVENT_USE_EPOLL -c -o fast_task_queue.o fast_task_queue.c

cc -Wall -D_FILE_OFFSET_BITS= -g -DDEBUG_FLAG -DOS_LINUX -DIOEVENT_USE_EPOLL -c -o fast_timer.o fast_timer.c

cc -Wall -D_FILE_OFFSET_BITS= -g -DDEBUG_FLAG -DOS_LINUX -DIOEVENT_USE_EPOLL -c -o process_ctrl.o process_ctrl.c

cc -Wall -D_FILE_OFFSET_BITS= -g -DDEBUG_FLAG -DOS_LINUX -DIOEVENT_USE_EPOLL -c -o fast_mblock.o fast_mblock.c

cc -Wall -D_FILE_OFFSET_BITS= -g -DDEBUG_FLAG -DOS_LINUX -DIOEVENT_USE_EPOLL -c -o connection_pool.o connection_pool.c

ar rcs libfastcommon.a hash.o

[root@tracker1 libfastcommon-1.0.]#

[root@tracker1 libfastcommon-1.0.]# ./make.sh install

mkdir -p /usr/lib64

install -m  libfastcommon.so /usr/lib64

mkdir -p /usr/include/fastcommon

install -m  common_define.h hash.h chain.h logger.h base64.h shared_func.h pthread_func.h ini_file_reader.h _os_bits.h sockopt.h sched_thread.h http_func.h md5.h local_ip_func.h avl_tree.h ioevent.h ioevent_loop.h fast_task_queue.h fast_timer.h process_ctrl.h fast_mblock.h connection_pool.h /usr/include/fastcommon

[root@tracker1 libfastcommon-1.0.]#
④ libfastcommon.so 安装到了/usr/lib64/libfastcommon.so,但是FastDFS主程序设置的lib目录是/usr/local/lib,所以需要创建软链接。
# ln -s /usr/lib64/libfastcommon.so /usr/local/lib/libfastcommon.so

# ln -s /usr/lib64/libfastcommon.so /usr/lib/libfastcommon.so

# ln -s /usr/lib64/libfdfsclient.so /usr/local/lib/libfdfsclient.so

# ln -s /usr/lib64/libfdfsclient.so /usr/lib/libfdfsclient.so
2、下载安装FastDFS
① 下载FastDFS
# wget https://github.com/happyfish100/fastdfs/archive/V5.05.tar.gz
② 解压
# tar -zxvf V5.05.tar.gz
# cd fastdfs-5.05
绝对路径
# cd /usr/local/softpackages/fastdfs-5.05
授权
# chmod 755 *
③ 编译、安装
# ./make.sh
# ./make.sh install
[root@tracker1 softpackages]# cd fastdfs-5.05

[root@tracker1 fastdfs-5.05]#

[root@tracker1 fastdfs-5.05]# pwd

/usr/local/softpackages/fastdfs-5.05

[root@tracker1 fastdfs-5.05]#

[root@tracker1 fastdfs-5.05]# ll

total

drwxr-xr-x.  root root   Jun   : client

drwxr-xr-x.  root root   Jun   : common

drwxr-xr-x.  root root   Jun   : conf

-rw-r--r--.  root root  Jun   : COPYING-3_0.txt

-rw-r--r--.  root root   Jun   : fastdfs.spec

-rw-r--r--.  root root  Jun   : HISTORY

drwxr-xr-x.  root root     Jun   : init.d

-rw-r--r--.  root root   Jun   : INSTALL

-rw-r--r--.  root root   Jun   : make.sh

drwxr-xr-x.  root root   Jun   : php_client

-rw-r--r--.  root root   Jun   : README.md

-rw-r--r--.  root root   Jun   : restart.sh

-rw-r--r--.  root root   Jun   : stop.sh

drwxr-xr-x.  root root   Jun   : storage

drwxr-xr-x.  root root   Jun   : test

drwxr-xr-x.  root root   Jun   : tracker

[root@tracker1 fastdfs-5.05]#

[root@tracker1 fastdfs-5.05]# chmod  *

[root@tracker1 fastdfs-5.05]#

[root@tracker1 fastdfs-5.05]# ll

total

drwxr-xr-x.  root root   Jun   : client

drwxr-xr-x.  root root   Jun   : common

drwxr-xr-x.  root root   Jun   : conf

-rwxr-xr-x.  root root  Jun   : COPYING-3_0.txt

-rwxr-xr-x.  root root   Jun   : fastdfs.spec

-rwxr-xr-x.  root root  Jun   : HISTORY

drwxr-xr-x.  root root     Jun   : init.d

-rwxr-xr-x.  root root   Jun   : INSTALL

-rwxr-xr-x.  root root   Jun   : make.sh

drwxr-xr-x.  root root   Jun   : php_client

-rwxr-xr-x.  root root   Jun   : README.md

-rwxr-xr-x.  root root   Jun   : restart.sh

-rwxr-xr-x.  root root   Jun   : stop.sh

drwxr-xr-x.  root root   Jun   : storage

drwxr-xr-x.  root root   Jun   : test

drwxr-xr-x.  root root   Jun   : tracker

[root@tracker1 fastdfs-5.05]#

[root@tracker1 fastdfs-5.05]# ./make.sh

cc -Wall -D_FILE_OFFSET_BITS= -D_GNU_SOURCE -g -O -DDEBUG_FLAG -DOS_LINUX -DIOEVENT_USE_EPOLL -c -o ../common/fdfs_global.o ../common/fdfs_global.c  -I../common -I/usr/include/fastcommon

cc -Wall -D_FILE_OFFSET_BITS= -D_GNU_SOURCE -g -O -DDEBUG_FLAG -DOS_LINUX -DIOEVENT_USE_EPOLL -c -o tracker_proto.o tracker_proto.c  -I../common -I/usr/include/fastcommon

cc -Wall -D_FILE_OFFSET_BITS= -D_GNU_SOURCE -g -O -DDEBUG_FLAG -DOS_LINUX -DIOEVENT_USE_EPOLL -c -o tracker_mem.o tracker_mem.c  -I../common -I/usr/include/fastcommon

cc -Wall -D_FILE_OFFSET_BITS= -D_GNU_SOURCE -g -O -DDEBUG_FLAG -DOS_LINUX -DIOEVENT_USE_EPOLL -c -o tracker_service.o tracker_service.c  -I../common -I/usr/include/fastcommon

tracker_service.c: In function ‘tracker_deal_reselect_leader’:

tracker_service.c::: warning: variable ‘pClientInfo’ set but not used [-Wunused-but-set-variable]

  TrackerClientInfo *pClientInfo;

………………………………

………………………………

………………………………

[root@tracker1 fastdfs-5.05]# ./make.sh install

mkdir -p /usr/bin

mkdir -p /etc/fdfs

cp -f fdfs_trackerd /usr/bin

if [ ! -f /etc/fdfs/tracker.conf.sample ]; then cp -f ../conf/tracker.conf /etc/fdfs/tracker.conf.sample; fi

mkdir -p /usr/bin

mkdir -p /etc/fdfs

cp -f fdfs_storaged  /usr/bin

if [ ! -f /etc/fdfs/storage.conf.sample ]; then cp -f ../conf/storage.conf /etc/fdfs/storage.conf.sample; fi

mkdir -p /usr/bin

mkdir -p /etc/fdfs

mkdir -p /usr/lib64

cp -f fdfs_monitor fdfs_test fdfs_test1 fdfs_crc32 fdfs_upload_file fdfs_download_file fdfs_delete_file fdfs_file_info fdfs_appender_test fdfs_appender_test1 fdfs_append_file fdfs_upload_appender /usr/bin

if [  -eq  ]; then cp -f libfdfsclient.a /usr/lib64; fi

if [  -eq  ]; then cp -f libfdfsclient.so /usr/lib64; fi

mkdir -p /usr/include/fastdfs

cp -f ../common/fdfs_define.h ../common/fdfs_global.h ../common/mime_file_parser.h ../common/fdfs_http_shared.h ../tracker/tracker_types.h ../tracker/tracker_proto.h ../tracker/fdfs_shared_func.h ../storage/trunk_mgr/trunk_shared.h tracker_client.h storage_client.h storage_client1.h client_func.h client_global.h fdfs_client.h /usr/include/fastdfs

if [ ! -f /etc/fdfs/client.conf.sample ]; then cp -f ../conf/client.conf /etc/fdfs/client.conf.sample; fi
④ 默认安装方式安装后的相应文件与目录
A、服务脚本:
/etc/init.d/fdfs_storaged

/etc/init.d/fdfs_tracker
B、配置文件(这三个是作者给的样例配置文件) :
/etc/fdfs/client.conf.sample

/etc/fdfs/storage.conf.sample

/etc/fdfs/tracker.conf.sample
C、命令工具在 /usr/bin/ 目录下:
fdfs_appender_test

fdfs_appender_test1

fdfs_append_file

fdfs_crc32

fdfs_delete_file

fdfs_download_file

fdfs_file_info

fdfs_monitor

fdfs_storaged

fdfs_test

fdfs_test1

fdfs_trackerd

fdfs_upload_appender

fdfs_upload_file

stop.sh

restart.sh
⑤ FastDFS 服务脚本设置的 bin 目录是 /usr/local/bin, 但实际命令安装在 /usr/bin/ 下
两种方式:
》 一是修改FastDFS 服务脚本中相应的命令路径,也就是把 /etc/init.d/fdfs_storaged 和 /etc/init.d/fdfs_tracker 两个脚本中的 /usr/local/bin 修改成 /usr/bin。
# vim fdfs_trackerd
使用查找替换命令进统一修改:%s+/usr/local/bin+/usr/bin
# vim fdfs_storaged
使用查找替换命令进统一修改:%s+/usr/local/bin+/usr/bin
# vi /etc/init.d/fdfs_storaged
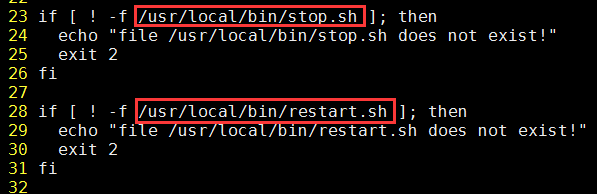
》 二是建立 /usr/bin 到 /usr/local/bin 的软链接,我是用这种方式。
# ln -s /usr/bin/fdfs_trackerd   /usr/local/bin

# ln -s /usr/bin/fdfs_storaged   /usr/local/bin

# ln -s /usr/bin/stop.sh         /usr/local/bin

# ln -s /usr/bin/restart.sh      /usr/local/bin
三、配置FastDFS跟踪器(Tracker)
配置文件详细说明参考:FastDFS 配置文件详解
① 进入 /etc/fdfs,复制 FastDFS 跟踪器样例配置文件 tracker.conf.sample,并重命名为 tracker.conf。
# cd /etc/fdfs
# cp tracker.conf.sample tracker.conf
# vim tracker.conf
[root@tracker1 ~]# cd /etc/fdfs

[root@tracker1 fdfs]#

[root@tracker1 fdfs]# ls

client.conf.sample  storage.conf.sample  tracker.conf.sample

[root@tracker1 fdfs]#

[root@tracker1 fdfs]# cp tracker.conf.sample tracker.conf

[root@tracker1 fdfs]#
② 编辑tracker.conf ,标红的需要修改下,其它的默认即可。
# vi tracker.conf
# 配置文件是否不生效,false 为生效

disabled=false

# 提供服务的端口

port=

# Tracker 数据和日志目录地址(根目录必须存在,子目录会自动创建)

base_path=/home/fastdfs/tracker

# HTTP 服务端口

http.server_port=80
③ 创建tracker基础数据目录,即base_path对应的目录
# mkdir -p /home/fastdfs/tracker
④ 防火墙中打开跟踪端口(默认的22122)
# vim /etc/sysconfig/iptables

添加如下端口行:

-A INPUT -m state --state NEW -m tcp -p tcp --dport  -j ACCEPT

重启防火墙:

# service iptables restart
⑤ 启动Tracker
初次成功启动,会在 /home/fdfsdfs/tracker/ (配置的base_path)下创建 data、logs 两个目录。
注意:
启动前先授权
# chmod 755 /etc/init.d/fdfs_trackerd
# chmod 755 -R /usr/local/bin/fdfs_trackerd
[root@tracker2 fdfs]# /etc/init.d/fdfs_trackerd start

-bash: /etc/init.d/fdfs_trackerd: Permission denied

[root@tracker2 fdfs]#

[root@tracker2 fdfs]# chmod  /etc/init.d/fdfs_trackerd

[root@tracker2 fdfs]#

[root@tracker2 fdfs]# /etc/init.d/fdfs_trackerd start

Reloading systemd:                                         [  OK  ]

Starting fdfs_trackerd (via systemctl):                    [  OK  ]

[root@tracker2 fdfs]#

[root@tracker2 fdfs]# service fdfs_trackerd status

● fdfs_trackerd.service - LSB: FastDFS tracker server

   Loaded: loaded (/etc/rc.d/init.d/fdfs_trackerd)

   Active: active (exited) since Tue -- :: CST; 14s ago

     Docs: man:systemd-sysv-generator()

  Process:  ExecStart=/etc/rc.d/init.d/fdfs_trackerd start (code=exited, status=/SUCCESS)

Jun  :: tracker2 systemd[]: Starting LSB: FastDFS tracker server...

Jun  :: tracker2 fdfs_trackerd[]: Starting FastDFS tracker server:

Jun  :: tracker2 systemd[]: Started LSB: FastDFS tracker server.

Jun  :: tracker2 fdfs_trackerd[]: /etc/rc.d/init.d/fdfs_trackerd: line : /usr/local/bin/fdfs_trackerd: Permission denied

[root@tracker2 fdfs]#

[root@tracker2 fdfs]# chmod  -R /usr/local/bin/fdfs_trackerd

[root@tracker2 fdfs]#

[root@tracker2 fdfs]# service fdfs_trackerd restart

Restarting fdfs_trackerd (via systemctl):                  [  OK  ]

[root@tracker2 fdfs]#

[root@tracker2 fdfs]# service fdfs_trackerd status

● fdfs_trackerd.service - LSB: FastDFS tracker server

   Loaded: loaded (/etc/rc.d/init.d/fdfs_trackerd)

   Active: active (running) since Tue -- :: CST; 3s ago

     Docs: man:systemd-sysv-generator()

  Process:  ExecStop=/etc/rc.d/init.d/fdfs_trackerd stop (code=exited, status=/SUCCESS)

  Process:  ExecStart=/etc/rc.d/init.d/fdfs_trackerd start (code=exited, status=/SUCCESS)

   CGroup: /system.slice/fdfs_trackerd.service

           └─ /usr/local/bin/fdfs_trackerd /etc/fdfs/tracker.conf

Jun  :: tracker2 systemd[]: Starting LSB: FastDFS tracker server...

Jun  :: tracker2 fdfs_trackerd[]: Starting FastDFS tracker server:

Jun  :: tracker2 systemd[]: Started LSB: FastDFS tracker server.

[root@tracker2 fdfs]#
可以用这种方式启动
# /etc/init.d/fdfs_trackerd start
也可以用这种方式启动,前提是上面创建了软链接,后面都用这种方式
# service fdfs_trackerd start
查看 FastDFS Tracker 是否已成功启动 ,22122端口正在被监听,则算是Tracker服务安装成功。
# netstat -tunlp | grep fdfs
[root@tracker1 ~]# service fdfs_trackerd start

Starting fdfs_trackerd (via systemctl):                    [  OK  ]

[root@tracker1 ~]#

[root@tracker1 ~]#

[root@tracker1 ~]# service fdfs_trackerd status

● fdfs_trackerd.service - LSB: FastDFS tracker server

   Loaded: loaded (/etc/rc.d/init.d/fdfs_trackerd)

   Active: active (running) since Tue -- :: CST; 4s ago

     Docs: man:systemd-sysv-generator()

  Process:  ExecStart=/etc/rc.d/init.d/fdfs_trackerd start (code=exited, status=/SUCCESS)

   CGroup: /system.slice/fdfs_trackerd.service

           └─ /usr/local/bin/fdfs_trackerd /etc/fdfs/tracker.conf

Jun  :: tracker1 systemd[]: Starting LSB: FastDFS tracker server...

Jun  :: tracker1 fdfs_trackerd[]: Starting FastDFS tracker server:

Jun  :: tracker1 systemd[]: Started LSB: FastDFS tracker server.

[root@tracker1 ~]#

[root@tracker1 ~]#

[root@tracker1 ~]# netstat -tunlp | grep fdfs

tcp               0.0.0.0:           0.0.0.0:*               LISTEN      /fdfs_trackerd

[root@tracker1 ~]#

[root@tracker1 ~]# ls /home/fastdfs/tracker/

data  logs
关闭Tracker命令:
# service fdfs_trackerd stop
⑥ 设置Tracker开机启动
# chkconfig fdfs_trackerd on

或者:

# vim /etc/rc.d/rc.local

加入配置:

/etc/init.d/fdfs_trackerd start
⑦ tracker server 目录及文件结构
Tracker服务启动成功后,会在base_path下创建data、logs两个目录。目录结构如下:
${base_path}

  |__data

  |   |__storage_groups.dat:存储分组信息

  |   |__storage_servers.dat:存储服务器列表

  |__logs

  |   |__trackerd.log: tracker server 日志文件
四、配置FastDFS 存储 (Storage)
① 进入 /etc/fdfs 目录,复制 FastDFS 存储器样例配置文件 storage.conf.sample,并重命名为 storage.conf
# cd /etc/fdfs

# cp storage.conf.sample storage.conf
② 编辑storage.conf
标红的需要修改,其它的默认即可。
# vi storage.conf
# 配置文件是否不生效,false 为生效

disabled=false

# 指定此 storage server 所在 组(卷)

group_name=group1

# storage server 服务端口

port=

# 心跳间隔时间,单位为秒 (这里是指主动向 tracker server 发送心跳)

heart_beat_interval=

# Storage 数据和日志目录地址(根目录必须存在,子目录会自动生成)

base_path=/home/fastdfs/storage

# 存放文件时 storage server 支持多个路径。这里配置存放文件的基路径数目,通常只配一个目录。

store_path_count=

# 逐一配置 store_path_count 个路径,索引号基于 。

# 如果不配置 store_path0,那它就和 base_path 对应的路径一样。

store_path0=/home/fastdfs/file

# FastDFS 存储文件时,采用了两级目录。这里配置存放文件的目录个数。

# 如果本参数只为 N(如: ),那么 storage server 在初次运行时,会在 store_path 下自动创建 N * N 个存放文件的子目录。

subdir_count_per_path=

# tracker_server 的列表 ,会主动连接 tracker_server

# 有多个 tracker server 时,每个 tracker server 写一行

tracker_server=192.168.2.134:22122
tracker_server=192.168.2.135:22122

# 允许系统同步的时间段 (默认是全天) 。一般用于避免高峰同步产生一些问题而设定。

sync_start_time=:

sync_end_time=:

# 访问端口

http.server_port=80
③ 创建Storage基础数据目录,对应base_path目录
# mkdir -p /home/fastdfs/storage
这是配置的store_path0路径
# mkdir -p /home/fastdfs/file
④ 防火墙中打开存储器端口(默认的 23000)
# vim /etc/sysconfig/iptables

添加如下端口行:

-A INPUT -m state --state NEW -m tcp -p tcp --dport  -j ACCEPT

重启防火墙:

# service iptables restart
⑤ 启动 Storage
启动Storage前确保Tracker是启动的。初次启动成功,会在 /home/fastdfs/storage 目录下创建 data、 logs 两个目录。
注意:
启动前先授权
# chmod 755 /etc/init.d/fdfs_storaged
# chmod 755 /usr/local/bin/fdfs_storaged
可以用这种方式启动
# /etc/init.d/fdfs_storaged start
也可以用这种方式,后面都用这种
# service fdfs_storaged start
[root@storage1 ~]# service fdfs_storaged start

env: /etc/init.d/fdfs_storaged: Permission denied

[root@storage1 ~]#

[root@storage1 ~]# chmod  /etc/init.d/fdfs_storaged

[root@storage1 ~]#

[root@storage1 ~]# service fdfs_storaged start

Starting fdfs_storaged (via systemctl):                    [  OK  ]

[root@storage1 ~]#

[root@storage1 ~]# service fdfs_storaged status

● fdfs_storaged.service - LSB: FastDFS storage server

   Loaded: loaded (/etc/rc.d/init.d/fdfs_storaged)

   Active: active (exited) since Tue -- :: CST; 50s ago

     Docs: man:systemd-sysv-generator()

  Process:  ExecStart=/etc/rc.d/init.d/fdfs_storaged start (code=exited, status=/SUCCESS)

Jun  :: storage1 systemd[]: Starting LSB: FastDFS storage server...

Jun  :: storage1 fdfs_storaged[]: Starting FastDFS storage server:

Jun  :: storage1 systemd[]: Started LSB: FastDFS storage server.

Jun  :: storage1 fdfs_storaged[]: /etc/rc.d/init.d/fdfs_storaged: line : /usr/local/bin/fdfs_storaged: Permission denied

[root@storage1 ~]#

[root@storage1 ~]# chmod  /usr/local/bin/fdfs_storaged

[root@storage1 ~]#

[root@storage1 ~]# service fdfs_storaged restart

Restarting fdfs_storaged (via systemctl):                  [  OK  ]

[root@storage1 ~]#

[root@storage1 ~]# service fdfs_storaged status

● fdfs_storaged.service - LSB: FastDFS storage server

   Loaded: loaded (/etc/rc.d/init.d/fdfs_storaged)

   Active: active (running) since Tue -- :: CST; 4s ago

     Docs: man:systemd-sysv-generator()

  Process:  ExecStop=/etc/rc.d/init.d/fdfs_storaged stop (code=exited, status=/SUCCESS)

  Process:  ExecStart=/etc/rc.d/init.d/fdfs_storaged start (code=exited, status=/SUCCESS)

   CGroup: /system.slice/fdfs_storaged.service

           └─ /usr/local/bin/fdfs_storaged /etc/fdfs/storage.conf

Jun  :: storage1 systemd[]: Starting LSB: FastDFS storage server...

Jun  :: storage1 fdfs_storaged[]: Starting FastDFS storage server:

Jun  :: storage1 systemd[]: Started LSB: FastDFS storage server.

[root@storage1 ~]# netstat -tunlp | grep fdfs

tcp               0.0.0.0:           0.0.0.0:*               LISTEN      /fdfs_storaged
关闭Storage命令:
# service fdfs_storaged stop
查看Storage和Tracker是否在通信:
# chmod 755 /usr/bin/fdfs_monitor
# /usr/bin/fdfs_monitor /etc/fdfs/storage.conf
[root@storage1 ~]# /usr/bin/fdfs_monitor /etc/fdfs/storage.conf

bash: /usr/bin/fdfs_monitor: Permission denied

[root@storage1 ~]#

[root@storage1 ~]# chmod  /usr/bin/fdfs_monitor

[root@storage1 ~]#

[root@storage1 ~]# /usr/bin/fdfs_monitor /etc/fdfs/storage.conf

[-- ::] DEBUG - base_path=/home/fastdfs/storage, connect_timeout=, network_timeout=, tracker_server_count=, anti_steal_token=, anti_steal_secret_key length=, use_connection_pool=, g_connection_pool_max_idle_time=3600s, use_storage_id=, storage server id count:

server_count=, server_index=

tracker server is 192.168.2.134:

group count:

Group :

group name = group1

disk total space =  MB

disk free space =  MB

trunk free space =  MB

storage server count =

active server count =

storage server port =

storage HTTP port =

store path count =

subdir count per path =

current write server index =

current trunk file id =

        Storage :

                id = 192.168.2.136

                ip_addr = 192.168.2.136  ACTIVE

                http domain =

                version = 5.05

                join time = -- ::

                up time = -- ::

                total storage =  MB

                free storage =  MB

                upload priority =

                store_path_count =

                subdir_count_per_path =

                storage_port =

                storage_http_port =

                current_write_path =

                source storage id =

                if_trunk_server =

                connection.alloc_count =

                connection.current_count =

                connection.max_count =

                total_upload_count =

                success_upload_count =

                total_append_count =

                success_append_count =

                total_modify_count =

                success_modify_count =

                total_truncate_count =

                success_truncate_count =

                total_set_meta_count =

                success_set_meta_count =

                total_delete_count =

                success_delete_count =

                total_download_count =

                success_download_count =

                total_get_meta_count =

                success_get_meta_count =

                total_create_link_count =

                success_create_link_count =

                total_delete_link_count =

                success_delete_link_count =

                total_upload_bytes =

                success_upload_bytes =

                total_append_bytes =

                success_append_bytes =

                total_modify_bytes =

                success_modify_bytes =

                stotal_download_bytes =

                success_download_bytes =

                total_sync_in_bytes =

                success_sync_in_bytes =

                total_sync_out_bytes =

                success_sync_out_bytes =

                total_file_open_count =

                success_file_open_count =

                total_file_read_count =

                success_file_read_count =

                total_file_write_count =

                success_file_write_count =

                last_heart_beat_time = -- ::

                last_source_update = -- ::

                last_sync_update = -- ::

                last_synced_timestamp = -- ::

[root@storage1 ~]#
⑥ 设置 Storage 开机启动
# chkconfig fdfs_storaged on

或者:

# vim /etc/rc.d/rc.local

加入配置:

/etc/init.d/fdfs_storaged start
⑦ Storage 目录
同 Tracker,Storage 启动成功后,在base_path 下创建了data、logs目录,记录着 Storage Server 的信息。
在 store_path0 目录下,创建了N*N个子目录:
# ls /home/fastdfs/file/data/

五、文件上传测试
① 修改 Tracker 服务器中的客户端配置文件
# cd /etc/fdfs

# cp client.conf.sample client.conf
修改如下配置即可,其它默认。
# Client 的数据和日志目录

base_path=/home/fastdfs/client

# Tracker端口

tracker_server=192.168.2.134:
创建client基础数据目录,对应base_path目录
# mkdir -p /home/fastdfs/client
② 上传测试
在linux内部执行如下命令上传test.jpg 图片
# /usr/bin/fdfs_upload_file /etc/fdfs/client.conf test.jpg
[root@tracker1 ~]# /usr/bin/fdfs_upload_file /etc/fdfs/client.conf test.jpg

-bash: /usr/bin/fdfs_upload_file: Permission denied

[root@tracker1 ~]#

[root@tracker1 ~]# chmod  /usr/bin/fdfs_upload_file

[root@tracker1 ~]# /usr/bin/fdfs_upload_file /etc/fdfs/client.conf test.jpg

group1/M00///wKgCiFz1bm-ATQNlAACLwhA7j18254.jpg
上传成功后返回文件ID号:group1/M00/00/00/wKgCiFz1bm-ATQNlAACLwhA7j18254.jpg
返回的文件ID由group、存储目录、两级子目录、fileid、文件后缀名(由客户端指定,主要用于区分文件类型)拼接而成。

六、安装Nginx
上面将文件上传成功了,但我们无法下载。因此安装Nginx作为服务器以支持Http方式访问文件。同时,后面安装FastDFS的Nginx模块也需要Nginx环境。
Nginx只需要安装到StorageServer所在的服务器即可,用于访问文件。
1、安装nginx所需环境
① gcc 安装
# yum install gcc-c++ -y
② PCRE pcre-devel 安装
# yum install -y pcre pcre-devel
③ zlib 安装
# yum install -y zlib zlib-devel
④ OpenSSL 安装
# yum install -y openssl openssl-devel
2、安装Nginx
① 下载nginx
# wget -c https://nginx.org/download/nginx-1.12.1.tar.gz
② 解压
# tar -zxvf nginx-1.12..tar.gz

# cd nginx-1.12.
③ 使用默认配置
# ./configure
实例操作如下:
[root@storage1 softpackages]# chmod  -R nginx-1.12.

[root@storage1 softpackages]#

[root@storage1 softpackages]# cd nginx-1.12.

[root@storage1 nginx-1.12.]#

[root@storage1 nginx-1.12.]# pwd

/usr/local/softpackages/nginx-1.12.

[root@storage1 nginx-1.12.]#

[root@storage1 nginx-1.12.]# ll

total

drwxr-xr-x.  root root    Jun   : auto

-rwxr-xr-x.  root root  Jun   : CHANGES

-rwxr-xr-x.  root root  Jun   : CHANGES.ru

drwxr-xr-x.  root root    Jun   : conf

-rwxr-xr-x.  root root    Jun   : configure

drwxr-xr-x.  root root      Jun   : contrib

drwxr-xr-x.  root root      Jun   : html

-rwxr-xr-x.  root root    Jun   : LICENSE

-rwxr-xr-x.  root root     Jun   : Makefile

drwxr-xr-x.  root root      Jun   : man

drwxr-xr-x.  root root    Jun   : objs

-rwxr-xr-x.  root root      Jun   : README

drwxr-xr-x.  root root      Jun   : src

[root@storage1 nginx-1.12.]#

[root@storage1 nginx-1.12.]# ./configure

Configuration summary

  + using system PCRE library

  + OpenSSL library is not used

  + using system zlib library

  nginx path prefix: "/usr/local/nginx"

  nginx binary file: "/usr/local/nginx/sbin/nginx"

  nginx modules path: "/usr/local/nginx/modules"

  nginx configuration prefix: "/usr/local/nginx/conf"

  nginx configuration file: "/usr/local/nginx/conf/nginx.conf"

  nginx pid file: "/usr/local/nginx/logs/nginx.pid"

  nginx error log file: "/usr/local/nginx/logs/error.log"

  nginx http access log file: "/usr/local/nginx/logs/access.log"

  nginx http client request body temporary files: "client_body_temp"

  nginx http proxy temporary files: "proxy_temp"

  nginx http fastcgi temporary files: "fastcgi_temp"

  nginx http uwsgi temporary files: "uwsgi_temp"

  nginx http scgi temporary files: "scgi_temp"

[root@storage1 nginx-1.12.]#
④ 编译、安装
# make

# make install
⑤ 启动nginx
# cd /usr/local/nginx/sbin/

# ./nginx

其它命令

# ./nginx -s stop

# ./nginx -s quit

# ./nginx -s reload
⑥ 设置开机启动
# vim /etc/rc.local

添加一行:

/usr/local/nginx/sbin/nginx

# 设置执行权限

# chmod  rc.local
⑦ 查看nginx的版本及模块
# /usr/local/nginx/sbin/nginx -V
[root@storage1 ~]# /usr/local/nginx/sbin/nginx -V

nginx version: nginx/1.12.

built by gcc 4.8.  (Red Hat 4.8.-) (GCC)

configure arguments:
⑧ 防火墙中打开Nginx端口(默认的 80)
添加后就能在本机使用80端口访问了。
# vim /etc/sysconfig/iptables

添加如下端口行:

-A INPUT -m state --state NEW -m tcp -p tcp --dport  -j ACCEPT

重启防火墙:

# service iptables restart
3、访问文件
简单的测试访问文件
① 修改nginx.conf
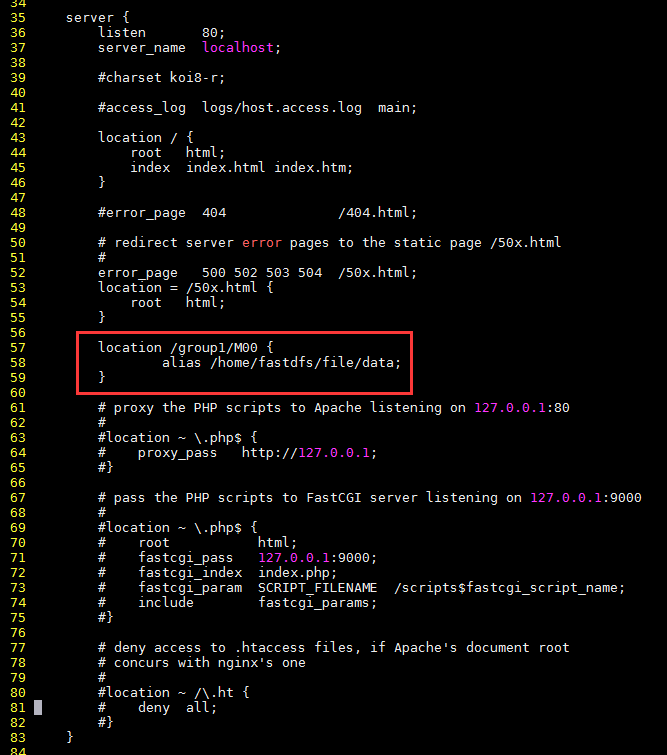
# vim /usr/local/nginx/conf/nginx.conf

添加如下行,将 /group1/M00 映射到 /home/fastdfs/file/data

location /group1/M00 {

    alias /home/fastdfs/file/data;

}

# 重启nginx

# /usr/local/nginx/sbin/nginx -s reload
查看80端口是否监听
# netstat -tunlp | grep 80
[root@storage1 sbin]# netstat -tunlp | grep

tcp               0.0.0.0:              0.0.0.0:*               LISTEN      /nginx: master
② 在浏览器访问之前上传的图片、成功。
http://192.168.2.136/group1/M00/00/00/wKgCiFz1bm-ATQNlAACLwhA7j18254.jpg

七、FastDFS 配置 Nginx 模块
1、安装配置Nginx模块
① fastdfs-nginx-module 模块说明
FastDFS 通过 Tracker 服务器,将文件放在 Storage 服务器存储, 但是同组存储服务器之间需要进行文件复制, 有同步延迟的问题。
假设 Tracker 服务器将文件上传到了 192.168.2.136,上传成功后文件 ID已经返回给客户端。
此时 FastDFS 存储集群机制会将这个文件同步到同组存储 192.168.2.138,在文件还没有复制完成的情况下,客户端如果用这个文件 ID 在 192.168.2.138 上取文件,就会出现文件无法访问的错误。
而 fastdfs-nginx-module 可以重定向文件链接到源服务器取文件,避免客户端由于复制延迟导致的文件无法访问错误。
② 下载 fastdfs-nginx-module、解压
# 这里为啥这么长一串呢,因为最新版的master与当前nginx有些版本问题。

# wget https://github.com/happyfish100/fastdfs-nginx-module/archive/5e5f3566bbfa57418b5506aaefbe107a42c9fcb1.zip

# 解压

# unzip 5e5f3566bbfa57418b5506aaefbe107a42c9fcb1.zip

# 重命名

# mv fastdfs-nginx-module-5e5f3566bbfa57418b5506aaefbe107a42c9fcb1  fastdfs-nginx-module-master
③ 配置Nginx
在nginx中添加模块
# 先停掉nginx服务

# /usr/local/nginx/sbin/nginx -s stop

进入解压包目录

# cd /usr/local/softpackages/nginx-1.12.1

# 添加模块

# ./configure --add-module=../fastdfs-nginx-module-master/src

重新编译、安装

# make && make install
④ 查看Nginx的模块
# /usr/local/nginx/sbin/nginx -V
有下面这个就说明添加模块成功
[root@storage1 nginx-1.12.]# /usr/local/nginx/sbin/nginx -V

nginx version: nginx/1.12.

built by gcc 4.8.  (Red Hat 4.8.-) (GCC)

configure arguments: --add-module=../fastdfs-nginx-module-master/src

[root@storage1 nginx-1.12.]#
⑤ 复制 fastdfs-nginx-module 源码中的配置文件到/etc/fdfs 目录, 并修改
[root@storage1 ~]# cd /usr/local/softpackages/fastdfs-nginx-module-master/src/

[root@storage1 src]#

[root@storage1 src]# cp mod_fastdfs.conf /etc/fdfs/
修改如下配置,其它默认
# vi /etc/fdfs/mod_fastdfs.conf
# 连接超时时间

connect_timeout=

# Tracker Server

tracker_server=192.168.2.134:

# StorageServer 默认端口

storage_server_port=

# 如果文件ID的uri中包含/group**,则要设置为true

url_have_group_name = true

# Storage 配置的store_path0路径,必须和storage.conf中的一致

store_path0=/home/fastdfs/file
⑥ 复制 FastDFS 的部分配置文件到/etc/fdfs 目录
[root@storage1 softpackages]# cd fastdfs-5.05/conf/

[root@storage1 conf]#

[root@storage1 conf]# pwd

/usr/local/softpackages/fastdfs-5.05/conf

[root@storage1 conf]#

[root@storage1 conf]# cp anti-steal.jpg http.conf mime.types /etc/fdfs/
⑦ 配置nginx,修改nginx.conf
# vim /usr/local/nginx/conf/nginx.conf
修改配置,其它的默认
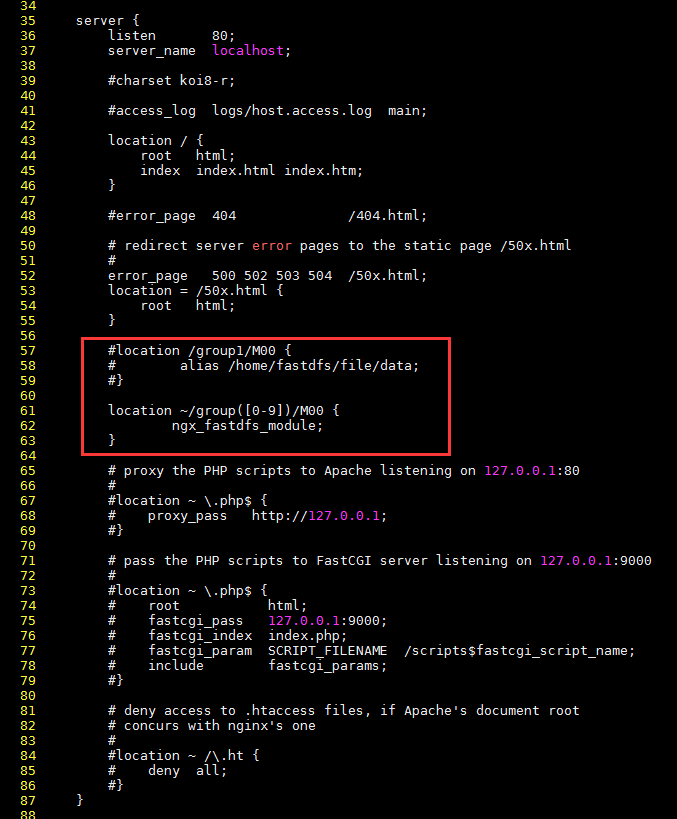
在80端口下添加fastdfs-nginx模块
location ~/group([-])/M00 {

    ngx_fastdfs_module;

}
注意:
listen 80 端口值是要与 /etc/fdfs/storage.conf 中的 http.server_port=80 (前面改成80了)相对应。如果改成其它端口,则需要统一,同时在防火墙中打开该端口。
location 的配置,如果有多个group则配置location ~/group([0-9])/M00 ,没有则不用配group。
⑧ 在/home/fastdfs/file 文件存储目录下创建软连接,将其链接到实际存放数据的目录,这一步可以省略
# ln -s /home/fastdfs/file/data/ /home/fastdfs/file/data/M00
⑨ 启动nginx
# /usr/local/nginx/sbin/nginx
打印处如下就算配置成功
[root@storage1 ~]# /usr/local/nginx/sbin/nginx

ngx_http_fastdfs_set pid=

[root@storage1 ~]#
⑩ 在地址栏访问。
能下载文件就算安装成功。注意和第三点中直接使用nginx路由访问不同的是,这里配置 fastdfs-nginx-module 模块,可以重定向文件链接到源服务器取文件。
http://192.168.2.136/group1/M00/00/00/wKgCiFz1bm-ATQNlAACLwhA7j18254.jpg
参考博客:
用FastDFS一步步搭建文件管理系统
https://www.cnblogs.com/chiangchou/p/fastdfs.html
https://blog.csdn.net/yin_zh0522/article/details/81232041
搭建fastdfs文件服务器的更多相关文章
- linux搭建FastDFS文件服务器
本文主要介绍在linux服务器如何搭建FastDFS文件服务器.大概分为9个步骤,由于内容较为繁琐.下面带你入坑! 首先简单介绍一下FastDFS是淘宝资深架构师余庆老师主导开源的一个分布式文件系统, ...
- 阿里云centos6.9搭建fastDFS文件服务器
准备压缩包: 1.fastdfs-nginx-module_v1.16.tar.gz 2.FastDFS_v5.05.tar.gz 3.libfastcommonV1.0.7.tar.gz 4.ngi ...
- docker安装部署、fastDFS文件服务器搭建与springboot项目接口
一.docker安装部署 1.更新yum包:sudo yum update 2.安装需要的软件包,yum-util 提供yum-config-manager功能,另外两个是devicemapper驱动 ...
- 为fastdfs文件服务器新增一个storage
一.前言: 前期,已经搭建好了一套fastdfs文件服务器,一个tracker和一个storage,且部署在同一台服务器上,已经正式投入运行快半年了,1T的空间现在只剩下100G容量了,现在需要扩容, ...
- 百度富文本编辑器整合fastdfs文件服务器上传
技术:springboot+maven+ueditor 概述 百度富文本整合fastdfs文件服务器上传 详细 代码下载:http://www.demodashi.com/demo/15008.h ...
- 手把手教你搭建FastDFS集群(上)
手把手教你搭建FastDFS集群(上) 本文链接:https://blog.csdn.net/u012453843/article/details/68957209 FastDFS是一个 ...
- 【FastDFS】小伙伴们说在CentOS 8服务器上搭建FastDFS环境总报错?
写在前面 在[冰河技术]微信公众号的[分布式存储]专题中,我们分别搭建了单节点FastDFS环境和高可用FastDFS集群环境.但是,之前的环境都是基于CentOS 6.8服务器进行搭建的.很多小伙伴 ...
- 一、手把手教你docker搭建fastDFS文件上传下载服务器
在搭建fastDFS文件上传下载服务器之前,你需要准备的有一个可连接的linux服务器,并且该linux服务器上已经安装了docker,若还有没安装docker的,先百度自行安装docker. 1.执 ...
- 在CentOS 8服务器上搭建FastDFS环境
什么是FastDFS? 这里,我就摘录下百度百科上对于FastDFS的描述. FastDFS是一个开源的轻量级分布式文件系统,它对文件进行管理,功能包括:文件存储.文件同步.文件访问(文件上传.文件下 ...
随机推荐
- Nginx作为web静态资源服务器——跨域访问
跨站访问 为什么浏览器禁止跨域访问 Nginx跨站访问 Syntax:add_header name value [always]; Default:—— Context:http,serve ...
- request session
例子 url = 'http://beanhome.com/user/login' header = { "Content-Type": 'application/json', & ...
- git工作中总结
# .克隆到本地 git clone url git clone -b 分支 url # 注意:克隆完成后,要删除.git隐藏文件夹 # .修改代码 # .生成master git init git ...
- ORM基础1
1.增删改查 .models.类.object.all() 获取所有对象->select * from 表 2.models.类.object.get(id=1) 获取id为1的对象->s ...
- spring Cloud-eureka的保护模式
eureka的首页出现以下警告 EMERGENCY! EUREKA MAY BE INCORRECTLY CLAIMING INSTANCES ARE UP WHEN THEY'RE NOT. REN ...
- Oracle设置序列方法
create sequence SEQ_LoanApplicantGuarantee minvalue 1 nomaxvalue start with 1 increment by 1 nocycle ...
- [校内训练19_09_02]C
题意 给出一棵N 个节点的树,树上的每个节点都有一个权值$a_i$. 有Q 次询问,每次在树上选中两个点u, v,考虑所有在简单路径u, v 上(包括u, v)的点构成的集合S. 求$\sum_{w∈ ...
- RSTP协议简介
RTSP(Real-Time Stream Protocol)协议是一个基于文本的多媒体播放控制协议,属于应用层.RTSP以客户端方式工作,对流媒体提供播放.暂停.后退.前进等操作.该标准由IETF指 ...
- Docker底层架构之网络实现
前言 Docker 的网络实现其实就是利用了 Linux 上的网络命名空间和虚拟网络设备(特别是 vethpair). 基本原理 首先,要实现网络通信,机器需要至少一个网络接口(物理接口或虚拟接口)来 ...
- SpringBoot系列专栏
学会使用SpringBoot能够极大地提升Spring应用的开发效率,可以说是目前开发应用Java必需掌握的工具之一,而且SpringBoot也是微服务应用的基础,只有学会了SpringBoot,你才 ...