
KVM管理工具 WebVirtMgr
WEB管理工具 WebVirtMgr
WebVirtMgr是一个基于libvirt的Web界面,用于管理虚拟机。它允许您创建和配置新域,并调整域的资源分配。VNC查看器为来宾域提供完整的图形控制台。KVM是目前唯一支持的虚拟机管理程序。
基础环境
[root@BJtest32 ~]# cat /etc/redhat-release

CentOS release 6.6 (Final)

[root@BJtest32 ~]# uname -r

2.6.32-504.el6.x86_64

[root@BJtest32 ~]# getenforce

Disabled

查看是否支持虚拟化

cat /proc/cpuinfo | grep -E 'vmx|svm'

查看KVM 驱动是否加载

lsmod | grep kvm

如果没有加载kvm驱动,利用命令加载驱动

modprobe -a kvm

modprobe -a kvm_intel
hosts免密登录
kvm所用的所有服务器都需要互相做免密
如果只有一台机器,把本机的id_rsa.pub 拷贝到authorized_keys里
[root@BJtest32 ~]# ssh-keygen

[root@BJtest32 ~]# -copy-id -i .ssh/id_rsa.pub root@$IP
依赖包及管理工具
kvm属于内核,不需要安装。但是需要一些管理工具包

yum install -y qemu-kvm libvirt libvirt-python libguestfs-tools virt-install virt-manager python-virtinst libvirt-client virt-viewer qemu-kvm-tool

libvirt 用来管理kvm

yum install -y virt-install

安装管理KVM命令
WebVirtMgr 安装
官方地址
WebVirtMgr只在管理端安装
[root@BJtest32 data]# yum -y install http://dl.fedoraproject.org/pub/epel/6/i386/epel-release-6-8.noarch.rpm

[root@BJtest32 data]# yum -y install git python-pip libvirt-python libxml2-python python-websockify supervisor nginx

[root@BJtest32 data]# git clone git://github.com/retspen/webvirtmgr.git

[root@BJtest32 data]# cd webvirtmgr

[root@BJtest32 webvirtmgr]# pip install -r requirements.txt # or python-pip (RedHat, Fedora, CentOS, OpenSuse)

#requirements.txt主要是用于记录所有依赖包及其精确的版本号。以便新环境部署

[root@BJtest32 webvirtmgr]# ./manage.py syncdb

WARNING:root:No local_settings file found.

Creating tables ...

Creating table auth_permission

Creating table auth_group_permissions

Creating table auth_group

Creating table auth_user_groups

Creating table auth_user_user_permissions

Creating table auth_user

Creating table django_content_type

Creating table django_session

Creating table django_site

Creating table servers_compute

Creating table instance_instance

Creating table create_flavor

You just installed Django's auth system, which means you don't have any superusers defined.

这里需要我们输入Yes,配置管理员用户

配置信息如下

You just installed Django's auth system, which means you don't have any superusers defined.

Would you like to create one now? (yes/no): yes         #是否现在创建管理员用户

Username (leave blank to use 'root'): root              #用户名称

Email address: cyh@i4t.com                              #邮箱地址 (可以不填)

Password:                                               #管理员用户密码

Password (again):                                       #重复输入密码

Superuser created successfully.                         #创建成功

Installing custom SQL ...

Installing indexes ...

Installed 6 object(s) from 1 fixture(s)

#配置Django 静态页面

[root@BJtest32 webvirtmgr]# ./manage.py collectstatic

输入Yes即可

#如果还需要再添加管理员用户,执行下面的命令

#前台启动WebVirMgr,默认是Debug模式同时日志打印在前台

[root@BJtest32 webvirtmgr]# ./manage.py createsuperuser

以上执行Python脚本必须在webvirtmgr目录
启动WebVirMgr
前台启动WebVirMgr,默认是Debug模式同时日志打印在前台
[root@BJtest32 webvirtmgr]# ./manage.py runserver 0:8000

IP+8000端口访问
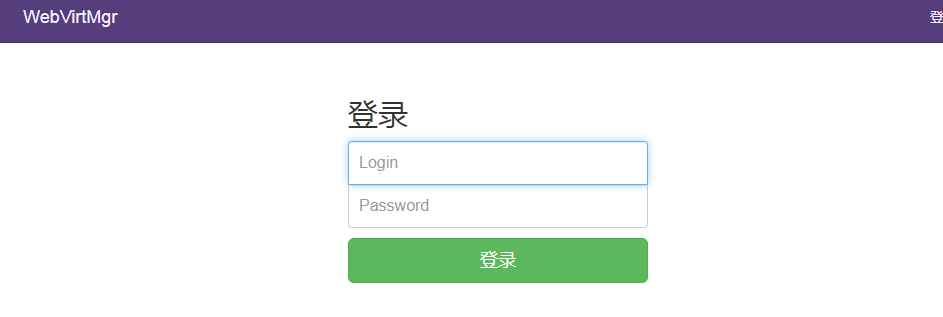
用户名和密码就是刚刚创建的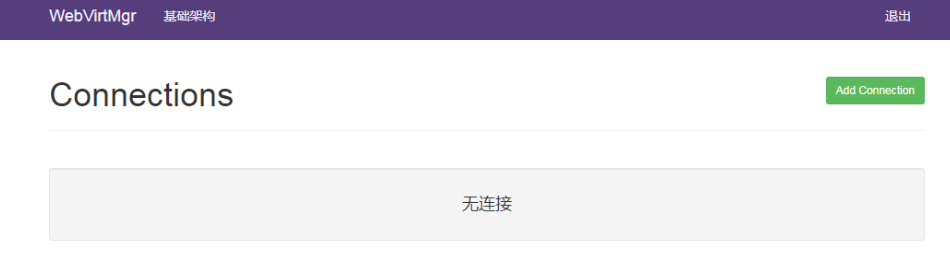
登录成功,没有报错。
现在在服务器端Ctrl+C退出
安装Nginx使用supervisor进行管理。
配置Nginx
Nginx安装 安装完成后修改配置文件
[root@BJtest32 conf.d]# cat webvirtmgr.conf

server {

    listen       80;

    server_name  webvirtmgr.nfsnobody.com;

    location / {

    proxy_pass http://127.0.0.1:8000;

    proxy_set_header X-Real-IP $remote_addr;

    proxy_set_header X-Forwarded-for $proxy_add_x_forwarded_for;

    proxy_set_header Host $host:$server_port;

    proxy_set_header X-Forwarded-Proto $remote_addr;

    proxy_connect_timeout 600;

    proxy_read_timeout 600;

    proxy_send_timeout 600;

    client_max_body_size 5120M;

      }

location /static/ {

    root /data1/webvirtmgr;

    expires max;

  }

}

[root@BJtest32 conf.d]# nginx -t

nginx: the configuration file /etc/nginx/nginx.conf syntax is ok

nginx: configuration file /etc/nginx/nginx.conf test is successful

[root@BJtest32 conf.d]# /etc/init.d/nginx restart
配置supervisor
supervisorctl所有的操作都需要在webvirtmgr的安装目录下,否则会提示找不到文件
WebVirtMgr默认使用supervisor进行管理(启动停止服务) 所以我们需要配置supervisor
安装supervisor
[root@BJtest32 ~]# yum remove supervisor -y

[root@BJtest32 ~]# pip install supervisor==3.1.3

[root@BJtest32 ~]# echo_supervisord_conf > /etc/supervisor/supervisord.conf

#修改配置文件

[root@BJtest32 ~]# vim /etc/supervisord.conf

#新增以下内容

[include]

files = /etc/supervisord.d/*.conf

#创建目录

[root@BJtest32 ~]# mkdir /etc/supervisord.d/

#配置service

[root@BJtest32 ~]# vi /etc/init.d/supervisord

#!/bin/bash

#

# supervisord   This scripts turns supervisord on

#

# Author:       Mike McGrath <mmcgrath@RedHat.com> (based off yumupdatesd)

#

# chkconfig:    - 95 04

#

# description:  supervisor is a process control utility.  It has a web based

#               xmlrpc interface as well as a few other nifty features.

# processname:  supervisord

# config: /etc/supervisor/supervisord.conf

# pidfile: /tmp/supervisord.pid

#

# source function library

. /etc/rc.d/init.d/functions

PIDFILE=/tmp/supervisord.pid

RETVAL=0

start() {

    echo -n $"Starting supervisord: "

    daemon "supervisord --pidfile=$PIDFILE -c /etc/supervisord.conf"

    RETVAL=$?

    echo

    [ $RETVAL -eq 0 ] && touch /var/lock/subsys/supervisord

}

stop() {

    echo -n $"Stopping supervisord: "

    killproc supervisord

    echo

    [ $RETVAL -eq 0 ] && rm -f /var/lock/subsys/supervisord

}

restart() {

    stop

    start

}

case "$1" in

  start)

    start

    ;;

  stop)

    stop

    ;;

  restart|force-reload|reload)

    restart

    ;;

  condrestart)

    [ -f /var/lock/subsys/supervisord ] && restart

    ;;

  status)

    status supervisord

    RETVAL=$?

    ;;

  *)

    echo $"Usage: $0 {start|stop|status|restart|reload|force-reload|condrestart}"

    exit 1

esac

exit $RETVAL

[root@BJtest32 ~]# chmod 755 /etc/init.d/supervisord

[root@BJtest32 ~]# chkconfig supervisord on

supervisord 启动成功后,可以通过 supervisorctl 客户端控制进程,启动、停止、重启。

运行 supervisorctl 命令,不加参数,会进入 supervisor 客户端的交互终端,并会列出当前所管理的所有进程。
创建supervisor配置文件
#创建配置文件

[root@BJtest32 ~]# vi /etc/supervisord.d/webvirtmgr.conf

[program:webvirtmgr]

command=/usr/bin/python /data/webvirtmgr/manage.py run_gunicorn -c /data/webvirtmgr/conf/gunicorn.conf.py

directory=/data/webvirtmgr

autostart=true

autorestart=true

logfile=/var/log/supervisor/webvirtmgr.log

log_stderr=true

user=root

[program:webvirtmgr-console]

command=/usr/bin/python /data/webvirtmgr/console/webvirtmgr-console

directory=/data/webvirtmgr

autostart=true

autorestart=true

stdout_logfile=/var/log/supervisor/webvirtmgr-console.log

redirect_stderr=true

user=root

#重启supervisor

[root@BJtest32 ~]# /etc/init.d/supervisord status

supervisord (pid  6877) is running...

[root@BJtest32 ~]# /etc/init.d/supervisord restart

[root@BJtest32 ~]# supervisorctl status

webvirtmgr                       RUNNING   pid 8773, uptime 0:01:12

webvirtmgr-console               RUNNING   pid 8772, uptime 0:01:12
Web界面配置webvirtmgr
1.Add Connection 添加宿主机(即KVM主机)
2.点击SSH连接
3.Label 为主机名,必须为主机名做免密
4.IP 为宿主机IP
5.用户名为服务器用户名
6.点击添加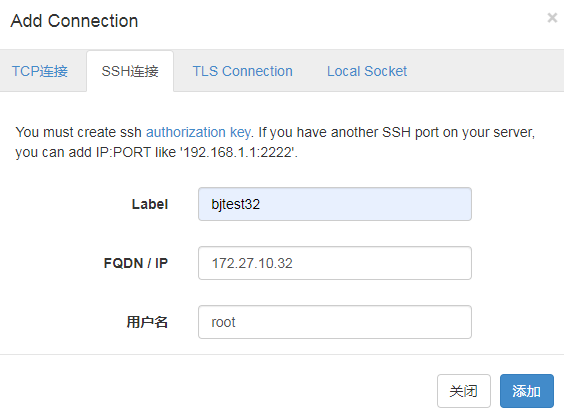
添加完后点击主机名激活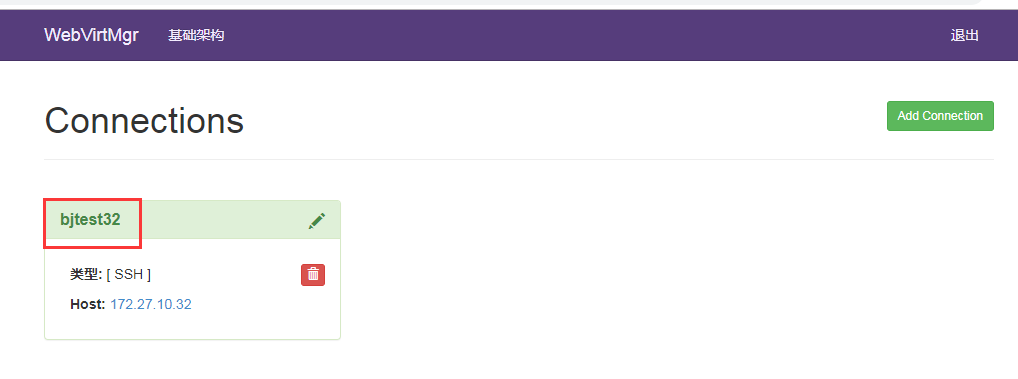
虚机实例就是已经存在的虚拟机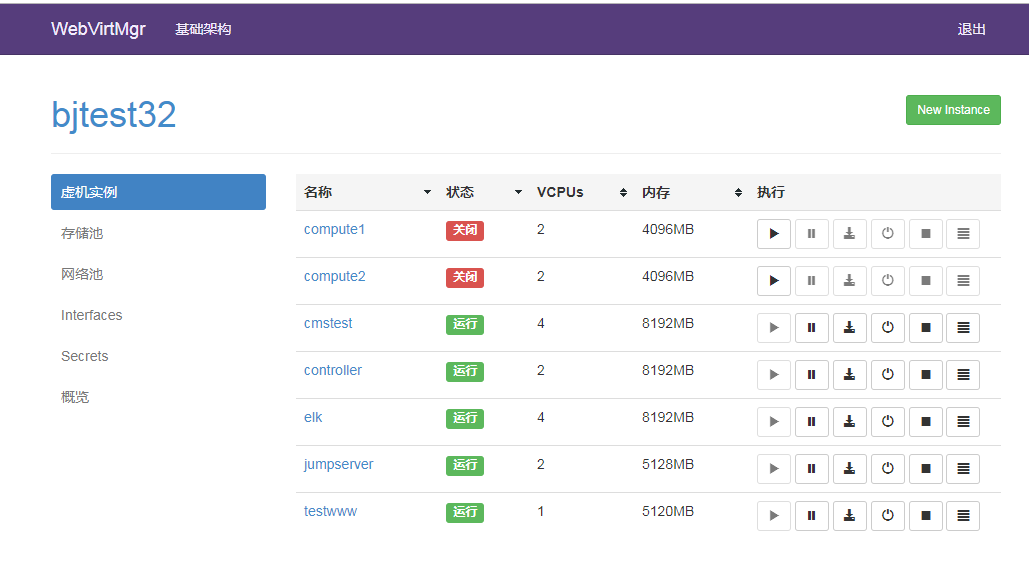
创建存储KVM镜像目录
KVM中的虚拟机都是以镜像的方式进行存储
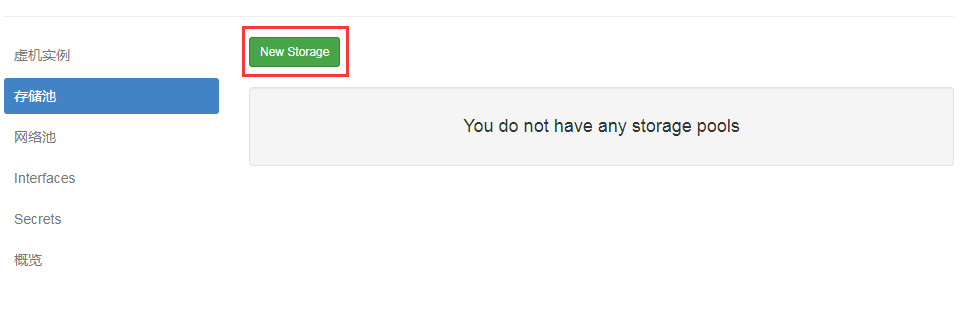
根据自己服务器的分区灵活选择位置
名称: 这里的名称显示的名称
路径: 即存储KVM虚拟机路径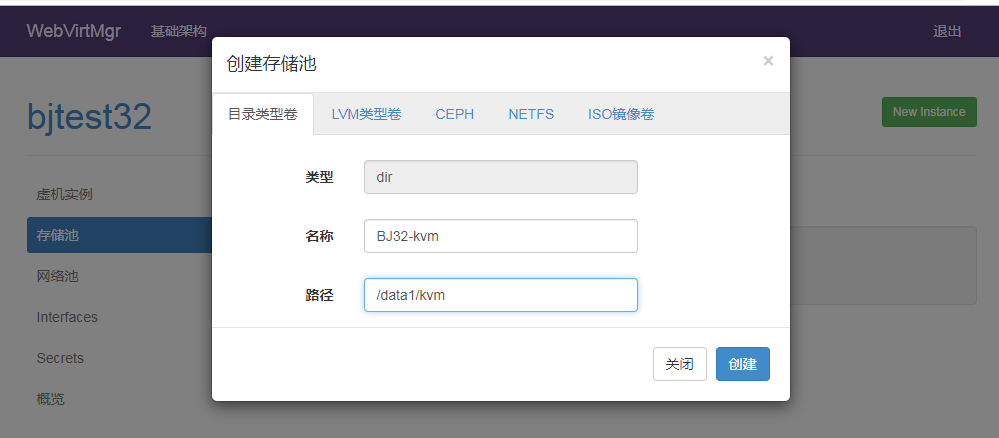
创建完后需要创建镜像(相当于虚拟硬盘大小)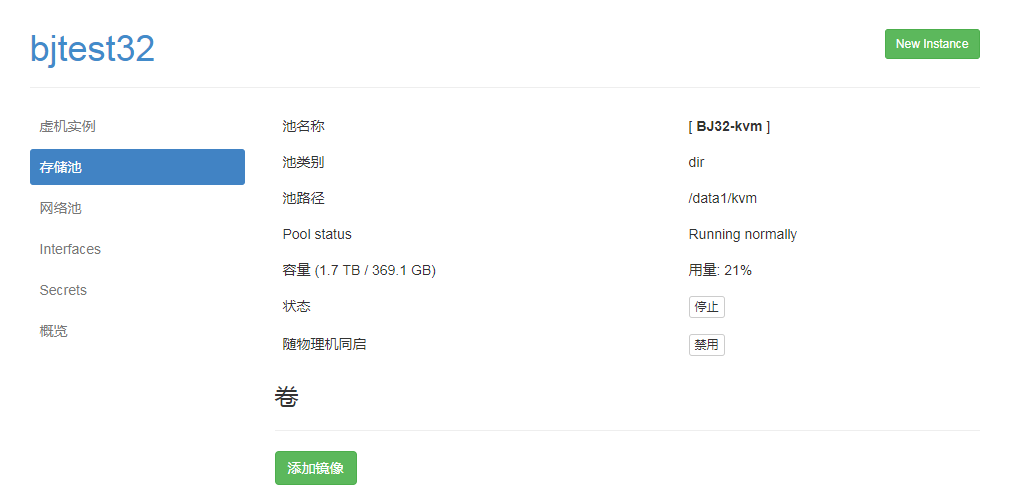
创建镜像
下面“Metadata”前的小方框一定不能勾选(默认是勾选的,要去掉!)
这里添加的“镜像”就是所创建虚拟机的硬盘空间
虚拟机所占用的空间就是这个“镜像”所在的宿主机下路径所在的分区空间(也就是/home/kvm/kvmstorage/,即宿主机的home分区)
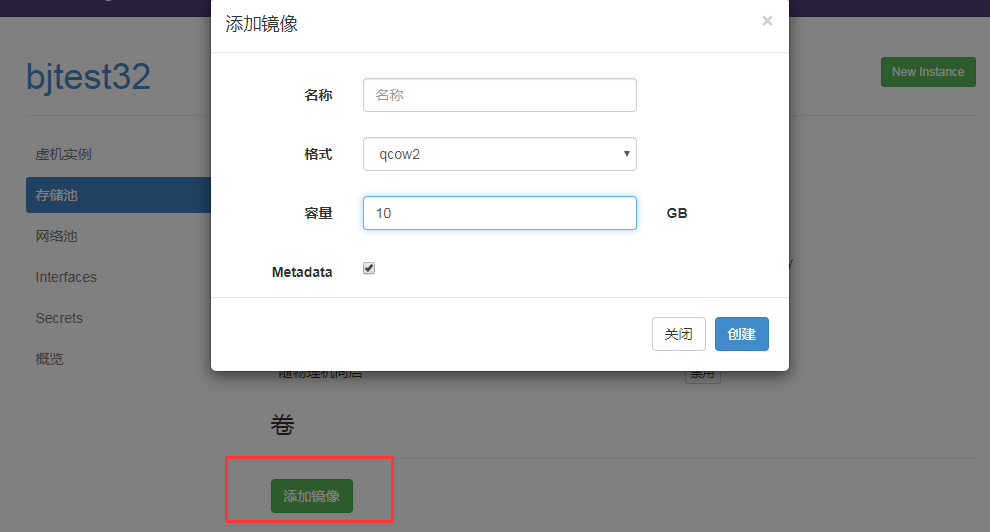
创建完毕
上传镜像
创建完虚拟硬盘,我们在创建一个IOS镜像目录
点击>存储池>NEW_Storage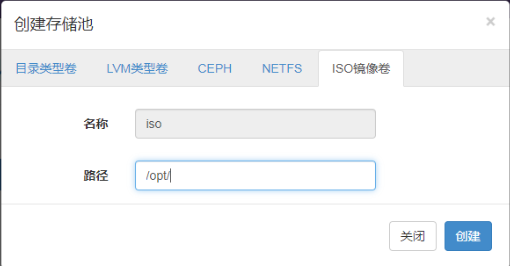
点击上传镜像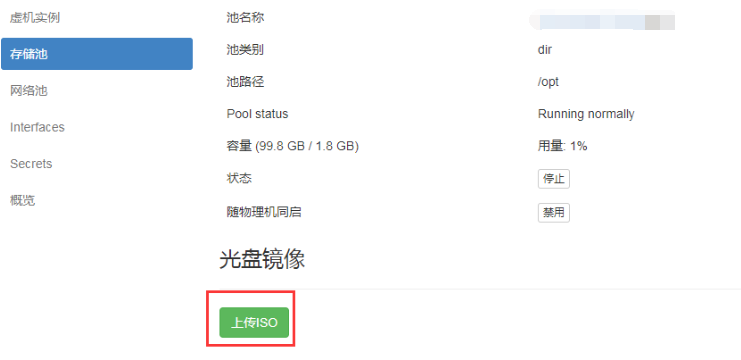
选中镜像选择上传
除了在浏览器上传,还可以直接下载阿里云镜像站镜像。只要镜像在/opt下就会被获取
wget -P /opt/ https://mirrors.aliyun.com/centos/7.6.1810/isos/x86_64/CentOS-7-x86_64-DVD-1810.iso
如果使用Web界面上传镜像nginx出现413的情况请修改client_max_body_size参数
KVM管理工具 WebVirtMgr的更多相关文章
- KVM管理工具webvirtmgr的使用
WebVirtMgr的日常配置:添加宿主机,创建虚拟机,磁盘扩容,快照等具体操作记录如下: 一.创建虚拟机 1.创建存储池 点击创建的宿主机,进入虚拟机部署界面 点击“存储池”按钮,创建存储池(即创建 ...
- kvm管理工具Webvirtmgr安装
虚拟机版本vmware workstation 15.5.0 pro (也就是linux版) cat /etc/redhat-release CentOS Linux release 7.4.17 ...
- KVM web管理工具——WebVirtMgr(一)
WebVirtMgr 介绍 WebVirtMgr采用几乎纯Python开发,其前端是基于Python的Django,后端是基于Libvirt的Python接口,将日常kvm的管理操作变的更加的 ...
- kvm-web管理工具webvirtmgr
前言: 使用开源的虚拟化技术,对公司自有的少数服务器进行虚拟化,在满足业务需求的同时,并未增加投入,同时也避免了使用云主机的不便,技术层面,kvm是开源的虚拟化产品,虚拟化性能出众,更重要的是免费!! ...
- Kvm --05 密码保护:Kvm管理之WebVirtMgr
目录 密码保护:Kvm管理之WebVirtMgr 1. 前言 2. 特点 3. 功能 4. 部署 1).安装相关依赖 2).安装Python需求环境 3).配置Nginx 4). 远程连接 5).更新 ...
- 快速搭建 kvm web 管理工具 WebVirtMgr
作者:SRE运维博客 博客地址: https://www.cnsre.cn/ 文章地址:https://www.cnsre.cn/posts/211117937177/ 相关话题:https://ww ...
- 虚拟化技术之kvm管理工具virsh常用基础命令(一)
在上一篇博客中,我们了解了KVM基础架构和部署以及图形管理工具virt-manager安装虚拟机的过程,回顾请参考https://www.cnblogs.com/qiuhom-1874/p/13499 ...
- KVM WEB管理工具——WebVirtMgr(二)日常配置
配置宿主机 1.登录WebVirtMgr管理平台 2.添加宿主机 选择首页的WebVirtMgr -->Addd Connection 选择“SSH链接“,设置Label,IP,用户 注意:La ...
- KVM WEB管理工具webvirtmgr安装和使用
生产环境的KVM宿主机越来越多,需要对宿主机的状态进行调控.这里用webvirtmgr进行管理.图形化的WEB,让人能更方便的查看kvm 宿主机的情况和操作 1 安装支持的软件源 yum -y ins ...
随机推荐
- AMD-require.js模块加载原理
项目中使用大了require.js,功能实现,现重新学习下模块加载原理相关知识,借鉴如下博文:https://blog.csdn.net/ai52011/article/details/7711361 ...
- PHP mysql扩展整理,操作数据库的实现过程分析
相关文章:PHP mysqli扩展整理,包括面向过程和面向对象的比较\事务控制\批量执行\预处理 PHPmysqli扩展整理,包括面向过程和面向对象的比较\事务控制\批量执行\预处理 从某种程度上 ...
- linux 在 1 MB 之下的 ISA 内存
一个最著名的 I/O 内存区是在个人计算机上的 ISA 范围. 这是在 640 KB(0xA0000)和 1 MB(0x100000)之间的内存范围. 因此, 它正好出现于常规内存 RAM 中间. 这 ...
- js 对象的深拷贝
function deepCopy(obj) { var result = Array.isArray(obj) ? [] : {}; for (var key in obj) { if (obj.h ...
- 牛客小白月赛15A 斑羚飞渡
链接:https://ac.nowcoder.com/acm/contest/917/A 时间限制:C/C++ 1秒,其他语言2秒 空间限制:C/C++ 131072K,其他语言262144K 64b ...
- HDU6578 2019HDU多校训练赛第一场 1001 (dp)
HDU6578 2019HDU多校训练赛第一场 1001 (dp) 传送门:http://acm.hdu.edu.cn/showproblem.php?pid=6578 题意: 你有n个空需要去填,有 ...
- hibernate配置文件模板
hibernate.cfg.xml 配置文件模版: <?xml version='1.0' encoding='UTF-8'?> <!DOCTYPE hibernate-config ...
- springboot多租户设计
1. 概述 根据不同用户的请求,选择不同的数据源,不同的数据源可以是Oracle.MySQL或者其它.用到的技术栈,没有什么复杂的技术,可以看到,依赖也就加了几个而已,如下: 2. 先睹为快 如下图, ...
- ELK学习实验006:Nginx的日志分析系统之filebeat配置
一 Filebeat工作原理 Filebeat由两个主要组件组成: prospector和 harvester 1.1 harvester 负责读取单个文件的内容 如果文件在读取时被制除或重命名, F ...
- echarts实现group关系图案例
官网案例:https://www.echartsjs.com/examples/zh/editor.html?c=graph-simple 自己在项目中实现了两个group图: 1.先看实现效果,两个 ...