
solr5.3.1 集群服务搭建
一. 安装部署
zookeeper集群部署:
节点:
10.1.12.51:2181 node1
10.1.12.52:2181 node2
10.1.12.53:2181 node3
最新稳定版下载地址(当前3.4.6):
http://mirrors.cnnic.cn/apache/zookeeper/stable/zookeeper-3.4.6.tar.gz
各节点上解压zookeeper到/usr/local
|
1
2
3
|
tar xf /usr/local/src/zookeeper-3.4.6.tar.gz -C /usr/localcd /usr/localln -s zookeeper-3.4.6 zookeeper |
创建如下数据目录结构:
/data/zookeeper/
├── data
└── log
|
1
|
mkdir -p /data/zookeeper/{data,log} |
各节点配置zookeeper:
|
1
2
3
4
5
6
7
8
9
10
11
|
cd /usr/local/zookeeper/conf cp zoo_sample.cfg zoo.cfgvim zoo.cfg修改如下:tickTime=2000initLimit=10syncLimit=5dataDir=/data/zookeeper/dataclientPort=2181server.1=10.1.12.51:2888:3888server.2=10.1.12.52:2888:3888server.3=10.1.12.53:2888:3888 |
各节点的数据目录下添加唯一的node id标识
|
1
2
3
4
5
6
|
node1: echo 1>/data/zookeeper/data/myidnode2:echo 2>/data/zookeeper/data/myidnode3:echo 3>/data/zookeeper/data/myid |
各节点修改ZOO_LOG_DIR环境变量:
|
1
|
echo -e "\nZOO_LOG_DIR=/data/zookeeper/log" >> /usr/local/zookeeper/bin/zkEnv.sh |
各节点上启动zookeeper:
|
1
2
3
4
5
6
7
8
9
10
11
12
13
|
/usr/local/zookeeper/bin/zkServer.sh start添加zookeeper的sysv服务脚本vim /etc/init.d/zookeeper#!/bin/bash## chkconfig: 345 30 70# description: Starts/Stops Apache Zookeeper export ZOO_HOME=/usr/local/zookeeperexport ZOO_BIN=$ZOO_HOME/binexport ZOO_SER_BIN=$ZOO_BIN/zkServer.sh $ZOO_SER_BIN $1 |
#------finish-------
|
1
2
3
|
chmod +x /etc/init.d/zookeeperchkconfig -add zookeeperchkconfig zookeeper on |
solrcloud部署(3分片2复制集):
节点:
10.1.12.51:8983 shard1-repl1 shard2-repl2
10.1.12.52:8983 shard2-repl1 shard3-repl2
10.1.12.53:8983 shard3-repl1 shard1-repl2
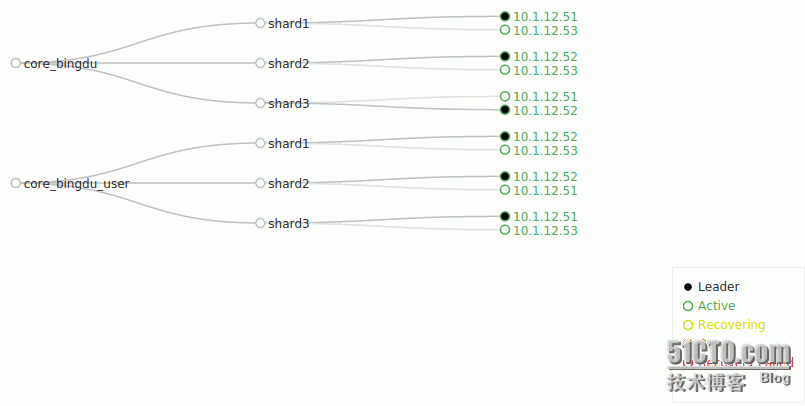
最新稳定版下载地址(当前5.3.1)
http://mirrors.cnnic.cn/apache/lucene/solr/5.3.1/solr-5.3.1.tgz
各节点解压安装操作:
|
1
2
3
|
cd /usr/local/srctar xzf solr-5.3.1.tgz solr-5.3.1/bin/install_solr_service.sh --strip-components=2./install_solr_service.sh solr-5.3.1.tgz -i /usr/local -d /data/solrcloud -u solr -s solr -p 8983 |
各节点solr服务配置修改:
1.调整jvm堆内存大小
|
1
|
echo 'SOLR_JAVA_MEM="-Xms10g -Xmx10g"' >> /data/solrcloud/solr.in.sh |
2.添加zookeeper
|
1
|
echo 'ZK_HOST=10.1.12.51:2181,10.1.12.52:2181,10.1.12.53:2181' >> /data/solrcloud/solr.in.sh |
3.添加solr依赖jar包
这里使用ik分词器,支持solr5.x版本下载地址为: https://github.com/EugenePig/ik-analyzer-solr5
|
1
2
3
|
cp ~/ik-analyzer-solr5-5.x.jar /usr/local/solr/server/solr-webapp/webapp/WEB-INF/libcp -n /usr/local/solr/dist/*.jar /usr/local/solr/server/solr-webapp/webapp/WEB-INF/libcp ~/mysql-connector-java-5.1.35.jar /usr/local/solr/server/lib |
4.重启solr服务
|
1
|
/etc/init.d/solr restart |
创建colletion(其中一个节点下操作即可)
|
1
2
|
su -c '/usr/local/solr/bin/solr create -c core_bingdu -d /opt/core_bingdu_conf -n core_bingdu -s 3 -rf 2 -port 8983' - solrsu -c '/usr/local/solr/bin/solr create -c core_bingdu_user -d /opt/core_bingdu_user_conf -n core_bingdu_user -s 3 -rf 2 -port 8983' - solr |
二. 集群操作
修改solr的collection配置后上传到zookeeper:
当前solr的collection配置副本存放在opt目录下
|
1
2
3
4
5
6
7
8
9
10
11
12
13
14
15
16
17
18
19
20
|
[root@mongo-shard1-1 opt]# tree ..├── core_bingdu_conf│ ├── admin-extra.html│ ├── admin-extra.menu-bottom.html│ ├── admin-extra.menu-top.html│ ├── data-config.xml│ ├── dataimport.properties│ ├── _rest_managed.json│ ├── schema.xml│ └── solrconfig.xml└── core_bingdu_user_conf ├── admin-extra.html ├── admin-extra.menu-bottom.html ├── admin-extra.menu-top.html ├── data-config.xml ├── dataimport.properties ├── _rest_managed.json ├── schema.xml └── solrconfig.xml |
对以上配置文件进行修改后需要手动上传到zookeeper:
1)整个配置目录上传
|
1
2
3
|
cd /usr/local/solr/server/scripts/cloud-scripts./zkcli.sh -zkhost 10.1.12.51:2181 -cmd upconfig -confdir /opt/core_bingdu_conf -confname core_bingdu./zkcli.sh -zkhost 10.1.12.51:2181 -cmd upconfig -confdir /opt/core_bingdu_user_conf -confname core_bingdu_user |
2)单文件上传
|
1
2
|
./zkcli.sh -zkhost 10.1.12.51:2181 -cmd putfile /configs/core_bingdu/solrconfig.xml /opt/core_bingdu_conf/solrconfig.xml./zkcli.sh -zkhost 10.1.12.51:2181 -cmd putfile /configs/core_bingdu_user/solrconfig.xml /opt/core_bingdu_user_conf/solrconfig.xml |
三. solr 的一些常规操作:
基于命令:
<solr_install_dir>/bin/solr command [options...]
支持的command如下:
start, stop, restart, status, healthcheck, create, create_core, create_collection, delete
其中start,stop,restart,status操作已经封装到sysv风格的服务脚本中,例如重启solr服务:
|
1
|
/etc/init.d/solr restart |
检查solr集群各节点状态:
|
1
2
3
4
5
6
7
8
9
10
11
12
13
14
15
16
17
18
19
20
21
22
23
24
25
26
27
28
29
30
31
32
33
34
35
36
37
38
39
40
41
42
43
44
45
46
47
48
49
50
51
52
53
54
55
56
57
58
59
60
61
62
63
64
|
[root@mongo-shard1-1 bin]# ./solr healthcheck -c core_bingdu -z 10.1.12.52:2181{ "collection":"core_bingdu", "status":"healthy", "numDocs":180900, "numShards":3, "shards":[ { "shard":"shard1", "status":"healthy", "replicas":[ { "name":"core_node2", "url":"http://10.1.12.51:8983/solr/core_bingdu_shard1_replica2/", "numDocs":60424, "status":"active", "uptime":"2 days, 17 hours, 13 minutes, 9 seconds", "memory":"3.4 GB (%36) of 9.6 GB", "leader":true}, { "name":"core_node5", "url":"http://10.1.12.53:8983/solr/core_bingdu_shard1_replica1/", "numDocs":60424, "status":"active", "uptime":"2 days, 16 hours, 58 minutes, 39 seconds", "memory":"2.2 GB (%22.5) of 9.6 GB"}]}, { "shard":"shard2", "status":"healthy", "replicas":[ { "name":"core_node3", "url":"http://10.1.12.52:8983/solr/core_bingdu_shard2_replica1/", "numDocs":59916, "status":"active", "uptime":"2 days, 17 hours, 14 minutes, 3 seconds", "memory":"3 GB (%31.1) of 9.6 GB", "leader":true}, { "name":"core_node6", "url":"http://10.1.12.53:8983/solr/core_bingdu_shard2_replica2/", "numDocs":59916, "status":"active", "uptime":"2 days, 16 hours, 58 minutes, 39 seconds", "memory":"2.2 GB (%22.5) of 9.6 GB"}]}, { "shard":"shard3", "status":"healthy", "replicas":[ { "name":"core_node1", "url":"http://10.1.12.51:8983/solr/core_bingdu_shard3_replica1/", "numDocs":60560, "status":"active", "uptime":"2 days, 17 hours, 13 minutes, 9 seconds", "memory":"3.5 GB (%36) of 9.6 GB"}, { "name":"core_node4", "url":"http://10.1.12.52:8983/solr/core_bingdu_shard3_replica2/", "numDocs":60560, "status":"active", "uptime":"2 days, 17 hours, 14 minutes, 3 seconds", "memory":"3 GB (%31.2) of 9.6 GB", "leader":true}]}]} |
创建集合:
|
1
|
bin/solr create -c core_bingdu -d /opt/core_bingdu_conf -n core_bingdu -s 3 -rf 2 -port 8983 |
这里说明一下选项:
-c: 指定集合或core名称(对于单实例模式的solr,colletion和core的意思基本相同,集群模式下,colletion等于每个shard下对应的core的集合)
-d:指定本地的solr配置目录(一个临时目录,用于存放solr配置文件,如solrconfig.xml,schema.xml),每次该目录的配置发生修改都需要手动上传到zookeeper的/configs目录节点下
-n: 指定zookeeper的/configs目录节点下创建的子目录节点名称,这里为/configs/core_bingdu
-s: 指定对应集合的分片数, 指定分片数后solr会根据各个节点上的负载在其上创建分片
-rf: 指定每个shard创建多少个复制节点
-port: 指定solr服务端口,不指定默认为8983
删除集合:
|
1
|
bin/solr delete -c core_bingdu |
基于solr api方式的操作:
创建集合:
|
1
|
http://localhost:8983/solr/admin/collections?action=CREATE&name=mycollection&numShards=3&replicationFactor=4 |
删除集合:
|
1
|
http://localhost:8983/solr/admin/collections?action=DELETE&name=mycollection |
重新载入集合:
|
1
|
http://localhost:8983/solr/admin/collections?action=RELOAD&name=mycollection |
列出所有集合:
|
1
|
http://10.1.12.53:8983/solr/admin/collections?action=LIST |
将一个分片拆分成两个分片(用于集群扩展):
|
1
|
http://localhost:8983/solr/admin/collections?action=SPLITSHARD&collection=anotherCollection&shard=shard1 |
为指定集合创建别名:
|
1
|
http://localhost:8983/solr/admin/collections?action=CREATEALIAS&name=testalias&collections=anotherCollection,testCollection |
删除集合别名:
|
1
|
http://localhost:8983/solr/admin/collections?action=DELETEALIAS&name=testalias |
删除复制节点:
|
1
|
http://localhost:8983/solr/admin/collections?action=DELETEREPLICA&collection=test2&shard=shard2&replica=core_node3 |
添加复制节点:
|
1
|
http://localhost:8983/solr/admin/collections?action=ADDREPLICA&collection=test2&shard=shard2&node=192.167.1.2:8983_solr |
查看overseer状态:
solr集群中唯一负责action处理的节点,负责其他分片,节点的状态跟踪,为节点分配分片
|
1
|
http://localhost:8983/solr/admin/collections?action=OVERSEERSTATUS&wt=json |
集群状态检查:
|
1
|
http://localhost:8983/solr/admin/collections?action=clusterstatus&wt=json |
还有其他集合api,详细说明请参考:
https://cwiki.apache.org/confluence/display/solr/Collections+API
创建全量索引
|
1
|
/usr/bin/curl -G "http://10.1.12.53:8983/solr/core_bingdu/dataimport?command=full-import&clean=true&commit=true" 2&> /dev/null |
创建增量索引
|
1
|
/usr/bin/curl -G "http://10.1.12.53:8983/solr/core_bingdu_user/dataimport?command=delta-import&clean=false&commit=true" 2&> /dev/null |
更多请参阅官方文档:
http://mirrors.cnnic.cn/apache/lucene/solr/ref-guide/apache-solr-ref-guide-5.3.pdf
solr5.3.1 集群服务搭建的更多相关文章
- LVS负载均衡集群服务搭建详解(二)
lvs-nat模型构建 1.lvs-nat模型示意图 本次构建的lvs-nat模型的示意图如下,其中所有的服务器和测试客户端均使用VMware虚拟机模拟,所使用的CentOS 7 VS内核都支持ipv ...
- LVS负载均衡集群服务搭建详解(一)
LVS概述 1.LVS:Linux Virtual Server 四层交换(路由):根据请求报文的目标IP和目标PORT将其转发至后端主机集群中的某台服务器(根据调度算法): 不能够实现应用层的负载均 ...
- Nginx+Tomcat+Memcached负载均衡集群服务搭建
操作系统:CentOS6.5 本文档主要讲解,如何在CentOS6.5下搭建Nginx+Tomcat+Memcached负载均衡集群服务器,Nginx负责负载均衡,Tomcat负责实际服务,Memc ...
- cas4.2.7 集群服务搭建
cas服务端集群,网上资料很多,无非就是session共享,ticket共享. 但是session共享是必须的吗?或者能实现集群吗? 实践: 1. ticket共享,直接上代码 package org ...
- Redis6.0.6集群服务搭建
实现目标 一台主机上搭建3主3从高可用redis集群 环境 Linux :CentOS7 Redis : 6.0.6 准备工作 1.查看是否有安装wget命令,如果没有安装使用yum命令安装wgt命令 ...
- ZooKeeper一二事 - 搭建ZooKeeper伪分布式及正式集群 提供集群服务
集群真是好好玩,最近一段时间天天搞集群,redis缓存服务集群啦,solr搜索服务集群啦,,,巴拉巴拉 今天说说zookeeper,之前搭建了一个redis集群,用了6台机子,有些朋友电脑跑步起来,有 ...
- 使用Codis搭建redis集群服务
转(http://www.jianshu.com/p/f8e968e57863) 一. 应用场景 redis 作为数据结构存储引擎,有着很多优点 高性能单机引擎可以达到5-10W qps 数据结构全面 ...
- centos HA高可用集群 heartbeat搭建 heartbeat测试 主上停止heartbeat服务 测试脑裂 两边都禁用ping仲裁 第三十二节课
centos HA高可用集群 heartbeat搭建 heartbeat测试 主上停止heartbeat服务 测试脑裂 两边都禁用ping仲裁 第三十二节课 heartbeat是Linu ...
- CentOs7.3 搭建 SolrCloud 集群服务
一.概述 Lucene是一个Java语言编写的利用倒排原理实现的文本检索类库: Solr是以Lucene为基础实现的文本检索应用服务.Solr部署方式有单机方式.多机Master-Slaver方式.C ...
随机推荐
- C# 泛型2
我们在编写程序时,经常遇到两个模块的功能非常相似,只是一个是处理int数据,另一个是处理string数据,或者其他自定义的数据类型,但我们没有办法,只能分别写多个方法处理每个数据类型,因为方法的参数类 ...
- MySQL增删改查的常用操作指令总结
总结: 1.数据库操作: 创建库: create database db_name; 查询库: show databases; //显示所有的数据库 show create databases db_ ...
- 命令模式(Command)
1.本质: 封装请求 2.定义: 把一个请求封装为一个对象,从而使你可用不同的请求对客户进行参数化,对请求排队或记录请求日志,以及支持可撤销的操作 3.核心: 原本“行为请求者”和“行为执行者”是紧紧 ...
- hibernate映射关系之多对多
多对多: * 关系在第三张表中,和两张表本身没有关系 * 多对多谁维护关系:谁都能维护关系(效率是一样的),一般情况下可以通过页面 来体现 * 关系体现: 第三张表的维护:增加.删除 course类对 ...
- Mac使用rz、sz远程上传下载文件
习惯了 在windows下的securecrt和xshell的rz 和sz. rz 可以很方便的从客户端传文件到服务器,sz也可以很方便的从服务器传文件到客户端,就算中间隔着跳板机也不影响.在mac下 ...
- 基于Qt QGraphicsView的多点触摸绘图
本应用于基于QGraphicsView框架,实现多点触摸. 工程仅仅演示了多点触摸绘图,源自我前段时间一款基于Qt的绘图软件. 工程结构: kmp.h 定义了枚举 slide.h/cpp 定义了派生于 ...
- GlusterFS简单配置
1.准备工作 准备三台机器(物理机或者虚拟机均可)用于安装和测试GlusterFS,其中两台用作服务器,一台用作客户端,主机名分别为: Server1.zhaogang.int 10.0.21.24 ...
- launchpad bzr
在lp注册 一个 lp ID, 比如 alangwansui 然后添加 SSH keys.为自己的管理添加权限. 注册一个项目的 比如 melody. 然后就可以开始使用bzr 在这个项目下建 ...
- UFLDL实验报告1: Softmax Regression
PS:这些是今年4月份,跟斯坦福UFLDL教程时的实验报告,当时就应该好好整理的…留到现在好凌乱了 Softmax Regression实验报告 1.Softmax Regression实验描述 So ...
- android 开源项目学习
1.Android团队提供的示例项目 如果不是从学习Android SDK中提供的那些样例代码开始,可能没有更好的方法来掌握在Android这个框架上开发.由Android的核心开发团队提供了15个优 ...