OSPFv3实验配置(GNS3)
实验目的
1. 掌握 OSPFv3(v2) 的配置方法
2. 掌握在帧中继环境下 OSPFv3 (v2)的配置方法
3. 掌握 OSPFv3(v2) NSSA 的配置方法
4. 掌握外部路由汇总的配置
5. 掌握区域间路由的汇总配置
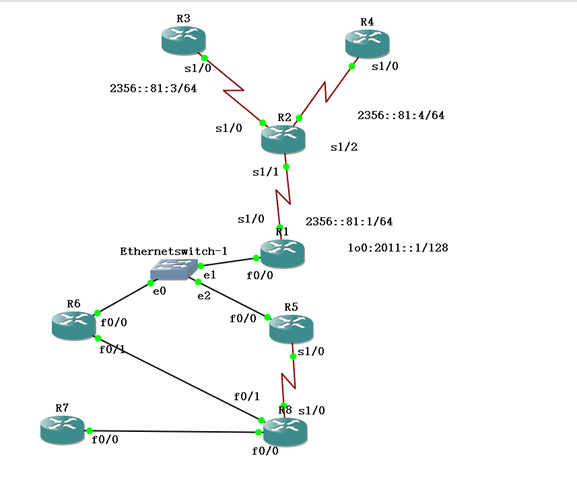
实验拓扑图
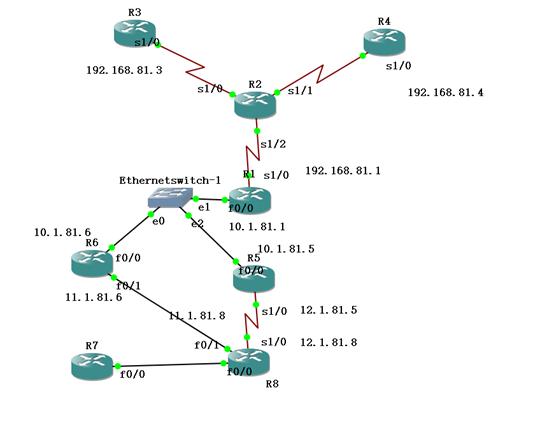
IPv4地址表
|
Device |
Interface |
IP Address |
|
R1 |
F 0/0 |
10.1.81.1 |
|
S 1/0 |
192.168.81.1 |
|
|
R3 |
S 1/0 |
192.168.81.3 |
|
R4 |
S 1/0 |
192.168.81.4 |
|
R5 |
F 0/0 |
10.1.81.5 |
|
S 1/0 |
12.1.81.5 |
|
|
R6 |
F 0/0 |
10.1.81.6 |
|
F 0/1 |
11.1.81.6 |
|
|
R8 |
F 0/1 |
11.1.81.8 |
|
S 1/0 |
12.1.81.8 |
步骤1:开启帧中继交换功能
R2(config)#frame-relay switching
步骤2:配置接口封装
R2(config)#int s 1/2
R2(config-if)#no shutdown
R2(config-if)#clock rate 128000
R2(config-if)#encapsulation frame-relay
R2(config)#int s 1/0
R2(config-if)#no shutdown
R2(config-if)#clock rate 128000
R2(config-if)#encapsulation frame-relay
R2(config)#int s 1/1
R2(config-if)#no shutdown
R2(config-if)#clock rate 128000
R2(config-if)#encapsulation frame-relay
(3) 步骤3:配置LMI类型
R2(config)#int s 1/2
R2(config-if)#frame-relay lmi-type cisco
R2(config-if)#frame-relay intf-type dce
R2(config)#int s 1/0
R2(config-if)#frame-relay lmi-type cisco
R2(config-if)#frame-relay intf-type dce
R2(config)#int s 1/1
R2(config-if)#frame-relay lmi-type cisco
R2(config-if)#frame-relay intf-type dce
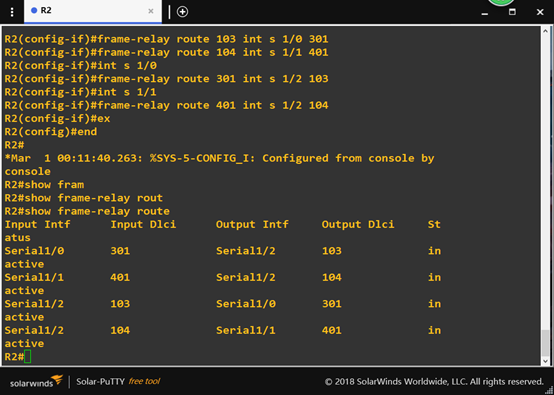
(4) 步骤4:配置帧中继交换表
R2(config)#int s 1/2
R2(config-if)#frame-relay route 103 interface s 1/0 301
R2(config-if)#frame-relay route 104 interface s 1/1 401
R2(config)#int Serial 1/0
R2(config-if)#frame-relay route 301 interface Serial1/2 103
R2(config)#int Serial 1/1
R2(config-if)#frame-relay route 401 interface Serial1/2 104
此时“show frame-relay route”
检查帧中继交换机是否正常
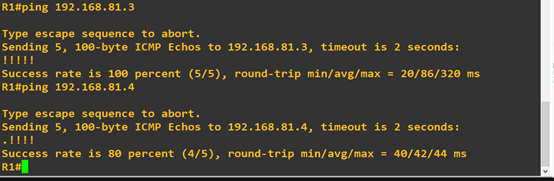
(5)步骤5:配置R1、R3、R4,使得它们能够互相通信
R1(config)#int s 1/0
R1(config-if)#ip address 192.168..81.1 255.255.255.0
R1(config-if)#no shutdown
R1(config-if)#encapsulation frame-relay
R1(config-if)#frame-relay lmi-type cisco
R1(config-if)#no frame-relay inverse-arp //关闭自动映射
R1(config-if)#frame-relay map ip 192.168.81.3 103 broadcast
R1(config-if)#frame-relay map ip 192.168.81.4 104 broadcast
R3(config)#int s 1/0
R3(config-if)#ip address 192.168.81.3 255.255.255.0
R3(config-if)#no shutdown
R3(config-if)#encapsulation frame-relay
R3(config-if)#no frame-relay inverse-arp
R3(config-if)#frame-relay map ip 192.168.81.1 301 broadcast
R4(config)#int s 1/0
R4(config-if)#ip address 192.168.81.4 255.255.255.0
R4(config-if)#no shutdown
R4(config-if)#encapsulation frame-relay
R4(config-if)#no frame-relay inverse-arp
R4(config-if)#frame-relay map ip 192.168.81.1 401 broadcast
进行ping命令测试
从R1ping到R3与R4
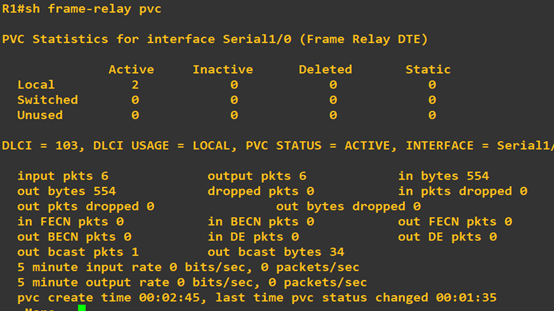
R1#show frame-relay PVC
发现已有两条本地连接
步骤6:开始配置ospf
先配置外部路由器ospf (R6、R1为例,R5.R8同理)
R6(config)#router ospf 1
R6(config-router)#router-id 6.6.6.6
R6 (config-router)#area 1 nssa――配置区域 1 为 NSSA 区域
R6(config)#interface loopback 0
R6(config-if)#ip add 6.6.6.6 255.255.255.255
R6(config)#int f 0/0
R6(config-if)#ip add 10.1.81.6 255.255.255.0
R6(config-if)#no shut
R6(config-if)#ip ospf 1 area 0
R6(config-if)#int f 0/1
R6(config-if)#ip add 11.1.81.6 255.255.255.0
R6(config-if)#no shut
R6(config-if)#ip ospf 1 area 1
R6(config-if)#ex
R6(config)#router ospf 1
R6(config-router)#network 6.6.6.6 0.0.0.0 area 0
R6(config-router)#network 10.1.81.0 0.0.0.255 area 0
R6(config-router)#network 11.1.81.0 0.0.0.255 area 1
R1(config)#router ospf 1
R1(config-router)#router-id 1.1.1.1
R1(config)#interface loopback 0
R1(config-if)#ip add 1.1.1.1 255.255.255.255
R1(config)#int f 0/0
R1(config-if)#ip add 10.1.81.1 255.255.255.0
R1(config-if)#no shut
R1(config-if)#ip ospf 1 area 0
R1(config-if)#int s 1/0
R1(config-if)#ip ospf 1 area 0
R1(config-if)#ex
R1(config)#router ospf 1
R1(config-router)#network 1.1.1.1 0.0.0.0 area 0
R1(config-router)#network 10.1.81.0 0.0.0.255 area 0
R1(config-router)#network 192.168.81.0 0.0.0.255 area 2
R1(config-router)#neighbor 192.168.81.3
R1(config-router)#neighbor 192.168.81.4
步骤7:配置帧中继中路由器的ospf (R3为例,R4同理)
R3(config)#router ospf 1
R3(config-router)#router-id 3.3.3.3
R3(config-router)#ex
R3(config)#int loopback 0
R3(config-if)#ip add 3.3.3.3 255.255.255.255
R3(config-if)#ip ospf 1 area 2
R3(config-if)#int s 1/0
R3(config-if)# ip ospf 1 area 2
R3(config-if)# ip ospf priority 0
R3(config)#router ospf 1
R3(config-router)#network 3.3.3.3 0.0.0.0 area 2
R3(config-router)#network 192.168.81.0 0.0.0.255 area 2
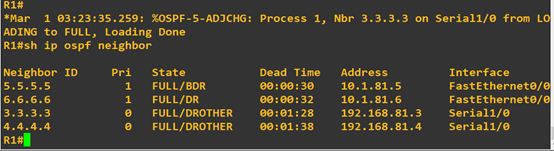
已完成OSPFv2配置,在R1上查ospf邻居关系
R1#show ipv6 ospf neighbor
测试路由通断情况
在R5上测试得出结果如下(从内部到外部皆ping通,实验完成)

因为RIPNG是针对IPV6设计的一种路由协议,不支持IPV4,所以在OSPFv2里并没有做RIPNG路由配置。
Ospfv3配置
IPv6地址表
|
Device |
Interface |
IPv6 Address |
|
R1 |
F 0/0 |
2123::81:1/64 |
|
S 1/0.1 |
2356::81:1/64 |
|
|
Loopback 0 |
2011::1/128 |
|
|
R3 |
S 1/0.1 |
2356::81:3/64 |
|
Loopback 0 |
2033::1/128 |
|
|
R3 |
S 1/0.1 |
2356::81:3/64 |
|
Loopback 0 |
2044::1/128 |
|
|
R5 |
F 0/0 |
2123::81:5/64 |
|
S 1/0 |
2027::81:5/64: |
|
|
Loopback 0 |
2055::1/128 |
|
|
R6 |
F 0/0 |
2123::81:6/64 |
|
Loopback 0 |
2066::1/128 |
|
|
Loopback 1 |
2166::1/128 |
|
|
R8 |
S 1/0 |
2027::81:8/64: |
|
Loopback 0 |
2088::1/128 |
帧中继R2配置与ospfv2相同。
1.完成接口 IPv6 地址的配置,注意不要忘记配置 loopback0
R1(config)#ipv6 unicast-routing ―――全局打开 IPv6 路由功能
R1config)#interface loopback 0
R1(config-if)#ipv6 enable
R1(config-if)#ipv6 address 2011::1/128―――配置 loopback0 接口地址
R1(config-if)#int f 0/0
R1(config-if)#ipv6 enable
R1(config-if)# ipv6 address 2123::81:1/64
R1(config-if)#no shut
R1(config-if)#int s 1/0
R1(config-if)#ipv6 enable
R1(config-if)# encapsulation frame-relay
R1(config-if)#no shut
R1(config)#interface serial 1/0.1 multipoint
R1(config-subif)#ipv6 address 2356::81:1/64
R1(config-subif)#frame-relay map ipv6 2356::81:3 103 broadcast
R1(config-subif)#frame-relay map ipv6 2356::81:4 104 broadcast
R1(config-subif)#frame-relay map ipv6 2356::81:1 104 broadcast
R1(config-subif)#frame-relay map ipv6 FE80::C804:1CFF:FE48:8 104 broadcast
R1(config-subif)#frame-relay map ipv6 FE80::C803:1CFF:FE48:8 103 broadcast
R3(config)#ipv6 unicast-routing
R3(config)#interface loopback 0
R3(config-if)#ipv6 address 2033::1/128
R3(config-if)#int s 1/0
R3(config-if)#ipv6 enable
R3(config-if)# encapsulation frame-relay
R3(config-if)#no shutdown
R3(config)#interface serial 1/0.1 multipoint
R3(config-subif)#ipv6 address 2356::81:3/64
R3(config-subif)#frame-relay map ipv6 2356::81:1 301 broadcast
R3(config-subif)#frame-relay map ipv6 2356::81:4 301 broadcast
R3(config-subif)#frame-relay map ipv6 2356::81:3 301 broadcast
R3(config-subif)#frame-relay map ipv6 FE80::C804:1CFF:FE48:8 304 broadcast
R3(config-subif)#frame-relay map ipv6 FE80::C801:1CFF:FE48:8 301 broadcast
R4(config)#ipv6 unicast-routing
R4(config)#interface loopback 0
R4(config-if)#ipv6 address 2044::1/128
R4(config-if)#int s 1/0
R4(config-if)#ipv6 enable
R4(config-if)# encapsulation frame-relay
R4(config-if)#no shutdown
R4(config)#interface serial 1/0.1 multipoint
R4(config-subif)#ipv6 address 2356::81:4/64
R4(config-subif)#frame-relay map ipv6 2356::81:1 401 broadcast
R4(config-subif)#frame-relay map ipv6 2356::81:4 401 broadcast
R4(config-subif)#frame-relay map ipv6 2356::81:3 401 broadcast
R4(config-subif)#frame-relay map ipv6 FE80::C803:1CFF:FE48:8 403 broadcast
R4(config-subif)#frame-relay map ipv6 FE80::C801:1CFF:FE48:8 401 broadcast
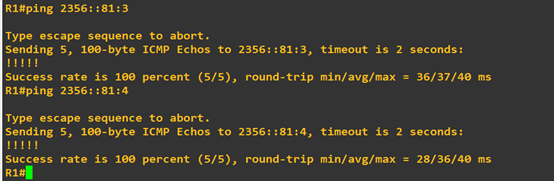
试R1上ping通 R3.R4
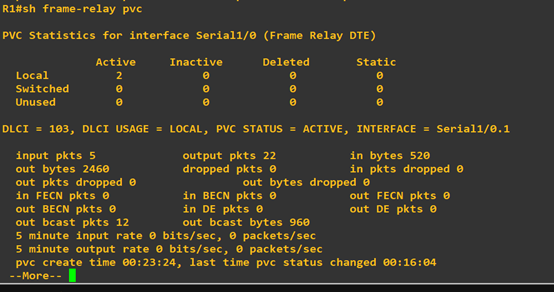
用show frame-relay pvc命令查看,帧中继配置完成
2. 按实验拓扑图标识的区域,完成 OSPFv3 的基本配置。区域 1 为 NSSA 区域。
R6(config)#ipv6 unicast-routing
R6(config)#ipv6 router ospf 1―――启动 OSPFv3 进程
R6(config-rtr)#router-id 6.6.6.6
R6(config-rtr)#area 1 nssa――配置区域 1 为 NSSA 区域
R6(config-rtr)#int f 0/0
R6(config-if)#ipv6 enable
R6(config-if)# ipv6 ospf 1 area 0
R6(config-if)#no shutdown
R6(config-if)#int loopback 0
R6(config-if)#ipv6 enable
R6(config-if)#ipv6 address 2066::1/128
R6(config-if)# ipv6 ospf 1 area 0
R6(config-if)#int f 0/1
R6(config-if)#ipv6 enable
R6(config-if)# ipv6 ospf 1 area 1
R6(config-if)#no shutdown
R5(config)#ipv6 unicast-routing
R5(config)#ipv6 router ospf 1―――启动 OSPFv3 进程
R5(config-rtr)#router-id 5.5.5.5
R5(config-rtr)#area 1 nssa――配置区域 1 为 NSSA 区域
R5(config-rtr)#int f 0/0
R5(config-if)#ipv6 enable
R5(config-if)# ipv6 ospf 1 area 0
R5(config-if)#no shutdown
R5(config-if)#int loopback 0
R5(config-if)#ipv6 enable
R5(config-if)#ipv6 address 2055::1/128
R5(config-if)# ipv6 ospf 1 area 0
R5(config-if)#int s 1/0
R5(config-if)#ipv6 enable
R5(config-if)# ipv6 ospf 1 area 1
R5(config-if)#no shutdown
R1(config)#ipv6 unicast-routing
R1(config)#ipv6 router ospf 1―――启动 OSPFv3 进程
R1(config-rtr)#router-id 1.1.1.1
R1(config-rtr)#int f 0/0
R1(config-if)#ipv6 enable
R1(config-if)# ipv6 ospf 1 area 0
R1(config-if)#no shutdown
R1(config-if)#int loopback 0
R1(config-if)#ipv6 enable
R1(config-if)#ipv6 address 2011::1/128
R1(config-if)# ipv6 ospf 1 area 0
R1(config-if)#int s 1/0.1
R1(config-subif)#ipv6 enable
R1(config-subif)# ipv6 ospf 1 area 2
R1(config-subif)#ipv6 ospf neighbor FE80::C803:1CFF:FE48:8
R1(config-subif)#ipv6 ospf neighbor FE80::C804:1CFF:FE48:8
R1(config-subif)# ipv6 address FE80::C801:1CFF:FE48:8 link-local
R3(config)#ipv6 router ospf 1
R3(config-rtr)#router-id 5.5.5.5
R3(config-rtr)#int loopback 0
R3(config-if)#ipv6 enable
R3(config-if)#ipv6 address 2033::1/128
R3(config-if)# ipv6 ospf 1 area 2
R3(config-if)#int s 1/0.1
R3(config-subif)#ipv6 enable
R3(config-subif)# ipv6 ospf 1 area 2
R3(config-subif)# ipv6 ospf priority 0
R3(config-subif)# ipv6 address FE80::C803:1CFF:FE48:8 link-local
R4config)#ipv6 router ospf 1
R4config-rtr)#router-id 4.4.4.4
R4config-rtr)#int loopback 0
R4config-if)#ipv6 enable
R4(config-if)#ipv6 address 2044::1/128
R4(config-if)# ipv6 ospf 1 area 2
R4(config-if)#int s 1/0.1
R4(config-subif)#ipv6 enable
R4(config-subif)# ipv6 ospf 1 area 2
R4(config-subif)# ipv6 ospf priority 0
R4(config-subif)# ipv6 address FE80::C804:1CFF:FE48:8 link-local
R8(config)#ipv6 unicast-routing
R8(config)#ipv6 router ospf 1―――启动 OSPFv3 进程
R8(config-rtr)#router-id 8.8.8.8
R8(config-rtr)#area 1 nssa――配置区域 1 为 NSSA 区域
R8(config-rtr)#int s 1/0
R8(config-if)#ipv6 enable
R8(config-if)# ipv6 ospf 1 area 1
R8(config-if)#no shutdown
R8(config-if)#int loopback 0
R8(config-if)#ipv6 enable
R8(config-if)#ipv6 address 2088::1/128
R8(config-if)# ipv6 ospf 1 area 1
R8(config-if)#int f 0/1
R8(config-if)#ipv6 enable
R8(config-if)# ipv6 ospf 1 area 1
R8(config-if)#no shutdown
3.检查 OSPFv3 的邻居关系
在 R31上检查,可以看到邻居的 Router-ID 都是用 IPv4 的地址格式标识
R1#show ipv6 ospf neighbor
4.测试路由通断情况在R3测试,Ospfv3配置成功。
本实验步骤引入外部路由类型 5 和外部路由类型 7
1) 在 R6 上新增加一个 loopback1 接口,地址为 2166::1/128,然后重分布进入 OSPFv3
R6(config)#interface loopback 1
R6(config-if)#ipv6 address 2166::1/128
R6(config-if)#exit
R6(config)#ipv6 router ospf 1
R6(config-rtr)#redistribute connected
配置 R7 和 R8 的 RIPng,然后重分布 RIPng 到 OSPFv3
R7(config)#ipv6 router rip yeslab
R7(config-rtr)#exit
R7(config)#interface fastEthernet 0/0
R7(config-if)#ipv6 rip yeslab enable
R7(config-if)#exit
R8(config)#ipv6 router rip yeslab
R8(config-rtr)#exit
R8(config)#interface fastEthernet 0/0
R8(config-if)#ipv6 rip yeslab enable
R8(config-if)#exit
R8(config)#ipv6 router ospf 1
R8(config-rtr)#redistribute rip yeslab―――重分布 RIPng 到 OSPFv3
R8(config-rtr)#redistribute connected―――由于重分布 RIPng,不能把连接 R8 的接口网段重分布进入OSPFv3,因此重分布直连,把连接 R8 的网段重分布到 OSPFv3
OSPFv3实验配置(GNS3)的更多相关文章
- OSPFv3综合实验(GNS3)
一.实验目的 1. 掌握 OSPFv3(v2) 的配置方法 2. 掌握在帧中继环境下 OSPFv3 (v2)的配置方法 3. 掌握 OSPFv3(v2) NSSA 的配置方法 4. 掌握外部路 ...
- 详解eNSP下的单臂路由模拟实验配置
不同VLAN之间的通信可以通过两种方式:单臂路由和三层交换机.其中,单臂路由是通过路由子接口,交换机的某个端口以trunk的方式与路由器的某个端口相连,同时路由器的链接端口配置子接口,配置子接口承载的 ...
- ipv6地址配置实验(GNS3/ENSP)
实验拓扑: IPV6地址配置如图所示, 配置ipv6指令(以R2为例,R1类似): int e1/2 R2(config-if)#ipv6 address 2001:db08:acad:1::2/64 ...
- “大地主”IPv6的地址实验配置
上一篇文章,我们简单的介绍了一下IPv6协议的邻居发现BD和简单的基础配置,这里我们通过实验观察一下 IPv6邻居发现中会发送的报文,顺便熟悉一下,新的地址配置 根据拓扑图配置地址 这里原理和IPv4 ...
- 详解eNSP下的PPP之MP、PAP/CHAP认证实验配置
一.PPP MP实验(用虚拟模板配置) 1.拓扑图
- 一些LVS实验配置、工具和方案
最近做了一些LVS配置和方案的验证实验,将过程中用到的一些配置.工具和具体的解决方案记录一下.使用DR模式.验证一种不中断业务的RealServer升级或者重启方案. 网络规划: 节点 IP地址 ce ...
- ENSP静态链路聚合实验配置要点及实例
链路聚合分为:静态链路聚合.动态链路聚合链路聚合的负载分担模式:对于二层数据流,系统会根据MAC地址(源mac地址和目的mac地址来计算),而对于三层数据流则会根据ip地址来进行负载分担计算. 静态链 ...
- 实验配置cisco单臂路由
第一步 搭建实验拓扑图 第二步 对路由器做基本配置 为路由器创建名称: 设置进入特权模式 口令:控制台登录密码:vty登录密码 禁用DNS查找: 加密明文密码: 创建一个向访问设备者发出警告的标语&q ...
- 【iCore3 双核心板_FPGA】例程四:Tcl脚本实验——配置引脚
实验指导书及代码包下载: http://pan.baidu.com/s/1pJZDz0v iCore3 购买链接: https://item.taobao.com/item.htm?id=524229 ...
随机推荐
- 一:SqlServer中的 CEILING函数和 FLOOR函数以及ROUND()
例如 1.ROUND() 格式为ROUND(y1,y2,y3) y1:要被四舍五入的数字y2:保留的小数位数 y3:为0,可以不写,y1进行四舍五入,不为0则y1不进入四舍五入,如果y1有值就直接根据 ...
- Linux学习历程——Centos 7 ls命令
一.命令介绍 ls命令用于显示目录中的信息. ----------------------------------------------------------------------------- ...
- python崩溃到现在居然还没有放弃的Day07
今天新入一个全新的知识面,叫做深浅拷贝,拷贝英文名copy,俗称复制,作为一个火影迷就会想到拷贝忍者旗木卡卡西,跑题了,在所有的数据存储时,都会有内存地址和存储地址,浅拷贝只拷贝第一层的内存地址,深拷 ...
- 数据结构学习之字符串匹配算法(BF||KMP)
数据结构学习之字符串匹配算法(BF||KMP) 0x1 实验目的 通过实验深入了解字符串常用的匹配算法(BF暴力匹配.KMP.优化KMP算法)思想. 0x2 实验要求 编写出BF暴力匹配.KM ...
- MySQL慢查询&执行计划
参考文章: https://blog.csdn.net/tiantianw/article/details/53334566 http://www.cnblogs.com/luyucheng/p/62 ...
- 我用Python爬取了李沧最近一年多的二手房成交数据得出以下结论
前言 去年年底,博主有购房的意愿,本来是打算在青岛市北购房,怎奈工作变动,意向转移到了李沧,坐等了半年以后,最终选择在红岛附近购置了期房. 也许一些知道青岛红岛的小伙伴会问我,为什么会跑到那鸟不拉屎的 ...
- spring boot 打包war
@SpringBootApplication public class AesApplication extends SpringBootServletInitializer { public sta ...
- 高橋君とカード / Tak and Cards AtCoder - 2037 (DP)
Problem Statement Tak has N cards. On the i-th (1≤i≤N) card is written an integer xi. He is selectin ...
- 纯手工搭建VS 2017(社区 免费版)离线安装包
不知不觉中,史上功能最强大的Visual Studio 2017版本发于美国时间2017年3月8日正式在发布了,但是由于版本更新速度加快和与第三方工具包集成的原因,微软研发团队没有为这个版本提供离线下 ...
- Windows之常用命令
1. 重启/关机 shutdown命令 #关机 shutdown -s -t -f #重启 shutdown -r -t //30秒之后,重启 00是立即 #注销 shutdown -l -t #休眠 ...