
OSPFv3综合实验(GNS3)
一、实验目的
1. 掌握 OSPFv3(v2) 的配置方法
2. 掌握在帧中继环境下 OSPFv3 (v2)的配置方法
3. 掌握 OSPFv3(v2) NSSA 的配置方法
4. 掌握外部路由汇总的配置
5. 掌握区域间路由的汇总配置
二、OSPFv2实验拓扑图
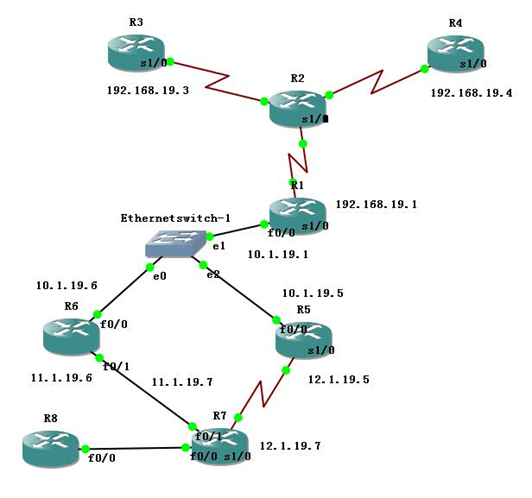
三、OSPFv2网络地址规划
IPv4地址表
|
Device |
Interface |
IP Address |
|
R1 |
F0/0 |
10.1.19.1 |
|
S1/0 |
192.168.19.1 |
|
|
R3 |
S1/0 |
192.168.19.3 |
|
R4 |
S1/0 |
192.168.19.4 |
|
R5 |
F0/0 |
10.1.19.5 |
|
S1/0 |
12.1.19.5 |
|
|
R6 |
F0/0 |
10.1.19.6 |
|
F0/1 |
11.1.19.6 |
|
|
R7 |
F0/1 |
11.1.19.7 |
|
S1/0 |
12.1.19.7 |
|
|
R8 |
||
四、OSPFv2配置步骤
步骤1:开启R2帧中继交换功能
R2(config)#frame-relay switching
步骤2:配置各接口封装
R2(config)#interface Serial 1/2
R2(config-if)#no shutdown
R2(config-if)#clock rate 128000
R2(config-if)#encapsulation frame-relay
R2(config)#interface Serial 1/0
R2(config-if)#no shutdown
R2(config-if)#clock rate 128000
R2(config-if)#encapsulation frame-relay
R2(config)#interface Serial 1/1
R2(config-if)#no shutdown
R2(config-if)#clock rate 128000
R2(config-if)#encapsulation frame-relay
步骤3:配置LMI类型
R2(config)#interface Serial 1/2
R2(config-if)#frame-relay lmi-type cisco
R2(config-if)#frame-relay intf-type dce
R2(config)#interface Serial 1/0
R2(config-if)#frame-relay lmi-type cisco
R2(config-if)#frame-relay intf-type dce
R2(config)#interface Serial 1/1
R2(config-if)#frame-relay lmi-type cisco
R2(config-if)#frame-relay intf-type dce
步骤4:配置帧中继交换表
R2(config)#interface Serial 1/2
R2(config-if)#frame-relay route 103 interface Serial 1/0 301
R2(config-if)#frame-relay route 104 interface Serial 1/1 401
R2(config)#interface Serial 1/0
R2(config-if)#frame-relay route 301 interface Serial 1/2 103
R2(config)#interface Serial 1/1
R2(config-if)#frame-relay route 401 interface Serial 1/2 104
此时执行命令“show frame-relay route”来检查帧中继交换机是否正常:

步骤5:配置R1、R3、R4,使得它们能够互相通信
R1(config)#interface Serial 1/0
R1(config-if)#ip address 192.168.19.1 255.255.255.0
R1(config-if)#no shutdown
R1(config-if)#encapsulation frame-relay
R1(config-if)#frame-relay lmi-type cisco
R1(config-if)#no frame-relay inverse-arp //关闭自动映射
R1(config-if)#frame-relay map ip 192.168.19.3 103 broadcast
R1(config-if)#frame-relay map ip 192.168.19.4 104 broadcast
R3(config)#interface Serial 1/0
R3(config-if)#ip address 192.168.19.3 255.255.255.0
R3(config-if)#no shutdown
R3(config-if)#encapsulation frame-relay
R3(config-if)#no frame-relay inverse-arp
R3(config-if)#frame-relay map ip 192.168.19.1 301 broadcast
R4(config)#interface Serial 1/0
R4(config-if)#ip address 192.168.19.4 255.255.255.0
R4(config-if)#no shutdown
R4(config-if)#encapsulation frame-relay
R4(config-if)#no frame-relay inverse-arp
R4(config-if)#frame-relay map ip 192.168.19.1 401 broadcast
执行ping命令测试:
R1 ping R3与R4

在R1执行命令“show frame-relay PVC”
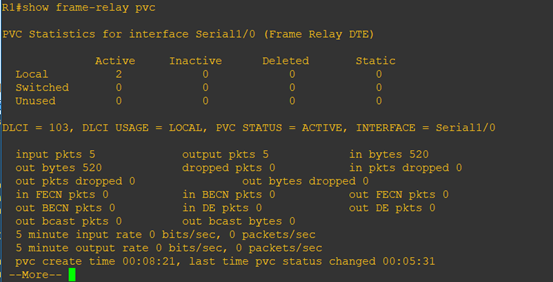
显示存在两条本地连接。
步骤6:开始配置OSPF
先配置外部路由器OSPF(配置以R6、R1为例,R5、R7同理)
R6(config)#router ospf 1
R6(config-router)#router-id 6.6.6.6
R6(config-router)#area 1 nssa //配置区域 1为 NSSA 区域
R6(config)#interface loopback 0
R6(config-if)#ip address 6.6.6.6 255.255.255.255
R6(config)#interface FastEthernet 0/0
R6(config-if)#ip address 10.1.19.6 255.255.255.0
R6(config-if)#no shutdown
R6(config-if)#ip ospf 1 area 0
R6(config-if)#interface FastEthernet 0/1
R6(config-if)#ip address 11.1.19.6 255.255.255.0
R6(config-if)#no shutdown
R6(config-if)#ip ospf 1 area 1
R6(config-if)#exit
R6(config)#router ospf 1
R6(config-router)#network 6.6.6.6 0.0.0.0 area 0
R6(config-router)#network 10.1.19.0 0.0.0.255 area 0
R6(config-router)#network 11.1.19.0 0.0.0.255 area 1
R1(config)#router ospf 1
R1(config-router)#router-id 1.1.1.1
R1(config)#interface loopback 0
R1(config-if)#ip address 1.1.1.1 255.255.255.255
R1(config)#interface FastEthernet 0/0
R1(config-if)#ip add 10.1.19.1 255.255.255.0
R1(config-if)#no shutdown
R1(config-if)#ip ospf 1 area 0
R1(config-if)#interface Serial 1/0
R1(config-if)#ip ospf 1 area 0
R1(config-if)#exit
R1(config)#router ospf 1
R1(config-router)#network 1.1.1.1 0.0.0.0 area 0
R1(config-router)#network 10.1.19.0 0.0.0.255 area 0
R1(config-router)#network 192.168.19.0 0.0.0.255 area 2
R1(config-router)#neighbor 192.168.19.3
R1(config-router)#neighbor 192.168.19.4
步骤7:配置帧中继中路由器的OSPF(以R3为例,R4同理)
R3(config)#router ospf 1
R3(config-router)#router-id 3.3.3.3
R3(config-router)#exit
R3(config)#interface loopback 0
R3(config-if)#ip address 3.3.3.3 255.255.255.255
R3(config-if)#ip ospf 1 area 2
R3(config-if)# interface Serial 1/0
R3(config-if)# ip ospf 1 area 2
R3(config-if)# ip ospf priority 0
R3(config)#router ospf 1
R3(config-router)#network 3.3.3.3 0.0.0.0 area 2
R3(config-router)#network 192.168.19.0 0.0.0.255 area 2
此时已完成OSPFv2配置,在R1上查OSPF邻居关系:
R1#show ipv6 ospf neighbor
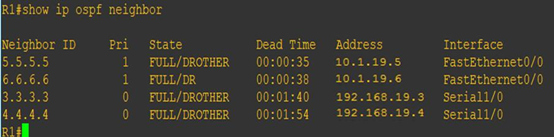
接着测试路由通断情况,在R5上测试得出结果如下:

从内部到外部皆ping通,实验完成。
五、OSPFv3实验拓扑图

六、OSPFv3网络地址规划
IPv6地址表
|
Device |
Interface |
IPv6 Address |
|
R1 |
F0/0 |
2123::19:1/64 |
|
S1/0.1 |
2356::19:1/64 |
|
|
Loopback 0 |
2011:19::1/128 |
|
|
R3 |
S1/0.1 |
2356::19:3/64 |
|
Loopback 0 |
2033:19::1/128 |
|
|
R4 |
S1/0.1 |
2356::19:4/64 |
|
Loopback 0 |
2044:19::1/128 |
|
|
R5 |
F0/0 |
2123::19:5/64 |
|
S1/0 |
2027::19:5/64 |
|
|
Loopback 0 |
2055:19::1/128 |
|
|
R6 |
F0/0 |
2123::19:6/64 |
|
Loopback 0 |
2066:19::1/128 |
|
|
Loopback 1 |
2166:19::1/128 |
|
|
R7 |
S1/0 |
2027::19:7/64 |
|
Loopback 0 |
2077:19::1/128 |
七、OSPFv3配置步骤
帧中继R2配置与第二部分OSPFv2相同。
步骤1:完成接口 IPv6地址的配置,并且在路由上配置 loopback0
R1(config)#ipv6 unicast-routing //全局打开 IPv6路由功能
R1config)#interface loopback 0
R1(config-if)#ipv6 enable
R1(config-if)#ipv6 address 2011:19::1/128 //配置 loopback0接口地址
R1(config-if)#interface FastEthernet 0/0
R1(config-if)#ipv6 enable
R1(config-if)#ipv6 address 2123::19:1/64
R1(config-if)#no shutdown
R1(config-if)#interface Serial 1/0
R1(config-if)#ipv6 enable
R1(config-if)# encapsulation frame-relay
R1(config-if)#no shutdown
R1(config)#interface serial 1/0.1 multipoint
R1(config-subif)#ipv6 address 2356::19:1/64
R1(config-subif)#frame-relay map ipv6 2356::19:3 103 broadcast
R1(config-subif)#frame-relay map ipv6 2356::19:4 104 broadcast
R1(config-subif)#frame-relay map ipv6 2356::19:1 104 broadcast
R1(config-subif)#frame-relay map ipv6 FE80::C804:1CFF:FE48:8 104 broadcast
R1(config-subif)#frame-relay map ipv6 FE80::C803:1CFF:FE48:8 103 broadcast
R3(config)#ipv6 unicast-routing
R3(config)#interface loopback 0
R3(config-if)#ipv6 address 2033:19::1/128
R3(config-if)# interface Serial 1/0
R3(config-if)#ipv6 enable
R3(config-if)# encapsulation frame-relay
R3(config-if)#no shutdown
R3(config)#interface serial 1/0.1 multipoint
R3(config-subif)#ipv6 address 2356::19:3/64
R3(config-subif)#frame-relay map ipv6 2356::19:1 301 broadcast
R3(config-subif)#frame-relay map ipv6 2356::19:4 301 broadcast
R3(config-subif)#frame-relay map ipv6 2356::19:3 301 broadcast
R3(config-subif)#frame-relay map ipv6 FE80::C804:1CFF:FE48:8 304 broadcast
R3(config-subif)#frame-relay map ipv6 FE80::C801:1CFF:FE48:8 301 broadcast
R4(config)#ipv6 unicast-routing
R4(config)#interface loopback 0
R4(config-if)#ipv6 address 2044:19::1/128
R4(config-if)# interface Serial 1/0
R4(config-if)#ipv6 enable
R4(config-if)# encapsulation frame-relay
R4(config-if)#no shutdown
R4(config)#interface serial 1/0.1 multipoint
R4(config-subif)#ipv6 address 2356::19:4/64
R4(config-subif)#frame-relay map ipv6 2356::19:1 401 broadcast
R4(config-subif)#frame-relay map ipv6 2356::19:4 401 broadcast
R4(config-subif)#frame-relay map ipv6 2356::19:3 401 broadcast
R4(config-subif)#frame-relay map ipv6 FE80::C803:1CFF:FE48:8 403 broadcast
R4(config-subif)#frame-relay map ipv6 FE80::C801:1CFF:FE48:8 401 broadcast
执行ping命令测试:
尝试R1上ping通 R3和R4
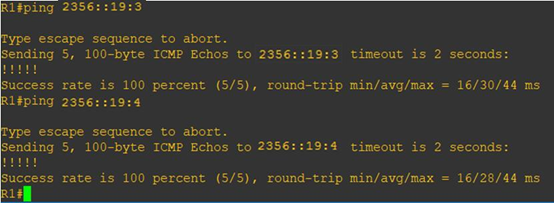
用“show frame-relay pvc”命令查看:

帧中继配置完成。
步骤2:按实验拓扑图标识的区域,完成 OSPFv3的基本配置。其中区域 1为 NSSA 区域。
R6(config)#ipv6 unicast-routing
R6(config)#ipv6 router ospf 1 //启动 OSPFv3进程
R6(config-rtr)#router-id 6.6.6.6
R6(config-rtr)#area 1 nssa //配置区域 1为 NSSA 区域
R6(config-rtr)#interface FastEthernet 0/0
R6(config-if)#ipv6 enable
R6(config-if)# ipv6 ospf 1 area 0
R6(config-if)#no shutdown
R6(config-if)#int loopback 0
R6(config-if)#ipv6 enable
R6(config-if)#ipv6 address 2066:19::1/128
R6(config-if)# ipv6 ospf 1 area 0
R6(config-if)#interface FastEthernet 0/1
R6(config-if)#ipv6 enable
R6(config-if)# ipv6 ospf 1 area 1
R6(config-if)#no shutdown
R5(config)#ipv6 unicast-routing
R5(config)#ipv6 router ospf 1 //启动 OSPFv3进程
R5(config-rtr)#router-id 5.5.5.5
R5(config-rtr)#area 1 nssa //配置区域 1 为 NSSA 区域
R5(config-rtr)#interface FastEthernet 0/0
R5(config-if)#ipv6 enable
R5(config-if)# ipv6 ospf 1 area 0
R5(config-if)#no shutdown
R5(config-if)#int loopback 0
R5(config-if)#ipv6 enable
R5(config-if)#ipv6 address 2055:19::1/128
R5(config-if)# ipv6 ospf 1 area 0
R5(config-if)#interface Serial 1/0
R5(config-if)#ipv6 enable
R5(config-if)# ipv6 ospf 1 area 1
R5(config-if)#no shutdown
R1(config)#ipv6 unicast-routing
R1(config)#ipv6 router ospf 1 //启动 OSPFv3 进程
R1(config-rtr)#router-id 1.1.1.1
R1(config-rtr)#interface FastEthernet 0/0
R1(config-if)#ipv6 enable
R1(config-if)# ipv6 ospf 1 area 0
R1(config-if)#no shutdown
R1(config-if)#int loopback 0
R1(config-if)#ipv6 enable
R1(config-if)#ipv6 address 2011:19::1/128
R1(config-if)# ipv6 ospf 1 area 0
R1(config-if)#interface Serial 1/0.1
R1(config-subif)#ipv6 enable
R1(config-subif)# ipv6 ospf 1 area 2
R1(config-subif)#ipv6 ospf neighbor FE80::C803:1CFF:FE48:8
R1(config-subif)#ipv6 ospf neighbor FE80::C804:1CFF:FE48:8
R1(config-subif)# ipv6 address FE80::C801:1CFF:FE48:8 link-local
R3(config)#ipv6 router ospf 1
R3(config-rtr)#router-id 3.3.3.3
R3(config-rtr)#interface loopback 0
R3(config-if)#ipv6 enable
R3(config-if)#ipv6 address 2033:19::1/128
R3(config-if)# ipv6 ospf 1 area 2
R3(config-if)#interface Serial 1/0.1
R3(config-subif)#ipv6 enable
R3(config-subif)# ipv6 ospf 1 area 2
R3(config-subif)# ipv6 ospf priority 0
R3(config-subif)# ipv6 address FE80::C803:1CFF:FE48:8 link-local
R4config)#ipv6 router ospf 1
R4config-rtr)#router-id 4.4.4.4
R4config-rtr)#interface loopback 0
R4config-if)#ipv6 enable
R4(config-if)#ipv6 address 2044:19::1/128
R4(config-if)# ipv6 ospf 1 area 2
R4(config-if)#interface Serial 1/0.1
R4(config-subif)#ipv6 enable
R4(config-subif)# ipv6 ospf 1 area 2
R4(config-subif)# ipv6 ospf priority 0
R4(config-subif)# ipv6 address FE80::C804:1CFF:FE48:8 link-local
R7(config)#ipv6 unicast-routing
R7(config)#ipv6 router ospf 1 //启动 OSPFv3进程
R7(config-rtr)#router-id 7.7.7.7
R7(config-rtr)#area 1 nssa //配置区域 1为 NSSA 区域
R7(config-rtr)#int s 1/0
R7(config-if)#ipv6 enable
R7(config-if)# ipv6 ospf 1 area 1
R7(config-if)#no shutdown
R7(config-if)#int loopback 0
R7(config-if)#ipv6 enable
R7(config-if)#ipv6 address 2077:19::1/128
R7(config-if)# ipv6 ospf 1 area 1
R7(config-if)#interface FastEthernet 0/1
R7(config-if)#ipv6 enable
R7(config-if)# ipv6 ospf 1 area 1
R7(config-if)#no shutdown
步骤3:检查 OSPFv3的邻居关系
R3上检查,可以看到邻居的 Router-ID都是用 IPv4的地址格式标识
R1#show ipv6 ospf neighbor

步骤4:测试路由通断情况在R4测试,OSPFv3配置成功
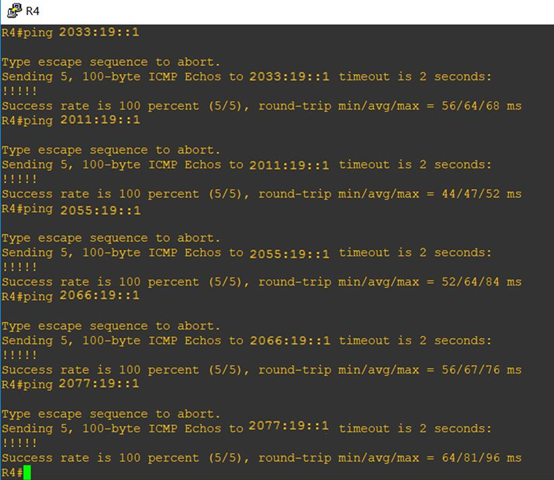
在本实验步骤基础上引入外部路由类型 5和外部路由类型 7
(1) 在 R6上新增加一个loopback1接口,地址为2166::1/128,然后重分布进入OSPFv3:
R6(config)#interface loopback 1
R6(config-if)#ipv6 address 2166:19::1/128
R6(config-if)#exit
R6(config)#ipv6 router ospf 1
R6(config-rtr)#redistribute connected
(2)配置R7和R8的RIPng,然后重分布RIPng 到OSPFv3:
R8(config)#ipv6 router rip yeslab
R8(config-rtr)#exit
R8(config)#interface FastEthernet 0/0
R8(config-if)#ipv6 rip yeslab enable
R8(config-if)#exit
R7(config)#ipv6 router rip yeslab
R7(config-rtr)#exit
R7(config)#interface FastEthernet 0/0
R7(config-if)#ipv6 rip yeslab enable
R7(config-if)#exit
R7(config)#ipv6 router ospf 1
R7(config-rtr)#redistribute rip yeslab //重分布RIPng到OSPFv3
R7(config-rtr)#redistribute connected
//由于重分布RIPng,不能把连接R7的接口网段重分布进入OSPFv3,因此重分布直连,把连接R7的网段重分布到OSPFv3
八、心得体会
本次实验在IPv4的OSPFv2实验配置基础上进行IPv6的OSPFv3实验配置,在配置中遇到了许多问题,包括IPv6地址的路由分配以及在OSPFv3的步骤基础上引入RIPng重分布,在与小组成员的讨论中合理进行了组网规划并确定好OSPF区域,在这一环节上加深了对OSPF的理解。通过OSPFv2以及OSPFv3对比实验,也让我明白了IPv4和IPv6的异同,为之后的IP课程学习打下了良好的基础。
OSPFv3综合实验(GNS3)的更多相关文章
- 第三组 通信一班 030 OSPFv2、OSPFv3综合实验
一. 实验目的 掌握 OSPFv2. OSPFv3 的配置方法 掌握在帧中继环境下OSPFv2. OSPFv3 的配置方法 掌握 OSPFv2. OSPFv3 NSSA 的配置方法 ...
- OSPFV3综合实验 (第三组)
拓扑图 本次试验规划:拓扑分4个区域,其中区域2采用帧中继实现区域内互通的前提下配置OSPF.ospfv3.R7与R8之间配置rip实现互通,区域1作为nssa区域,实现路由注入.最终实现全局互通. ...
- 第九组 通信3班 063 OSPFv2与OSPFv3综合实验
实验目的 1. 掌握 OSPFv3(v2) 的配置方法 2. 掌握在帧中继环境下 OSPFv3 (v2)的配置方法 3. 掌握 OSPFv3(v2) NSSA 的配置方法 4. 掌握外部路由汇总的配置 ...
- 【Linux程序设计】之环境系统函数综合实验
这个系列的博客贴的都是我大二的时候学习Linux系统高级编程时的一些实验程序,都挺简单的.贴出来纯粹是聊胜于无. 实验题目:Linux环境下系统函数综合实验 实验目的:熟悉并掌握Linux环境下数学函 ...
- CCNP第四天 OSPF综合实验(1)
ospf综合实验(1) 本实验主要考察ospf中的接口上的多种工作方式 实验如图所示: 所用拓扑为CCNP标准版,如图: --------------------------------------- ...
- (6综合实验)从零开始的嵌入式图像图像处理(PI+QT+OpenCV)实战演练
从零开始的嵌入式图像图像处理(PI+QT+OpenCV)实战演练 1综述http://www.cnblogs.com/jsxyhelu/p/7907241.html2环境架设http://www.cn ...
- 华为路由交换综合实验 ---IA阶段
目录 华为路由交换综合实验 ---IA阶段 实验拓扑 实验需求 华为路由交换综合实验 ---IA阶段 实验拓扑 实验需求 根据拓扑合理规划IP地址以及VLANIf地址(PC1属于运营部,PC2属于市场 ...
- CCNA 之 综合实验
CCNA 综合实验 需要:根据下列图中的网路拓扑,搭建环境; PC1属于VLAN10:PC2属于VLAN20:网关均在OR_C2811: VLAN10.20对应的网段分别为192.168.10.0.2 ...
- OSPF与ACL综合实验
OSPF与ACL综合实验 1.实验内容 (1)企业内网运行OSPF路由协议,区域规划如拓扑图所示(见3.实验拓扑图): (2)财务和研发所在的区域不受其他区域链路不稳定性影响: (3)R1.R2.R3 ...
随机推荐
- django 三种缓存模式的使用及注意点
Django 缓存模式的使用(主要针对RestFul设计模式的项目) 有三种模式: 全站使用缓存模式(整个项目每个接口都会使用缓存,缺点:所以接口都无法实时性获取数据) 单独视图缓存模式(单个接口使用 ...
- Python的内置函数
python的内置函数一共有68个,下面将简单介绍各个函数的功能. abs() dict() help() min() setattr() all() dir() hex() next() slice ...
- jinja2 把文本变成html
data 是传过去的值 过滤器 | {{data.name | safe}}
- WebView内容自适应
webview页面自适应 //适应内容大小 start webSetting.setUseWideViewPort(true); webSetting.setLayoutAlgorithm(WebSe ...
- reg 和wire 区别
reg相当于存储单元,wire相当于物理连线 Verilog 中变量的物理数据分为线型和寄存器型.这两种类型的变量在定义时要设置位宽,缺省为1位.变量的每一位可以是0,1,X,Z.其中x代表一个未被预 ...
- 使用Java创建指定大小的空文件夹
/** 方法一 * 创建固定大小的文件 * @param file * @param length * @throws IOException */ public static void create ...
- 必做作业3:短视频编辑app原型化系统
本app立足于打造短视频分享交流社区,app不仅有视频编辑的功能,还有视频的分享和收藏功能.系统有登录.注册.找回密码的功能,可以进行账号资料管理,并可以管理自己的视频.分享和收藏.系统可以对视频进行 ...
- java面试题复习(六)
51.实现多线程的方法 一种是继承Thread类:另一种是实现Runnable接口.两种方式都要通过重写run()方法来定义线程的行为,推荐使用后者,因为Java中的继承是单继承,一个类有一个父类,如 ...
- leetcode1034
class Solution: def __init__(self): self.V = list() def bfs(self,grid,color,rows,coloums,r,c,ocolor) ...
- Programming Series 1.0 — C Programming
In the growing world of technology, C programming has kind of lost its way. Today, we have a million ...