
第三章 服务治理:Spring Cloud Eureka
服务治理:
服务注册:
在服务治理框架中,通常都会构建一个注册中心,每个服务单元向注册中心登记自己提供的服务,将主机与端口号、版本号、通信协议等一些附加信息告知注册中心,注册中心按服务名分类组织服务清单。比如:有两个提供服务A的进程分别运行于192.168.0.100:8000 和192.168.0.101:8000 位置上,还有三个提供服务B的进程分别运行于192.168.0.100:9000、192.168.0.101:9000、192.168.0.102:9000位置上。当这些进程都启动,并向注册中心注册自己的服务之后,注册中心就会维护类似下面的一个服务清单。另外,注册中心还需要以心跳的方式去监测清单中的服务是否可用,若不可用需要从服务清单中剔除,达到排除故障服务的效果。

服务发现:
Netflix Eureka
搭建服务注册中心
<?xml version="1.0" encoding="UTF-8"?>

<project xmlns="http://maven.apache.org/POM/4.0.0" xmlns:xsi="http://www.w3.org/2001/XMLSchema-instance"

    xsi:schemaLocation="http://maven.apache.org/POM/4.0.0 http://maven.apache.org/xsd/maven-4.0.0.xsd">

    <modelVersion>4.0.0</modelVersion>

    <groupId>com.example</groupId>

    <artifactId>eureka-server</artifactId>

    <version>0.0.1-SNAPSHOT</version>

    <packaging>jar</packaging>

    <name>eureka-server</name>

    <description>Demo project for Spring Boot</description>

    <parent>

        <groupId>org.springframework.boot</groupId>

        <artifactId>spring-boot-starter-parent</artifactId>

        <version>1.5.6.RELEASE</version>

        <relativePath/> <!-- lookup parent from repository -->

    </parent>

    <properties>

        <project.build.sourceEncoding>UTF-8</project.build.sourceEncoding>

        <project.reporting.outputEncoding>UTF-8</project.reporting.outputEncoding>

        <java.version>1.8</java.version>

        <spring-cloud.version>Dalston.SR2</spring-cloud.version>

    </properties>

    <dependencies>

        <dependency>

            <groupId>org.springframework.cloud</groupId>

            <artifactId>spring-cloud-starter-eureka-server</artifactId>

        </dependency>

        <dependency>

            <groupId>org.springframework.boot</groupId>

            <artifactId>spring-boot-starter-test</artifactId>

            <scope>test</scope>

        </dependency>

    </dependencies>

    <dependencyManagement>

        <dependencies>

            <dependency>

                <groupId>org.springframework.cloud</groupId>

                <artifactId>spring-cloud-dependencies</artifactId>

                <version>${spring-cloud.version}</version>

                <type>pom</type>

                <scope>import</scope>

            </dependency>

        </dependencies>

    </dependencyManagement>

    <build>

        <plugins>

            <plugin>

                <groupId>org.springframework.boot</groupId>

                <artifactId>spring-boot-maven-plugin</artifactId>

            </plugin>

        </plugins>

    </build>

</project>
通过@EnableEurekaServer 注解启动一个服务注册中心提供给其他应用进行对话
package com.example.demo;

import org.springframework.boot.SpringApplication;

import org.springframework.boot.autoconfigure.SpringBootApplication;

import org.springframework.cloud.netflix.eureka.server.EnableEurekaServer;

@EnableEurekaServer

@SpringBootApplication

public class EurekaServerApplication {

    public static void main(String[] args) {

        SpringApplication.run(EurekaServerApplication.class, args);

    }

}
server.port=8082

eureka.instance.hostname=localhost

# 向注册中心注册服务

eureka.client.register-with-eureka=false

# 检索服务

eureka.client.fetch-registry=false

eureka.client.service-url.defaultZone=http://${eureka.instance.hostname}:${server.port}/eureka/
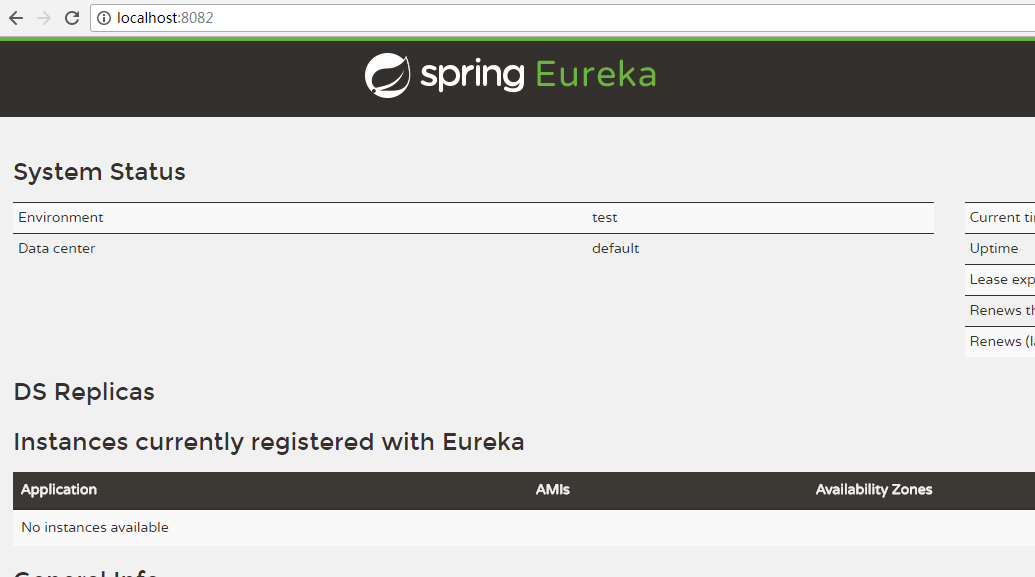
注册服务提供者
<?xml version="1.0" encoding="UTF-8"?>

<project xmlns="http://maven.apache.org/POM/4.0.0" xmlns:xsi="http://www.w3.org/2001/XMLSchema-instance"

    xsi:schemaLocation="http://maven.apache.org/POM/4.0.0 http://maven.apache.org/xsd/maven-4.0.0.xsd">

    <modelVersion>4.0.0</modelVersion>

    <groupId>com.example</groupId>

    <artifactId>eureka-client</artifactId>

    <version>0.0.1-SNAPSHOT</version>

    <packaging>jar</packaging>

    <name>eureka-client</name>

    <description>Demo project for Spring Boot</description>

    <parent>

        <groupId>org.springframework.boot</groupId>

        <artifactId>spring-boot-starter-parent</artifactId>

        <version>1.5.6.RELEASE</version>

        <relativePath/> <!-- lookup parent from repository -->

    </parent>

    <properties>

        <project.build.sourceEncoding>UTF-8</project.build.sourceEncoding>

        <project.reporting.outputEncoding>UTF-8</project.reporting.outputEncoding>

        <java.version>1.8</java.version>

        <spring-cloud.version>Dalston.SR2</spring-cloud.version>

    </properties>

    <dependencies>

        <dependency>

            <groupId>org.springframework.boot</groupId>

            <artifactId>spring-boot-starter-web</artifactId>

        </dependency>

        <dependency>

            <groupId>org.springframework.cloud</groupId>

            <artifactId>spring-cloud-starter-eureka</artifactId>

        </dependency>

        <dependency>

            <groupId>org.springframework.boot</groupId>

            <artifactId>spring-boot-starter-test</artifactId>

            <scope>test</scope>

        </dependency>

    </dependencies>

    <dependencyManagement>

        <dependencies>

            <dependency>

                <groupId>org.springframework.cloud</groupId>

                <artifactId>spring-cloud-dependencies</artifactId>

                <version>${spring-cloud.version}</version>

                <type>pom</type>

                <scope>import</scope>

            </dependency>

        </dependencies>

    </dependencyManagement>

    <build>

        <plugins>

            <plugin>

                <groupId>org.springframework.boot</groupId>

                <artifactId>spring-boot-maven-plugin</artifactId>

            </plugin>

        </plugins>

    </build>

</project>
接着,新建RESTful API,通过注入DiscoveryClient对象,在日志中打印出服务的相关内容。
package com.example.demo.web;

import org.apache.log4j.Logger;

import org.springframework.beans.factory.annotation.Autowired;

import org.springframework.cloud.client.ServiceInstance;

import org.springframework.cloud.client.discovery.DiscoveryClient;

import org.springframework.web.bind.annotation.RequestMapping;

import org.springframework.web.bind.annotation.RestController;

/**

 * @author lxx

 * @version V1.0.0

 * @date 2017-8-9

 */

@RestController

public class HelloController {

    private final Logger logger = Logger.getLogger(getClass());

    @Autowired

    private DiscoveryClient client;

    @RequestMapping(value = "/index")

    public String index(){

        ServiceInstance instance = client.getLocalServiceInstance();

        logger.info("/hello:host:"+instance.getHost()+" port:"+instance.getPort()

                +" service_id:"+instance.getServiceId());

        return "hello world!";

    }

}
package com.example.demo;

import org.springframework.boot.SpringApplication;

import org.springframework.boot.autoconfigure.SpringBootApplication;

import org.springframework.cloud.client.discovery.EnableDiscoveryClient;

@EnableDiscoveryClient

@SpringBootApplication

public class EurekaClientApplication {

    public static void main(String[] args) {

        SpringApplication.run(EurekaClientApplication.class, args);

    }

}
最后修改application.properties文件,通过spring.application.name属性为服务命名,再通过eureka.client.service-url.defaultZone 属性来指定服务注册中心的地址,地址和注册中心设置的地址一致:
server.port=2222

spring.application.name=hello-service

eureka.client.service-url.defaultZone=http://localhost:8082/eureka/
2017-08-09 17:17:27.635  INFO 8716 --- [           main] c.example.demo.EurekaClientApplication   : Started EurekaClientApplication in 9.844 seconds (JVM running for 10.772)

2017-08-09 17:17:27.797  INFO 8716 --- [nfoReplicator-0] com.netflix.discovery.DiscoveryClient    : DiscoveryClient_HELLO-SERVICE/chanpin-PC:hello-service:2222 - registration status: 204
2017-08-09 17:17:27.786  INFO 10396 --- [nio-8082-exec-1] c.n.e.registry.AbstractInstanceRegistry  : Registered instance HELLO-SERVICE/chanpin-PC:hello-service:2222 with status UP (replication=false)

2017-08-09 17:17:47.792  INFO 10396 --- [a-EvictionTimer] c.n.e.registry.AbstractInstanceRegistry  : Running the evict task with compensationTime 0ms
高可用注册中心
- 创建 application-peer1.properties,作为peer1 服务中心的配置,并将serviceUrl指向peer2:
spring.application.name=eureka-server

server.port=1111

eureka.instance.hostname=peer1

eureka.client.service-url.defaultZone=http://peer2:1112/eureka/
- 创建 application-peer2.properties,作为peer2 服务中心的配置,并将serviceUrl指向peer1:
spring.application.name=eureka-server

server.port=1112

eureka.instance.hostname=peer2

eureka.client.service-url.defaultZone=http://peer1:1111/eureka/
- 在C:\Windows\System32\drivers\etc\hosts 文件中添加对peer1 和 peer2 中的转换,让上面配置的host形式的serviceURL能在本地正确访问到;
127.0.0.1 peer1

127.0.0.1 peer2 - 通过spring.profiles.active 属性来分别启动peer1 和 peer2(打开两个terminal进行启动,在一个terminal中先启动的peer1 会报错,但不影响,是因为它所注册的服务peer2 还未启动,在另外个terminal中把peer2 启动即可,不用启动主类) :
java -jar eureka-server-0.0.1-SNAPSHOT.jar --spring.profiles.active=peer1

java -jar eureka-server-0.0.1-SNAPSHOT.jar --spring.profiles.active=peer2
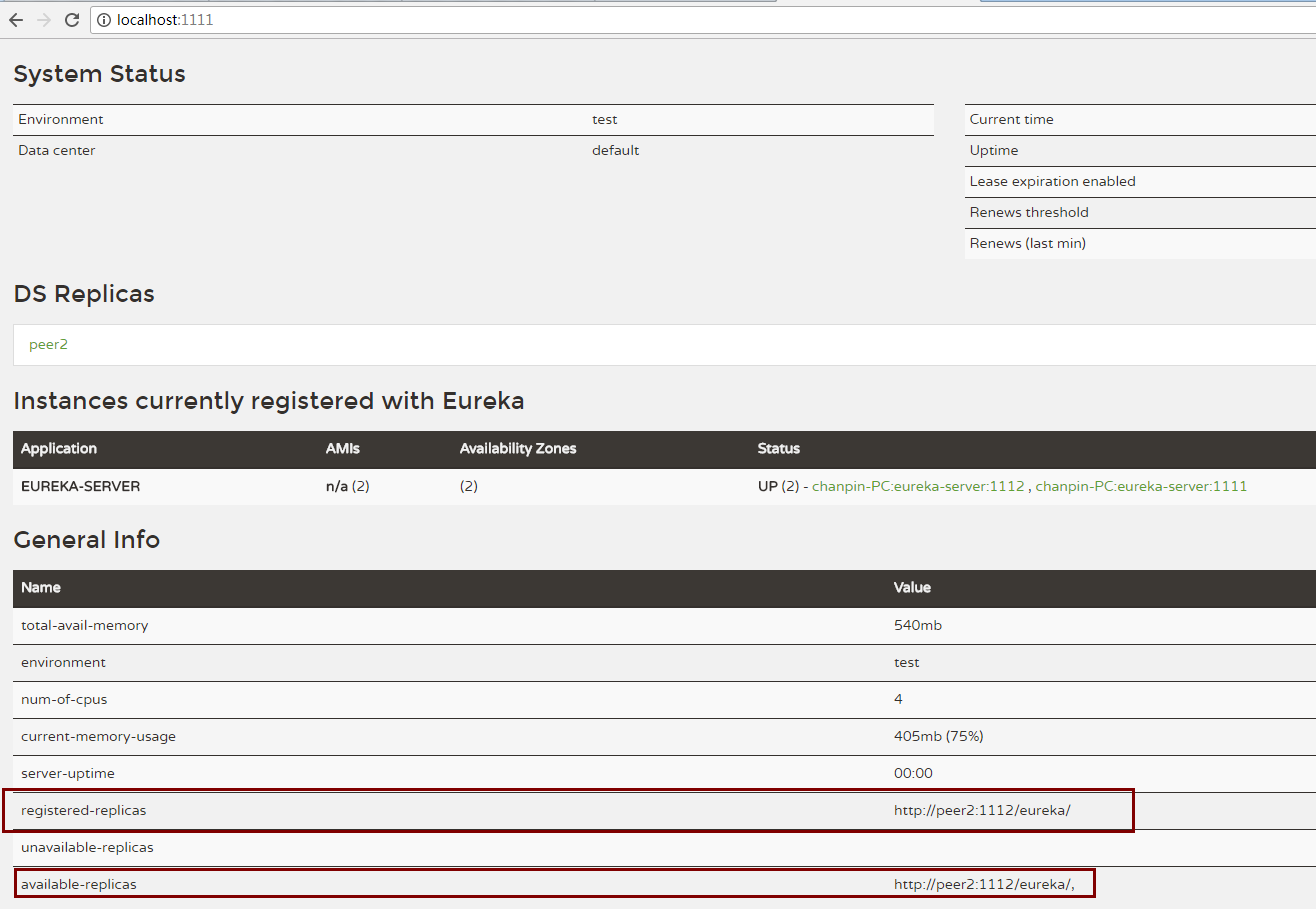
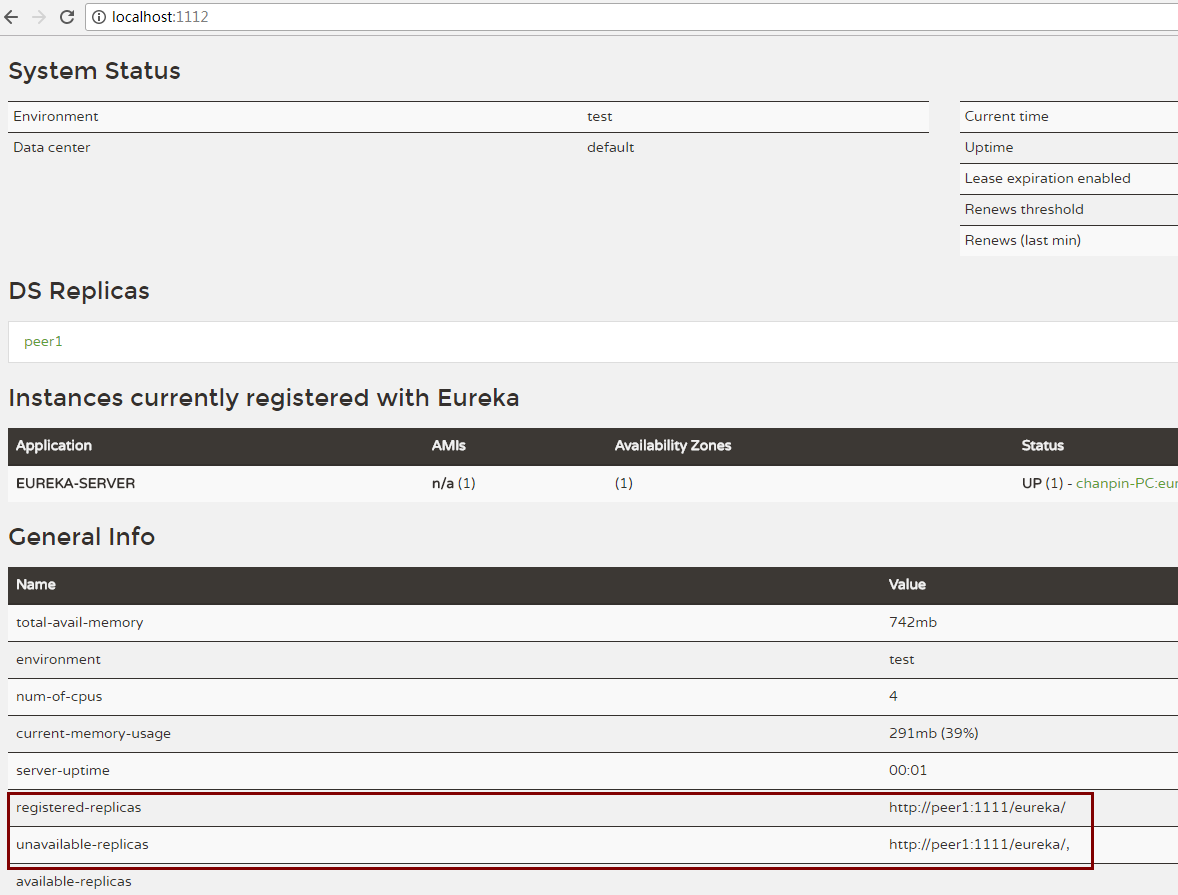
- 在设置了多节点的服务注册中心之后,服务提供方还需要做一些简单的配置才能将服务注册到Eureka Server 集群中。以hello-service为例,修改配置文件如下:
server.port=2222

spring.application.name=hello-service

eureka.client.service-url.defaultZone=http://peer1:1111/eureka/,http://peer2:1112/eureka/
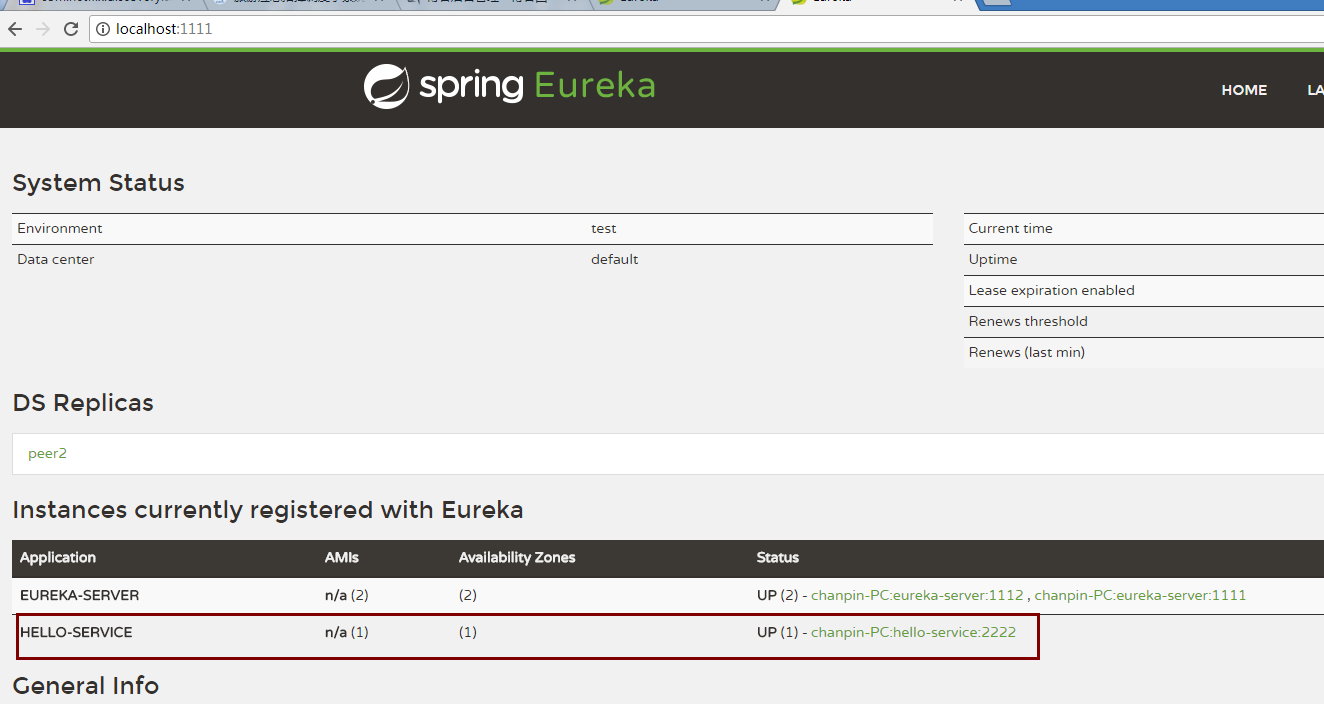
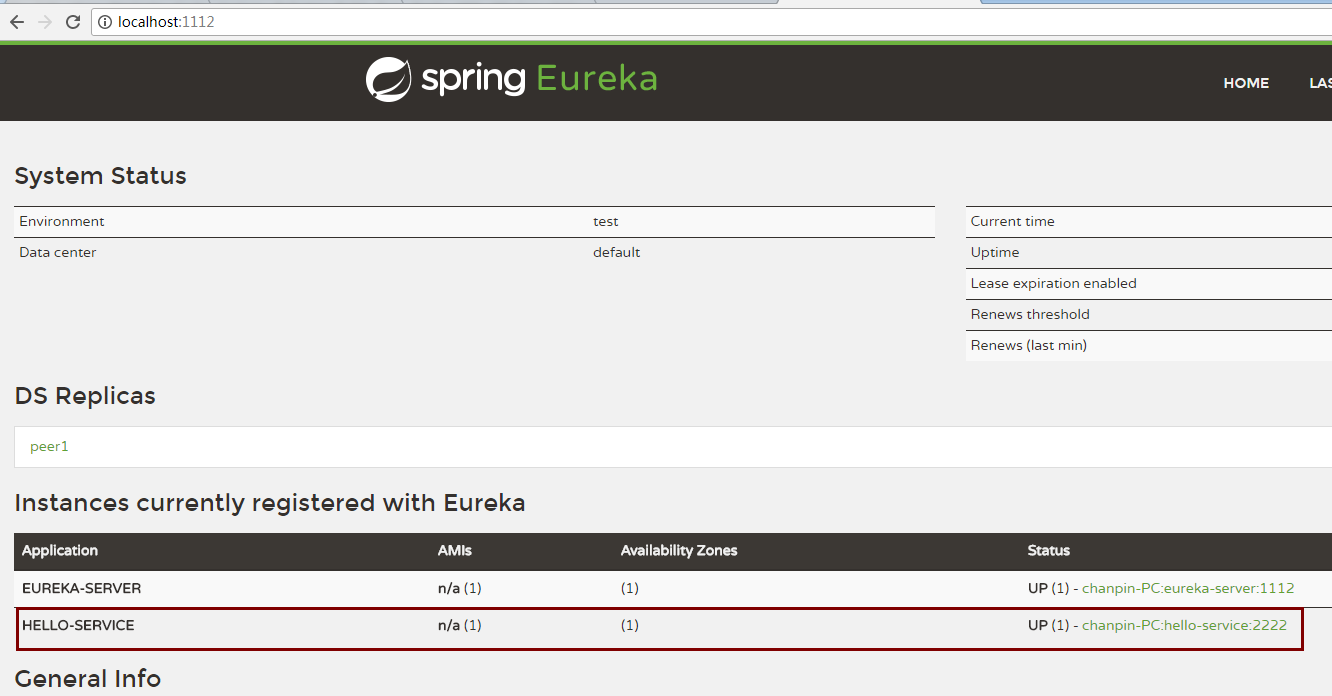
如果不想使用主机名来定义注册中心的地址,也可以使用IP地址的形式,但是需要在配置文件中增加配置参数 eureka.instance.prefer-ip-address=true,该值默认为false。
服务发现与消费
- 准备工作:启动之前实现的服务注册中心eureka-server以及hello-service服务,为了实验Ribbon的客户端负载均衡功能,我们通过java -jar 命令行的方式来启动两个端口不同的hello-service,具体如下:
- 修改配置文件:
server.port=2222

spring.application.name=hello-service

eureka.client.service-url.defaultZone=http://localhost:8082/eureka/
- 再将hello-service应用打包:mvn clean package
- 通过下列命令启动应用程序:
java -jar eureka-client-0.0.1-SNAPSHOT.jar --server.port=8011

java -jar eureka-client-0.0.1-SNAPSHOT.jar --server.port=8012
- 成功启动两个服务后,可以在注册中心看到名为HELLO-SERVICE的服务中出现两个实例单元:

- 创建一个Spring boot项目来实现服务消费者,取名为ribbon-consumer,并在pom.xml中引入如下的依赖内容。
<?xml version="1.0" encoding="UTF-8"?>

<project xmlns="http://maven.apache.org/POM/4.0.0" xmlns:xsi="http://www.w3.org/2001/XMLSchema-instance"

    xsi:schemaLocation="http://maven.apache.org/POM/4.0.0 http://maven.apache.org/xsd/maven-4.0.0.xsd">

    <modelVersion>4.0.0</modelVersion>

    <groupId>com.example</groupId>

    <artifactId>demo</artifactId>

    <version>0.0.1-SNAPSHOT</version>

    <packaging>jar</packaging>

    <name>demo</name>

    <description>Demo project for Spring Boot</description>

    <parent>

        <groupId>org.springframework.boot</groupId>

        <artifactId>spring-boot-starter-parent</artifactId>

        <version>1.5.6.RELEASE</version>

        <relativePath/> <!-- lookup parent from repository -->

    </parent>

    <properties>

        <project.build.sourceEncoding>UTF-8</project.build.sourceEncoding>

        <project.reporting.outputEncoding>UTF-8</project.reporting.outputEncoding>

        <java.version>1.8</java.version>

        <spring-cloud.version>Dalston.SR2</spring-cloud.version>

    </properties>

    <dependencies>

        <dependency>

            <groupId>org.springframework.cloud</groupId>

            <artifactId>spring-cloud-starter-eureka</artifactId>

        </dependency>

        <dependency>

            <groupId>org.springframework.cloud</groupId>

            <artifactId>spring-cloud-starter-ribbon</artifactId>

        </dependency>

        <dependency>

            <groupId>org.springframework.boot</groupId>

            <artifactId>spring-boot-starter-web</artifactId>

        </dependency>

        <dependency>

            <groupId>org.springframework.boot</groupId>

            <artifactId>spring-boot-starter-test</artifactId>

            <scope>test</scope>

        </dependency>

    </dependencies>

    <dependencyManagement>

        <dependencies>

            <dependency>

                <groupId>org.springframework.cloud</groupId>

                <artifactId>spring-cloud-dependencies</artifactId>

                <version>${spring-cloud.version}</version>

                <type>pom</type>

                <scope>import</scope>

            </dependency>

        </dependencies>

    </dependencyManagement>

    <build>

        <plugins>

            <plugin>

                <groupId>org.springframework.boot</groupId>

                <artifactId>spring-boot-maven-plugin</artifactId>

            </plugin>

        </plugins>

    </build>

</project>
- 在主类中通过@EnableDiscoveryClient注解让该应用注册为Eureka客户端应用,以获取服务发现的能力,同时,在该主类中创建RestTemplate的Spring Bean实例,并通过@LoadBalanced 注解开启客户端负载均衡。
package com.example.demo;

import org.springframework.boot.SpringApplication;

import org.springframework.boot.autoconfigure.SpringBootApplication;

import org.springframework.cloud.client.discovery.EnableDiscoveryClient;

import org.springframework.cloud.client.loadbalancer.LoadBalanced;

import org.springframework.context.annotation.Bean;

import org.springframework.web.client.RestTemplate;

@EnableDiscoveryClient

@SpringBootApplication

public class DemoApplication {

    @Bean

    @LoadBalanced

    RestTemplate restTemplate(){

        return new RestTemplate();

    }

    public static void main(String[] args) {

        SpringApplication.run(DemoApplication.class, args);

    }

}
- 创建ConsumerController类并实现/ribbon-consumer接口。在该接口中,通过上面创建的RestTemplate 来实现对HELLO-SERVICE 服务提供的 /hello 接口进行调用。此处的访问地址是服务名 HELLO-SERVICE ,而不是一个具体的地址,在服务治理框架中,这是一个重要特性。
package com.example.demo.web;

import org.springframework.beans.factory.annotation.Autowired;

import org.springframework.web.bind.annotation.RequestMapping;

import org.springframework.web.bind.annotation.RequestMethod;

import org.springframework.web.bind.annotation.RestController;

import org.springframework.web.client.RestTemplate;

/**

 * @author lxx

 * @version V1.0.0

 * @date 2017-8-9

 */

@RestController

public class ConsumerController {

    @Autowired

    RestTemplate restTemplate;

    @RequestMapping(value = "ribbon-consumer", method = RequestMethod.GET)

    public String helloConsumer(){

        return restTemplate.getForEntity("http://HELLO-SERVICE/index",

                String.class).getBody();

    }

}
- 在application.properties中配置Eureka服务注册中心的位置,需要与之前的HELLO-SERVICE一样,同时设置该消费者的端口为3333,不与之前启动的应用端口冲突即可。
server.port=3333

spring.application.name=ribbon-consumer

eureka.client.service-url.defaultZone=http://localhost:8082/eureka/
- 启动ribbon-consumer应用后,可以在Eureka信息面板中看到,除了HELLO-SERVICE外,还多了实现的RIBBON-CONSUMER服务。
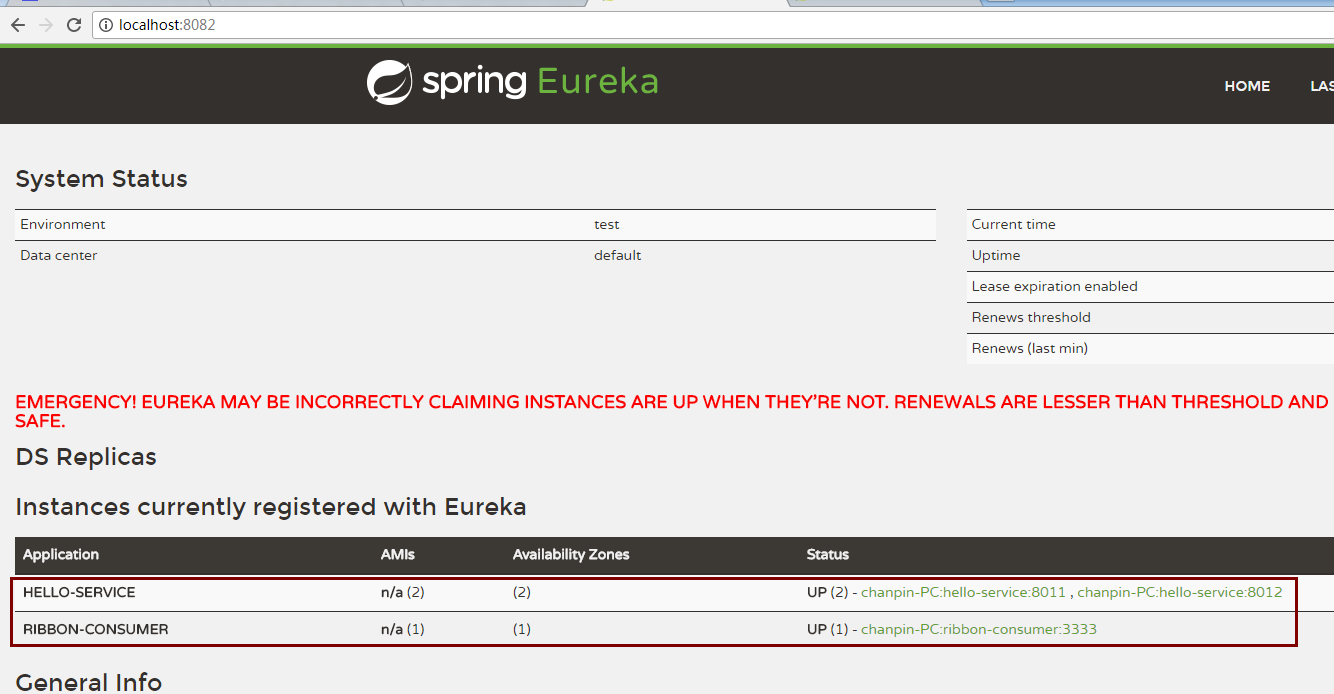
- 通过向 http://localhost:3333/ribbon-consumer 发起访问, 成功返回字符串 “hello world”。在消费者控制台中打印出服务列表情况。
- 多发送几次请求,可以在服务提供方hello-service的控制台中看到一些打印信息,可以看出两个控制台基本是交替访问,实现了客户端的负载均衡。
Eureka详解
基础架构(核心三要素)
- 服务注册中心:Eureka提供的服务端,提供服务注册与发现的功能,即之前的eureka-server。
- 服务提供者:提供服务的应用,可以是spring boot应用,也可以是其他技术平台且遵循Eureka通信机制的应用。它将自己提供的服务注册到Eureka,以供其他应用发现。即之前的HELLO-SERVICE.
- 服务消费者:消费者从服务注册中心获取服务列表,从而使消费者可以知道去何处调用其所需要的服务,在上一节中使用了Ribbon来实现服务消费,后续还会介绍使用Feign的消费方式
服务治理机制
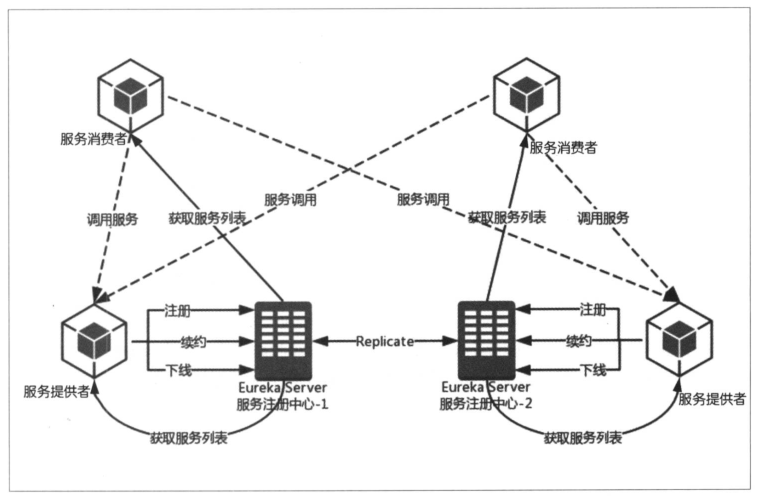
体验了Spring cloud Eureka 通过简单的注解配置就能实现强大的服务治理功能之后,进一步了解一下Eureka基础架构中各个元素的一些通信行为,以此来理解基于Eureka实现的服务治理体系是如何运作起来的。以上图为例,其中有几个重要元素:
- “服务注册中心-1” 和 “服务注册中心-2”,他们互相注册组成高可用集群。
- “服务提供者” 启动了两个实例,一个注册到“服务注册中心-1” 上,另外一个注册到 “服务注册中心-2” 上。
- 还有两个 “服务消费者” ,它们也都分别指向了一个注册中心。
根据上面的结构,可以详细了解从服务注册开始到服务调用,及各个元素所涉及的一些重要通信行为。
服务提供者
服务注册
“服务提供者” 在启动的时候会通过发送REST请求的方式将自己注册到Eureka Server 上,同时带上了自身服务的一些元数据信息。Eureka Server 接收到这个REST请求后,将元数据信息存储在一个双层结构Map中,其中第一层的key是服务名,第二层的key 是具体服务的实例名。
在服务注册时,需要确认eureka.client.register-with-eureka=true参数是否正确,若为false,将不会启动注册操作。
服务同步
如图所示,这里的两个服务提供者分别注册到了两个不同的服务注册中心上,即它们的信息分别被两个服务注册中心维护。由于服务注册中心之间为互相注册,当服务提供者发送注册请求到一个服务注册中心时,它会将请求转发给集群中相连的其他注册中心,从而实现注册中心之间的服务同步。通过服务同步,两个服务提供者的服务信息就可以通过这两个服务注册中心中的任意一台获取到。
服务续约
在注册完服务之后,服务提供者会维护一个心跳用来持续告诉 Eureka Server :“我还活着”,以防止 Eureka Server 的 “剔除任务” 将该服务实例从服务列表中排除出去,我们称该操作为服务续约。
服务消费者
获取服务
到这里,在服务注册中心已经注册了一个服务,并且该服务有两个实例。当我们启动服务消费者时,它会发送一个REST请求给服务注册中心,来获取上面注册的服务清单。为了性能考虑,Eureka Server 会维护一份只读的服务清单来返回给客户端,同时该缓存清单会每隔30秒更新一次。
获取服务是服务消费者的基础,所以要确保 eureka-client-fetch-registery=true 参数没有被修改成false,该值默认为 true。若想修改缓存清单的更新时间,可以通过 eureka-client.registry-fetch-interval-seconds=30 参数来进行修改,该值默认为30,单位为秒。
服务调用
服务消费者在获取服务清单后,通过服务名可以获得具体提供服务的实例名和该实例的元数据信息。因为有这些服务实例的详细信息,所以客户端可以根据自己的需要决定具体需要调用的实例,在Ribbon中会默认采用轮询的方式进行调用,从而实现客户端的负载均衡。
服务下线
在系统运行过程中必然会面临关闭或重启服务的某个实例的情况,在服务关闭期间,我们自然不希望客户端会继续调用关闭了的实例。所以在客户端程序中,当服务实例进行正常的关闭操作时,它会触发一个服务下线的REST请求给 Eureka Server,告诉服务注册中心:“我要下线了”。服务端在接收到请求之后,将该服务状态设置为下线(DOWN),并把该下线事件传播出去。
服务注册中心
失效剔除
当一些外部原因如内存溢出、网络故障等导致服务实例非正常下线,而服务注册中心并未收到“服务下线”的请求。为了从服务列表中将这些无法提供服务的实例剔除,Eureka Server 在启动的时候会创建一个定时任务,默认每隔一段时间(默认60秒)将当前清单中超时(默认90秒)没有续约的服务剔除出去。
自我保护
当我们在本地调试基于 Eureka 的程序时,基本上都会在服务注册中心的信息面板上出现类似下面的红色警告信息:

实际上,该警告就是触发了Eureka Server的自我保护机制。之前介绍过,服务注册到Eureka Server之后,会维护一个心跳连接,告诉Eureka Server 自己还活着。Eureka Server 在运行期间,会统计心跳失败的比例在15分钟之内低于85%,如果出现低于的情况,Eureka Server 会将当前的实例信息保护起来,让这些实例不会过期,尽可能保护这些注册信息。但是,在保护期间内实例若出现问题,那么客户端很容易拿到实际已经不存在的服务实例,会出现调用失败的情况,所以客户端必须要有容错机制,比如可以使用请求重试、断路器等机制。
由于在本地调试很容易触发注册中心的保护机制,使得注册中心维护的服务实例不那么准确。可以在本地进行开发时,使用 eureka-server.enable-self-preservation=false 参数来关闭保护机制,确保注册中心将不可用的实例正确剔除。
源码分析
上面,我们对Eureka中各个核心元素的通信行为做了详细的介绍,为了更深入的理解它的运作和配置,下面我们结合源码来分别看看各个通信行为是如何实现的。
在看具体源码之前,先回顾一下之前所实现的内容,从而找到一个合适的切入口去分析。首先,对于服务注册中心、服务提供者、服务消费者这三个主要元素来说,后两者(Eureka客户端)在整个运行机制中是大部分通信行为的主动发动着,而注册中心主要是处理请求的接受者。所以,我们从Eureka客户端作为入口看看它是如何完成这些主动通信行为的。
我们将一个普通的spring boot 应用注册到Eureka Server 或是从 Eureka Server 中获取服务列表时,主要就做了两件事:
- 在应用类中配置了 @EnableDiscoveryClient 注解。
- 在application.properties 中用 eureka-client.service-url.defaultZone 参数指定了注册中心的位置。
顺着上面的线索,我们看看 @EnableDiscoveryClient 的源码,具体如下:
//

// Source code recreated from a .class file by IntelliJ IDEA

// (powered by Fernflower decompiler)

//

package org.springframework.cloud.client.discovery;

import java.lang.annotation.Documented;

import java.lang.annotation.ElementType;

import java.lang.annotation.Inherited;

import java.lang.annotation.Retention;

import java.lang.annotation.RetentionPolicy;

import java.lang.annotation.Target;

import org.springframework.cloud.client.discovery.EnableDiscoveryClientImportSelector;

import org.springframework.context.annotation.Import;

@Target({ElementType.TYPE})

@Retention(RetentionPolicy.RUNTIME)

@Documented

@Inherited

@Import({EnableDiscoveryClientImportSelector.class})

public @interface EnableDiscoveryClient {

    boolean autoRegister() default true;

}
从该注解的注释中我们可以知道,它主要用来开启 DiscoveryClient 的实例。通过搜索 DiscoveryClient ,我们可以发现有一个类和一个接口。通过梳理可以得到如下图所示的关系:
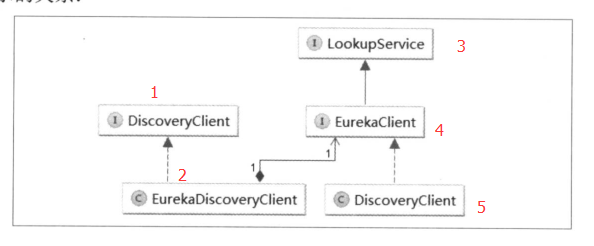
其中,1 是 Spring Cloud 的接口,它定义了用来发现服务的常用抽象方法,通过该接口可以有效的屏蔽服务治理的实现细节,所以使用 Spring Cloud 构建的微服务应用可以方便的切换不同服务治理框架,而不改动程序代码,只需要另外添加一些针对服务治理框架的配置即可。2 是对 1 接口的实现,从命名判断。它实现的是对 Eureka 发现服务的封装。所以 EurekaDiscoveryClient 依赖了 Netflix Eureka 的 EurekaClient 接口,EurekaClient 接口继承了 LookupService 接口,它们都是 Netflix 开源包中的内容,主要定义了针对 Eureka 的发现服务的抽象发放,而真正实现发现服务的则Netflix包中的 DiscoveryClient (5)类。
接下来,我们就详细看看DiscoveryClient类。先看下该类的头部注释,大致内容如下:

在具体研究Eureka Client 负责完成的任务之前,我们先看看在哪里对Eureka Server 的URL列表进行配置。根据配置的属性名 eureka.client.service-url.defaultZone,通过 ServiceURL 可以找到该属性相关的加载属性,但是在SR5 版本中它们都被 @Deprecated 标注为不再建议使用,并 @link 到了替代类 EndpointUtils,所以可以在该类中找到下面这个函数:
public static Map<String, List<String>> getServiceUrlsMapFromConfig(EurekaClientConfig clientConfig, String instanceZone, boolean preferSameZone) {

        LinkedHashMap orderedUrls = new LinkedHashMap();

        String region = getRegion(clientConfig);

        String[] availZones = clientConfig.getAvailabilityZones(clientConfig.getRegion());

        if(availZones == null || availZones.length == 0) {

            availZones = new String[]{"default"};

        }

        logger.debug("The availability zone for the given region {} are {}", region, Arrays.toString(availZones));

        int myZoneOffset = getZoneOffset(instanceZone, preferSameZone, availZones);

        String zone = availZones[myZoneOffset];

        List serviceUrls = clientConfig.getEurekaServerServiceUrls(zone);

        if(serviceUrls != null) {

            orderedUrls.put(zone, serviceUrls);

        }

        int currentOffset = myZoneOffset == availZones.length - 1?0:myZoneOffset + 1;

        while(currentOffset != myZoneOffset) {

            zone = availZones[currentOffset];

            serviceUrls = clientConfig.getEurekaServerServiceUrls(zone);

            if(serviceUrls != null) {

                orderedUrls.put(zone, serviceUrls);

            }

            if(currentOffset == availZones.length - 1) {

                currentOffset = 0;

            } else {

                ++currentOffset;

            }

        }

        if(orderedUrls.size() < 1) {

            throw new IllegalArgumentException("DiscoveryClient: invalid serviceUrl specified!");

        } else {

            return orderedUrls;

        }

    }
Region、Zone
从上面的函数中可以发现,客户端依次加载了两个内容,第一个是Region,第二个是Zone,从其加载逻辑上可以判断它们之间的关系:
- 通过 getRegion 函数,我们可以看到他从配置中读取了一个Region返回,所以一个微服务应用只可以属于一个Region,如果不特别配置,默认为default。若要自己配置,可以通过 eureka.client.region属性来定义。
 public static String getRegion(EurekaClientConfig clientConfig) {

        String region = clientConfig.getRegion();

        if(region == null) {

            region = "default";

        }

        region = region.trim().toLowerCase();

        return region;

    }
- 通过 getAvailabilityZones 函数,可以知道当我们没有特别为 Region 配置 Zone 的时候,默认采用defaultZone , 这才是我们之前配置参数 eureka.client.service-url.defaultZone 的由来。若要为应用指定Zone,可以通过eureka.client.availability-zones 属性来设置。从该函数的 return 内容,可以知道 Zone 能够设置多个,并且通过逗号分隔来配置。由此,我们可以判断Region与Zone 是一对多的关系。
 public String[] getAvailabilityZones(String region) {

        String value = (String)this.availabilityZones.get(region);

        if(value == null) {

            value = "defaultZone";

        }

        return value.split(",");

    }
serviceUrls
在获取了Region 和 Zone 的信息之后,才开始真正加载 Eureka Server 的具体地址。它根据传入的参数按一定算法确定加载位于哪一个Zone配置的serviceUrls。
int myZoneOffset = getZoneOffset(instanceZone, preferSameZone, availZones);

String zone = availZones[myZoneOffset];

List serviceUrls = clientConfig.getEurekaServerServiceUrls(zone);
具体获取serviceUrls 的实现,可以详细查看getEurekaServerServiceUrls 函数的具体实现类 EurekaClientConfigBean,用来加载配置文件中的内容,通过搜索defaultZone,我们可以很容易找到下面这个函数,它具体实现了如何解析该参数的过程,通过此内容,我们可以知道,eureka.client.service-url.defaultZone 属性可以配置多个,并且需要通过逗号分隔。
public List<String> getEurekaServerServiceUrls(String myZone) {

        String serviceUrls = (String)this.serviceUrl.get(myZone);

        if(serviceUrls == null || serviceUrls.isEmpty()) {

            serviceUrls = (String)this.serviceUrl.get("defaultZone");

        }

        if(!StringUtils.isEmpty(serviceUrls)) {

            String[] serviceUrlsSplit = StringUtils.commaDelimitedListToStringArray(serviceUrls);

            ArrayList eurekaServiceUrls = new ArrayList(serviceUrlsSplit.length);

            String[] var5 = serviceUrlsSplit;

            int var6 = serviceUrlsSplit.length;

            for(int var7 = 0; var7 < var6; ++var7) {

                String eurekaServiceUrl = var5[var7];

                if(!this.endsWithSlash(eurekaServiceUrl)) {

                    eurekaServiceUrl = eurekaServiceUrl + "/";

                }

                eurekaServiceUrls.add(eurekaServiceUrl);

            }

            return eurekaServiceUrls;

        } else {

            return new ArrayList();

        }

    }
当我们在微服务应用中使用Ribbon来实现服务调用时,对于Zone的设置可以在负载均衡时实现区域亲和特性:Ribbon的默认策略会优先访问同客户端处于一个Zone中的服务端实例,只有当同一个Zone 中没有可用服务端实例的时候才会访问其他Zone中的实例。所以通过Zone属性的定义,配合实际部署的物理结构,我们就可以有效地设计出对区域性故障的容错集群。
服务注册
在理解了多个服务注册中心信息的加载后,我们再回头看看DiscoveryClient类是如何实现“服务注册”行为的,通过查看它的构造类,可以找到调用了下面这个函数:
private void initScheduledTasks() {

        int renewalIntervalInSecs;

        int expBackOffBound;

        if(this.clientConfig.shouldFetchRegistry()) {

            renewalIntervalInSecs = this.clientConfig.getRegistryFetchIntervalSeconds();

            expBackOffBound = this.clientConfig.getCacheRefreshExecutorExponentialBackOffBound();

            this.scheduler.schedule(new TimedSupervisorTask("cacheRefresh", this.scheduler, this.cacheRefreshExecutor, renewalIntervalInSecs, TimeUnit.SECONDS, expBackOffBound, new DiscoveryClient.CacheRefreshThread()), (long)renewalIntervalInSecs, TimeUnit.SECONDS);

        }

        if(this.clientConfig.shouldRegisterWithEureka()) {

            renewalIntervalInSecs = this.instanceInfo.getLeaseInfo().getRenewalIntervalInSecs();

            expBackOffBound = this.clientConfig.getHeartbeatExecutorExponentialBackOffBound();

            logger.info("Starting heartbeat executor: renew interval is: " + renewalIntervalInSecs);

            this.scheduler.schedule(new TimedSupervisorTask("heartbeat", this.scheduler, this.heartbeatExecutor, renewalIntervalInSecs, TimeUnit.SECONDS, expBackOffBound, new DiscoveryClient.HeartbeatThread(null)), (long)renewalIntervalInSecs, TimeUnit.SECONDS);

            this.instanceInfoReplicator = new InstanceInfoReplicator(this, this.instanceInfo, this.clientConfig.getInstanceInfoReplicationIntervalSeconds(), 2);

            this.statusChangeListener = new StatusChangeListener() {

                public String getId() {

                    return "statusChangeListener";

                }

                public void notify(StatusChangeEvent statusChangeEvent) {

                    if(InstanceStatus.DOWN != statusChangeEvent.getStatus() && InstanceStatus.DOWN != statusChangeEvent.getPreviousStatus()) {

                        DiscoveryClient.logger.info("Saw local status change event {}", statusChangeEvent);

                    } else {

                        DiscoveryClient.logger.warn("Saw local status change event {}", statusChangeEvent);

                    }

                    DiscoveryClient.this.instanceInfoReplicator.onDemandUpdate();

                }

            };

            if(this.clientConfig.shouldOnDemandUpdateStatusChange()) {

                this.applicationInfoManager.registerStatusChangeListener(this.statusChangeListener);

            }

            this.instanceInfoReplicator.start(this.clientConfig.getInitialInstanceInfoReplicationIntervalSeconds());

        } else {

            logger.info("Not registering with Eureka server per configuration");

        }

    }
在上面的函数中,可以看到一个与服务注册相关的判断语句 if(this.clientConfig.shouldRegisterWithEureka())。在该分支内,创建了一个 InstanceInfoReplicator 类的实例,他会执行一个定时任务,而这个定时任务的具体工作可以查看该类的run() 函数,具体如下所示:
public void run() {

        boolean var6 = false;

        ScheduledFuture next2;

        label53: {

            try {

                var6 = true;

                this.discoveryClient.refreshInstanceInfo();

                Long next = this.instanceInfo.isDirtyWithTime();

                if(next != null) {

                    this.discoveryClient.register();

                    this.instanceInfo.unsetIsDirty(next.longValue());

                    var6 = false;

                } else {

                    var6 = false;

                }

                break label53;

            } catch (Throwable var7) {

                logger.warn("There was a problem with the instance info replicator", var7);

                var6 = false;

            } finally {

                if(var6) {

                    ScheduledFuture next1 = this.scheduler.schedule(this, (long)this.replicationIntervalSeconds, TimeUnit.SECONDS);

                    this.scheduledPeriodicRef.set(next1);

                }

            }

            next2 = this.scheduler.schedule(this, (long)this.replicationIntervalSeconds, TimeUnit.SECONDS);

            this.scheduledPeriodicRef.set(next2);

            return;

        }

        next2 = this.scheduler.schedule(this, (long)this.replicationIntervalSeconds, TimeUnit.SECONDS);

        this.scheduledPeriodicRef.set(next2);

    }
这里有个 this.discoveryClient.register(); 这一行,真正触发调用注册的地方就在这里,继续查看register() 的实现内容,如下:
  boolean register() throws Throwable {

        logger.info("DiscoveryClient_" + this.appPathIdentifier + ": registering service...");

        EurekaHttpResponse httpResponse;

        try {

            httpResponse = this.eurekaTransport.registrationClient.register(this.instanceInfo);

        } catch (Exception var3) {

            logger.warn("{} - registration failed {}", new Object[]{"DiscoveryClient_" + this.appPathIdentifier, var3.getMessage(), var3});

            throw var3;

        }

        if(logger.isInfoEnabled()) {

            logger.info("{} - registration status: {}", "DiscoveryClient_" + this.appPathIdentifier, Integer.valueOf(httpResponse.getStatusCode()));

        }

        return httpResponse.getStatusCode() == 204;

    }
可以看出,注册操作也是通过REST请求的方式进行的。同时,我们能看到发起注册请求的时候,传入了一个 instanceInfo 对象,该对象就是注册时客户端给服务端的服务的元数据。
服务获取与服务续约
顺着上面的思路,继续看 DiscoveryClient 的 initScheduledTasks 函数,不难发现在其中还有两个定时任务,分别是 “服务获取” 和 “服务续约” :
private void initScheduledTasks() {

        int renewalIntervalInSecs;

        int expBackOffBound;

        if(this.clientConfig.shouldFetchRegistry()) {

            renewalIntervalInSecs = this.clientConfig.getRegistryFetchIntervalSeconds();

            expBackOffBound = this.clientConfig.getCacheRefreshExecutorExponentialBackOffBound();

            this.scheduler.schedule(new TimedSupervisorTask("cacheRefresh", this.scheduler, this.cacheRefreshExecutor, renewalIntervalInSecs, TimeUnit.SECONDS, expBackOffBound, new DiscoveryClient.CacheRefreshThread()), (long)renewalIntervalInSecs, TimeUnit.SECONDS);

        }

        if(this.clientConfig.shouldRegisterWithEureka()) {

            renewalIntervalInSecs = this.instanceInfo.getLeaseInfo().getRenewalIntervalInSecs();

            expBackOffBound = this.clientConfig.getHeartbeatExecutorExponentialBackOffBound();

            logger.info("Starting heartbeat executor: renew interval is: " + renewalIntervalInSecs);

            this.scheduler.schedule(new TimedSupervisorTask("heartbeat", this.scheduler, this.heartbeatExecutor, renewalIntervalInSecs, TimeUnit.SECONDS, expBackOffBound, new DiscoveryClient.HeartbeatThread(null)), (long)renewalIntervalInSecs, TimeUnit.SECONDS);

            …………

        } else {

            logger.info("Not registering with Eureka server per configuration");

        }

    }
从源码中可以看出,“服务获取” 任务相对于 “服务续约” 和 “服务注册” 任务更为独立。“服务续约” 与 “服务注册” 在同一个 if 逻辑中,这个不难理解,服务注册到Eureka Server 后,需要一个心跳去续约,防止被剔除,所以它们肯定是成对出现的。
而 “服务获取” 的逻辑在一个独立的 if 判断中,而且是由eureka.client.fetch-registry=true 参数控制,它默认为true,大部分情况下不需关心。
继续往下可以发现 “服务获取” 和 “服务续约” 的具体方法,其中 “服务续约” 的实现比较简单,直接以REST请求的方式进行续约:
boolean renew() {

        try {

            EurekaHttpResponse httpResponse = this.eurekaTransport.registrationClient.sendHeartBeat(this.instanceInfo.getAppName(), this.instanceInfo.getId(), this.instanceInfo, (InstanceStatus)null);

            logger.debug("{} - Heartbeat status: {}", "DiscoveryClient_" + this.appPathIdentifier, Integer.valueOf(httpResponse.getStatusCode()));

            if(httpResponse.getStatusCode() == 404) {

                this.REREGISTER_COUNTER.increment();

                logger.info("{} - Re-registering apps/{}", "DiscoveryClient_" + this.appPathIdentifier, this.instanceInfo.getAppName());

                return this.register();

            } else {

                return httpResponse.getStatusCode() == 200;

            }

        } catch (Throwable var3) {

            logger.error("{} - was unable to send heartbeat!", "DiscoveryClient_" + this.appPathIdentifier, var3);

            return false;

        }

    }
而 “服务获取” 则复杂一些,会根据是否是第一次获取发起不同的 REST 请求和相应的处理。
服务注册中心处理
通过上面的源码分析,可以看到所有的交互都是通过 REST 请求发起的。下面看看服务注册中心对这些请求的处理。Eureka Server 对于各类 REST 请求的定义都位于 com.netflix.eureka.resources 包下。
以 “服务注册” 请求为例(在ApplicationResource类中):
@POST

    @Consumes({"application/json", "application/xml"})

    public Response addInstance(InstanceInfo info, @HeaderParam("x-netflix-discovery-replication") String isReplication) {

        logger.debug("Registering instance {} (replication={})", info.getId(), isReplication);

        if(this.isBlank(info.getId())) {

            return Response.status(400).entity("Missing instanceId").build();

        } else if(this.isBlank(info.getHostName())) {

            return Response.status(400).entity("Missing hostname").build();

        } else if(this.isBlank(info.getAppName())) {

            return Response.status(400).entity("Missing appName").build();

        } else if(!this.appName.equals(info.getAppName())) {

            return Response.status(400).entity("Mismatched appName, expecting " + this.appName + " but was " + info.getAppName()).build();

        } else if(info.getDataCenterInfo() == null) {

            return Response.status(400).entity("Missing dataCenterInfo").build();

        } else if(info.getDataCenterInfo().getName() == null) {

            return Response.status(400).entity("Missing dataCenterInfo Name").build();

        } else {

            DataCenterInfo dataCenterInfo = info.getDataCenterInfo();

            if(dataCenterInfo instanceof UniqueIdentifier) {

                String dataCenterInfoId = ((UniqueIdentifier)dataCenterInfo).getId();

                if(this.isBlank(dataCenterInfoId)) {

                    boolean experimental = "true".equalsIgnoreCase(this.serverConfig.getExperimental("registration.validation.dataCenterInfoId"));

                    if(experimental) {

                        String amazonInfo1 = "DataCenterInfo of type " + dataCenterInfo.getClass() + " must contain a valid id";

                        return Response.status(400).entity(amazonInfo1).build();

                    }

                    if(dataCenterInfo instanceof AmazonInfo) {

                        AmazonInfo amazonInfo = (AmazonInfo)dataCenterInfo;

                        String effectiveId = amazonInfo.get(MetaDataKey.instanceId);

                        if(effectiveId == null) {

                            amazonInfo.getMetadata().put(MetaDataKey.instanceId.getName(), info.getId());

                        }

                    } else {

                        logger.warn("Registering DataCenterInfo of type {} without an appropriate id", dataCenterInfo.getClass());

                    }

                }

            }

            this.registry.register(info, "true".equals(isReplication));

            return Response.status(204).build();

        }

    }
在对注册信息进行了一堆校验之后,会调用 org.springframework.cloud.netflix.eureka.server.InstanceRegister 对象中的 register( InstanceInfo info, int leaseDuration, boolean isReplication) 函数来进行服务注册:
 public void register(InstanceInfo info, int leaseDuration, boolean isReplication) {

        this.handleRegistration(info, leaseDuration, isReplication);

        super.register(info, leaseDuration, isReplication);

    }
 private void handleRegistration(InstanceInfo info, int leaseDuration, boolean isReplication) {

        this.log("register " + info.getAppName() + ", vip " + info.getVIPAddress() + ", leaseDuration " + leaseDuration + ", isReplication " + isReplication);

        this.publishEvent(new EurekaInstanceRegisteredEvent(this, info, leaseDuration, isReplication));

    }
在注册函数中,先调用publishEvent 函数,将该新服务注册的事件传播出去,然后调用 com.netflix.eureka.registry.AbstractInstanceRegistry 父类中的注册实现,将 InstanceInfo 中的元数据信息存储在一个 ConcurrentHashMap 对象中。正如之前所说,注册中心存储了两层 Map 结构,第一层的key 存储服务名: InstanceInfo 中的APPName 属性,第二层的 key 存储实例名:InstanceInfo中的 instanceId 属性。
配置详解
在 Eureka 的服务治理体系中,主要分为服务端和客户端两个不同的角色,服务端为服务注册中心,而客户端为各个提供接口的微服务应用。当我们构建了高可用的注册中心之后,该集群中所有的微服务应用和后续将要介绍的一些基础类应用(如配置中心、API网关等)都可以视为该体系下的一个微服务(Eureka客户端)。服务注册中心也一样,只是高可用环境下的服务注册中心除了服务端之外,还为集群中的其他客户端提供了服务注册的特殊功能。所以,Eureka 客户端的配置对象存在于所有 Eureka 服务治理体系下的应用实例中。在使用使用 Spring cloud Eureka 的过程中, 我们所做的配置内容几乎都是对 Eureka 客户端配置进行的操作,所以了解这部分的配置内容,对于用好 Eureka 非常有帮助。
Eureka 客户端的配置主要分为以下两个方面:
- 服务注册相关的配置信息,包括服务注册中心的地址、服务获取的间隔时间、可用区域等。
- 服务实例相关的配置信息,包括服务实例的名称、IP地址、端口号、健康检查路径等。
服务注册类配置
关于服务注册类的配置信息,我们可以通过查看 org.springframework.cloud.netflix.eureka.EurekaClientConfigBean 的源码来获得比官方文档中更为详尽的内容,这些配置信息都已 eureka.client 为前缀。下面针对一些常用的配置信息做进一步的介绍和说明。
指定注册中心
在配置文件中通过 eureka.client.service-url 实现。该参数定义如下所示,它的配置值存储在HashMap类型中,并且设置有一组默认值,默认值的key为 defaultZone、value 为 http://localhost:8761/eureka/,类名为 EurekaClientConfigBean。
private Map<String, String> serviceUrl = new HashMap();

this.serviceUrl.put("defaultZone", "http://localhost:8761/eureka/");

public static final String DEFAULT_URL = "http://localhost:8761/eureka/";

public static final String DEFAULT_ZONE = "defaultZone";
由于之前的服务注册中心使用了 8082 端口,所以我们做了如下配置,来讲应用注册到对应的 Eureka 服务端中。
eureka.client.service-url.defaultZone=http://localhost:8082/eureka/
当构建了高可用的服务注册中心集群时,可以为参数的value 值配置多个注册中心的地址(逗号分隔):
eureka.client.service-url.defaultZone=http://peer1:1111/eureka/,http://peer2:1112/eureka/
另外,为了服务注册中心的安全考虑,很多时候会为服务注册中心加入安全校验。这个时候,在配置serviceUrl时,需要在value 值的 URL 中加入响应的安全校验信息,比如: http://<username>:<password>@localhost:1111/eureka。其中<username>为安全校验信息的用户名,<password>为该用户的密码。
其他配置
这些参数均以 eureka.client 为前缀。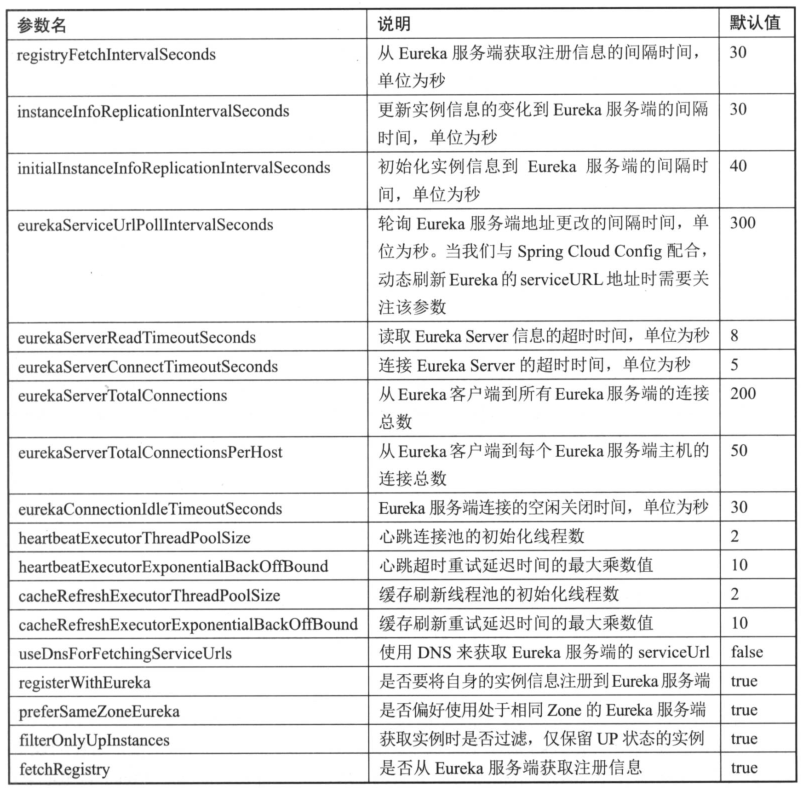
服务实例类配置
关于服务实例类的配置信息,可以通过查看 org.springframework.cloud.netflix.eureka.EurekaInstanceConfigBean 的源码来获取详细内容,这些配置均以 eureka.instance 为前缀。
元数据
在 org.springframework.cloud.netflix.eureka.EurekaInstanceConfigBean 的配置信息中,有一大部分内容都是对服务实例元数据的配置,元数据是 Eureka 客户端在向注册中心发送注册请求时,用来描述自身服务信息的对象,其中包含了一些标准化的元数据,比如服务名称、实例名称、实例IP、实例端口等用于服务治理的重要信息;以及一些用于负载均衡策略或是其他特殊用途的自定义元数据信息。
在使用 Spring Cloud Eureka 的时候,所有的配置信息都通过 org.springframework.cloud.netflix.eureka.EurekaInstanceConfigBean 进行加载,但在真正进行服务注册时,还是会包装成 com.netflix.appinfo.InstanceInfo 对象发送给 Eureka 客户端。这两个类的定义非常相似,可以直接查看 com.netflix.appinfo.InstanceInfo 类中的详细定义来了解原声的 Eureka 对元数据的定义。其中,Map<String, String> metaData = new ConcurrentHashMap<String, String>(); 是自定义的元数据信息,而其他成员变量则是标准化的元数据信息。Spring Cloud 的EurekaInstanceConfigBean 对原生元数据对象做了一些配置优化处理,在后续的介绍中会提到这些内容。
我们可以通过 eureka.instance.<properties>=<value> 的格式对标准化元数据直接进行配置,<properties> 就是 EurekaInstanceConfigBean 对象中的成员变量名。对于自定义元数据,可以通过 eureka.instance.metadataMap.<key>=<value> 的格式来进行配置。
接着,针对一些常用的元数据配置做进一步的介绍和说明。
实例名配置
实例名,即 InstanceInfo 中的 instanceId 参数,它是区分同一服务中不同实例的唯一标识。在NetflixEureka 的原生实现中,实例名采用主机名作为默认值,这样的设置使得在同一主机上无法启动多个相同的服务实例。所以,在 Spring Cloud Eureka 的配置中,针对同一主机中启动多实例的情况,对实例名的默认命名做了更为合理的扩展,它采用了如下默认规则:
${spring.cloud.client.hostname}:${spring.application.name}:${spring.application.instance_id}:${server.port}
对于实例名的命名规则,可以通过eureka.instance.instanceId 参数来进行配置。比如,在本地进行客户端负载均衡调试时,需要启动同一服务的多个实例,如果我们直接启动同一个应用必然会发生端口冲突。虽然可以在命令行中指定不同的server.port 来启动,但这样略显麻烦。可以直接通过设置 server.port=0 或者使用随机数 server.port=${random.int[10000,19999]} 来让Tomcat 启动的时候采用随机端口。但是这个时候会发现注册到 Eureka Server的实例名都是相同的,这会使得只有一个服务实例能够正常提供服务。对于这个问题,就可以通过设置实例名规则来轻松解决:
eureka.instance.instanceId=${spring.application.name}:${random.int}
通过上面的配置,利用应用名+随机数的方式来区分不同的实例,从而实现在同一个主机上,不指定端就能轻松启动多个实例的效果。
跨平台支持
第三章 服务治理:Spring Cloud Eureka的更多相关文章
- 【SpringCloud微服务实战学习系列】服务治理Spring Cloud Eureka
Spring Cloud Eureka是Spring Cloud Netflix微服务中的一部分,它基于NetFlix Sureka做了二次封装,主要负责完成微服务架构中的服务治理功能. 一.服务治理 ...
- 服务治理-> Spring Cloud Eureka
服务治理->搭建服务注册中心 服务治理可以说是微服务架构中最为核心和基础的模块, 它主要用来实现各个微服务 实例的自动化注册与发现. 为什么我们在微服务架构中那么需要服务治理模块呢?微服务 系统 ...
- 第三章 服务治理: Spring Cloud Eureka
Spring Cloud Eureka是 Spring Cloud Netflix微服务套件中的一部分,它基于Netflix Eureka做了二次封装,主要负责完成微服务架构中的服务治理功能 服务治理 ...
- SpringCloud---服务治理---Spring Cloud Eureka
1.概述 1.1 Spring Cloud Eureka是Spring Cloud Netflix微服务套件中的一部分,基于Netflix Eureka做了二次封装,主要负责完成微服务架构中的服务治理 ...
- SpringCloud微服务实战——第三章服务治理
Spring Cloud Eureka 服务治理 是微服务架构中最核心最基本的模块.用于实现各个微服务实例的自动化注册与发现. 服务注册: 在服务治理框架中,都会构建一个注册中心,每个服务单元向注册中 ...
- Spring Cloud微服务笔记(三)服务治理:Spring Cloud Eureka快速入门
服务治理:Spring Cloud Eureka 一.服务治理 服务治理是微服务架构中最为核心和基础的模块,它主要用来实现各个微服务实例的自动化注册与发现. 1.服务注册: 在服务治理框架中,通常会构 ...
- 1 Spring Cloud Eureka服务治理
注:此随笔为读书笔记.<Spring Cloud微服务实战> 什么是微服务? 微服务是将一个原本独立的系统拆分成若干个小型服务(一般按照功能模块拆分),这些小型服务都在各自独立的进程中运行 ...
- 笔记:Spring Cloud Eureka 服务治理
Spring Cloud Eureka 是 Spring Cloud Netflix 微服务套件的一部分,基于 Netflix Eureka 做了二次封装,主要负责完成微服务架构中的服务治理功能,服务 ...
- Spring Cloud Eureka 服务治理
Spring Cloud Eureka 是 Spring Cloud Netflix 微服务套件的一部分,基于 Netflix Eureka 做了二次封装,主要负责完成微服务架构中的服务治理功能,服务 ...
随机推荐
- C++重写(覆盖)、重载、重定义、
总结: 重写(覆盖)override 是指派生类函数重写(覆盖)基类函数 不同的范围,分别位于基类和派生类中 函数的名字相同 参数相同 基类函数必须有virtual关键字 重载overload 成员函 ...
- IPV4/IPV6双协议栈配置案例
拓扑: XRV1配置: =================================================================== hostname XRV1! ipv6 ...
- ant 执行java文件,java文件中含中文,显示乱码
在build.xml文件run target下添加下面一行 <sysproperty key="file.encoding" value="UTF-8" ...
- PYthon第十二天
1. 生成器 生成器的本质是迭代器, 最简单的生成器函数如下: def foo(x): 1-4行定义了一个简单的生成器函数 yield x+1 yield 和 return 不同, return 结束 ...
- CentOS6.9安装Python-3.6.3
CentOS6.9上默认安装的python版本是2.6的.因为系统自带的python会被系统很多软件环境依赖使用,所以不要卸载原来的Python版本,根据需要进行安装新版本即可,本人此处安装的是3.6 ...
- 下拉列表 通过option 改变div的内容
<!DOCTYPE html><html> <head> <meta charset="UTF-8"> <title>& ...
- 连续子数组和的最大值plus
package wodeshiyao; import java.io.BufferedWriter; import java.io.File; import java.io.FileInputStre ...
- 74.CocoaPods安装和使用教程
CocoaPods安装和使用教程 Code4App 原创文章.转载请注明出处:http://code4app.com/article/cocoapods-install-usage 第一: Coco ...
- codeforces 508B
B. New Year Permutation time limit per test 2 seconds memory limit per test 256 megabytes input stan ...
- Python开发——2.基本数据类型之数字和字符串
一.基本数据类型 基本数据类型包括:数字(int).字符串(str).列表(list).元祖(tuple).字典(dict).布尔值(bool). 查看输出数据的类型 a = "123&qu ...