SpringBoot系统列 5 - 接口版本控制、SpringBoot FreeMarker模板引擎
接着上篇博客的代码继续写
1.接口版本控制
一个系统上线后会不断迭代更新,需求也会不断变化,有可能接口的参数也会发生变化,如果在原有的参数上直接修改,可能会影响线上系统的正常运行,这时我们就需要设置不同的版本,这样即使参数发生变化,由于老版本没有变化,因此不会影响上线系统的运行。
一般我们可以在地址上带上版本号,也可以在参数上带上版本号,还可以再 header 里带上版本号,这里我们在地址上带上版本号,大致的地址如:http://api.example.com/v1/test,其中,v1 即代表的是版本号。具体做法请看代码:
import org.springframework.web.bind.annotation.Mapping;

import java.lang.annotation.*;

/**

 * 版本控制

 * @author XIHONGLEI

 * @date 2018-11-15

 */

@Target({ElementType.METHOD, ElementType.TYPE})

@Retention(RetentionPolicy.RUNTIME)

@Documented

@Mapping

public @interface ApiVersion {

    int value();

}
import org.springframework.web.servlet.mvc.condition.RequestCondition;

import javax.servlet.http.HttpServletRequest;

import java.util.regex.Matcher;

import java.util.regex.Pattern;

/**

 * @author XIHONGLEI

 * @date 2018-11-15

 */

public class ApiVersionCondition implements RequestCondition<ApiVersionCondition> {

    // 路径中版本的前缀, 这里用 /v[1-9]/的形式

    private final static Pattern VERSION_PREFIX_PATTERN = Pattern.compile("v(\\d+)/");

    private int apiVersion;

    public ApiVersionCondition(int apiVersion) {

        this.apiVersion = apiVersion;

    }

    @Override

    public ApiVersionCondition combine(ApiVersionCondition other) {

        // 采用最后定义优先原则,则方法上的定义覆盖类上面的定义

        return new ApiVersionCondition(other.getApiVersion());

    }

    @Override

    public ApiVersionCondition getMatchingCondition(HttpServletRequest request) {

        Matcher m = VERSION_PREFIX_PATTERN.matcher(request.getRequestURI());

        if (m.find()) {

            Integer version = Integer.valueOf(m.group(1));

            if (version >= this.apiVersion) {

                return this;

            }

        }

        return null;

    }

    @Override

    public int compareTo(ApiVersionCondition other, HttpServletRequest request) {

        // 优先匹配最新的版本号

        return other.getApiVersion() - this.apiVersion;

    }

    public int getApiVersion() {

        return apiVersion;

    }

}
import org.springframework.core.annotation.AnnotationUtils;

import org.springframework.web.servlet.mvc.condition.RequestCondition;

import org.springframework.web.servlet.mvc.method.annotation.RequestMappingHandlerMapping;

import java.lang.reflect.Method;

/**

 * @author XIHONGLEI

 * @date 2018-11-15

 */

public class CustomRequestMappingHandlerMapping extends RequestMappingHandlerMapping {

    @Override

    protected RequestCondition<ApiVersionCondition> getCustomTypeCondition(Class<?> handlerType) {

        ApiVersion apiVersion = AnnotationUtils.findAnnotation(handlerType, ApiVersion.class);

        return createCondition(apiVersion);

    }

    @Override

    protected RequestCondition<ApiVersionCondition> getCustomMethodCondition(Method method) {

        ApiVersion apiVersion = AnnotationUtils.findAnnotation(method, ApiVersion.class);

        return createCondition(apiVersion);

    }

    private RequestCondition<ApiVersionCondition> createCondition(ApiVersion apiVersion) {

        return apiVersion == null ? null : new ApiVersionCondition(apiVersion.value());

    }

}
#然后在WebConfig配置类中注入Bean

import com.hello.config.CustomRequestMappingHandlerMapping;

import com.hello.filter.ApiInterceptor;

import org.springframework.beans.factory.annotation.Value;

import org.springframework.boot.SpringBootConfiguration;

import org.springframework.context.annotation.Bean;

import org.springframework.scheduling.concurrent.ThreadPoolTaskExecutor;

import org.springframework.web.servlet.config.annotation.InterceptorRegistry;

import org.springframework.web.servlet.config.annotation.WebMvcConfigurationSupport;

import org.springframework.web.servlet.mvc.method.annotation.RequestMappingHandlerMapping;

/**

 * 配置类

 * @author XIHONGLEI

 * @date 2018-10-31

 */

@SpringBootConfiguration

public class WebConfig extends WebMvcConfigurationSupport {

    @Override

    protected void addInterceptors(InterceptorRegistry registry) {

        super.addInterceptors(registry);

        // 将 ApiInterceptor 拦截器类添加进去

        registry.addInterceptor(new ApiInterceptor());

    }

    @Override

    @Bean

    public RequestMappingHandlerMapping requestMappingHandlerMapping() {

        RequestMappingHandlerMapping handlerMapping = new CustomRequestMappingHandlerMapping();

        handlerMapping.setOrder(0);

        handlerMapping.setInterceptors(getInterceptors());

        return handlerMapping;

    }

}
#最后定义一个带版本控制的接口
import com.hello.WebConfig;
import com.hello.config.ApiVersion;
import com.hello.entity.ContractDetailDto;
import com.hello.service.CheckPositionService;
import org.springframework.beans.factory.annotation.Autowired;
import org.springframework.web.bind.annotation.RequestMapping;
import org.springframework.web.bind.annotation.ResponseBody;
import org.springframework.web.bind.annotation.RestController; import java.util.List; @RestController public class HelloController { @Autowired
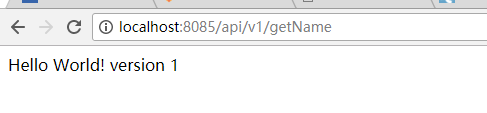
private WebConfig webConfig; @ApiVersion(1)
@RequestMapping("{version}/getName")
public String vGetName() {
return "Hello World! version 1";
}
@ApiVersion(2)
@RequestMapping("{version}/getName")
public String getName() {
return "Hello World! version 2";
}
}
查看效果:

2.模板引擎
在传统的 SpringMVC 架构中,我们一般将 JSP、HTML 页面放到 webapps 目录下面,但是 Spring Boot 没有 webapps,更没有 web.xml,如果我们要写界面的话,该如何做呢?
Spring Boot 官方提供了几种模板引擎:FreeMarker、Velocity、Thymeleaf、Groovy、mustache、JSP。
这里以 FreeMarker 为例讲解 Spring Boot 的使用。
首先引入 FreeMarker 依赖:
        <dependency>

            <groupId>org.springframework.boot</groupId>

            <artifactId>spring-boot-starter-freemarker</artifactId>

        </dependency>
在 resources 下面建立两个目录:static 和 templates,如图所示:

其中 static 目录用于存放静态资源,譬如:CSS、JS、HTML 等,templates 目录存放模板引擎文件,我们可以在 templates 下面创建一个文件:index.ftl(freemarker 默认后缀为 .ftl),并添加内容:
<!DOCTYPE html>

<html lang="en">

<head>

    <meta charset="UTF-8">

    <title>Hello ${name}!</title>

</head>

<body>

        Hello ${name}!

</body>

</html>
然后在POM中配置Resource的时候一定要把所有的资源文件都包括:
<resources>

            <resource>

                <directory>src/main/java</directory>

                <includes>

                    <include>**/*.yml</include>

                    <include>**/*.properties</include>

                    <include>**/*.xml</include>

                </includes>

                <filtering>false</filtering>

            </resource>

            <resource>

                <directory>src/main/resources</directory>

                <includes>

                    <include>**/*</include>

                </includes>

                <filtering>false</filtering>

            </resource>

        </resources>
新建Contrlller:
import org.springframework.stereotype.Controller;
import org.springframework.ui.Model;
import org.springframework.web.bind.annotation.RequestMapping;
import org.springframework.web.servlet.ModelAndView; @Controller
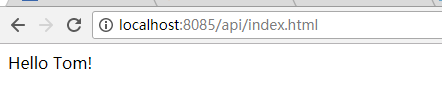
public class HomeController {
@RequestMapping(value = "/index")
public ModelAndView index() {
ModelAndView view = new ModelAndView("/index");
view.addObject("name","Tom");
return view;
}
}
看结果:
SpringBoot系统列 5 - 接口版本控制、SpringBoot FreeMarker模板引擎的更多相关文章
- SpringBoot系统列 2 - 配置文件,多环境配置(dev,qa,online)
实现项目的多环境配置的方法有很多,比如通过在Pom.xml中配置profiles(最常见) 然后在Install项目打War包的时候,根据需求打不同环境的包,如图: 这种配置多环境的方法在SSM框架中 ...
- SpringBoot系统列 1 - HelloWorld!
学习SpringBoot系统列之HelloWorld! 1.新建一个Maven项目 2.添加POM配置 <parent> <groupId>org.springframewor ...
- SpringBoot获取Freemarker模板引擎,生成HTML代码
今天用Ajax异步添加评论,加载Freemarker模板引擎,生成模板模块 1.新建Freemarker模板 <li id="${comment.oId}"> < ...
- Spring Boot 系列(五)web开发-Thymeleaf、FreeMarker模板引擎
前面几篇介绍了返回json数据提供良好的RESTful api,下面我们介绍如何把处理完的数据渲染到页面上. Spring Boot 使用模板引擎 Spring Boot 推荐使用Thymeleaf. ...
- Spring Boot 揭秘与实战(七) 实用技术篇 - FreeMarker 模板引擎
文章目录 1. FreeMaker 代替 JSP 作为页面渲染 2. 生成静态文件 3. 扩展阅读 4. 源代码 Spring Boot 提供了很多模板引擎的支持,例如 FreeMarker.Thym ...
- Java之利用Freemarker模板引擎实现代码生成器,提高效率
https://blog.csdn.net/huangwenyi1010/article/details/71249258 java模板引擎freemarker代码生成器 更多 个人分类: 一步一步 ...
- FreeMarker模板引擎
现在开发的项目,也是基于SOA架构,每个功能接口都是用WebService实现,Web服务的通信协议就是用XML来传输. 以前写WebService都是自动生成XML,没想到这项目竟然要自己定义XML ...
- Spring Boot 2.0 整合 FreeMarker 模板引擎
本篇博文将和大家一起使用Spring Boot 2.0 和FreeMarker 模板引擎整合实战. 1. 创建新的项目 2. 填写项目配置信息 3. 勾选web 模块 4. 勾选freemarker模 ...
- freemarker模板引擎的使用
freemarker是一套前端模板引擎,在使用时,要先在web项目中添加freemarker.jar的依赖. 我在这里主要演示spring-mvc整合freemarker模板引擎.项目案例的文件包结构 ...
随机推荐
- 第一本docker书,,持续更新中
1.查看应用是否在docker中部署成功 需要确认curl已安装 whereis curl sudo apt-get -y install curl curl localhost:8081 如果成 ...
- bzoj3376/poj1988[Usaco2004 Open]Cube Stacking 方块游戏 — 带权并查集
题目链接:http://www.lydsy.com/JudgeOnline/problem.php?id=3376 题目大意: 编号为1到n的n(1≤n≤30000)个方块正放在地上.每个构成一个立方 ...
- C#编程 - 交通灯模拟
程序写的有点繁杂,但大体功能出来的! 效果图: using System; using System.Collections.Generic; using System.Linq; using Sys ...
- 秘密袭击 [BZOJ5250] [树形DP]
分析: 听说正解是FFT+线段树合并,然而我并不会... 我们来思考其他的方法. 我们要求的是连通块第k大的和 对于某一个连通块,对答案的贡献=val(Rank.K) 我们不好直接算出每个连通块的Ra ...
- 区间dp板子题:[noi1995]石子合并
非常经典的区间dp模板 对于每一个大于二的区间 我们显然都可以将它拆分成两个子序列 那么分别计算对于每个取最优值即可 #pragma GCC optimize("O2") #inc ...
- HDU 4786 Fibonacci Tree 最小生成树
Fibonacci Tree 题目连接: http://acm.hdu.edu.cn/showproblem.php?pid=4786 Description Coach Pang is intere ...
- 记一次AngularJs 路由 $stateChangeStart不起作用(细节决定成败)
var app= angular .module('app', [ 'ngAnimate', 'ngCookies', 'ngResource', 'ngSanitize', 'ngTouch', ' ...
- Java知识回顾 (8) 集合
早在 Java 2 中之前,Java 就提供了特设类.比如:Dictionary, Vector, Stack, 和 Properties 这些类用来存储和操作对象组. 虽然这些类都非常有用,但是它们 ...
- ios之animateWithDuration的坑
[UIView animateWithDuration:<#(NSTimeInterval)#> delay:<#(NSTimeInterval)#> options:< ...
- 【ASP.NET Core】从向 Web API 提交纯文本内容谈起
前些时日,老周在升级“华南闲肾回收登记平台”时,为了扩展业务,尤其是允许其他开发人员在其他平台向本系统提交有关肾的介绍资料,于是就为该系统增加了几个 Web API. 其中,有关肾的介绍采用纯文本方式 ...