HyperLedger Fabric ca 1.2 正式环境部署
生成一个根CA(RootCA),在根CA下3个中间CA(IntermediaCA)。
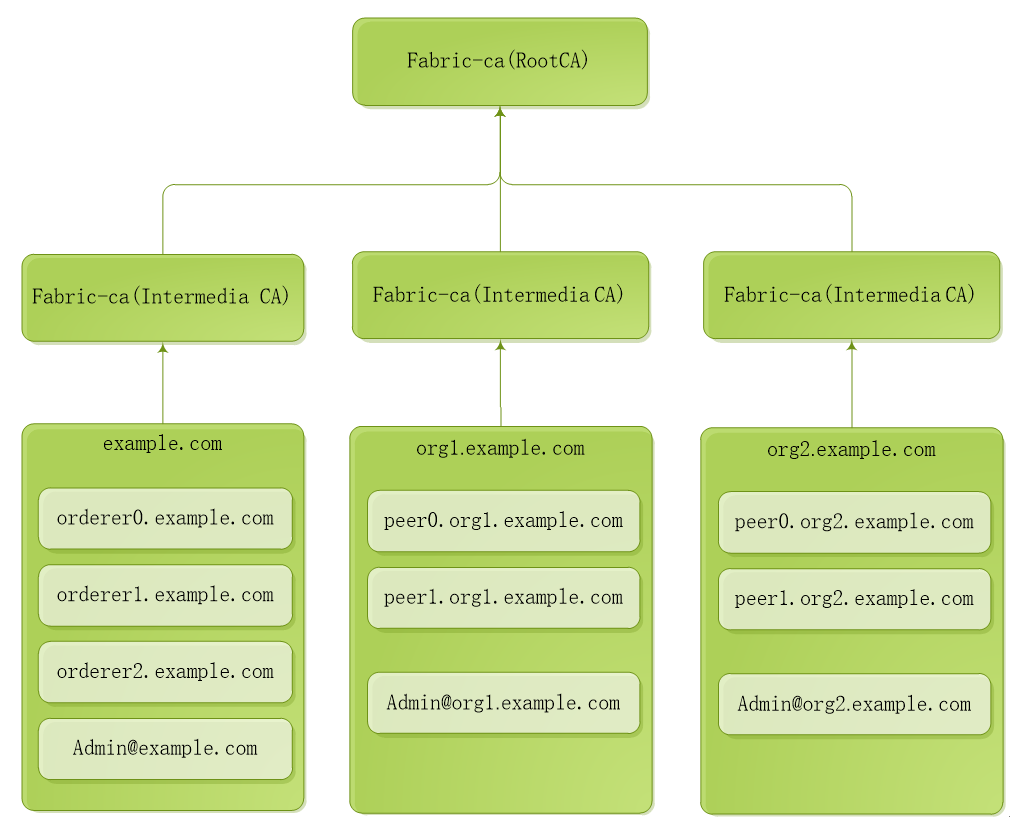
1. 运行和配置RootCA服务
#cd /opt/gopath/src/github.com/hyperledger/fabric-ca/bin
#mkdir ca-server
#cd ca-server
#fabric-ca-server start -b admin:adminpw --home ./rootca --cfg.affiliations.allowremove --cfg.identities.allowremove
【docker】方式运行
拷贝文件docker-rootca.yml到ca-server目录
#docker-compose -f docker-rootca.yaml up –d
2. 运行和配置IntermediaCA1
步骤一:启动 ca
#cd /opt/gopath/src/github.com/hyperledger/fabric-ca/bin/ca-server
#fabric-ca-server init -b admin1:adminpw1 -u http://admin:adminpw@localhost:7054 --home ./intermediaca1
#vi ./intermediaca1/fabric-ca-server-config.yaml
修改port为7055
#fabric-ca-server start -b admin1:adminpw1 -u http://admin:adminpw@localhost:7054 --home ./intermediaca1 --cfg.affiliations.allowremove --cfg.identities.allowremove
【docker】方式运行
拷贝文件docker-intermediaca1.yml到ca-server目录
#docker-compose -f docker-intermediaca1.yaml up
#vi ./intermediaca1/fabric-ca-server-config.yaml
修改port为7055
#docker-compose -f docker-intermediaca1.yaml up
步骤二:为example.com准备msp
#cd /opt/gopath/src/github.com/hyperledger/fabric-ca/bin/ca-server
#fabric-ca-client enroll -M ./crypto-config/ordererOrganizations/example.com/msp -u http://admin1:adminpw1@localhost:7055 --home ./fabric-ca-client
#fabric-ca-client affiliation list -M ./crypto-config/ordererOrganizations/example.com/msp -u http://admin1:adminpw1@localhost:7055 --home ./fabric-ca-client
#fabric-ca-client affiliation remove --force org1 -M ./crypto-config/ordererOrganizations/example.com/msp -u http://admin1:adminpw1@localhost:7055 --home ./fabric-ca-client
#fabric-ca-client affiliation remove --force org2 -M ./crypto-config/ordererOrganizations/example.com/msp -u http://admin1:adminpw1@localhost:7055 --home ./fabric-ca-client
#fabric-ca-client affiliation add com -M ./crypto-config/ordererOrganizations/example.com/msp -u http://admin1:adminpw1@localhost:7055 --home ./fabric-ca-client
#fabric-ca-client affiliation add com.example -M ./crypto-config/ordererOrganizations/example.com/msp -u http://admin1:adminpw1@localhost:7055 --home ./fabric-ca-client
步骤三:注册example.com的管理员Admin@example.com
#fabric-ca-client register --id.name Admin@example.com --id.type client --id.affiliation "com.example" --id.attrs '"hf.Registrar.Roles=client,orderer,peer,user","hf.Registrar.DelegateRoles=client,orderer,peer,user",hf.Registrar.Attributes=*,hf.GenCRL=true,hf.Revoker=true,hf.AffiliationMgr=true,hf.IntermediateCA=true,role=admin:ecert' --id.secret=123456 -M ./crypto-config/ordererOrganizations/example.com/msp -u http://admin1:adminpw1@localhost:7055 --home ./fabric-ca-client
#fabric-ca-client enroll -u http://Admin@example.com:123456@localhost:7055 -M ./crypto-config/ordererOrganizations/example.com/users/Admin@example.com/msp --home ./fabric-ca-client
#mkdir ./fabric-ca-client/crypto-config/ordererOrganizations/example.com/users/Admin@example.com/msp/admincerts
#cp ./fabric-ca-client/crypto-config/ordererOrganizations/example.com/users/Admin@example.com/msp/signcerts/cert.pem ./fabric-ca-client/crypto-config/ordererOrganizations/example.com/users/Admin@example.com/msp/admincerts
#mkdir ./fabric-ca-client/crypto-config/ordererOrganizations/example.com/msp/admincerts
#cp ./fabric-ca-client/crypto-config/ordererOrganizations/example.com/users/Admin@example.com/msp/signcerts/cert.pem ./fabric-ca-client/crypto-config/ordererOrganizations/example.com/msp/admincerts
步骤四:为orderer0.example.com准备msp
#fabric-ca-client register --id.name orderer0.example.com --id.type orderer --id.affiliation "com.example" --id.attrs '"role=orderer",ecert=true' --id.secret=123456 -M ./crypto-config/ordererOrganizations/example.com/msp -u http://admin1:adminpw1@localhost:7055 --home ./fabric-ca-client
#fabric-ca-client enroll -u http://orderer0.example.com:123456@localhost:7055 -M ./crypto-config/ordererOrganizations/example.com/orderers/orderer0.example.com/msp --home ./fabric-ca-client
#mkdir ./fabric-ca-client/crypto-config/ordererOrganizations/example.com/orderers/orderer0.example.com/msp/admincerts
#cp ./fabric-ca-client/crypto-config/ordererOrganizations/example.com/users/Admin@example.com/msp/signcerts/cert.pem ./fabric-ca-client/crypto-config/ordererOrganizations/example.com/orderers/orderer0.example.com/msp/admincerts
步骤五:为orderer1.example.com准备msp
#fabric-ca-client register --id.name orderer1.example.com --id.type orderer --id.affiliation "com.example" --id.attrs '"role=orderer",ecert=true' --id.secret=123456 -M ./crypto-config/ordererOrganizations/example.com/msp -u http://admin1:adminpw1@localhost:7055 --home ./fabric-ca-client
#fabric-ca-client enroll -u http://orderer1.example.com:123456@localhost:7055 -M ./crypto-config/ordererOrganizations/example.com/orderers/orderer1.example.com/msp --home ./fabric-ca-client
#mkdir ./fabric-ca-client/crypto-config/ordererOrganizations/example.com/orderers/orderer1.example.com/msp/admincerts
#cp ./fabric-ca-client/crypto-config/ordererOrganizations/example.com/users/Admin@example.com/msp/signcerts/cert.pem ./fabric-ca-client/crypto-config/ordererOrganizations/example.com/orderers/orderer1.example.com/msp/admincerts
步骤六:为orderer2.example.com准备msp
#fabric-ca-client register --id.name orderer2.example.com --id.type orderer --id.affiliation "com.example" --id.attrs '"role=orderer",ecert=true' --id.secret=123456 -M ./crypto-config/ordererOrganizations/example.com/msp -u http://admin1:adminpw1@localhost:7055 --home ./fabric-ca-client
#fabric-ca-client enroll -u http://orderer2.example.com:123456@localhost:7055 -M ./crypto-config/ordererOrganizations/example.com/orderers/orderer2.example.com/msp --home ./fabric-ca-client
#mkdir ./fabric-ca-client/crypto-config/ordererOrganizations/example.com/orderers/orderer2.example.com/msp/admincerts
#cp ./fabric-ca-client/crypto-config/ordererOrganizations/example.com/users/Admin@example.com/msp/signcerts/cert.pem ./fabric-ca-client/crypto-config/ordererOrganizations/example.com/orderers/orderer2.example.com/msp/admincerts
3. 运行和配置IntermediaCA2
步骤一:启动 ca
#cd /opt/gopath/src/github.com/hyperledger/fabric-ca/bin/ca-server
#fabric-ca-server init -b admin2:adminpw2 -u http://admin:adminpw@localhost:7054 --home ./intermediaca2
#vi ./intermediaca2/fabric-ca-server-config.yaml
修改port为7056
#fabric-ca-server start -b admin2:adminpw2 -u http://admin:adminpw@localhost:7054 --home ./intermediaca2 --cfg.affiliations.allowremove --cfg.identities.allowremove
【docker】方式运行
拷贝文件docker-intermediaca2.yml到ca-server目录
#docker-compose -f docker-intermediaca2.yaml up
#vi ./intermediaca2/fabric-ca-server-config.yaml
修改port为7056
#docker-compose -f docker-intermediaca2.yaml up
步骤二:为org1.example.com准备msp
#fabric-ca-client enroll -M ./crypto-config/peerOrganizations/org1.example.com/msp -u http://admin2:adminpw2@localhost:7056 --home ./fabric-ca-client
#fabric-ca-client affiliation list -M ./crypto-config/peerOrganizations/org1.example.com/msp -u http://admin2:adminpw2@localhost:7056 --home ./fabric-ca-client
#fabric-ca-client affiliation remove --force org1 -M ./crypto-config/peerOrganizations/org1.example.com/msp -u http://admin2:adminpw2@localhost:7056 --home ./fabric-ca-client
#fabric-ca-client affiliation remove --force org2 -M ./crypto-config/peerOrganizations/org1.example.com/msp -u http://admin2:adminpw2@localhost:7056 --home ./fabric-ca-client
#fabric-ca-client affiliation add com -M ./crypto-config/peerOrganizations/org1.example.com/msp -u http://admin2:adminpw2@localhost:7056 --home ./fabric-ca-client
#fabric-ca-client affiliation add com.example -M ./crypto-config/peerOrganizations/org1.example.com/msp -u http://admin2:adminpw2@localhost:7056 --home ./fabric-ca-client
#fabric-ca-client affiliation add com.example.org1 -M ./crypto-config/peerOrganizations/org1.example.com/msp -u http://admin2:adminpw2@localhost:7056 --home ./fabric-ca-client
步骤三:注册org1.example.com的管理员Admin@org1.example.com
#fabric-ca-client register --id.name Admin@org1.example.com --id.type client --id.affiliation "com.example.org1" --id.attrs '"hf.Registrar.Roles=client,orderer,peer,user","hf.Registrar.DelegateRoles=client,orderer,peer,user",hf.Registrar.Attributes=*,hf.GenCRL=true,hf.Revoker=true,hf.AffiliationMgr=true,hf.IntermediateCA=true,role=admin:ecert' --id.secret=123456 -M ./crypto-config/peerOrganizations/org1.example.com/msp -u http://admin2:adminpw2@localhost:7056 --home ./fabric-ca-client
#fabric-ca-client enroll -u http://Admin@org1.example.com:123456@localhost:7056 -M ./crypto-config/peerOrganizations/org1.example.com/users/Admin@org1.example.com/msp --home ./fabric-ca-client
#mkdir ./fabric-ca-client/crypto-config/peerOrganizations/org1.example.com/users/Admin@org1.example.com/msp/admincerts
#cp ./fabric-ca-client/crypto-config/peerOrganizations/org1.example.com/users/Admin@org1.example.com/msp/signcerts/cert.pem ./fabric-ca-client/crypto-config/peerOrganizations/org1.example.com/users/Admin@org1.example.com/msp/admincerts
#mkdir ./fabric-ca-client/crypto-config/peerOrganizations/org1.example.com/msp/admincerts
#cp ./fabric-ca-client/crypto-config/peerOrganizations/org1.example.com/users/Admin@org1.example.com/msp/signcerts/cert.pem ./fabric-ca-client/crypto-config/peerOrganizations/org1.example.com/msp/admincerts
步骤四:为peer0.org1.example.com准备msp
#fabric-ca-client register --id.name peer0.org1.example.com --id.type peer --id.affiliation "com.example.org1" --id.attrs '"role=peer",ecert=true' --id.secret=123456 -M ./crypto-config/peerOrganizations/org1.example.com/msp -u http://admin2:adminpw2@localhost:7056 --home ./fabric-ca-client
#fabric-ca-client enroll -u http://peer0.org1.example.com:123456@localhost:7056 -M ./crypto-config/peerOrganizations/org1.example.com/peers/peer0.org1.example.com/msp --home ./fabric-ca-client
#mkdir ./fabric-ca-client/crypto-config/peerOrganizations/org1.example.com/peers/peer0.org1.example.com/msp/admincerts
#cp ./fabric-ca-client/crypto-config/peerOrganizations/org1.example.com/users/Admin@org1.example.com/msp/signcerts/cert.pem ./fabric-ca-client/crypto-config/peerOrganizations/org1.example.com/peers/peer0.org1.example.com/msp/admincerts
步骤五:为peer1.org1.example.com准备msp
#fabric-ca-client register --id.name peer1.org1.example.com --id.type peer --id.affiliation "com.example.org1" --id.attrs '"role=peer",ecert=true' --id.secret=123456 -M ./crypto-config/peerOrganizations/org1.example.com/msp -u http://admin2:adminpw2@localhost:7056 --home ./fabric-ca-client
#fabric-ca-client enroll -u http://peer1.org1.example.com:123456@localhost:7056 -M ./crypto-config/peerOrganizations/org1.example.com/peers/peer1.org1.example.com/msp --home ./fabric-ca-client
#mkdir ./fabric-ca-client/crypto-config/peerOrganizations/org1.example.com/peers/peer1.org1.example.com/msp/admincerts
#cp ./fabric-ca-client/crypto-config/peerOrganizations/org1.example.com/users/Admin@org1.example.com/msp/signcerts/cert.pem ./fabric-ca-client/crypto-config/peerOrganizations/org1.example.com/peers/peer1.org1.example.com/msp/admincerts
4. 运行和配置IntermediaCA3
步骤一:启动 ca
#cd /opt/gopath/src/github.com/hyperledger/fabric-ca/bin/ca-server
#fabric-ca-server init -b admin3:adminpw3 -u http://admin:adminpw@localhost:7054 --home ./intermediaca3
#vi ./intermediaca3/fabric-ca-server-config.yaml
修改port为7057
#fabric-ca-server start -b admin3:adminpw3 -u http://admin:adminpw@localhost:7054 --home ./intermediaca3 --cfg.affiliations.allowremove --cfg.identities.allowremove
【docker】方式运行
拷贝文件docker-intermediaca3.yml到ca-server目录
#docker-compose -f docker-intermediaca3.yaml up
#vi ./intermediaca3/fabric-ca-server-config.yaml
修改port为7057
#docker-compose -f docker-intermediaca3.yaml up
步骤二:为org2.example.com准备msp
#fabric-ca-client enroll -M ./crypto-config/peerOrganizations/org2.example.com/msp -u http://admin3:adminpw3@localhost:7057 --home ./fabric-ca-client
#fabric-ca-client affiliation list -M ./crypto-config/peerOrganizations/org2.example.com/msp -u http://admin3:adminpw3@localhost:7057 --home ./fabric-ca-client
#fabric-ca-client affiliation remove --force org1 -M ./crypto-config/peerOrganizations/org2.example.com/msp -u http://admin3:adminpw3@localhost:7057 --home ./fabric-ca-client
#fabric-ca-client affiliation remove --force org2 -M ./crypto-config/peerOrganizations/org2.example.com/msp -u http://admin3:adminpw3@localhost:7057 --home ./fabric-ca-client
#fabric-ca-client affiliation add com -M ./crypto-config/peerOrganizations/org2.example.com/msp -u http://admin3:adminpw3@localhost:7057 --home ./fabric-ca-client
#fabric-ca-client affiliation add com.example -M ./crypto-config/peerOrganizations/org2.example.com/msp -u http://admin3:adminpw3@localhost:7057 --home ./fabric-ca-client
#fabric-ca-client affiliation add com.example.org2 -M ./crypto-config/peerOrganizations/org2.example.com/msp -u http://admin3:adminpw3@localhost:7057 --home ./fabric-ca-client
步骤三:注册org2.example.com的管理员Admin@org2.example.com
#fabric-ca-client register --id.name Admin@org2.example.com --id.type client --id.affiliation "com.example.org2" --id.attrs '"hf.Registrar.Roles=client,orderer,peer,user","hf.Registrar.DelegateRoles=client,orderer,peer,user",hf.Registrar.Attributes=*,hf.GenCRL=true,hf.Revoker=true,hf.AffiliationMgr=true,hf.IntermediateCA=true,role=admin:ecert' --id.secret=123456 -M ./crypto-config/peerOrganizations/org2.example.com/msp -u http://admin3:adminpw3@localhost:7057 --home ./fabric-ca-client
#fabric-ca-client enroll -u http://Admin@org2.example.com:123456@localhost:7057 -M ./crypto-config/peerOrganizations/org2.example.com/users/Admin@org2.example.com/msp --home ./fabric-ca-client
#mkdir ./fabric-ca-client/crypto-config/peerOrganizations/org2.example.com/users/Admin@org2.example.com/msp/admincerts
#cp ./fabric-ca-client/crypto-config/peerOrganizations/org2.example.com/users/Admin@org2.example.com/msp/signcerts/cert.pem ./fabric-ca-client/crypto-config/peerOrganizations/org2.example.com/users/Admin@org2.example.com/msp/admincerts
#mkdir ./fabric-ca-client/crypto-config/peerOrganizations/org2.example.com/msp/admincerts
#cp ./fabric-ca-client/crypto-config/peerOrganizations/org2.example.com/users/Admin@org2.example.com/msp/signcerts/cert.pem ./fabric-ca-client/crypto-config/peerOrganizations/org2.example.com/msp/admincerts
步骤四:为peer0.org2.example.com准备msp
#fabric-ca-client register --id.name peer0.org2.example.com --id.type peer --id.affiliation "com.example.org2" --id.attrs '"role=peer",ecert=true' --id.secret=123456 -M ./crypto-config/peerOrganizations/org2.example.com/msp -u http://admin3:adminpw3@localhost:7057 --home ./fabric-ca-client
#fabric-ca-client enroll -u http://peer0.org2.example.com:123456@localhost:7057 -M ./crypto-config/peerOrganizations/org2.example.com/peers/peer0.org2.example.com/msp --home ./fabric-ca-client
#mkdir ./fabric-ca-client/crypto-config/peerOrganizations/org2.example.com/peers/peer0.org2.example.com/msp/admincerts
#cp ./fabric-ca-client/crypto-config/peerOrganizations/org2.example.com/users/Admin@org2.example.com/msp/signcerts/cert.pem ./fabric-ca-client/crypto-config/peerOrganizations/org2.example.com/peers/peer0.org2.example.com/msp/admincerts
步骤五:为peer1.org2.example.com准备msp
#fabric-ca-client register --id.name peer1.org2.example.com --id.type peer --id.affiliation "com.example.org2" --id.attrs '"role=peer",ecert=true' --id.secret=123456 -M ./crypto-config/peerOrganizations/org2.example.com/msp -u http://admin3:adminpw3@localhost:7057 --home ./fabric-ca-client
#fabric-ca-client enroll -u http://peer1.org2.example.com:123456@localhost:7057 -M ./crypto-config/peerOrganizations/org2.example.com/peers/peer1.org2.example.com/msp --home ./fabric-ca-client
#mkdir ./fabric-ca-client/crypto-config/peerOrganizations/org2.example.com/peers/peer1.org2.example.com/msp/admincerts
#cp ./fabric-ca-client/crypto-config/peerOrganizations/org2.example.com/users/Admin@org2.example.com/msp/signcerts/cert.pem ./fabric-ca-client/crypto-config/peerOrganizations/org2.example.com/peers/peer1.org2.example.com/msp/admincerts
HyperLedger Fabric ca 1.2 正式环境部署的更多相关文章
- HyperLedger Fabric 1.4 kafka生产环境部署(11.1)
11.1 Kafka模式简介 上一章介绍的Solo模式只存在一个排序(orderer)服务,是一种中心化结构,一旦排序(orderer)服务出现了问题,整个区块链网络将会崩溃,为了能在正式 ...
- Hyperledger Fabric (1.0)环境部署 chaincode【转】
三.测试Fabric 其实我们在前面运行./network_setup.sh up的时候系统已经运行了一个Example02的ChainCode测试,部署上去的ChainCodeName是mycc,所 ...
- Hyperledger Fabric CA的命令行用法
介绍Hyperledger Fabric CA的命令行方式简单用法 Hyperledger Fabric CA由server和client两部分组成. 设置两个环境变量 export FABRIC_C ...
- Hyperledger Fabric CA User’s Guide——概述(二)
概述 下面的图表说明了如何将Hyperledger Fabric CA与总体的Hyperledger Fabric结构相匹配. 有两种方式与一种Hyperledger Fabric CA服务器进行交互 ...
- Hyperledger Fabric CA User’s Guide——CA用户指南(一)
Fabric CA用户指南 Hyperledger Fabric CA是一种用于Hyperledger Fabric的认证机构(CA). 它提供了如下特性: 登记身份(注册ID),或者连接到作为用户注 ...
- Hyperledger fabric 1.3版本的安装部署(原创多机多Orderer部署
首先,我们在安装前,要考虑一个问题 Hyperledger Fabric,通过指定的节点进行背书授权,才能完成交易的存储 延伸开来,就是为了实现容错.高并发.易扩展,需要zookeeper来选择排序引 ...
- ubuntu16.04 HyperLedger Fabric 1.2.0 开发环境搭建
安装准备 1. 安装git.cRUL.gcc/g++和make $ sudo apt-get update $ sudo apt-get install build-essential git cur ...
- Hyperledger Fabric CA User’s Guide——开始(三)
Fabric CA User’s Guide——开始 先决条件 安装Go 1.9+ 设置正确的GOPATH环境变量 安装了libtool和libtdhl-dev包 下面是在Ubuntu上安装libto ...
- HyperLedger Fabric 1.4 单机单节点部署(10.2)
单机单节点指在一台电脑上部署一个排序(Orderer)服务.一个组织(Org1),一个节点(Peer,属于Org1),然后运行官方案例中的example02智能合约例子,实现转财交易和查询功能.单机单 ...
随机推荐
- vue 2.6 更新变动
[原文链接] Slots:新语法,性能改进为3.0做准备改用 v-slot 指令 //默认插槽 <baz v-slot ="baz"> {{baz}} </ ba ...
- JavaScript常用字符串操作方法
1.concat() concat() 方法用于连接两个或多个字符串,并返回连接后的字符串.stringObject.concat() 与 Array.concat() 很相似. var str1=& ...
- DVB数字电视常见信号指标解释
1. 平均功率与峰值电平 峰值电平在模拟电视广播时用于表征频道信号电平强弱. 模拟电视信号是单极性.不对称的,即电视信号有一个固定黑色参考电平,比黑色亮的信号处在黑色电平线一边,同步脉冲处 ...
- Java项目性能瓶颈定位
文章目标 当Java项目出现性能瓶颈的时候,通常先是对资源消耗做分析,包括CPU,文件IO,网络IO,内存:之后再结合相应工具查找消耗主体的程序代码.本文主要介绍系统资源消耗的分析过程,以及常用的Ja ...
- Linux改变文件属性与权限
chgrp:改变文件所属用户组 chown:改变文件所有组 chmod:改变文件的权限 一.chgrp(change group的简称) 修改文件所属组:eg:chgrp users install. ...
- Windows Host 文件
Windows XP Home / Windows 7/ Windows Server 2008 c:\windows\system32\drivers\etc\hosts 如果碰到Localhost ...
- 使用extentreports美化testng报告2,增加监听
有兴趣研究了extentreports报告美化插件,但是因为发现插件有很多内容不能自定义,所以放弃了这个插件,我扩充了官方代码的demo,在testng中增加了监听,并打印了一些测试用例,现在我把两个 ...
- 装箱问题,贪心(POJ1017)
题目链接:http://poj.org/problem?id=1017 解题报告: #include<stdio.h> int main() { int n,a,b,c,d,e,f,x,y ...
- EF core 学习笔记
应该 以领域 为核心开发程序, 不应该 以数据库 entityframeworkcore entityframeworkcore.sqlserver entityframeworkcore.tool ...
- redis set类型