spring-boot 速成(8) 集成druid+mybatis
spring-boot与druid、mybatis集成(包括pageHelper分页插件), 要添加以下几个依赖项:
    compile('mysql:mysql-connector-java:6.0.5')

    compile('tk.mybatis:mapper-spring-boot-starter:1.1.1')

    compile('org.mybatis.spring.boot:mybatis-spring-boot-starter:1.3.0')

    compile('com.github.pagehelper:pagehelper-spring-boot-starter:1.1.1')

    compile('com.alibaba:druid:1.0.28')
一、集成druid
1.1 编写自定义属性类
package com.cnblogs.yjmyzz.druid;

import lombok.Data;

import org.springframework.boot.context.properties.ConfigurationProperties;

@ConfigurationProperties(prefix = "druid")

@Data

public class DruidProperties {

    private String url;

    private String username;

    private String password;

    private String driverClass;

    private int maxActive;

    private int minIdle;

    private int initialSize;

    private boolean testOnBorrow;

}
注:这里只列出了主要属性,其它属性如果需要,可自行添加
1.2 创建自定义配置类
package com.cnblogs.yjmyzz.druid;

import com.alibaba.druid.pool.DruidDataSource;

import org.springframework.beans.factory.annotation.Autowired;

import org.springframework.boot.autoconfigure.AutoConfigureBefore;

import org.springframework.boot.autoconfigure.condition.ConditionalOnClass;

import org.springframework.boot.autoconfigure.condition.ConditionalOnProperty;

import org.springframework.boot.autoconfigure.jdbc.DataSourceAutoConfiguration;

import org.springframework.boot.context.properties.EnableConfigurationProperties;

import org.springframework.context.annotation.Bean;

import org.springframework.context.annotation.Configuration;

import javax.sql.DataSource;

import java.sql.SQLException;

@Configuration

@EnableConfigurationProperties(DruidProperties.class)

@ConditionalOnClass(DruidDataSource.class)

@ConditionalOnProperty(prefix = "druid", name = "url")

@AutoConfigureBefore(DataSourceAutoConfiguration.class)

public class DruidAutoConfiguration {

    @Autowired

    private DruidProperties properties;

    @Bean

    public DataSource dataSource() {

        DruidDataSource dataSource = new DruidDataSource();

        dataSource.setUrl(properties.getUrl());

        dataSource.setUsername(properties.getUsername());

        dataSource.setPassword(properties.getPassword());

        if (properties.getInitialSize() > 0) {

            dataSource.setInitialSize(properties.getInitialSize());

        }

        if (properties.getMinIdle() > 0) {

            dataSource.setMinIdle(properties.getMinIdle());

        }

        if (properties.getMaxActive() > 0) {

            dataSource.setMaxActive(properties.getMaxActive());

        }

        dataSource.setTestOnBorrow(properties.isTestOnBorrow());

        try {

            dataSource.init();

        } catch (SQLException e) {

            throw new RuntimeException(e);

        }

        return dataSource;

    }

}
注1:如果多数据源的,参考上面的代码自行修改
注2:上面这二个类,可以抽出来放到公用类库里,方便以后复用。
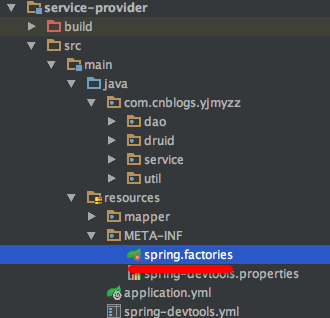
1.3 添加 META-INF/spring.factories
参考如下内容(告诉spring-boot,如何自动加载配置)
# Auto Configure

org.springframework.boot.autoconfigure.EnableAutoConfiguration=\

com.cnblogs.yjmyzz.druid.DruidAutoConfiguration
1.4 application.yml中配置
druid:

    url: jdbc:mysql://localhost:3306/study?useSSL=false

    driver-class: com.mysql.jdbc.Driver

    username: root

    password: ***

    initial-size: 1

    min-idle: 1

    max-active: 20

    test-on-borrow: true
二、集成mybatis
2.1 常规的mapper/xml配置
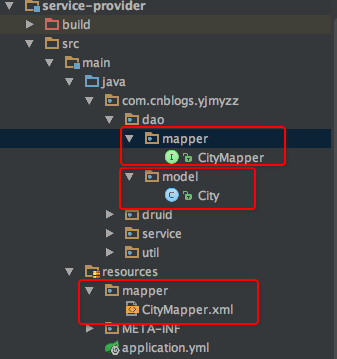
这个跟常规使用mybatis并没有什么不同,参考上图的结构
2.2 抽象一个通用Mapper
package com.cnblogs.yjmyzz.util;

import tk.mybatis.mapper.common.Mapper;

import tk.mybatis.mapper.common.MySqlMapper;

public interface MyMapper<T> extends Mapper<T>, MySqlMapper<T> {

}
写这个通用Mapper是为了后面写crud代码更简单,其它具体的XXXMapper都应该继承它,类似:
package com.cnblogs.yjmyzz.dao.mapper;

import com.cnblogs.yjmyzz.dao.model.City;

import com.cnblogs.yjmyzz.util.MyMapper;

public interface CityMapper extends MyMapper<City> {

}
2.3 application.yml配置
mybatis:

    type-aliases-package: com.cnblogs.yjmyzz.service.dao

    mapper-locations: classpath:mapper/*.xml

mapper:

    mappers:

        - com.cnblogs.yjmyzz.util.MyMapper

    not-empty: false

    identity: MYSQL

pagehelper:

    helperDialect: mysql

    reasonable: true

    supportMethodsArguments: true

    params: count=countSql
还有一个常见问题:如何在调试时输出SQL语句,以及屏蔽掉一些不需要的日志?可参考下面的配置
logging:

    level:

        root: DEBUG

        tk.mybatis: DEBUG

        com.alibaba.dubbo: ERROR

        org.apache.zookeeper: ERROR

    file: "/var/log/application/dubbo-provider.log"
最后使用的地方,代码就跟常规代码完全一样了,参考下面:
package com.cnblogs.yjmyzz.service.impl;

import com.alibaba.dubbo.config.annotation.Service;

import com.cnblogs.yjmyzz.dao.mapper.CityMapper;

import com.cnblogs.yjmyzz.dao.model.City;

import com.cnblogs.yjmyzz.service.api.DemoService;

import com.cnblogs.yjmyzz.service.api.vo.CityVO;

import com.github.pagehelper.PageHelper;

import org.slf4j.Logger;

import org.slf4j.LoggerFactory;

import org.springframework.beans.factory.annotation.Autowired;

import org.springframework.util.CollectionUtils;

import java.util.ArrayList;

import java.util.List;

/**

 * Created by 菩提树下的杨过(http:/yjmyzz.cnblogs.com) on 2017/5/21.

 */

@Service(version = "1.0.0")

public class DemoServiceImpl implements DemoService {

    Logger logger = LoggerFactory.getLogger(DemoServiceImpl.class);

    @Autowired

    CityMapper cityMapper;

    @Override

    public List<CityVO> getCityList(int pageIndex, int pageSize) {

        PageHelper.startPage(pageIndex, pageSize);//设置分页参数

        List<City> list = cityMapper.selectAll();

        com.github.pagehelper.PageInfo page = new com.github.pagehelper.PageInfo<>(list);//取页面信息

        List<CityVO> result = new ArrayList<>();

        if (!CollectionUtils.isEmpty(list)) {

            for (City c : list) {

                CityVO v = new CityVO();

                v.setCityName(c.getName());

                v.setProvinceName(c.getState());

                result.add(v);

            }

        }

        logger.info("pageInfo=> page:" + page.getPageNum() + "/" + page.getPages());

        return result;

    }

}
文中的示例代码,已经托管在github上,地址:https://github.com/yjmyzz/spring-boot-dubbo-demo
spring-boot 速成(8) 集成druid+mybatis的更多相关文章
- 14、Spring Boot 2.x 集成 Druid 数据源
14.Spring Boot 2.x 集成 Druid 数据源 完整源码: Spring-Boot-Demos
- Spring Boot 2.0 集成 Druid 数据源
一.Maven项目依赖 <!-- 开发者工具(热部署 修改classpath下的文件springboot自动重启) --> <dependency> <groupId&g ...
- 6、Spring Boot 2.x 集成 MyBatis
1.6 Spring Boot 2.x 集成 MyBatis 简介 详细介绍如何在Spring Boot中整合MyBatis,并通过注解方式实现映射. 完整源码: 1.6.1 创建 spring-bo ...
- spring boot rest 接口集成 spring security(2) - JWT配置
Spring Boot 集成教程 Spring Boot 介绍 Spring Boot 开发环境搭建(Eclipse) Spring Boot Hello World (restful接口)例子 sp ...
- spring boot rest 接口集成 spring security(1) - 最简配置
Spring Boot 集成教程 Spring Boot 介绍 Spring Boot 开发环境搭建(Eclipse) Spring Boot Hello World (restful接口)例子 sp ...
- Spring Boot 2.X(五):MyBatis 多数据源配置
前言 MyBatis 多数据源配置,最近在项目建设中,需要在原有系统上扩展一个新的业务模块,特意将数据库分库,以便减少复杂度.本文直接以简单的代码示例,如何对 MyBatis 多数据源配置. 准备 创 ...
- 7、Spring Boot 2.x 集成 Redis
1.7 Spring Boot 2.x 集成 Redis 简介 继续上篇的MyBatis操作,详细介绍在Spring Boot中使用RedisCacheManager作为缓存管理器,集成业务于一体. ...
- 06.深入浅出 Spring Boot - 数据访问之Druid
代码下载:https://github.com/Jackson0714/study-spring-boot.git 一.Druid是什么? 1.Druid是数据库连接池,功能.性能.扩展性方面都算不错 ...
- spring boot / cloud (三) 集成springfox-swagger2构建在线API文档
spring boot / cloud (三) 集成springfox-swagger2构建在线API文档 前言 不能同步更新API文档会有什么问题? 理想情况下,为所开发的服务编写接口文档,能提高与 ...
随机推荐
- JavaScript内部原理实践——真的懂JavaScript吗?(转)
通过翻译了Dmitry A.Soshnikov的关于ECMAScript-262-3 JavaScript内部原理的文章, 从理论角度对JavaScript中部分特性的内部工作机制有了一定的了解. 但 ...
- 【CodeForces】983 E. NN country 树上倍增+二维数点
[题目]E. NN country [题意]给定n个点的树和m条链,q次询问一条链(a,b)最少被多少条给定的链覆盖.\(n,m,q \leq 2*10^5\). [算法]树上倍增+二维数点(树状数组 ...
- 20155227 2016-2017-2 《Java程序设计》第五周学习总结
20155227 2016-2017-2 <Java程序设计>第五周学习总结 教材学习内容总结 语法与继承架构 使用try...catch JVM会尝试执行try区块中的程序代码,如果发生 ...
- iOS 处理缓存的三种方法
缓存处理是个相当头疼的事情,要根据需要综合应用不同的策略.总的来说有以下几种情况: 1.URL缓存,例如社交应用的帖子浏览,要在viewDidAppear:里面进行URL缓存.简单来说就是用NSURL ...
- HTTP 错误 404.0 - Not Found
当网上的那些修改程序池的方法,无法解决此问题时,可以尝试修改以下的参数: 1.控制面板-->程序-->启用或关闭Windows功能--> Internet Information S ...
- 自己动手开发Socks5代理服务器
一.Socks5协议简介 socks5是基于传输层的协议,客户端和服务器经过两次握手协商之后服务端为客户端建立一条到目标服务器的通道,在传输层转发TCP/UDP流量. 关于socks5协议规范,到处都 ...
- 01 workerman之GatewayWorker框架简单使用
1.GatewayWorker框架是什么? GatewayWorker基于Workerman开发的一个项目框架,用于快速开发TCP长连接应用,例如app推送服务端.即时IM服务端.游戏服务端.物联网. ...
- Spring Boot 多模块项目创建与配置 (一)
最近在负责的是一个比较复杂项目,模块很多,代码中的二级模块就有9个,部分二级模块下面还分了多个模块.代码中的多模块是用maven管理的,每个模块都使用spring boot框架.之前有零零散散学过一些 ...
- MVC5使用EF6 Code First--创建EF数据模型(一)
此Web应用程序演示如何使用Entity Framework 6和Visual Studio 2015创建ASP.NET MVC 5应用程序.本教程使用“Code First ”即代码先行.有关如何在 ...
- navicate连接Linux下mysql慢,卡,以及mysql相关查询,授权
方法,网上的办法是在my.ini的“[mysqld]”下面加入一行“skip-name-resolve”,就像这样: 然后保存并重启mysql服务即可. service mysqld restart ...