7.vue组件(二)--双向绑定,父子组件访问
本文主要说两件事
1. 如何实现父子组件之间的双向绑定
2. 父组件如何访问子组件的data,method, 子组件如何访问父组件的data,method等
一. 如何实现父子组件之间的双向绑定
案例描述:
父子组件双向绑定

父组件有一个message,

子组件有一个文本框

让他们两个同步变化
实现思路:
1. 子组件接收父组件传递过来的参数

2. 先实现子组件的双向绑定

3. 子组件将数据传给父组件
实现步骤:
第一步: 子组件接收父组件的data
<!DOCTYPE html>

<html lang="en">

<head>

    <meta charset="UTF-8">

    <title>Title</title>

    <script src="../../js/vue.js"></script>

</head>

<body>

    <div id="app">

        父组件的值: {{message}}

        <br>

        <input type="text" v-model="message"></input>

        <comp1 :cmessage="message" ></comp1>

    </div>

    <template id="comp1">

        <div style=" width: 600px; background-color: #085e7d; color: antiquewhite">

            <h2>子组件cmessage的值:{{cmessage}}</h2>

            <br>

        </div>

    </template>

    <script>

        Vue.component("comp1", {

            template: "#comp1",

            props: ["cmessage"],

        })

        const app = new Vue({

            el: "#app",

            data: {

                message: "hello"

            }

        });

    </script>

</body>

</html>
子组件通过属性props: ["cmessage"], 来接收父组件的message属性. 并且父组件修改message的值, 子组件跟随改变
效果如下:

第二步: 实现子组件属性的双向绑定
组件的数据绑定, 使用的也是data属性.但在组件中, data定义为一个方法
<!DOCTYPE html>

<html lang="en">

<head>

    <meta charset="UTF-8">

    <title>Title</title>

    <script src="../../js/vue.js"></script>

</head>

<body>

    <div id="app">

        父组件的值: {{message}}

        <br>

        <input type="text" v-model="message"></input>

        <comp1 :cmessage="message" ></comp1>

    </div>

    <template id="comp1">

        <div style=" width: 600px; background-color: #085e7d; color: antiquewhite">

            <h2>子组件cmessage的值:{{cmessage}}</h2>

            <h2>子组件cmess的值: {{cmess}}</h2>

            <br>

            cmess:<input type="text"  v-model="cmess" ></input>

            <br>

        </div>

    </template>

    <script>

        Vue.component("comp1", {

            template: "#comp1",

            props: ["cmessage"],

            data() {

                return {

                    "cmess": this.cmessage

                }

            }

        })

        const app = new Vue({

            el: "#app",

            data: {

                message: "hello"

            }

        });

    </script>

</body>

</html>
data中定义了属性cmess, 其值是属性cmessage的值. 我们实现cmess属性的双向绑定.cmess:<input type="text" v-model="cmess" ></input>
效果如下:
这样子组件cmess的双向绑定实现了, 但是我们发现修改父组件的时候,子组件没有变化. 修改子组件的时候, 父组件也没有变化
第三步: 子组件属性变化同步给父组件
子组件属性的改变同步给父组件, 使用的是自定义事件
<!DOCTYPE html>

<html lang="en">

<head>

    <meta charset="UTF-8">

    <title>Title</title>

    <script src="../../js/vue.js"></script>

</head>

<body>

    <div id="app">

        父组件的值: {{message}}

        <br>

        <input type="text" v-model="message"></input>

        <comp1 :cmessage="message" @csyncchange="syncchange"></comp1>

    </div>

    <template id="comp1">

        <div style=" width: 600px; background-color: #085e7d; color: antiquewhite">

            <h2>子组件cmessage的值:{{cmessage}}</h2>

            <h2>子组件cmess的值: {{cmess}}</h2>

            <br>

            cmess:<input type="text"  v-model="cmess"  @input="changeMessage"></input>

            <br>

        </div>

    </template>

    <script>

        Vue.component("comp1", {

            template: "#comp1",

            props: ["cmessage"],

            data() {

                return {

                    "cmess": this.cmessage

                }

            },

            methods: {

                changeMessage(event) {

                    console.log(event.target.value)

                    this.$emit("csyncchange", event.target.value)

                }

            },

            watch: {

                cmessage(val, oldval) {

                    console.log(val, oldval)

                    console.log()

                    this.cmess = val

                }

            }

        })

        const app = new Vue({

            el: "#app",

            data: {

                message: "hello"

            },

            methods: {

                syncchange(value) {

                    this.message = value

                }

            }

        });

    </script>

</body>

</html>
添加子组件的input事件: @input="changeMessage".
changeMessage(event) {

    console.log(event.target.value)

    this.$emit("csyncchange", event.target.value)

}
然后自定义一个csyncchange事件, 父组件监听这个事件的变化
<comp1 :cmessage="message" @csyncchange="syncchange"></comp1>
父组件自定义一个method方法, 接收事件传递的数据
methods: {

    syncchange(value) {

        this.message = value

    }

}
这样就实现了子组件修改cmess的值, 同步给父组件. 效果如下:
但是, 我们发现,在组建同步给父组件没问题, 组件只同步数据给了props属性, 而没有同步给cmess
第四步: 使用watch方法监听props属性的变化
<!DOCTYPE html>

<html lang="en">

<head>

    <meta charset="UTF-8">

    <title>Title</title>

    <script src="../../js/vue.js"></script>

</head>

<body>

    <div id="app">

        父组件的值: {{message}}

        <br>

        <input type="text" v-model="message"></input>

        <comp1 :cmessage="message" @csyncchange="syncchange"></comp1>

    </div>

    <template id="comp1">

        <div style=" width: 600px; background-color: #085e7d; color: antiquewhite">

            <h2>子组件cmessage的值:{{cmessage}}</h2>

            <h2>子组件cmess的值: {{cmess}}</h2>

            <br>

            cmess:<input type="text"  v-model="cmess"  @input="changeMessage"></input>

            <br>

        </div>

    </template>

    <script>

        Vue.component("comp1", {

            template: "#comp1",

            props: ["cmessage"],

            data() {

                return {

                    "cmess": this.cmessage

                }

            },

            methods: {

                changeMessage(event) {

                    console.log(event.target.value)

                    this.$emit("csyncchange", event.target.value)

                }

            },

            watch: {

                cmessage(val, oldval) {

                    console.log(val, oldval)

                    console.log()

                    this.cmess = val

                }

            }

        })

        const app = new Vue({

            el: "#app",

            data: {

                message: "hello"

            },

            methods: {

                syncchange(value) {

                    this.message = value

                }

            }

        });

    </script>

</body>

</html>
这一步的重点是watch方法. 同步cmessage的值给cmess. 看看效果
以上,完美实现了,父子组件的双向数据绑定.
二. 父子组件的相互访问
如果父组件想要访问子组件的属性和方法, 或者子组件想要访问父组件的属性和方法怎么办呢? 下面来看看:
1. 父组件访问子组件
父组件访问子组件有两种方式
- 1. 使用$children
- 2. 使用@refs
案例: 现在有一个父组件, 想要拿到子组件的方法或者变量.
使用$children获取
获取所有的子组件: this.$children

获取某个子组件的属性: this.$children.属性名

获取某个子组件的方法: this.$children.方法名()
<!DOCTYPE html>

<html lang="en">

<head>

    <meta charset="UTF-8">

    <title>Title</title>

</head>

<body>

<div id="app">

    <h1>第一种方法: 使用children访问子组件</h1>

    <app1-comp></app1-comp>

    <app1-comp></app1-comp>

    <app1-comp></app1-comp>

    <button @click="btnclick">按钮</button>

</div>

<template id="comp1">

    <div>

        <p>只有app1才能使用的组件</p>

        <h2>{{name}}</h2>

    </div>

</template>

<script src="../../js/vue.js"></script>

<script>

    const app1Comp = Vue.extend({

        template: comp1,

        data() {

            return {

                name : "name名称"

            }

        },

        methods: {

            getchange() {

                console.log("getchange方法")

            }

        }

    })

    let app = new Vue({

        el: "#app",

        data: {

            message: "hello"

        },

        components:{

            app1Comp: app1Comp

        },

        methods: {

            btnclick() {

                console.log("点击事件", this.$children)

                console.log("父组件访问子组件的data数据: ",this.$children[1].name)

                console.log("父组件访问子组件的方法: ",this.$children[1].getchange())

            }

        }

    });

</script>

</body>

</html>
在dom中使用了三个comp1组件. 我们可以使用this.$children来获取所有的组件
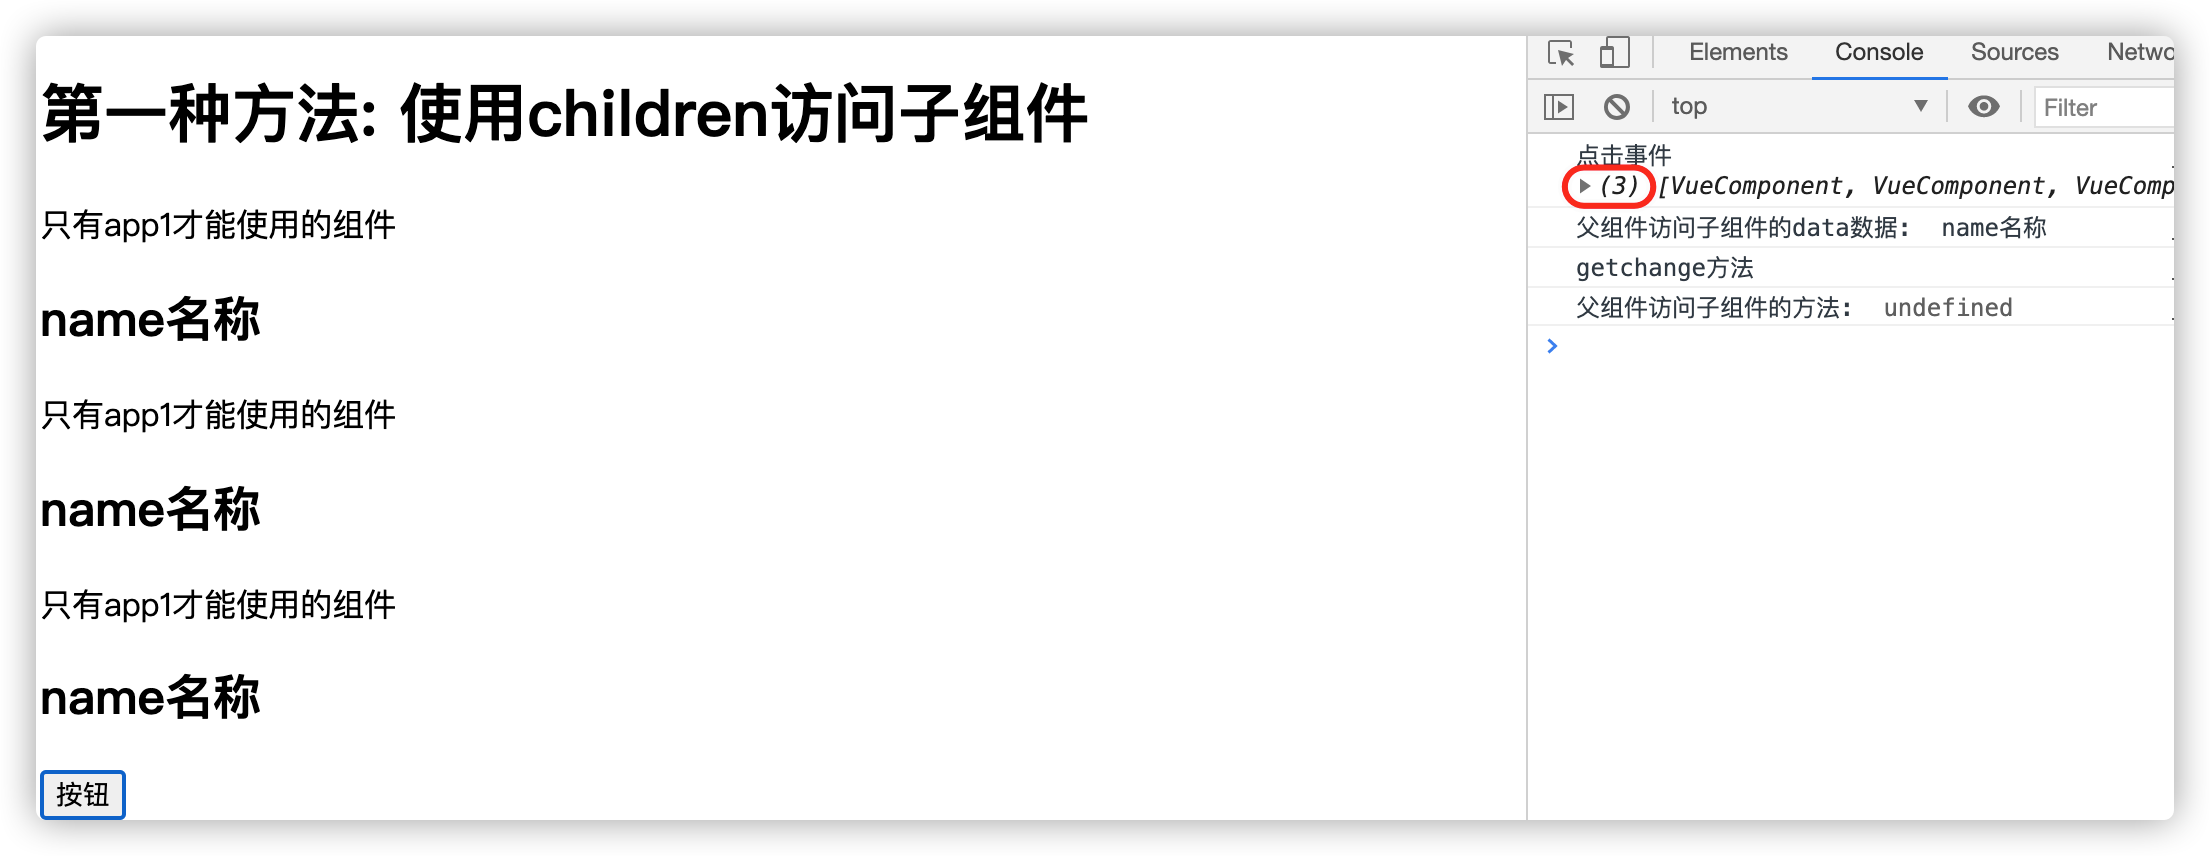
这里获取到了3个组件, 并打印了第二个组件的名称和方法
使用@refs获取属性
使用refs的好处是可以根据组件名称获取. 而不是遍历, 因为遍历的下标时可能修改的.
<!DOCTYPE html>

<html lang="en">

<head>

    <meta charset="UTF-8">

    <title>Title</title>

</head>

<body>

<!--

    父组件访问子组件有两种方式

    1. 使用$children

    2. 使用@refs

    需求: 现在有一个父组件, 想要拿到子组件的方法或者变量.

    所以, 我们先定义一个组件.

-->

<div id="app">

    <h1>第二种方法: 使用refs访问子组件</h1>

    <app2-comp ref="app21"></app2-comp>

    <app2-comp ref="app22"></app2-comp>

    <app2-comp ref="app23"></app2-comp>

    <button @click="btnclick">按钮</button>

</div>

<template id="comp1">

    <div>

        <p>只有app1才能使用的组件</p>

        <h2>{{name}}</h2>

    </div>

</template>

<script src="../../js/vue.js"></script>

<script>

    const app1Comp = Vue.extend({

        template: comp1,

        data() {

            return {

                name : "name名称"

            }

        },

        methods: {

            getchange() {

                console.log("getchange方法")

            }

        }

    })

    let app = new Vue({

        el: "#app",

        data: {

            message: "hello"

        },

        components:{

            app1Comp: app1Comp,

            app2Comp: app1Comp

        },

        methods: {

            btnclick() {

                console.log(this.$refs.app21.name)

                console.log(this.$refs.app21.getchange())

            }

        }

    });

</script>

</body>

</html>
这一次我们给组件起了名字, 通过$refs可以指定组件名,获取属性和方法

2. 子组件访问父组件
- 子组件访问父组件使用的是$parent
- 子组件访问根组件使用$root
通常new Vue()也是一个组件, 他是根组件. 如果子组件想要获取根组件的属性和方法,使用@root
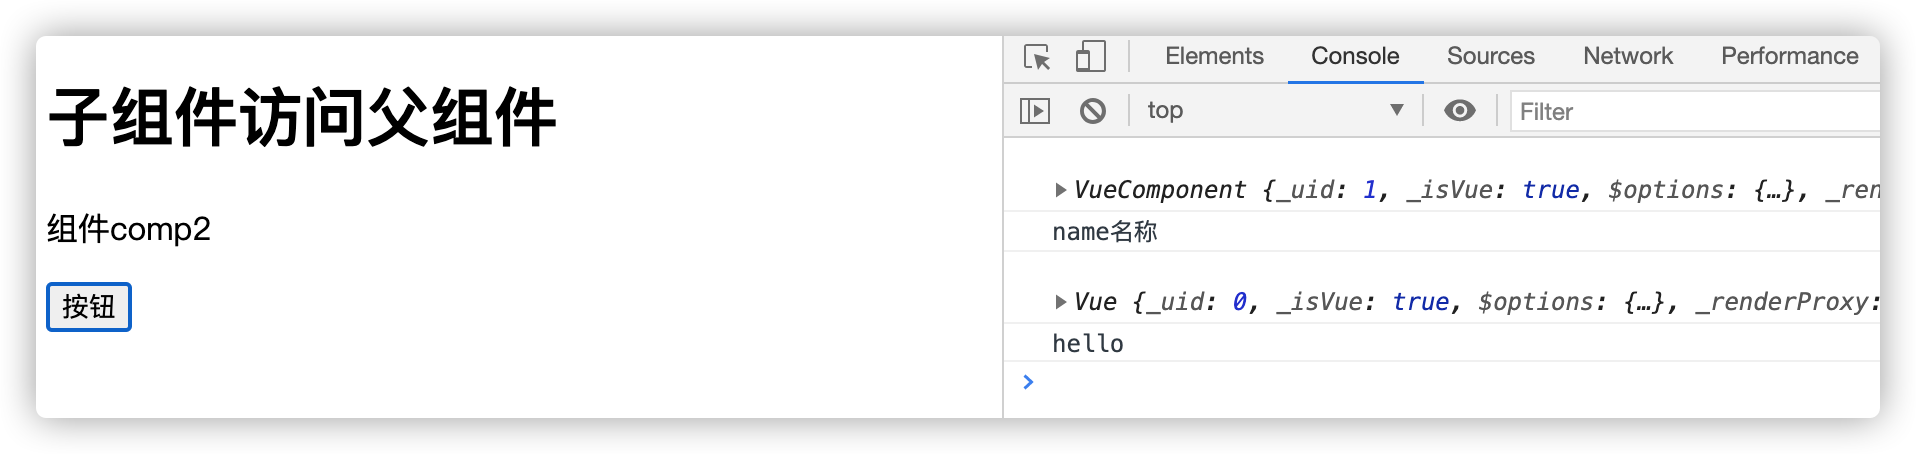
下面这个例子, 是子组件comp1里面引用了另一个组件comp2. 在comp2中获取comp1的属性和方法, 使用@parent, 这就是子组件获取父组件的属性和方法
comp2要想获取new Vue()对象的属性和方法, 使用的是$root.
<!DOCTYPE html>

<html lang="en">

<head>

    <meta charset="UTF-8">

    <title>Title</title>

</head>

<body>

<!--

    父组件访问子组件有两种方式

    1. 使用$children

    2. 使用@refs

    需求: 现在有一个父组件, 想要拿到子组件的方法或者变量.

    所以, 我们先定义一个组件.

-->

<div id="app">

    <h1>子组件访问父组件</h1>

    <comp1></comp1>

</div>

<template id="comp1">

    <div>

        <comp2></comp2>

    </div>

</template>

<template id="comp2">

    <div>

        <p>组件comp2</p>

        <button  type="text" @click="btnClick">按钮</button>

    </div>

</template>

<script src="../../js/vue.js"></script>

<script>

    const app1Comp = Vue.extend({

        template: comp1,

        data() {

            return {

                name: "name名称"

            }

        },

        components: {

            comp2: {

                template: comp2,

                methods: {

                    btnClick() {

                        console.log(this.$parent)

                        console.log(this.$parent.name)

                        // 获取root元素, 也就是vue元素

                        console.log(this.$root)

                        console.log(this.$root.message)

                    }

                }

            }

        }

    })

    let app = new Vue({

        el: "#app",

        data: {

            message: "hello"

        },

        components:{

            comp1: app1Comp

        },

        methods: {

            btnclick() {

            }

        }

    });

</script>

</body>

</html>
以上就是父子组件之间相互访问的情况
7.vue组件(二)--双向绑定,父子组件访问的更多相关文章
- 组件的通信 :provide / inject 对象进入后,就等于不用props,然后内部对象,直接复制可以接受数组,属性不能直接复制,可以用Object.assgin覆盖对象,或者Vue的set 双向绑定数据
组件的通信 :provide / inject 对象进入后,就等于不用props,然后内部对象,直接复制可以接受数组,属性不能直接复制,可以用Object.assgin覆盖对象,或者Vue的set 双 ...
- sync 简单实现 父子组件的双向绑定
这里主要是对vue文档中的sync进行一个再解释: 如果自己尝试的话,最好在已经使用emit 和prop实现了双向绑定的组件中尝试,以免出现不必要的错误: <!DOCTYPE html> ...
- 使用 v-model 实现 双向绑定.(子组件和父组件.)
vue 自定义组件 v-model双向绑定. 父子组件同步通信 父子组件通信,都是单项的,很多时候需要双向通信.方法如下: 1.父组件使用:msg.sync="aa" 子组件 ...
- 如何在Vue2中实现组件props双向绑定
Vue学习笔记-3 前言 Vue 2.x相比较Vue 1.x而言,升级变化除了实现了Virtual-Dom以外,给使用者最大不适就是移除的组件的props的双向绑定功能. 以往在Vue1.x中利用pr ...
- ionic3.x angular4.x ng4.x 自定义组件component双向绑定之自定义计数器
本文主要示例在ionic3.x环境下实现一个自定义计数器,实现后最终效果如图: 1.使用命令创建一个component ionic g component CounterInput 类似的命令还有: ...
- 自定义组件实现双向绑定v-model
自定义组件实现 v-model 双向绑定,首先要先明白 v-model,这个指令到底实现了什么? v-model实际做的事情就是:传入一个value属性值,然后监听input事件返回一个值,用该返回值 ...
- Vue的数据双向绑定和Object.defineProperty()
Vue是前端三大框架之一,也被很多人指责抄袭,说他的两个核心功能,一个数据双向绑定,一个组件化分别抄袭angular的数据双向绑定和react的组件化思想,咱们今天就不谈这种大是大非,当然我也没到达那 ...
- Vue框架之双向绑定事件
Vue框架之双向绑定事件 首先介绍下Vue框架的语法 vue通过 {{temp}} 来渲染变量 {{count+100}} # 求和 v-text # 为标签插入text文本 v-html # 为标签 ...
- 用ES6的class模仿Vue写一个双向绑定
原文地址:用ES6的class模仿Vue写一个双向绑定 点击在线尝试一下 最终效果如下: 构造器(constructor) 构造一个TinyVue对象,包含基本的el,data,methods cla ...
随机推荐
- 删括号(dp)
题目链接:https://ac.nowcoder.com/acm/problem/21303 思路:删括号的时候一定要时刻保证左括号数量比右括号多,我们可以定义dp[i][j][k]表示考虑AA前i个 ...
- 用Python修改本机适配器信息
主要参考来自[用Python干实事(一)自动修改Windows的IP.网关和DNS设置]. 使用_winreg模块来操作注册表实现相关信息的修改,它是python的内置模块.也可以通过Win32 Ex ...
- zjnu1735BOB (单调队列,单调栈)
Description Little Bob is a famous builder. He bought land and wants to build a house. Unfortunately ...
- poj2926Requirements (曼哈顿距离)
Description An undergraduate student, realizing that he needs to do research to improve his chances ...
- HDU - 1059 背包dp
题目: 有两个小朋友想要平分一大堆糖果,但他们不知道如何平分需要你的帮助,由于没有spj我们只需回答能否平分即可. 糖果大小有6种分别是1.2.3.4.5.6,每种若干颗,现在需要知道能不能将这些糖果 ...
- 牛客编程巅峰赛S1第5场 - 青铜&白银 A.凯撒密码(字符串)
题意:给你一个加密的字符串,以及偏移量,求对应的明文. 题解:根据样例,不难看出模板串是:\(0123456789ABCDEFGHIJKLMNOPQRSTUVWXYZabcdefghijklmnopq ...
- 计算文件MD5
计算文件MD5 def get_md5(file_path): md5 = None if os.path.exists(file_path): f = open(file_path, 'rb') m ...
- PTA L1-006 连续因子【暴力模拟】
一个正整数N的因子中可能存在若干连续的数字.例如630可以分解为3*5*6*7,其中5.6.7就是3个连续的数字.给定任一正整数N,要求编写程序求出最长连续因子的个数,并输出最小的连续因子序列. 输入 ...
- C# TextBlock
TextBlock 适合长文本多行显示,Label可以看成是一个简短的单行的TextBlock,只是Label可以显示图片,TextBlock只能显示纯文本 默认的文本不会分行显示,超出窗体宽度的字符 ...
- spring-cloud-netflix-config
Spring Cloud Config 在我们了解spring cloud config之前,我可以想想一个配置中心提供的核心功能应该有什么 提供服务端和客户端支持 集中管理各环境的配置文件 配置文件 ...