Android的学习第六章(布局一LinearLayout)
今天我们来说一下Android五大布局-LinearLayout布局(线性布局)
含义:线性布局,顾名思义,指的是整个Android布局中的控件摆放方式是以线性的方式摆放的,
主要作用:主要对整个界面进行基本设置使用
重要属性:android:orientation 值:horizontal 元素水平摆放 | vertical 元素垂直摆放
看代码:
<!--
第一个线性布局, 我们可以视为html中的div,用于对于整个界面进行布局
这里面 xmlns:android和xmlns:tools指定的是xml文件的命名空间,不是对布局的主要设置
但是要有
android:layout_width="match_parent"指的是当前的线性布局宽度占整个父元素,这里相对于
当前的线性布局父元素为当前的窗体,所以宽度占满窗体
android:layout_height="match_parent"指的是当前的线性布局高度占整个父元素,这里相对于
当前的线性布局父元素为当前的窗体,所以高度占满窗体
tools:context="com.example.activitylife.MainActivity":用于指定渲染上下文
android:orientation="vertical":指的是当前控件为垂直摆放
-->
<LinearLayout xmlns:android="http://schemas.android.com/apk/res/android"
xmlns:tools="http://schemas.android.com/tools"
android:layout_width="match_parent"
android:layout_height="match_parent"
tools:context="com.example.activitylife.MainActivity"
android:orientation="vertical">
<!--
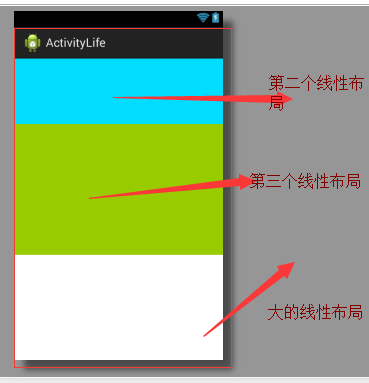
第二个线性布局,这里我们放置在大的线性布局中,作为子布局使用,设置背景颜色为蓝色
这里面android:layout_width="match_parent"指的是宽度占满父元素LinearLayout的宽度
android:layout_height="100dp"高度占100dp
android:background="@android:color/holo_blue_bright"设置背景色
-->
<LinearLayout
android:layout_width="match_parent"
android:layout_height="100dp"
android:background="@android:color/holo_blue_bright">
</LinearLayout>
<!--
第三个线性布局,这里我们放置在大的线性布局中,作为子布局使用,设置背景颜色为绿色
这里面android:layout_width="match_parent"指的是宽度占满父元素LinearLayout的宽度
android:layout_height="200dp"高度占200dp
android:background="@android:color/holo_green_light"设置背景色
-->
<LinearLayout
android:layout_width="match_parent"
android:layout_height="200dp"
android:background="@android:color/holo_green_light">
</LinearLayout>
</LinearLayout>
整段代码界面效果图是:
只是一段代码和效果图我们不知道怎么做到对一个Android界面的绘制,根据我对线性布局的简单理解,我认为是想用线性布局作出较好的布局效果主要可以这样用
使用线性布局特效对整体的元素进行布局,至于元素与元素之间的微调我们可以通过Margin属性进行微调
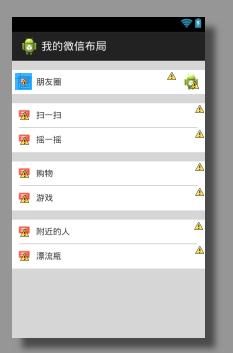
下面是一个简答的线性布局模仿微信界面的案例,希望大家能够有所收获
需要用到的字符串资源定义到string.xml文件中

<?xml version="1.0" encoding="utf-8"?>

<resources>

    <string name="app_name">我的微信布局</string>

    <string name="hello_world">Hello world!</string>

    <string name="action_settings">Settings</string>

    <!-- 微信第三面板使用 -->

    <string name="friendcacl">朋友圈</string>

    <string name="saoyisao">扫一扫</string>

    <string name="yaoyiyao">摇一摇</string>

    <string name="aroundperson">附近的人</string>

    <string name="piaoping">漂流瓶</string>

    <string name="shop">购物</string>

    <string name="game">游戏</string>

</resources>
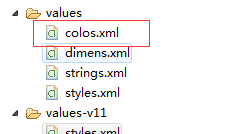
我们需要用到颜色的自定义:在color.xml文件中可以自定义我们需要的颜色
内容代码是:
<?xml version="1.0" encoding="utf-8"?>

<resources>

    <!-- 淡灰 -->

    <color name="dangrey">#CCCCCCCC</color>

    <!-- 灰色 -->

    <color name="grey">#999999</color>

    <!-- 浅灰,不清楚,大家自己可以去找颜色的定义 -->

    <color name="grey2">#888888</color>

    <!-- 绿色 -->

    <color name="green">#07bb07</color>

</resources>
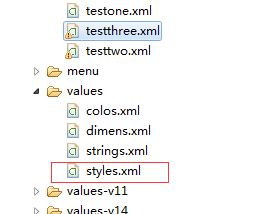
这里我们要用到样式文件先看样式文件中的定义,打开value中的styles.xml文件,把样式定义在其中
内容代码:
<resources xmlns:android="http://schemas.android.com/apk/res/android">

    <!--

        Base application theme for API 11+. This theme completely replaces

        AppBaseTheme from res/values/styles.xml on API 11+ devices.

    -->

    <style name="AppBaseTheme" parent="android:Theme.Holo.Light">

        <!-- API 11 theme customizations can go here. -->

    </style>

    <!-- 以下是样式的主要布局代码 -->

    <!--

        myteststyle样式中声明了要用到的样式

        android:layout_width:match_parent元素占满父元素

        android:layout_marginTop顶部外边距15dp

        android:background:背景色为白色

     -->

    <style name="myteststyle">

        <item name="android:layout_width">match_parent</item>

        <item name="android:layout_marginTop">15dp</item>

        <item name="android:background">@android:color/white</item>

    </style>

    <!--

        对图片控件的样式设置

        android:layout_width:设置宽度

        android:layout_height:设置高度

        android:background:引入color中的声明为grey的颜色

        android:layout_gravity:设置当前元素在父元素的位置为水平居中

    -->

    <style name="imagestyle">

        <item name="android:layout_width">295dp</item>

        <item name="android:layout_height">0.5dp</item>

        <item name="android:background">@color/grey</item>

        <item name="android:layout_gravity">center_horizontal</item>

    </style>

    <!--

        android:layout_width:设置宽度占满父元素

        android:layout_height:设置高度40dp

        android:background:引入Android内置白色

        android:orientation:设置内容水平摆放

    -->

    <style name="innerstyle">

        <item name="android:layout_width">match_parent</item>

        <item name="android:layout_height">40dp</item>

        <item name="android:background">@android:color/white</item>

        <item name="android:orientation">horizontal</item>

    </style>

</resources>
布局代码:
<!--

    外层的线性布局设置为元素垂直摆放

    那么当前线性布局中的内容都是垂直的

    这里引入了color.xml文件中的淡灰色背景色

 -->

<?xml version="1.0" encoding="utf-8"?>

<LinearLayout xmlns:android="http://schemas.android.com/apk/res/android"

    android:layout_width="match_parent"

    android:layout_height="match_parent"

    android:orientation="vertical"

    android:background="@color/dangrey">

    <!--

        第一个线性布局

        style="@style/myteststyle" 引入了我们声明的一个样式

        使得这个线性布局是--宽度占满父元素,顶部外边距15dp,背景色白色

        而线性布局也有独有的一些属性高度为40dp,内容水平摆放

    -->

    <LinearLayout

        style="@style/myteststyle"

        android:layout_height="40dp"

        android:orientation="horizontal">

        <ImageView

            android:layout_width="20dp"

            android:layout_height="20dp"

            android:layout_margin="10dp"

            android:layout_gravity="center_vertical"

            android:src="@drawable/sendmessage"/>

        <TextView

            android:layout_width="wrap_content"

            android:layout_height="wrap_content"

            android:text="@string/friendcacl"

            android:layout_gravity="center_vertical"/>

        <TextView

            android:layout_height="wrap_content"

            android:layout_width="match_parent"

            android:layout_weight="1"/>

        <ImageView

            android:layout_width="30dp"

            android:layout_height="30dp"

            android:layout_margin="8dp"

            android:layout_gravity="center_vertical"

            android:src="@drawable/ic_launcher"/>

    </LinearLayout>

    <!--

        第二个线性布局也是引入了之前的myteststyle样式,但是这里高度设置为81dp,里面放置俩个线性布局

        内容设置设置为垂直摆放

    -->

    <LinearLayout

        style="@style/myteststyle"

        android:layout_height="81dp"

        android:orientation="vertical">

        <!-- 扫一扫 -->

        <!--

            引入了style中的innerstyle样式 意思就是

            设置宽度占满父元素,设置高度40dp,引入Android内置白色,设置内容水平摆放

         -->

        <LinearLayout style="@style/innerstyle">

            <ImageView

                android:layout_width="20dp"

                android:layout_height="20dp"

                android:layout_margin="10dp"

                android:layout_gravity="center_vertical"

                android:src="@drawable/sendmessage"/>

            <TextView

                android:layout_width="wrap_content"

                android:layout_height="wrap_content"

                android:text="@string/saoyisao"

                android:layout_gravity="center_vertical"/>

            <TextView

                android:layout_height="wrap_content"

                android:layout_width="match_parent"

                android:layout_weight="1"/>

        </LinearLayout>

        <!-- 中间线条 -->

        <!--

            这里一个ImageView控件用来代替扫一扫和摇一摇中间的线条,引入了imagestyle样式

            设置宽度 295dp设置高度0.5dp,引入color中的声明为grey的颜色

            设置当前元素在父元素的位置为水平居中

         -->

        <ImageView style="@style/imagestyle"/>

        <!-- 摇一摇 -->

        <!--

             与上面的扫一扫同样,引入了innerstyle样式

            设置宽度占满父元素,设置高度40dp,引入Android内置白色,设置内容水平摆放

         -->

        <LinearLayout style="@style/innerstyle">

            <ImageView

                android:layout_width="20dp"

                android:layout_height="20dp"

                android:layout_margin="10dp"

                android:layout_gravity="center_vertical"

                android:src="@drawable/sendmessage"/>

            <TextView

                android:layout_width="wrap_content"

                android:layout_height="wrap_content"

                android:text="@string/yaoyiyao"

                android:layout_gravity="center_vertical"/>

            <TextView

                android:layout_height="wrap_content"

                android:layout_width="match_parent"

                android:layout_weight="1"/>

        </LinearLayout>

    </LinearLayout>

    <!--

        第三个与上面的线性布局大致都相同了,打击如果能看懂上面的,下面的布局都是相差无几的

    -->

    <LinearLayout

        style="@style/myteststyle"

        android:layout_height="81dp"

        android:orientation="vertical">

        <!-- 附近的人 -->

        <LinearLayout style="@style/innerstyle">

            <ImageView

                android:layout_width="20dp"

                android:layout_height="20dp"

                android:layout_margin="10dp"

                android:layout_gravity="center_vertical"

                android:src="@drawable/sendmessage"/>

            <TextView

                android:layout_width="wrap_content"

                android:layout_height="wrap_content"

                android:text="@string/shop"

                android:layout_gravity="center_vertical"/>

            <TextView

                android:layout_height="wrap_content"

                android:layout_width="match_parent"

                android:layout_weight="1"/>

        </LinearLayout>

        <!-- 中间线条 -->

        <ImageView style="@style/imagestyle"/>

        <!-- 漂流瓶 -->

        <LinearLayout style="@style/innerstyle">

            <ImageView

                android:layout_width="20dp"

                android:layout_height="20dp"

                android:layout_margin="10dp"

                android:layout_gravity="center_vertical"

                android:src="@drawable/sendmessage"/>

            <TextView

                android:layout_width="wrap_content"

                android:layout_height="wrap_content"

                android:text="@string/game"

                android:layout_gravity="center_vertical"/>

            <TextView

                android:layout_height="wrap_content"

                android:layout_width="match_parent"

                android:layout_weight="1"/>

        </LinearLayout>

    </LinearLayout>

    <!-- 第四个 -->

    <LinearLayout

        style="@style/myteststyle"

        android:layout_height="81dp"

        android:orientation="vertical">

        <!-- 附近的人 -->

        <LinearLayout style="@style/innerstyle">

            <ImageView

                android:layout_width="20dp"

                android:layout_height="20dp"

                android:layout_margin="10dp"

                android:layout_gravity="center_vertical"

                android:src="@drawable/sendmessage"/>

            <TextView

                android:layout_width="wrap_content"

                android:layout_height="wrap_content"

                android:text="@string/aroundperson"

                android:layout_gravity="center_vertical"/>

            <TextView

                android:layout_height="wrap_content"

                android:layout_width="match_parent"

                android:layout_weight="1"/>

        </LinearLayout>

        <!-- 中间线条 -->

        <ImageView style="@style/imagestyle"/>

        <!-- 漂流瓶 -->

        <LinearLayout style="@style/innerstyle">

            <ImageView

                android:layout_width="20dp"

                android:layout_height="20dp"

                android:layout_margin="10dp"

                android:layout_gravity="center_vertical"

                android:src="@drawable/sendmessage"/>

            <TextView

                android:layout_width="wrap_content"

                android:layout_height="wrap_content"

                android:text="@string/piaoping"

                android:layout_gravity="center_vertical"/>

            <TextView

                android:layout_height="wrap_content"

                android:layout_width="match_parent"

                android:layout_weight="1"/>

        </LinearLayout>

    </LinearLayout>

</LinearLayout>
以上就是我所做的一个简单的微信页面的简单布局的案例,希望大家能够有所收获,这里本人认为使用线性布局就是使用它将大致布局列举出来然后使用属性来微调,就可以做到大致的布局了
Android的学习第六章(布局一LinearLayout)的更多相关文章
- Android的学习第六章(布局一TableLayout)
今天我们来简单的说一下Android不居中的TableLayout布局(表格布局) 表格布局的意思就是将我们的布局看做为一个表格,主要用于对控件进行整齐排列 我们看一个简单的案例 <TableL ...
- Android的学习第六章(布局二--RelativeLayout)
今天我们来说一下Android布局中的Relativelayout布局(相对布局) 根据英译过来意思是相对布局,很容易理解,这一样布局使用的是元素与元素之间的微调做到布局的 含义:通过元素与元素之间的 ...
- Android Animation学习(六) View Animation介绍
Android Animation学习(六) View Animation介绍 View Animation View animation系统可以用来执行View上的Tween animation和F ...
- 201671010140. 2016-2017-2 《Java程序设计》java学习第六章
java学习第六章 本周对与java中的接口,lambda表达式与内部类进行了学习,以下是我在学习中的一些体会: 1.接口: <1>.接口中的所有常量必须是public sta ...
- 【转载】Gradle学习 第六章:构建脚本基础
转载地址:http://ask.android-studio.org/?/article/11 6.1. Projects and tasks 项目和任务Everything in Gradle si ...
- Java基础知识二次学习--第六章 常用类
第六章 常用类 时间:2017年4月26日16:14:49~2017年4月26日16:56:02 章节:06章_01节~06章_06节 视频长度:20:57+1:15+8:44+1:26+11:2 ...
- C#高级编程 (第六版) 学习 第六章:运算符和类型强制转换
第六章 运算符和类型强制转换 1,运算符 类别 运算符 算术运算符 + - * / % 逻辑运算符 & | ^ ~ && || ! 字符串连接运算符 + 增量和减量运算符 ++ ...
- android 项目学习随笔六(网络缓存)
1. 对SharePreference的封装 import android.content.Context; import android.content.SharedPreferences; /** ...
- 深度学习框架PyTorch一书的学习-第六章-实战指南
参考:https://github.com/chenyuntc/pytorch-book/tree/v1.0/chapter6-实战指南 希望大家直接到上面的网址去查看代码,下面是本人的笔记 将上面地 ...
随机推荐
- svn 服务器搭建
http://www.cnblogs.com/wrmfw/archive/2011/09/08/2170465.html 一,安装必须的软件包. $ apt-get install subversio ...
- html5 css3 loading 效果
canvas html5load1 主要思路update 实现12个点的绘制和旋转效果 var update = function() { ctx.save();// 把当前绘图状态保存起来 ct ...
- WINDOWS下PhoneGap(Cordova)安装笔记
1.首先下载Node.js 安装nodejs很简单直接点击安装文件下一步直至成功即可,安装notejs的同时npm也会同时安装 成功后打开notejs的命令行工具 输入“node -v”," ...
- mysql关于排序值的问题
- Oracle 索引创建、表分区
--EAF_WORKFLOWSTEP 表创建 CREATE TABLE EAF_WORKFLOWSTEP ( ) NOT NULL PRIMARY KEY USING INDEX TABLESPACE ...
- Oracle数据库相关问题之ORA-12541:TNS:无监听程序
在用PL/SQL Developer等客户端工具连接oracle服务器时出现ORA-12541:TNS:无监听程序的错误,如下图: 发现原来是oracle的监听没有启动,重启监听后就连接成功了,下面跟 ...
- 上下箭头选中 选项事件 JS
//上下键 选择事件 searchBackgroud 为样式,只做标记,无实质样式,因为和其他样式不兼容,只能添加CSS $(document).keydown(function (event) { ...
- lua 类支持属性不能被修改
背景 lua是类是借助表的来实现的, 类被定义后, 在使用场景下, 不希望被修改.如果被修改, 则影响的类的原始定义, 影响所有使用类的地方. 例如: --- router.lua class fil ...
- storage disk
scsi fdisk -l can not display the new disk Rescan the SCSI Bus to Add a SCSI Device Without rebootin ...
- UDP server & client
Server: import java.io.IOException; import java.net.DatagramPacket; import java.net.DatagramSocket; ...