Android-自定义开关(ViewGroup版)
虽然实现自定义开关,通常情况下都是继承View,比较合理方便快捷一些
但是我今天想去继承ViewGroup来实现自定义开关来玩玩
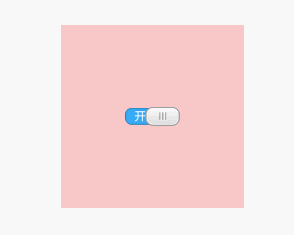
效果图:
布局代码:
<!-- 自定义开关ViewGroup版 -->

<RelativeLayout

    xmlns:android="http://schemas.android.com/apk/res/android"

    xmlns:myswitch="http://schemas.android.com/apk/res-auto"

    xmlns:tools="http://schemas.android.com/tools"

    android:layout_width="match_parent"

    android:layout_height="match_parent"

    tools:context=".upgrade.MainActivity">

    <custom.view.upgrade.my_switch_viewgroup.MySwitch2

        android:layout_width="200dp"

        android:layout_height="200dp"

        android:layout_centerInParent="true"

        android:background="#33F00000">

    </custom.view.upgrade.my_switch_viewgroup.MySwitch2>

</RelativeLayout>
效果:

布局代码:
<!-- 自定义开关ViewGroup版 -->

<RelativeLayout

    xmlns:android="http://schemas.android.com/apk/res/android"

    xmlns:myswitch="http://schemas.android.com/apk/res-auto"

    xmlns:tools="http://schemas.android.com/tools"

    android:layout_width="match_parent"

    android:layout_height="match_parent"

    tools:context=".upgrade.MainActivity">

    <custom.view.upgrade.my_switch_viewgroup.MySwitch2

        android:layout_width="200dp"

        android:layout_height="200dp"

        android:layout_centerInParent="true"

        android:background="#33F00000">

        <!-- 第一个子控件 -->

        <ImageView

            android:id="@+id/iv_switch_bg"

            android:layout_width="wrap_content"

            android:layout_height="wrap_content"

            android:src="@mipmap/switch_background"/>

        <!-- 第二个子控件 -->

        <ImageView

            android:id="@+id/iv_switch_drag"

            android:layout_width="wrap_content"

            android:layout_height="wrap_content"

            android:src="@mipmap/switch_drag"/>

    </custom.view.upgrade.my_switch_viewgroup.MySwitch2>

</RelativeLayout>
自定义开关继承ViewGroup代码:
package custom.view.upgrade.my_switch_viewgroup;

import android.content.Context;

import android.graphics.Canvas;

import android.util.AttributeSet;

import android.util.Log;

import android.view.MotionEvent;

import android.view.View;

import android.view.ViewGroup;

public class MySwitch2 extends ViewGroup implements View.OnClickListener , View.OnTouchListener {

    private static final String TAG = MySwitch2.class.getSimpleName();

    private View switchBackground;

    private View switchGrag;

    private int switchBackgroundWidth;

    private int switchBackgroundHeight;

    private int switchGragWidth;

    private int switchGragHeight;

    private boolean onCreate = false;

    // 开关的状态

    private boolean switchStatus;

    public MySwitch2(Context context, AttributeSet attrs) {

        super(context, attrs);

        // 如果是这样写的话,是给整个粉红色正方形区域都设置了点击事件

        // setOnClickListener(this);

    }

    @Override

    protected void onFinishInflate() {

        super.onFinishInflate();

        switchBackground = getChildAt(0);

        switchGrag = getChildAt(1);

        onCreate = true;

        // 给子控件设置点击事件

        switchBackground.setOnClickListener(this);

        switchGrag.setOnClickListener(this);

        // 给子控件设置Touch事件

        switchBackground.setOnTouchListener(this);

        switchGrag.setOnTouchListener(this);

    }

    @Override

    protected void onMeasure(int widthMeasureSpec, int heightMeasureSpec) {

        super.onMeasure(widthMeasureSpec, heightMeasureSpec);

        // 测量第一个子控件

        LayoutParams switchBgParams = switchBackground.getLayoutParams();

        switchBackground.measure(switchBgParams.width, switchBgParams.height);

        // 测量第二个子控件

        LayoutParams switchGragParams = switchGrag.getLayoutParams();

        switchGrag.measure(switchGragParams.width, switchGragParams.height);

        // -2 代表是wrap_content

        // Log.d(TAG, "测量方法>>> switchGragParams.width" + switchGragParams.width);

        // 得到测量后的高和宽

        if (onCreate) {

            onCreate = false;

            switchBackgroundWidth = switchBackground.getMeasuredWidth();

            switchBackgroundHeight = switchBackground.getMeasuredHeight();

            switchGragWidth = switchGrag.getMeasuredWidth();

            switchGragHeight = switchGrag.getMeasuredHeight();

        }

        // 在拖动开关的时候,测量会执行很多次,因为在拖动的过程中,开关Grag会的测量宽度会不断变化

        // Log.d(TAG, "测量方法>>> switchBackgroundWidth:" + switchBackgroundWidth + " switchGragWidth:" + switchGragWidth);

    }

    @Override

    protected void onLayout(boolean changed, int l, int t, int r, int b) {

        // 给子控件排版指定位置

        switchBackground.layout(

                getMeasuredWidth() / 2 - switchBackground.getWidth() / 2,

                getMeasuredHeight() / 2 - switchBackground.getHeight() / 2,

                switchBackground.getMeasuredWidth() + (getMeasuredWidth() / 2 - switchBackground.getWidth() / 2),

                switchBackground.getMeasuredHeight() + (getMeasuredHeight() / 2 - switchBackground.getHeight() / 2));

        /*switchGrag.layout(

                getMeasuredWidth() / 2 - (switchGrag.getWidth() / 2),

                getMeasuredHeight()  /2 - (switchGrag.getHeight() / 2),

                switchGrag.getMeasuredWidth() + getMeasuredWidth() / 2 - (switchGrag.getWidth() / 2),

                switchGrag.getMeasuredHeight() + getMeasuredHeight()  /2 - (switchGrag.getHeight() / 2));*/

        int gragL = getMeasuredWidth() / 2 - (switchBackground.getWidth() / 2);

        int gragT = getMeasuredHeight()  / 2 - (switchGrag.getHeight() / 2);

        switchGrag.layout(

                gragL,

                gragT,

                switchGrag.getMeasuredWidth() + gragL,

                switchGrag.getMeasuredHeight() + gragT);

        // 动的是两个子控件

        // scrollTo(90, 0);

    }

    /**

     * 打开开关

     * @return

     */

    /*private int getOpenSwitch() {

        return getMeasuredWidth() / 2;

    }*/

    /**

     * 关闭开关

     * @return

     */

    /*private int getCloseSwitch() {

        return getMeasuredWidth() / 2 - (switchBackground.getWidth() / 2);

    }*/

    /**

     * 开关滑动的按钮

     * @param move

     */

    private void setScrollMove(int move) {

        int countValue = (switchBackground.getMeasuredWidth() - switchGrag.getMeasuredWidth()) / 2;

        int countValue2 = (switchBackgroundWidth - switchGragWidth);

        // Log.d(TAG, "switchBackgroundWidth:" + switchBackgroundWidth + " switchGragWidth:" + switchGragWidth);

        Log.d(TAG, "move:" + move + " countValue:" + countValue +

                " getMeasuredWidth():" + switchGrag.getMeasuredWidth()

              + " getWidth():" + switchGrag.getWidth() + " countValue2:" +countValue2);

        if (move < 0) {

            move = 0;

        } else if (move > countValue2) {

            Log.d(TAG, "移动到最右边....");

            move = countValue2;

        }

        // switchGrag.setPadding(move, 0, 0, 0);

        setPaddingAction(move);

    }

    /**

     * 注意!这个是当前MySwitch2 ViewGroup的Touch事件

     * @param event

     * @return

     */

    @Override

    public boolean onTouchEvent(MotionEvent event) {

        return super.onTouchEvent(event);

    }

    /**

     * 此方法并不去绘制任何东西,Android自动回去绘制的

     * @param canvas

     */

    @Override

    protected void onDraw(Canvas canvas) {

        super.onDraw(canvas);

    }

    /**

     * 是否可以点击

     */

    private boolean isClick = true;

    @Override

    public void onClick(View v) {

        Log.d(TAG, "onClick() >>>>>>>>>>>>>>>> run");

        Log.d(TAG, "onClick() isClick:" + isClick);

        if (isClick) {

            if (!switchStatus) {

                // 说明是关闭状态,我要打开

                moveResult = (switchBackgroundWidth - switchGragWidth);

            } else {

                moveResult = 0;

            }

            switchGrag.setPadding(moveResult, 0, 0, 0);

        }

    }

    private float downX;

    private int moveResult;

    private float downTempX;

    @Override

    public boolean onTouch(View v, MotionEvent event) {

        boolean touchResult = false;

        switch (event.getAction()) {

            case MotionEvent.ACTION_DOWN:

                downX = event.getX();

                touchResult = false;

                downTempX = downX;

                isClick = true;

                break;

            case MotionEvent.ACTION_MOVE:

                moveResult += (int) (event.getX() - downX);

                setScrollMove(moveResult);

                downX = event.getX();

                if (Math.abs(event.getX() - downTempX) > 5) {

                    // 说明在滑动,就onTouch来消费掉了,不给onClick点击事件了

                    touchResult = true;

                    Log.d(TAG, "说明在滑动,就onTouch来消费掉了,不给onClick点击事件了");

                    isClick = false;

                }

                break;

            case MotionEvent.ACTION_UP:

                // int upLeft = 0;

                if (moveResult > (switchBackgroundWidth - switchGragWidth) / 2) {

                    moveResult = switchBackgroundWidth - switchGragWidth;

                } else if (moveResult < (switchBackgroundWidth - switchGragWidth) / 2) {

                    moveResult = 0;

                } else if (moveResult <= 0){

                    moveResult = 0;

                }

                setPaddingAction(moveResult);

                break;

            default:

                break;

        }

        return touchResult;

    }

    private void setPaddingAction(int value) {

        if (value > (switchBackgroundWidth - switchGragWidth) / 2) {

            switchStatus = true;

        } else if (value < (switchBackgroundWidth - switchGragWidth) / 2) {

            switchStatus = false;

        } else if (value <= 0){

            switchStatus = false;

        }

        switchGrag.setPadding(value, 0,0,0);

    }

}
Android-自定义开关(ViewGroup版)的更多相关文章
- 【Android - 自定义View】之自定义View浅析
1.概述 Android自定义View / ViewGroup的步骤大致如下: 1) 自定义属性: 2) 选择和设置构造方法: 3) 重写onMeasure()方法: 4) 重写onDraw()方法: ...
- Android自定义ViewGroup(四、打造自己的布局容器)
转载请标明出处: http://blog.csdn.net/xmxkf/article/details/51500304 本文出自:[openXu的博客] 目录: 简单实现水平排列效果 自定义Layo ...
- Android之探究viewGroup自定义子属性参数的获取流程
通常会疑惑,当使用不同的布局方式时,子view得布局属性就不太一样,比如当父布局是LinearLayout时,子view就能有效的使用它的一些布局属性如layout_weight.weightSum. ...
- android自定义viewgroup之我也玩瀑布流
先看效果图吧, 继上一篇<android自定义viewgroup实现等分格子布局>中实现的布局效果,这里稍微有些区别,每个格子的高度不规则,就是传说的瀑布流布局,一般实现这种效果,要么用第 ...
- android 自定义ViewGroup和对view进行切图动画实现滑动菜单SlidingMenu
示意图就不展示了,和上一节的一样,滑动菜单SlidingMenu效果如何大家都比较熟悉,在这里我简单说明一下用自定义ViewGroup来实现. 实现方法:我们自定义一个ViewGroup实现左右滑动, ...
- android 自定义ViewGroup和对view进行切图动画实现滑动菜单SlidingMenu[转]
http://blog.csdn.net/jj120522/article/details/8095852 示意图就不展示了,和上一节的一样,滑动菜单SlidingMenu效果如何大家都比较熟悉,在这 ...
- Android -- 自定义ViewGroup+贝塞尔+属性动画实现仿QQ点赞效果
1,昨天我们写了篇简单的贝塞尔曲线的应用,今天和大家一起写一个QQ名片上常用的给别人点赞的效果,实现效果图如下: 红心的图片比较丑,见谅见谅(哈哈哈哈哈哈).... 2,实现的思路和原理 从上面的效果 ...
- Android 自定义ViewGroup手把手教你实现ArcMenu
转载请标明出处:http://blog.csdn.net/lmj623565791/article/details/37567907 逛eoe发现这样的UI效果,感觉很不错,后来知道github上有这 ...
- Android -- 自定义ViewGroup实现FlowLayout效果
1,在开发的时候,常在我们的需求中会有这种效果,添加一个商品的一些热门标签,效果图如下: 2,从上面效果可以看得出来,这是一个自定义的ViewGroup,然后实现换行效果,让我们一起来实现一下 自定义 ...
随机推荐
- Netty私有协议栈 读书笔记
1.数据结构定义 1)netty消息:NettyMessage package com.cherry.netty.demo.protocolstack.pojo; import com.cherry. ...
- TF54000: 由于服务器时钟设置可能不正确,无法更新数据解决方案(补充)
此问题出现的原因: 服务器时间比本地时间大.由于TFS源代码的Source Control会根据签入时间做判断.如果后续签入的时间小于变更集的最新版本的时间,就会报错误“TF54000”,并拒绝签入. ...
- PAT 甲级 1011 World Cup Betting (20)(20 分)(水题,不用特别在乎精度)
1011 World Cup Betting (20)(20 分) With the 2010 FIFA World Cup running, football fans the world over ...
- 第10课 初探 Qt 中的消息处理
1. Qt消息模型 (1)Qt封装了具体操作系统的消息机制 (2)Qt遵循经典的GUI消息驱动事件模型 2. 信号与槽 (1)Qt中定义了与系统消息相关的概念 ①信号(Signal):由操作系统产生的 ...
- 关于LaaS,PaaS,SaaS一些个人的理解
关于LaaS,PaaS,SaaS一些个人的理解 其实如果从整个程序运营的角度来考虑比较好 第一个LaaS 这个也叫做Haas 就是硬件或者基础设置即服务 比如现在的 aws azure 阿 ...
- 基于 Lucene 的桌面文件搜索
开源2010年,自己在学习 Lucene 时开发的一款桌面文件搜索工具,这么多年过去了,代码一直静静存放在自己的硬盘上,与其让其沉睡,不如分享出来. 这款工具带有明显的模仿 Everything 的痕 ...
- 【333】Python3.6 格式化文本
看如下例子进行体会: min_temperature = 0 max_temperature = 300 step = 20 # \t: A tab print('Fahrenheit\tCelsiu ...
- 迷你MVVM框架 avalonjs 1.3发布
性能得到大幅改良的avalon1.3发布了. 修复$outer BUG 修复IE6-8下扫描加载Flash资源的OBJECT标签时,遇到它既没有innerHTML也没有getAttributeNode ...
- webHttpBinding、basicHttpBinding和wsHttpBinding区别
webHttpBinding is the REST-style binding, where you basically just hit a URL and get back a truckloa ...
- 14.Longest Common Prefix (String)
Write a function to find the longest common prefix string amongst an array of strings. class Solutio ...