
Android课程设计第五天欢迎界面(滑动)和图形选择
注意:课程设计只为完成任务,不做细节描述~
滑动界面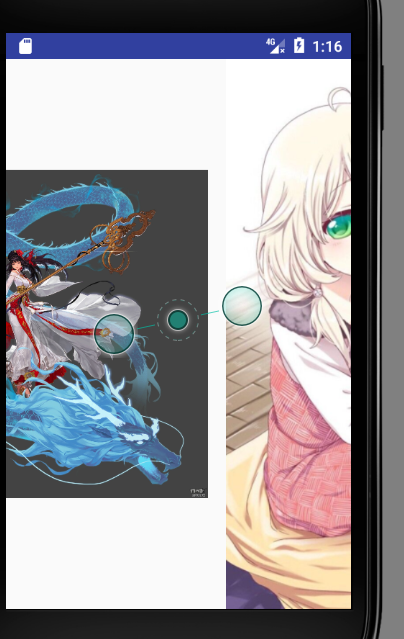
 package com.example.myapplication;

 import android.content.Intent;

 import android.os.Handler;

 import android.os.Message;

 import android.support.v7.app.AppCompatActivity;

 import android.os.Bundle;

 import Utils.AboutVersion;

 public class MainActivity extends AppCompatActivity {

     private Handler handle=null;

     @Override

     protected void onCreate(Bundle savedInstanceState) {

         super.onCreate(savedInstanceState);

         setContentView(R.layout.activity_main);

         //得到Handler的对象,默认接收消息

         handle = new Handler(){

             @Override

             public void handleMessage(Message msg) {

                 super.handleMessage(msg);

                 int a=msg.what;

                 AboutVersion aboutAboutVersion = new AboutVersion();

                 int ver= aboutAboutVersion.getSaveVersion(MainActivity.this);

                 int saveServison= aboutAboutVersion.getSaveVersion(MainActivity.this);

                 if(ver==saveServison){

                     //没有更新 跳转到主界面

                         Intent intent = new Intent(MainActivity.this,HomeActivity.class);

                         startActivity(intent);

                 }else{

                     aboutAboutVersion.saveVersion(MainActivity.this);

                     Intent intent=new Intent(MainActivity.this,WelcomeActivity.class);

                     //貌似获取版本失败了

                     startActivity(intent);

                 }

             }

         };

         new FirstThread().start();

     }

     class FirstThread extends Thread{

         @Override

         public void run() {

             super.run();

             try {

                 Thread.sleep(1000);

                 handle.sendEmptyMessage(11);

             } catch (InterruptedException e) {

                 e.printStackTrace();

             }

         }

     }

 }
package com.example.myapplication;

import android.app.FragmentManager;

import android.app.FragmentTransaction;

import android.support.v7.app.AppCompatActivity;

import android.os.Bundle;

import android.view.View;

import android.widget.Button;

public class HomeActivity extends AppCompatActivity {

    private Button btn_first,btn_theme,btn_person;

    private FirstFragment first;

    private ThemFragment ThemFragment;

    private PersonFragment PersonFragment;

    @Override

    protected void onCreate(Bundle savedInstanceState) {

        super.onCreate(savedInstanceState);

        setContentView(R.layout.activity_home);

        initView();

        //开启碎片管理器

        FragmentManager manager =getFragmentManager();

        //开启碎片事物

        FragmentTransaction action =manager.beginTransaction();

        first = new FirstFragment();

        //将fragment的对象添加到帧布局中

        action.add(R.id.frame,first);

        action.commit();

    }

    public void initView(){

        btn_first= (Button) findViewById(R.id.firstPage);

        btn_theme= (Button) findViewById(R.id.mainTheme);

        btn_person=(Button) findViewById(R.id.My);

        btn_first.setSelected(true);

        btn_person.setSelected(false);

        btn_theme.setSelected(false);

    }

    /*

        该方法是由布局文件的Onclick属性指定过来的,修饰符需要pubilc,方法名需要和Onclick的值相同

     */

    public  void Click(View v){

        btn_first.setSelected(false);

        btn_person.setSelected(false);

        btn_theme.setSelected(false);

        FragmentManager mananger = getFragmentManager();

        FragmentTransaction action=mananger.beginTransaction();

        switch (v.getId()){

            case  R.id.firstPage:

                btn_first.setSelected(true);

                if(first==null){

                    first= new FirstFragment();

                }

                action.replace(R.id.frame,first);

                action.commit();

                break;

            case R.id.mainTheme:

                btn_theme.setSelected(true);

                if(ThemFragment ==null){

                    ThemFragment =new ThemFragment();

                }

                action.replace(R.id.frame, ThemFragment);

                action.commit();

                break;

            case R.id.My:

                btn_person.setSelected(true);

                if(PersonFragment ==null){

                    PersonFragment =new PersonFragment();

                }

                action.replace(R.id.frame, PersonFragment);

                action.commit();

                break;

        }

    }

}
package com.example.myapplication;

import android.app.Fragment;

import android.os.Bundle;

import android.support.annotation.Nullable;

import android.view.LayoutInflater;

import android.view.View;

import android.view.ViewGroup;

/**

 * Created by 樱花落舞 on 2017/6/15.

 */

public class PersonFragment extends Fragment {

    @Nullable

    @Override

    public View onCreateView(LayoutInflater inflater, @Nullable ViewGroup container, Bundle savedInstanceState) {

        View view=inflater.inflate(R.layout.fragment_person,container,false);

        return view;

    }

}
package com.example.myapplication;

import android.app.Fragment;

import android.os.Bundle;

import android.support.annotation.Nullable;

import android.view.LayoutInflater;

import android.view.View;

import android.view.ViewGroup;

/**

 * Created by 樱花落舞 on 2017/6/15.

 */

public class ThemFragment extends Fragment {

    @Nullable

    @Override

    public View onCreateView(LayoutInflater inflater, @Nullable ViewGroup container, Bundle savedInstanceState) {

        View view=inflater.inflate(R.layout.fragment_them,container,false);

        return view;

    }

}
package com.example.myapplication;

import android.app.Activity;

import android.os.Bundle;

import android.provider.ContactsContract;

import android.support.annotation.Nullable;

import android.support.v4.view.ViewPager;

import android.view.View;

import android.widget.ImageView;

import Adapter.WeclomeAdapter;

/**

 * Created by 樱花落舞 on 2017/6/13.

 *          1.创建java文件继承Activity或者activity子类

 *          2.重写OnCreate()方法

 *          3.添加布局文件

 *          4.在清单文件中进行注册

 */

public class WelcomeActivity extends Activity {

    private ViewPager pager;

    private int images[]={R.mipmap.b,R.mipmap.c,R.mipmap.a};

    private ImageView views[]=new ImageView[3];

    @Override

    protected void onCreate(Bundle savedInstanceState) {

        super.onCreate(savedInstanceState);

        setContentView(R.layout.activity_welcome);

        pager= (ViewPager) findViewById(R.id.viewapger);

        for(int i=0;i<3;i++){

            ImageView view=new ImageView(WelcomeActivity.this);

            view.setImageResource(images[i]);

            views[i]=view;

        }

        WeclomeAdapter adapter= new WeclomeAdapter(views);

        pager.setAdapter(adapter);

    }

}
<?xml version="1.0" encoding="utf-8"?>

<selector xmlns:android="http://schemas.android.com/apk/res/android">

    <item android:state_selected="true"

        android:color="#ffff0000"/>

    <item android:color="#0fffff" android:state_selected="false"/>

</selector>
<?xml version="1.0" encoding="utf-8"?>

<selector xmlns:android="http://schemas.android.com/apk/res/android">

    <item android:state_selected="true" android:drawable="@mipmap/ico_screen"  />

    <item android:drawable="@mipmap/ico_screen_pred" android:state_selected="false"/>

</selector>
<?xml version="1.0" encoding="utf-8"?>

<selector xmlns:android="http://schemas.android.com/apk/res/android">

    <item android:state_selected="true" android:drawable="@mipmap/ico_personal_pred"/>

    <item android:drawable="@mipmap/ico_personal" android:state_selected="false"/>

</selector>
<?xml version="1.0" encoding="utf-8"?>

<RelativeLayout xmlns:android="http://schemas.android.com/apk/res/android"

    xmlns:app="http://schemas.android.com/apk/res-auto"

    xmlns:tools="http://schemas.android.com/tools"

    android:layout_width="match_parent"

    android:layout_height="match_parent"

    tools:context="com.example.myapplication.HomeActivity">

    <LinearLayout

        android:id="@+id/bottomBar"

        android:layout_width="match_parent"

        android:layout_height="40dp"

        android:layout_alignParentBottom="true"

        android:orientation="horizontal"

        android:background="#0ccfff"

        >

        <Button

            android:id="@+id/firstPage"

            android:drawableTop="@drawable/picture"

            android:text="首页"

            style="@style/bottomStyle"

            android:textColor="@color/barcolor"

            android:onClick="Click"

            />

        <Button

            android:id="@+id/mainTheme"

            style="@style/bottomStyle"

            android:drawableTop="@drawable/picture2"

            android:text="专题"

            android:textColor="@color/barcolor"

            android:onClick="Click"

            />

        <Button

            android:id="@+id/My"

            style="@style/bottomStyle"

            android:drawableTop="@drawable/picture3"

            android:text="我的"

            android:textColor="@color/barcolor"

            android:onClick="Click"

            />

    </LinearLayout>

    <FrameLayout

        android:layout_width="match_parent"

        android:layout_height="match_parent"

        android:id="@+id/frame"

        android:layout_above="@id/bottomBar"

        ></FrameLayout>

</RelativeLayout>
<?xml version="1.0" encoding="utf-8"?>

<RelativeLayout xmlns:android="http://schemas.android.com/apk/res/android"

    xmlns:app="http://schemas.android.com/apk/res-auto"

    xmlns:tools="http://schemas.android.com/tools"

    android:layout_width="match_parent"

    android:layout_height="match_parent"

    tools:context="com.example.myapplication.MainActivity"

    android:background="@mipmap/xiaomai">

</RelativeLayout>
<?xml version="1.0" encoding="utf-8"?>

<RelativeLayout xmlns:android="http://schemas.android.com/apk/res/android"

    android:layout_width="match_parent" android:layout_height="match_parent">

    <android.support.v4.view.ViewPager

        android:layout_width="match_parent"

        android:layout_height="match_parent"

        android:id="@+id/viewapger">

    </android.support.v4.view.ViewPager>

</RelativeLayout>
<?xml version="1.0" encoding="utf-8"?>

<RelativeLayout xmlns:android="http://schemas.android.com/apk/res/android"

    android:layout_width="match_parent" android:layout_height="match_parent"

    android:background="#075f3a">

    <ListView

        android:layout_width="match_parent"

        android:layout_height="match_parent"

        android:id="@+id/list"

        ></ListView>

</RelativeLayout>
<?xml version="1.0" encoding="utf-8"?>

<RelativeLayout xmlns:android="http://schemas.android.com/apk/res/android"

    android:layout_width="match_parent"

    android:layout_height="match_parent"

    android:background="#8b844c">

</RelativeLayout>
<?xml version="1.0" encoding="utf-8"?>

<RelativeLayout xmlns:android="http://schemas.android.com/apk/res/android"

    android:layout_width="match_parent"

    android:layout_height="match_parent"

    android:background="#4c648b">

</RelativeLayout>
<resources>

    <!-- Base application theme. -->

    <style name="AppTheme" parent="Theme.AppCompat.Light.DarkActionBar">

        <!-- Customize your theme here. -->

        <item name="colorPrimary">@color/colorPrimary</item>

        <item name="colorPrimaryDark">@color/colorPrimaryDark</item>

        <item name="colorAccent">@color/colorAccent</item>

    </style>

    <style name="bottomStyle">

        <item name="android:layout_height">match_parent</item>

        <item name="android:layout_width">0dp</item>

        <item name="android:layout_weight">1</item>

        <item name="android:background">@null</item>

        <item name="android:color">@color/barcolor</item>

        <item name="android:textSize">12sp</item>

        <item name="android:paddingTop">8dp</item>

    </style>

</resources>
Android课程设计第五天欢迎界面(滑动)和图形选择的更多相关文章
- Android课程设计第六天欢迎界面(跳转)
注意:课程设计只为完成任务,不做细节描述~ package com.example.myapplication; import android.app.Activity; import android ...
- Android课程设计第二天界面排版
注意:课程设计只为完成任务,不做细节描述~ 老师叫我们做一个这个样子,然后.. <?xml version="1.0" encoding="utf-8"? ...
- Android课程设计——博学谷1.0
本文讲述了如何应用大三下学期智能移动终端开发技术课程所学知识,完成包含服务器端.客户端程序的应用——博学谷登录模块的开发,结合java语言基本知识,例如:字符串.列表.类.数据库读写等,设计.实现一个 ...
- Android课程设计第四天ListView运用
注意:课程设计只为完成任务,不做细节描述~ 效果图 <?xml version="1.0" encoding="utf-8"?> <Relat ...
- Android课程设计第三天帧动画区间动画
注意:课程设计只为完成任务,不做细节描述~ 点火是帧动画,发射是区间动画,于是 <?xml version="1.0" encoding="utf-8"? ...
- Android课程设计第一天Android Studio安装
注意:课程设计只为完成任务,不做细节描述~ 学校有一个Android的课设,所以顺便把Android Studio安装了上去. 实际上安装过程并不复杂,只有几个地方需要注意~ 安装包可以去http:/ ...
- python课程设计笔记(五) ----Resuests+BeautifulSoup (爬虫入门)
官方参考文档(中文版): requests:http://docs.python-requests.org/zh_CN/latest/user/quickstart.html beautifulsou ...
- 【Android UI设计与开发】9:滑动菜单栏(一)开源项目SlidingMenu的使用和示例
一.SlidingMenu简介 相信大家对SlidingMenu都不陌生了,它是一种比较新的设置界面或配置界面的效果,在主界面左滑或者右滑出现设置界面效果,能方便的进行各种操作.很多优秀的应用都采用了 ...
- 【Android UI设计与开发】10:滑动菜单栏(二)SlidingMenu 动画效果的实现
其实就是在显示菜单栏时,有个动画的效果.代码比较简单,下面进行说明. 1.效果图如下,手机上查看效果更佳 2.代码实现,这里只讲解动画效果的实现,具体代码可在源代码中查看 <1> 先定义一 ...
随机推荐
- Centos6.5 安装 Oracle11gR2(64位)
Centos6.5安装 Oracle11gR2(64位) 安装centos6.5 (我的是虚拟机环境) 1. 下载centos6.5的安装包,不解释. 例如以下图: 2. 下载oracle安装包, ...
- HDOJ1004 数组还要自己初始化
#include <iostream> #include <stdio.h> #include "string.h"using namespace std; ...
- JVM手动分配内存(转载)
原文内容很详细,不利于快速浏览,所以只保留了重点 原文地址 http://blog.csdn.net/mr__fang/article/details/47723767 内存检测工具jvisualVM ...
- nginx搭建支持http和rtmp协议的流媒体server之中的一个
实验目的:让Nginx支持flv和mp4格式文件,支持RTMP协议的直播和点播:同一时候打开RTMP的HLS功能 资料:HTTP Live Streaming(缩写是 HLS)是一个由苹果公司提出的 ...
- 20170225-第三件事:FR0002测试
第三件事:FR0002测试 MATNR WERKS BERID 800000217 I010 问题,上for all entrys… 1 ...
- ReactNative Android 研究
先从ReactRootView入手吧,它是一个FrameLayout mReactRootView.startReactApplication 这的start其实是会等到inital onMeasur ...
- 前端如何展示商品属性:SKU多维属性状态判断算法的应用-Vue 实现
由于公司开发了一个电商项目,涉及到前台商品属性的展示,所以百度上找了一下!找到了 周琪力写的一个算法例子,因为作者只有jQuery 实现demo, 自己仿照 demo 实现了一个 vue 的! 周琪力 ...
- MYSQL进阶学习笔记五:MySQL函数的创建!(视频序号:进阶_13)
知识点六:MySQL函数的创建(13) 内置函数: 自定义函数: 首先查看是否已经开启了创建函数的功能: SHOW VARIABLES LIKE ‘%fun%’; 如果变量的值是OFF,那么需要开启 ...
- 不用打开Eclipse就可以执行的命令
1.android 弹出Android SDK and AVD Manager2.android list avds 列出所有创建的Android模拟器3.android list targets 列 ...
- BZOJ_1295_[SCOI2009]最长距离_dij
BZOJ_1295_[SCOI2009]最长距离_dij Description windy有一块矩形土地,被分为 N*M 块 1*1 的小格子. 有的格子含有障碍物. 如果从格子A可以走到格子B,那 ...