Spring Cloud构建微服务架构(二)分布式配置中心
注:此文不适合0基础学习者直接阅读,请先完整的将作者关于微服务的博文全部阅读一遍,如果还有疑问,可以再来阅读此文,地址:http://blog.csdn.net/sosfnima/article/details/53178157,推荐读者去找作者的书籍《Spring Cloud微服务实战》进行详细的学习
功能:
spring Cloud Config为服务端和客户端提供了分布式系统的外部化配置支持。配置服务器为各应用的所有环境提供了一个中心化的外部配置。它实现了对服务端和客户端对Spring Environment和PropertySource抽象的映射,所以它除了适用于Spring构建的应用程序,也可以在任何其他语言运行的应用程序中使用。作为一个应用可以通过部署管道来进行测试或者投入生产,我们可以分别为这些环境创建配置,并且在需要迁移环境的时候获取对应环境的配置来运行配置服务器默认采用Git来存储配置信息,这样就有助于对环境配置进行版本管理,并且可以通过git客户端工具来方便的管理和访问配置内容。当然他也提供本地化文件系统的存储方式,下面从这两方面介绍如何使用分布式配置来存储微服务应用多环境的配置内容。
构建Config Server
通过Spring Cloud构建一个Config Server,非常简单,只需要三步:
1、pom.xml中引入spring-cloud-config-server依赖,完整依赖配置如下:
<parent>

    <groupId>org.springframework.boot</groupId>

    <artifactId>spring-boot-starter-parent</artifactId>

    <version>1.5.1.RELEASE</version>

    <relativePath/> <!-- lookup parent from repository -->

</parent>

<dependencies>

    <dependency>

        <groupId>org.springframework.boot</groupId>

        <artifactId>spring-boot-starter-test</artifactId>

        <scope>test</scope>

    </dependency>

    <dependency>

        <groupId>org.springframework.cloud</groupId>

        <artifactId>spring-cloud-config-server</artifactId>

    </dependency>

</dependencies>

<dependencyManagement>

    <dependencies>

        <dependency>

            <groupId>org.springframework.cloud</groupId>

            <artifactId>spring-cloud-dependencies</artifactId>

            <version>Brixton.RELEASE</version>

            <type>pom</type>

            <scope>import</scope>

        </dependency>

    </dependencies>

</dependencyManagement>
2、创建Spring Boot的程序主类,并添加@EnableConfigServer注解,开启Config Server
@EnableConfigServer

@SpringBootApplication

public class Application {

    public static void main(String[] args) {

        new SpringApplicationBuilder(Application.class).web(true).run(args);

    }

}
3、application.properties中配置服务信息以及git信息,例如:
spring.application.name=serConfig

server.port=2227

spring.cloud.config.server.git.uri=http://10.10.10.236/spring/cloud-config.git

spring.cloud.config.server.git.searchPaths=cloud-config-repo
- spring.cloud.config.server.git.uri:配置git仓库位置,此处只需配置到工程名即可
- spring.cloud.config.server.git.searchPaths:配置仓库路径下的相对搜索位置,可以配置多个
- spring.cloud.config.server.git.username:访问git仓库的用户名
- spring.cloud.config.server.git.password:访问git仓库的用户密码
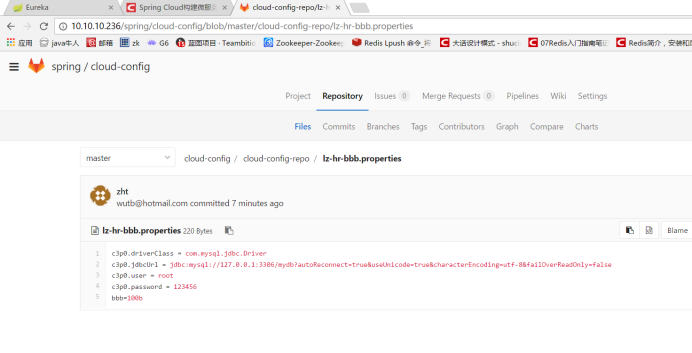
说明:因为我的例子是http://10.10.10.236/spring/cloud-config工程,而此工程下cloud-config-repo文件夹下面已经存在文件,具体文件名如下图:

我使用到的配置文件为lz-hr-aaa.properties和lz-hr-bbb.properties, 而这两个文件里面的内容从上到下分别是:

此时,配置中心的服务端已经配置完毕,我们只需要按照自己的固定的格式进行访问就行了,具体的访问路径由以下部分组成:
http://ip:port//{application}/{profile}
说明:{application}-{profile}.properties是组成文件的名称,最后一个中横线之前的所有名字都叫{application},之后的部分都叫{profile}. 所有的配置文件最好用中横线(-)加以区分。
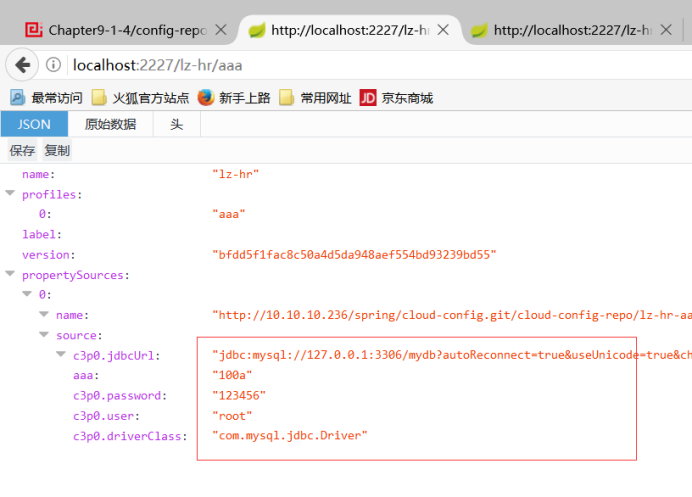
根据上面说的url组成规则,那么我的本地配置中心搭建完毕之后的路径应该是:http://localhost:2227/lz-hr/aaa,访问信息如下:
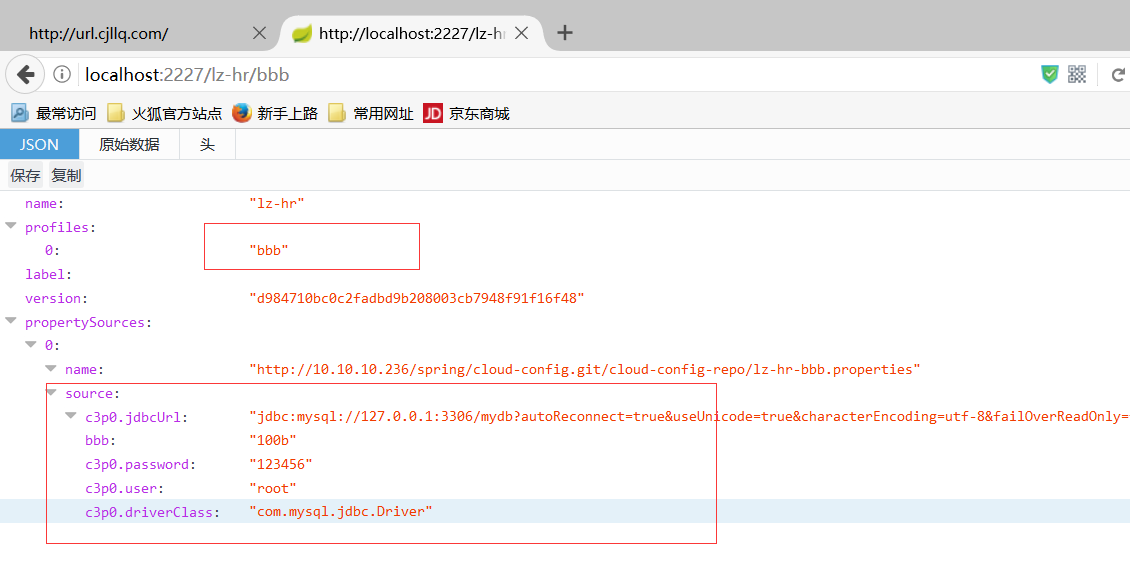
而如果我们想要看看lz-hr-bbb.properties文件,可以直接输入访问地址即可:http://localhost:2227/lz-hr/bbb,具体访问信息为:
至此,一个简单的配置中心配置完毕。
注意:
1、我们在实际开发的工程中,如果多个文件只是进行区分生产环境的话,即开发环境、测试环境等单一选项的话,各个配置里面的属性是可以一样的。
2、如果我们监控的多个文件是多选,即可以同时使用各个文件里面的属性的话,那么必须将各个文件里面的属性进行区分开。否则在下面的配置中心客户端程序中,想要具体调用某个属性,那就不可想象了。
构建Config Client
1、创建一个Spring Boot应用,在pom.xml中引入spring-cloud-starter-config依赖
完整依赖关系如下:
<parent>

    <groupId>org.springframework.boot</groupId>

    <artifactId>spring-boot-starter-parent</artifactId>

    <version>1.5.1.RELEASE</version>

    <relativePath/> <!-- lookup parent from repository -->

</parent>

<properties>

        <project.build.sourceEncoding>UTF-8</project.build.sourceEncoding>

        <java.version>1.7</java.version>

    </properties>

<dependencies>

    <dependency>

        <groupId>org.springframework.boot</groupId>

        <artifactId>spring-boot-starter-test</artifactId>

        <scope>test</scope>

    </dependency>

    <dependency>

        <groupId>org.springframework.boot</groupId>

        <artifactId>spring-boot-starter-web</artifactId>

    </dependency>

    <dependency>

        <groupId>org.springframework.cloud</groupId>

        <artifactId>spring-cloud-starter-config</artifactId>

    </dependency>

</dependencies>

<dependencyManagement>

    <dependencies>

        <dependency>

            <groupId>org.springframework.cloud</groupId>

            <artifactId>spring-cloud-dependencies</artifactId>

            <version>Brixton.RELEASE</version>

            <type>pom</type>

            <scope>import</scope>

        </dependency>

    </dependencies>

</dependencyManagement>
2、创建最基本的Spring Boot启动主类
package com.didispace;

import org.springframework.beans.factory.annotation.Autowired;

import org.springframework.boot.SpringApplication;

import org.springframework.boot.autoconfigure.SpringBootApplication;

import org.springframework.cloud.client.discovery.EnableDiscoveryClient;

import org.springframework.cloud.context.config.annotation.RefreshScope;

import org.springframework.cloud.netflix.eureka.EnableEurekaClient;

import org.springframework.cloud.netflix.feign.EnableFeignClients;

import org.springframework.context.annotation.Bean;

import org.springframework.core.env.Environment;

import com.didispace.entity.Us;

@EnableDiscoveryClient

@SpringBootApplication

public class ServiceC {

    public static void main(String[] args) throws Exception

    {

        SpringApplication.run(ServiceC.class, args);

    }

}
3、创建bootstrap.properties配置,来指定config server
server.port=2223

spring.cloud.config.hostname=127.0.0.1

spring.cloud.config.uri=http://${spring.cloud.config.hostname}:${config.port:2227}

spring.cloud.config.name=lz-hr

spring.cloud.config.profile=${config.profile:aaa},${config.profile:bbb}
此处配置了多文件,分别是lz-hr-aaa.properties和lz-hr-bbb.properties
· spring.application.name:对应前配置文件中的{application}部分
· spring.cloud.config.profile:对应前配置文件中的{profile}部分
· spring.cloud.config.label:对应前配置文件的git分支
· spring.cloud.config.uri:配置中心的地址
这里需要格外注意:上面这些属性必须配置在bootstrap.properties中,config部分内容才能被正确加载。因为config的相关配置会先于application.properties,而bootstrap.properties的加载也是先于application.properties。
程序调用:
package com.didispace.controller; import org.springframework.beans.factory.annotation.Autowired;
import org.springframework.beans.factory.annotation.Value;
import org.springframework.boot.context.properties.EnableConfigurationProperties;
import org.springframework.web.bind.annotation.RequestMapping;
import org.springframework.web.bind.annotation.RestController;
import org.springframework.cloud.context.config.annotation.RefreshScope;
import org.springframework.context.annotation.Configuration;
import org.springframework.core.env.Environment; import com.didispace.entity.Us;
import com.didispace.service.IUserService; @RefreshScope
@EnableConfigurationProperties(Us.class)
@RestController
public class Controller { //第一种调用方式
@Autowired
private Environment env; //第二种调用方式
@Value("${from}")
private String from; //第三种调用方式
@Autowired
private Us u; @RequestMapping("/from")
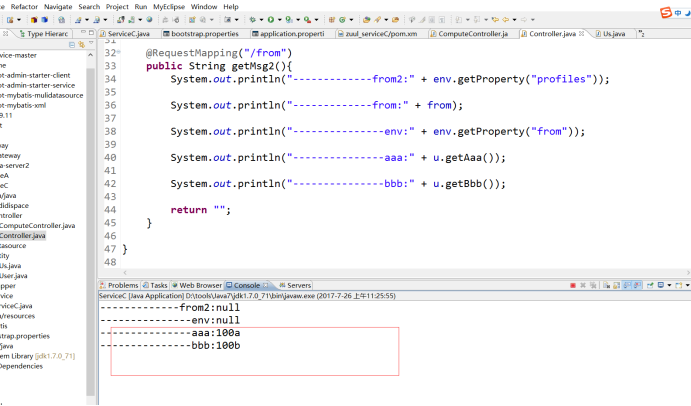
public String getMsg2(){
System.out.println("-------------from2:" + env.getProperty("profiles")); System.out.println("-------------from:" + from); System.out.println("---------------env:" + env.getProperty("from")); System.out.println("---------------aaa:" + u.getAaa()); System.out.println("---------------bbb:" + u.getBbb()); return "";
} }
下面重点说一下第三种调用方式:首先需要顶一个model类,用来存放我们从各个配置文件中读取的值,这个类必须要使用@ConfigurationProperties注解,而且各个字段名要和配置文件中的文件名一致:
Us.java文件(负责存放从git仓厘米获取到的配置文件里面的具体信息)
package com.didispace.entity;

import org.springframework.boot.context.properties.ConfigurationProperties;

@ConfigurationProperties

public class Us {

    private String aaa;

    private String bbb;

    public String getAaa() {

        return aaa;

    }

    public void setAaa(String aaa) {

        this.aaa = aaa;

    }

    public String getBbb() {

        return bbb;

    }

    public void setBbb(String bbb) {

        this.bbb = bbb;

    }

}
而上面的代码Control.Java文件中,分别需要使用@RefreshScope、@EnableConfigurationProperties(Us.class)两个注解。
@RefreshScope是热部署,即配置文件改变的话,配置中心客户端可以实时更新。
@EnableConfigurationProperties(Us.class)则是调用之前定义好了的Us.java文件,并且再通过
@Autowired

private Us u;
将具体实例注进到调用此实例的类中。
最后,看一下后台打印结果:
总结:
1、配置中心的服务端,其实就是在application.properties中添加一些配置信息就可以实现配置中心的服务端调用
2、所谓的配置中心,其实主要工作还是在配置中心客户端一侧,或者说主要工作就是在服务端一侧读取git仓中信息的过程,也就是我之前说的客户端api的3种读取配置信息。
比较:
1、通过Environment env获取配置信息,好处是可以根据键值对形式,直接获取到信息;但是它一般是进行debugger调测使用,不推荐在具体项目中大量使用
2、通过@Value("${from}")注解,如果属性过多,需要自己逐个的去注解字段,不方便复用
3、而自己封装model,我觉得比较好用,可以根据自己的需求,动态的进行属性配置,而且做到了复用的效果,推荐使用。
后期我会基于配置中心模块,专门在再整理一份关于配置数据源的博文,到时候可以详细的体验出使用自己封装model的好处
Spring Cloud构建微服务架构(二)分布式配置中心的更多相关文章
- Spring Cloud构建微服务架构
Dalston版本 由于Brixton和Camden版本的教程已经停止更新,所以笔者计划在2017年上半年完成Dalston版本的教程编写(原计划完成Camden版本教程,但由于写了两篇Dalston ...
- Spring Cloud构建微服务架构(二)服务消费者
Netflix Ribbon is an Inter Process Communication (IPC) cloud library. Ribbon primarily provides clie ...
- Spring Cloud构建微服务架构(三)消息总线
注:此文不适合0基础学习者直接阅读,请先完整的将作者关于微服务的博文全部阅读一遍,如果还有疑问,可以再来阅读此文,地址:http://blog.csdn.net/sosfnima/article/d ...
- 《Spring Cloud构建微服务架构》系列博文示例
SpringCloud-Learning 源码下载地址:http://download.csdn.net/detail/k21325/9650968 本项目内容为Spring Cloud教 ...
- Spring Cloud构建微服务架构:服务网关(路由配置)【Dalston版】
转载:http://blog.didispace.com/spring-cloud-starter-dalston-6-2/ 原创 2017-08-26 翟永超 Spring Cloud 被围观 ...
- Cola Cloud 基于 Spring Boot, Spring Cloud 构建微服务架构企业级开发平台
Cola Cloud 基于 Spring Boot, Spring Cloud 构建微服务架构企业级开发平台: https://gitee.com/leecho/cola-cloud
- Spring Cloud构建微服务架构(五)服务网关
通过之前几篇Spring Cloud中几个核心组件的介绍,我们已经可以构建一个简略的(不够完善)微服务架构了.比如下图所示: 我们使用Spring Cloud Netflix中的Eureka实现了服务 ...
- Spring Cloud构建微服务架构 - 服务网关
通过之前几篇Spring Cloud中几个核心组件的介绍,我们已经可以构建一个简略的(不够完善)微服务架构了.比如下图所示: alt 我们使用Spring Cloud Netflix中的Eureka实 ...
- 第1章 Spring Cloud 构建微服务架构(一)服务注册与发现
一.Spring Cloud 简介 Spring Cloud是一个基于Spring Boot实现的云应用开发工具,它为基于JVM的云应用开发中的配置管理.服务发现.断路器.智能路由.微代理.控制总 ...
- Spring Cloud构建微服务架构(一)服务注册与发现
Spring Cloud简介 Spring Cloud是一个基于Spring Boot实现的云应用开发工具,它为基于JVM的云应用开发中的配置管理.服务发现.断路器.智能路由.微代理.控制总线.全局锁 ...
随机推荐
- 055 Jump Game 跳跃游戏
给定一个非负整数数组,您最初位于数组的第一个索引处.数组中的每个元素表示您在该位置的最大跳跃长度.确定是否能够到达最后一个索引.示例:A = [2,3,1,1,4],返回 true.A = [3,2, ...
- HttpHelper使用记录
重新载入页面以获取源代码 var item = new HttpItem() { URL = @"http://www.xxx.com/msg/basic/?a=sendmsg", ...
- Exception sending context destroyed event to listener instance of class
五月 29, 2019 6:29:39 下午 org.apache.catalina.core.StandardContext listenerStop严重: Exception sending co ...
- javac 找不到文件 的可能原因
初学Java还不太明白,竟在些简单的事情上栽跟头,分享一下省的麻烦. 当我们配置好JDK和环境变量之后,在命令行下输入javac,说明我们的安装是正确的.
- tomcat调优方案Maximum number of threads (200) created for connector with address null and port 8091
1.tomcat6大并发出现:INFO: Maximum number of threads (200) created for connector with address null and por ...
- spring data jpa 简单使用
通过解析方法名创建查询 通过前面的例子,读者基本上对解析方法名创建查询的方式有了一个大致的了解,这也是 Spring Data JPA 吸引开发者的一个很重要的因素.该功能其实并非 Spring Da ...
- 初识Spinner
Spinner是个下拉列表框,与listview一样,也是adapterView的一个间接子类,是一个显示数据的窗口. <Spinner android:id="@+id/spinne ...
- SharePoint 2016 功能比较
SharePoint 2016中有很多功能.我们经常和客户谈论SharePoint安装时,我问他们是否计划安装SharePoint Server 2016 Standard或Enterprise.通常 ...
- linux系统及服务安全(持续更新中)
linux安全 1.隐藏NGINX和PHP版本号 curl -I "http://www.xxx.com" //检测 nginx: http段加入server_tokens of ...
- hdu 2126 Buy the souvenirs 买纪念品(01背包,略变形)
题意: 给出一些纪念品的价格,先算出手上的钱最多能买多少种东西k,然后求手上的钱能买k种东西的方案数.也就是你想要买最多种东西,而最多种又有多少种组合可选择. 思路: 01背包.显然要先算出手上的钱m ...