APUE 学习笔记(八) 线程同步
1. 进程的所有信息对该进程内的所有线程都是共享的
包括 可执行的程序文本、程序全局内存、堆内存以及文件描述符
#include <unistd.h>

#include <stdio.h>

#include <pthread.h>

void printid(const char* str)

{

    pid_t     pid = getpid();

    pthread_t tid = pthread_self();

    fprintf(stdout, "%s pid:%u,tid:%u\n", str, (unsigned int)pid, (unsigned int)tid);

}

void* thread_func(void* arg)

{

    printid("new thread: ");

    return (void*);

}

int main(int argc, char* argv[])

{

    pthread_t tid;

    int ret = pthread_create(&tid, NULL, thread_func, NULL);

    if (ret != ) {

        fprintf(stderr, "pthread_create error\n");

        return -;

    }

    printid("main thread: ");

    sleep();

    return ;

}
#include <pthread.h>

#include <stdio.h>

#include <unistd.h>

#include <assert.h>

#define NTHREADS 5

void* PrintHello(void* threadId)

{

    int tid = ((int)threadId);

    fprintf(stdout, "Hello world, thread %d\n", tid);

    pthread_exit(NULL);

}

int main(int argc, char* argv[])

{

    pthread_t threads[NTHREADS];

    int rc = ;

    for (int i = ; i < NTHREADS; ++i) {

        fprintf(stdout, "In main: creating thread %d\n", i);

        rc = pthread_create(&threads[i], NULL, PrintHello, (void*)i);

        if (rc != ) {

            fprintf(stderr, "error:return code from pthread_create is %d\n", rc);

            exit(-);

        }

    }

    pthread_exit(NULL);

}
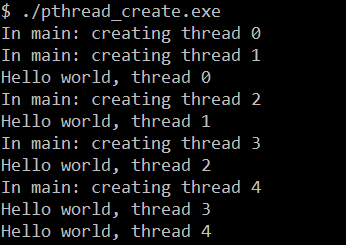
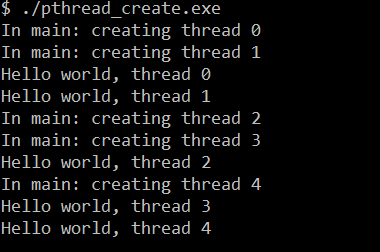
上述代码,我们创建了5个线程,每个线程打印一条包含线程编号的语句
可以预想到:每次运行程序时,结果不尽相同。因为 线程创建时并不能保证哪个线程会先执行,不能在线程调度上做出任何假设
假如我们将上述代码中
rc = pthread_create(&threads[i], NULL, PrintHello, (void*)i);
 void* PrintHello(void* threadId)

 {

     int tid = ((int)threadId);

     fprintf(stdout, "Hello world, thread %d\n", tid);

     pthread_exit(NULL);

 }
改为以下:
rc = pthread_create(&threads[i], NULL, PrintHello, (void*)&i);
void* PrintHello(void* threadId)

{

    int tid = *((int*)threadId);

    fprintf(stdout, "Hello world, thread %d\n", tid);

    pthread_exit(NULL);

}
仅有的差别就是线程执行函数的参数传递不同,执行改过之后的程序:
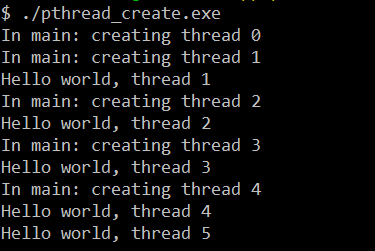
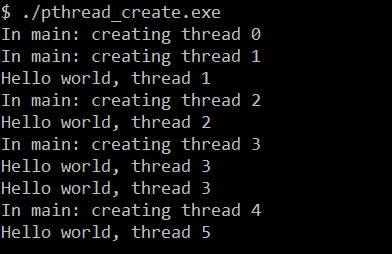
我们可以看到程序执行结果完全不同并且不正确
对于修改前:直接传递 变量i 的值,这是值语义,之后线程操作的只是 变量i 的副本,跟原来的 变量i 没有任何关系,没有竞争出现
对于修改后:传递的是 变量i 的地址(地址),这是引用语义,之后线程操作的是 原变量i,这时多个线程就出现了竞争,
因为这时 变量i 的地址是共享内存,对所有线程可见,其余5个线程通过共享内存在读这个变量i,而主线程通过 i++在写这个变量值
这之间并没有任何同步,所以5个线程读取的值并不正确
#include <stdio.h>

#include <unistd.h>

#include <pthread.h>

#include <stdlib.h>

#include <assert.h>

#include <math.h>

#define NTHREADS 5

void* busywork(void* ptr)

{

    int tid = (int)ptr;

    fprintf(stdout, "Thread %d starting...\n", tid);

    double result = 0.0;

    for (int i = ; i < ; ++i) {

        result = result + sin(i) * tan(i);

    }

    fprintf(stdout, "Thread %d done. Result = %e\n", tid, result);

    pthread_exit((void*)ptr);

}

int main(int argc, char* argv[])

{

    pthread_t thread[NTHREADS];

    pthread_attr_t attr;

    /* Initialize and set thread detached attribute */

    pthread_attr_init(&attr);

    pthread_attr_setdetachstate(&attr, PTHREAD_CREATE_JOINABLE);

    for (int i = ; i < NTHREADS; ++i) {

        fprintf(stdout, "Main: creating thread %d\n", i);

        int rc = pthread_create(&thread[i], &attr, busywork, (void*)i);

        if (rc != ) {

            fprintf(stderr, "error:return code from pthread_create is %d\n", rc);

            exit(-);

        }

    }

    /* Free attribute and wait for the other threads */

    void* status;

    pthread_attr_destroy(&attr);

    for (int i = ; i < NTHREADS; ++i) {

        int rc = pthread_join(thread[i], &status);

        if (rc != ) {

            fprintf(stderr, "error:return code from pthread_join id %d\n", rc);

            exit(-);

        }

        fprintf(stdout, "Main:completed join with thread %d having a status of %d\n", i, (int)status);

    }

    fprintf(stdout, "Main: program completed. Exiting\n");

    pthread_exit(NULL);

}
2.线程可以通过phread_cancel函数来请求取消同一进程中的其它线程
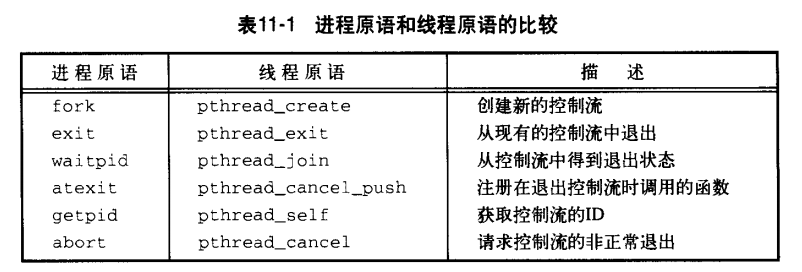
3.进程原语和线程原语的比较
3.线程同步

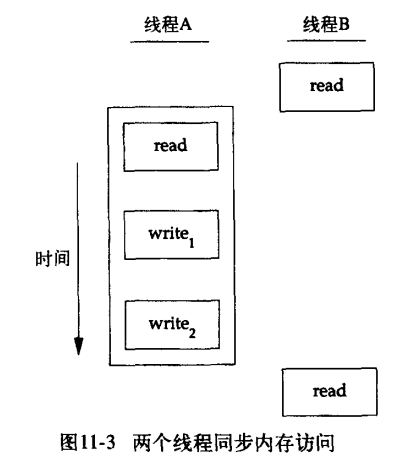
为了解决这个问题,线程必须使用锁,在同一时间只允许一个线程访问该变量
#include <unistd.h>

#include <stdio.h>

#include <stdlib.h>

#include <pthread.h>

struct foo {

    int        f_count;

    pthread_t  f_lock;

    /* more stuff here... */

};

struct foo* foo_alloc(void)

{

    struct foo* fp = malloc(sizeof(struct foo));

    if (fp != NULL) {

        fp->f_count = ;

        int ret = pthread_mutex_init(&fp->f_lock, NULL);

        if (ret != ) {

            free(fp);

            return NULL;

        }

    }

    return fp;

}

/* increase a reference to the object */

void foo_increase(struct foo* fp)

{

    assert(fp != NULL);

    pthread_mutex_lock(&fp->f_lock);

    fp->f_count++;

    pthread_mutex_unlock(&fp->f_lock);

}

/* decrease a reference to the object */

void foo_decrease(struct foo* fp)

{

    assert(fp != NULL);

    pthread_mutex_lock(&fp->f_lock);

    if (--fp->f_count == ) {

        pthread_mutex_unlock(&fp->f_lock);

        pthread_mutex_destroy(&fp->f_lock);

        free(fp);

    } else {

        pthread_mutex_unlock(&fp->f_lock);

    }

}
4.避免死锁
 #include <unistd.h>

 #include <stdio.h>

 #include <stdlib.h>

 #include <assert.h>

 #include <pthread.h>

 #define NHASH 29

 #define HASH(fp)  (((unsigned long)(fp)) % NHASH)

 pthread_mutex_t hashlock = PTHREAD_MUTEX_INITIALIZER;

 struct foo {

     struct foo*      f_next;

     int              f_count;

     pthread_mutex_t  f_lock;

     int              f_id;

     /* more stuff here... */

 };

 struct foo* fh[NHASH];

 struct foo* foo_alloc(void)

 {

     struct foo* fp = malloc(sizeof(struct foo));

     if (fp != NULL) {

         fp->f_count = ;

         int ret = pthread_mutex_init(&fp->f_lock, NULL);

         if (ret != ) {

             free(fp);

             return NULL;

         }

         int idx = HASH(fp);

         pthread_mutex_lock(&hashlock);

         fp->f_next = fh[idx];

         fh[idx] = fp->f_next;

         pthread_mutex_lock(&fp->f_lock);

         pthread_mutex_unlock(&hashlock);

         /*  continue initialization...... */

         pthread_mutex_unlock(&fp->f_lock);

     }

     return fp;

 }

 /* increase a reference to the object */

 void foo_increase(struct foo* fp)

 {

     assert(fp != NULL);

     pthread_mutex_lock(&fp->f_lock);

     fp->f_count++;

     pthread_mutex_unlock(&fp->f_lock);

 }

 /* find an existing object */

 struct foo* foo_find(int id)

 {

     struct foo* fp;

     int idx = HASH(fp);

     pthread_mutex_lock(&hashlock);

     for (fp = fh[idx]; fp != NULL; fp = fp->f_next) {

         if (fp->f_id == id) {

             foo_increase(fp);

             break;

         }

     }

     pthread_mutex_unlock(&hashlock);

     return fp;

 }

 /* decrease a reference to the object */

 void foo_decrease(struct foo* fp)

 {

     assert(fp != NULL);

     struct foo* tfp = NULL;

     int idx = ;

     pthread_mutex_lock(&fp->f_lock);

     if (fp->f_count == ) {

         pthread_mutex_unlock(&fp->f_lock);

         pthread_mutex_lock(&hashlock);

         pthread_mutex_lock(&fp->f_lock);

         /* need to recheck the condition */

         if (fp->f_count != ) {

             fp->f_count--;

             pthread_mutex_unlock(&fp->f_lock);

             pthread_mutex_unlock(&hashlock);

             return;

         }

         /* remove from list */

         idx = HASH(fp);

         tfp = fh[idx];

         if (tfp == fp) {

             fh[idx] = fp->f_next;

         } else {

             while (tfp->f_next != fp) {

                 tfp = tfp->f_next;

             }

             tfp->f_next = fp->f_next;

         }

         pthread_mutex_unlock(&hashlock);

         pthread_mutex_unlock(&fp->f_lock);

         pthread_mutex_destroy(&fp->f_lock);

         free(fp);

     } else {

         fp->f_count--;

         pthread_mutex_unlock(&fp->f_lock);

     }

 }
 #include <unistd.h>

 #include <stdio.h>

 #include <stdlib.h>

 #include <assert.h>

 #include <pthread.h>

 #define NHASH 29

 #define HASH(fp)  (((unsigned long)(fp)) % NHASH)

 struct foo {

     struct foo*       f_next;       /* protected by hashlock */

     int               f_count;      /* protected by hashlock */

     pthread_mutex_t   f_lock;

     int               f_id;

     /* more stuff here */

 };

 struct foo* fh[NHASH];

 pthread_mutex_t hashlock = PTHREAD_MUTEX_INITIALIZER;

 struct foo* foo_alloc(void)

 {

     int idx = ;

     struct foo* fp = malloc(sizeof(struct foo));

     if (fp != NULL) {

         fp->f_count = ;

         int ret = pthread_mutex_init(&fp->f_lock, NULL);

         if (ret != ) {

             free(fp);

             return NULL;

         }

         idx = HASH(fp);

         pthread_mutex_lock(&hashlock);

         fp->f_next = fh[idx];

         fh[idx] = fp->f_next;

         pthread_mutex_lock(&fp->f_count);

         pthread_mutex_unlock(&hashlock);

         /* continue initialization */

     }

     return fp;

 }

 void foo_increase(struct foo* fp)

 {

     assert(fp != NULL);

     pthread_mutex_lock(&hashlock);

     fp->f_count++;

     pthread_mutex_unlock(&hashlock);

 }

 struct foo* foo_find(int id)

 {

     struct foo* fp = NULL;

     int idx = HASH(fp);

     pthread_mutex_lock(&hashlock);

     for (fp = fh[idx]; fp != NULL; fp = fp->f_next) {

         if (fp->f_id == id) {

             fp->f_count++;

             break;

         }

     }

     pthread_mutex_unlock(&hashlock);

     return fp;

 }

 void foo_decrease(struct foo* fp)

 {

     assert(fp != NULL);

     struct foo* tfp = NULL;

     int idx = ;

     pthread_mutex_lock(&hashlock);

     if (--fp->f_count == ) {

         idx = HASH(fp);

         tfp = fh[idx];

         if (tfp == fp) {

             fh[idx] = fp->f_next;

         } else {

             while (tfp->f_next != fp) {

                 tfp = tfp->f_next;

             }

             tfp->f_next = fp->f_next;

         }

         pthread_mutex_unlock(&hashlock);

         pthread_mutex_destroy(&fp->f_lock);

         free(fp);

     } else {

         pthread_mutex_unlock(&hashlock);

     }

 }
5.读写锁
6.条件变量
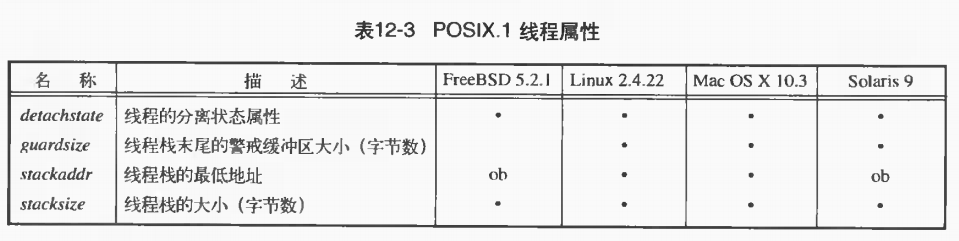
7. 线程属性
#include<pthread.h>

int pthread_attr_init(pthread_attr_t* attr);

int pthread_attr_destroy(pthread_attr_t* attr);
8.互斥量属性
#include <pthread.h>

int pthread_mutexattr_init(pthread_mutexattr_t* attr);

int pthread_mutexattr_destroy(pthread_mutexattr_t* attr);
9.重入、线程安全
APUE 学习笔记(八) 线程同步的更多相关文章
- APUE学习笔记——11 线程同步、互斥锁、自旋锁、条件变量
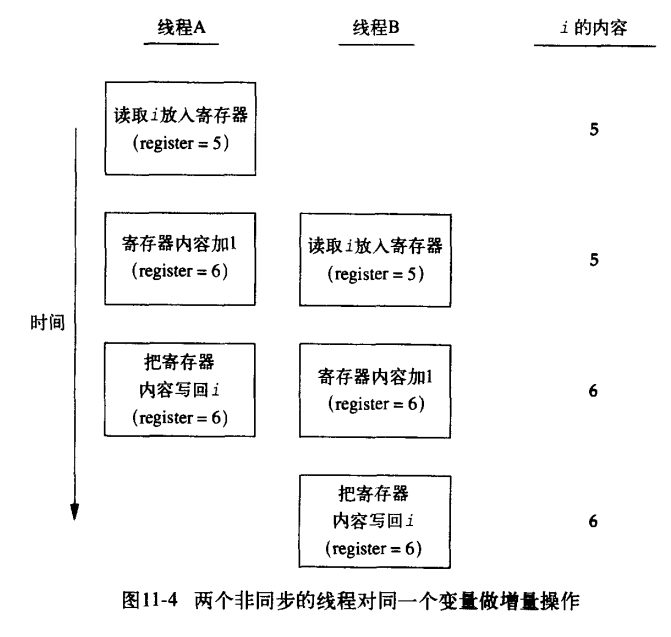
线程同步 同属于一个进程的不同线程是共享内存的,因而在执行过程中需要考虑数据的一致性. 假设:进程有一变量i=0,线程A执行i++,线程B执行i++,那么最终i的取值是多少呢?似乎一定 ...
- APUE学习笔记6——线程和线程同步
1 概念 线程是程序执行流的最小单元.线程是进程中的一个实体,是被系统独立调度和分派的基本单位,线程自己不拥有系统资源,只拥有一点在运行中必不可少的资源,但它可与同属一个进程的其它线程共享进程所拥有的 ...
- linux学习笔记之线程同步机制
一.基础知识. 1:线程同步机制:互斥量,读写锁,条件变量,自旋锁,屏障. 1,互斥量:每个进程访问被互斥量保护的资源时,都需要先对互斥量进行判断. 1)互斥量重要属性:进程共享属性,健壮属性,类型属 ...
- C#学习笔记之线程 - 同步上下文
同步上下文(Synchronization Contexts) 手动使用锁的一个替代方案是去声明锁.通过派生ContextBoundObject和应用Synchronization属性,你告诉CLR自 ...
- Linux学习笔记21——线程同步的两种方式
一 用信号量同步 1 信号量函数的名字都以sem_开头,线程中使用的基本信号量函数有4个 2 创建信号量 #include<semaphore.h> int sem_init(sem_t ...
- APUE学习笔记——11 线程基础
线程标识 线程由线程号进行标识.线程号仅在线程所属的进程环境中有效.也就是说属于不同进程的两个线程可能线程号一样. 线程标识用结构体pthread_t tid表示.与线程Id相关的函数如下: 比较两个 ...
- 操作系统学习笔记----进程/线程模型----Coursera课程笔记
操作系统学习笔记----进程/线程模型----Coursera课程笔记 进程/线程模型 0. 概述 0.1 进程模型 多道程序设计 进程的概念.进程控制块 进程状态及转换.进程队列 进程控制----进 ...
- 【opencv学习笔记八】创建TrackBar轨迹条
createTrackbar这个函数我们以后会经常用到,它创建一个可以调整数值的轨迹条,并将轨迹条附加到指定的窗口上,使用起来很方便.首先大家要记住,它往往会和一个回调函数配合起来使用.先看下他的函数 ...
- Java IO学习笔记八:Netty入门
作者:Grey 原文地址:Java IO学习笔记八:Netty入门 多路复用多线程方式还是有点麻烦,Netty帮我们做了封装,大大简化了编码的复杂度,接下来熟悉一下netty的基本使用. Netty+ ...
随机推荐
- ES6中const的用法
const声明一个只读的常量.一旦声明,常量的值就不能改变.且const一旦声明变量,就必须立即初始化,不能留到以后赋值. const的作用域与let命令相同:只在声明所在的块级作用域内有效. con ...
- C09 指针
目录 指针相关概念 指针变量 null指针 指针的算术运算 指针数组 指向指针的指针 传递指针给函数 从函数返回指针 指针相关概念 变量 如果在程序中定义了一个变量,在对程序进行编译时,系统就会为这个 ...
- 01_1_Struts环境搭建
01_1_Struts环境搭建 1. MyEclipse配置部分 1.1创建项目 新建new—>Project—>Web Project—>Project Name(配置项目名)—& ...
- iOS 资源大全整理
这是个精心编排的列表,它包含了优秀的 iOS 框架.库.教程.XCode 插件.组件等等. 这个列表分为以下几个部分:框架( Frameworks ).组件( Components ).测试( Tes ...
- NOIP模拟赛 某种数列问题
众所周知,chenzeyu97有无数的妹子(阿掉!>_<),而且他还有很多恶趣味的问题,继上次纠结于一排妹子的排法以后,今天他有非(chi)常(bao)认(cheng)真(zhe)去研究一 ...
- 拓展jQuery的serialize(),将form表单转化为json对象
jQuery 的 serialize() 方法经常会报 Uncaught TypeError: JSON.serializeObject is not a function 的错误, 原装的方法真的一 ...
- MyBatis的mapper.xml文件的参数问题:org.apache.ibatis.builder.IncompleteElementException: Could not find parameter map
配置参数类型有两种选择,即:parameterType和parameterMap 不管参数是否是基本数据类型还是map类型,都是使用parameterType. 版权声明:本文为博主原创文章,未经博主 ...
- 实验二 JSP基本动态元素的使用
实验二 JSP基本动态元素的使用 实验性质:验证性 实验学时: 2学时 实验地点: 一 .实验目的与要求 1.掌握JSP中声明变量.定义方法.java程序片及表达式的使 ...
- manjaro kde netease-cloud-music 网易云音乐
- 【HIHOCODER 1181】欧拉路·二
描述 在上一回中小Hi和小Ho控制着主角收集了分散在各个木桥上的道具,这些道具其实是一块一块骨牌. 主角继续往前走,面前出现了一座石桥,石桥的尽头有一道火焰墙,似乎无法通过. 小Hi注意到在桥头有一张 ...