tomcat源码--springboot整合tomcat源码分析
1.测试代码,一个简单的springboot web项目:地址:https://gitee.com/yangxioahui/demo_mybatis.git
一:tomcat的主要架构:1.如果我们下载了tomcat的安装包,可以在解压后的文件夹看到server.xml文件:

内容如下:
<?xml version='1.0' encoding='utf-8'?> <Server port="8005" shutdown="SHUTDOWN">
<Listener className="org.apache.catalina.startup.VersionLoggerListener" />
<Listener className="org.apache.catalina.core.AprLifecycleListener" SSLEngine="on" />
<!--Initialize Jasper prior to webapps are loaded. Documentation at /docs/jasper-howto.html -->
<Listener className="org.apache.catalina.core.JasperListener" />
<!-- Prevent memory leaks due to use of particular java/javax APIs-->
<Listener className="org.apache.catalina.core.JreMemoryLeakPreventionListener" />
<Listener className="org.apache.catalina.mbeans.GlobalResourcesLifecycleListener" />
<Listener className="org.apache.catalina.core.ThreadLocalLeakPreventionListener" />
<GlobalNamingResources>
<Resource name="UserDatabase" auth="Container"
type="org.apache.catalina.UserDatabase"
description="User database that can be updated and saved"
factory="org.apache.catalina.users.MemoryUserDatabaseFactory"
pathname="conf/tomcat-users.xml" />
</GlobalNamingResources>
<Service name="Catalina">
<Connector port="8080" protocol="HTTP/1.1"
connectionTimeout="20000"
redirectPort="8443" /> <Connector port="8009" protocol="AJP/1.3" redirectPort="8443" /> <Engine name="Catalina" defaultHost="localhost"> <Realm className="org.apache.catalina.realm.LockOutRealm">
<Realm className="org.apache.catalina.realm.UserDatabaseRealm"
resourceName="UserDatabase"/>
</Realm> <Host name="localhost" appBase="webapps"
unpackWARs="true" autoDeploy="true"> <Valve className="org.apache.catalina.valves.AccessLogValve" directory="logs"
prefix="localhost_access_log." suffix=".txt"
pattern="%h %l %u %t "%r" %s %b" />
<Context path="/shop" docBase="D:\shop\demo\web" debug="0" reloadable="true"> </Host>
</Engine>
</Service>
</Server>
从server.xml中我们可以分析出如下关系:
上图wrapper是我根据tomcat源码补上去的,在server.xml中并没有体现出来,通过上图,大概分析下他们的关系,记得不要在意每个节点的意思:
由于在java中一切皆对象,所以结合上图我们分析:
一个tomcat对象中会包含一个server对象,一个server对象可以包含多个service对象,一个service对象,可以包含多个connector对象(用于接收TCP连接)和一个Engine对象;
一个Engine可以包含多个Host对象,而每个Host可以包含多个context(我们写的每个项目就是一个context),每个Context会包含多个Wrapper对象,而每个Wrapper都会包含一个servlet;
从Engine节点往下包含它自己,都称为容器Container
伪代码实现如下:
Tomcat tomcat=new Tomcat();
Server server=new Server();
tomcat.setServer(server);
Service service=new Service();
server.addService(service); //存到集合中
Connector connector=new Connector();
service.setConnector(connector);
Engine engine=new Engine();
service.setEngine(engine);
..... 省略
在tomcat中,命名上面的节点都喜欢使用StandardXX,如StandardServer,StandardService;


通过这些节点的类,我们发现Engine节点和其包含的子节点都是继承了ContainerBase这个类,所以为何说Engine这个节点和其子节点都叫做容器的道理了:
我们仔细查看上面的节点类,发现他们都继承了生命周期相关的类:LifecycleMBeanBase:

所以他们都会有对应的生命周期相关方法,这些节点通过生命周期的方法进行串联起来,如tomcat.start()->server.start()->servece.start()->engine.start().........
二.springboot内嵌tomcat源码分析:
有了上面的基础,我们分析springboot内嵌tomcat的源码就比较方便了: 启动项目,debug调试,可以跟踪到内嵌tomcat的源码:

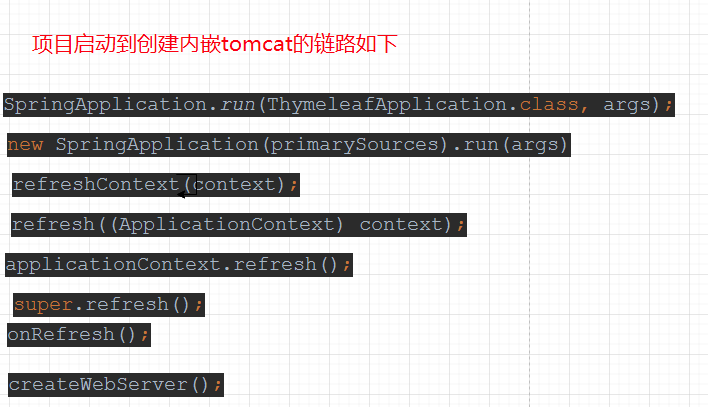
//下面从createWebServer() 开始就是我们要分析的源码了,它在ServletWebServerApplicationContext这个类中
private void createWebServer() {

        WebServer webServer = this.webServer; //第一次过来,这个为null

        ServletContext servletContext = getServletContext(); //这个也是null

        if (webServer == null && servletContext == null) {

            ServletWebServerFactory factory = getWebServerFactory();//获取tomcat工厂

            this.webServer = factory.getWebServer(getSelfInitializer());//通过工厂类获取服务器对象。这个是核心

            getBeanFactory().registerSingleton("webServerGracefulShutdown",

                    new WebServerGracefulShutdownLifecycle(this.webServer));

            getBeanFactory().registerSingleton("webServerStartStop",

                    new WebServerStartStopLifecycle(this, this.webServer));

        }

        else if (servletContext != null) {

            try {

                getSelfInitializer().onStartup(servletContext);

            }

            catch (ServletException ex) {

                throw new ApplicationContextException("Cannot initialize servlet context", ex);

            }

        }

        initPropertySources();

    }
上面代码主要是通过web工厂,创建webserver对象,那web工厂有哪些呢?

这里我们用的是tomcat,所以webserver工厂就自然是TomcatServletWebServerFactory,之后就看它是如何创建tomcat的

    @Override

    public WebServer getWebServer(ServletContextInitializer... initializers) {

        if (this.disableMBeanRegistry) {

            Registry.disableRegistry();

        }

        Tomcat tomcat = new Tomcat(); //创建tomcat对象了

        File baseDir = (this.baseDirectory != null) ? this.baseDirectory : createTempDir("tomcat");

        tomcat.setBaseDir(baseDir.getAbsolutePath());

        Connector connector = new Connector(this.protocol); //创建connector了,根据之前tomcat架构分析,这里的connector最终会包含在service里

        connector.setThrowOnFailure(true);

        tomcat.getService().addConnector(connector); //这里获取service,获取不到,就会创建,然后设置到Connector到service中

        customizeConnector(connector);

        tomcat.setConnector(connector);

        tomcat.getHost().setAutoDeploy(false);//获取Host节点,获取不到就会创建Host

        configureEngine(tomcat.getEngine());//创建Engine,在里面会将Host设置到Engine里面

        for (Connector additionalConnector : this.additionalTomcatConnectors) {

            tomcat.getService().addConnector(additionalConnector);

        }

        prepareContext(tomcat.getHost(), initializers);//创建Connext,在里面会将Context设置到host里面

        return getTomcatWebServer(tomcat);//启动各个组件的生命周期的方法

    }
上面的方法,主要是创建tomcat的架构的各种主件,并且将它们的关系串联起来,之后就调用组件的生命周期方法:
分析几个重要的方法,在tomcat中,通过tomcat.getXX主件,获取不到,内部会创建1. tomcat.getService().addConnector(connector); //由于创建service之前需要创建server,因为server节点是包含service的:
public Service getService() {

        return getServer().findServices()[0];

 }

public Server getServer() {

        if (server != null) {

            return server;

        }

        System.setProperty("catalina.useNaming", "false");

        server = new StandardServer(); //创建server节点了

        initBaseDir();

        // Set configuration source

        ConfigFileLoader.setSource(new CatalinaBaseConfigurationSource(new File(basedir), null));

        server.setPort( -1 );

        Service service = new StandardService(); //创建service节点了

        service.setName("Tomcat");

        server.addService(service); //将service节点加到server节点中

        return server;

    }

2.tomcat.getHost().setAutoDeploy(false); //根据tomcat架构分析,创建Host前一定会创建Engine

3.prepareContext(tomcat.getHost(), initializers); 这里开始创建Context节点了,并将其加到Host中
protected void prepareContext(Host host, ServletContextInitializer[] initializers) {

        File documentRoot = getValidDocumentRoot();

        TomcatEmbeddedContext context = new TomcatEmbeddedContext();//继承于StandardContext

        if (documentRoot != null) {

            context.setResources(new LoaderHidingResourceRoot(context));

        }

        context.setName(getContextPath());

        context.setDisplayName(getDisplayName());

        context.setPath(getContextPath());

        File docBase = (documentRoot != null) ? documentRoot : createTempDir("tomcat-docbase");

        context.setDocBase(docBase.getAbsolutePath());

        context.addLifecycleListener(new FixContextListener());

        context.setParentClassLoader((this.resourceLoader != null) ? this.resourceLoader.getClassLoader()

                : ClassUtils.getDefaultClassLoader());

        resetDefaultLocaleMapping(context);

        addLocaleMappings(context);

        try {

            context.setCreateUploadTargets(true);

        }

        catch (NoSuchMethodError ex) {

            // Tomcat is < 8.5.39. Continue.

        }

        configureTldSkipPatterns(context);

        WebappLoader loader = new WebappLoader();

        loader.setLoaderClass(TomcatEmbeddedWebappClassLoader.class.getName());

        loader.setDelegate(true);

        context.setLoader(loader);

        if (isRegisterDefaultServlet()) {

            addDefaultServlet(context); //context中添加servelet,这里添加的并不是我们业务代码创建的servlet,而是默认的

        }

        if (shouldRegisterJspServlet()) {

            addJspServlet(context); //

            addJasperInitializer(context);

        }

        context.addLifecycleListener(new StaticResourceConfigurer(context));

        ServletContextInitializer[] initializersToUse = mergeInitializers(initializers);

        host.addChild(context); //将Context添加到Host节点

        configureContext(context, initializersToUse);

        postProcessContext(context);

    }
4.我们看看servlet如何添加到Context中的

至此,tomcat架构的主要主件已经被串起来了,接下来要分析的是主件的生命周期启动过程:

protected TomcatWebServer getTomcatWebServer(Tomcat tomcat) {

   return new TomcatWebServer(tomcat, getPort() >= 0, getShutdown());

}

public TomcatWebServer(Tomcat tomcat, boolean autoStart, Shutdown shutdown) {

        Assert.notNull(tomcat, "Tomcat Server must not be null");

        this.tomcat = tomcat;

        this.autoStart = autoStart;

        this.gracefulShutdown = (shutdown == Shutdown.GRACEFUL) ? new GracefulShutdown(tomcat) : null;

        initialize(); //开始初始化

    }

    private void initialize() throws WebServerException {

        logger.info("Tomcat initialized with port(s): " + getPortsDescription(false));

        synchronized (this.monitor) {

            try {

                addInstanceIdToEngineName();

                Context context = findContext();

                context.addLifecycleListener((event) -> {

                    if (context.equals(event.getSource()) && Lifecycle.START_EVENT.equals(event.getType())) {

                        // Remove service connectors so that protocol binding doesn't

                        // happen when the service is started.

                        removeServiceConnectors();

                    }

                });

                // Start the server to trigger initialization listeners

                this.tomcat.start(); //开始启动主件的生命周期方法

                // We can re-throw failure exception directly in the main thread

                rethrowDeferredStartupExceptions();

                try {

                    ContextBindings.bindClassLoader(context, context.getNamingToken(), getClass().getClassLoader());

                }

                catch (NamingException ex) {

                    // Naming is not enabled. Continue

                }

                // Unlike Jetty, all Tomcat threads are daemon threads. We create a

                // blocking non-daemon to stop immediate shutdown

                startDaemonAwaitThread();

            }

            catch (Exception ex) {

                stopSilently();

                destroySilently();

                throw new WebServerException("Unable to start embedded Tomcat", ex);

            }

        }

    }
从这里开始this.tomcat.start();将会是我们要重点关注的逻辑了:
我们知道tomcat架构第一个主件是server,所以肯定接下来是server.start()

我们继续跟进,server.start(); //这里开始要注意了,主件的start()方法是在父类LifecycleBase 中的,因此,后续的主件调用也是调用父类的start方法
 @Override

    public final synchronized void start() throws LifecycleException {

        if (LifecycleState.STARTING_PREP.equals(state) || LifecycleState.STARTING.equals(state) ||

                LifecycleState.STARTED.equals(state)) {

            if (log.isDebugEnabled()) {

                Exception e = new LifecycleException();

                log.debug(sm.getString("lifecycleBase.alreadyStarted", toString()), e);

            } else if (log.isInfoEnabled()) {

                log.info(sm.getString("lifecycleBase.alreadyStarted", toString()));

            }

            return;

        }

        if (state.equals(LifecycleState.NEW)) {

            init();   //第一次进来先调用初始化,运用多态的思想,具体逻辑由子类实现

        } else if (state.equals(LifecycleState.FAILED)) {

            stop();

        } else if (!state.equals(LifecycleState.INITIALIZED) &&

                !state.equals(LifecycleState.STOPPED)) {

            invalidTransition(Lifecycle.BEFORE_START_EVENT);

        }

        try {

            setStateInternal(LifecycleState.STARTING_PREP, null, false);

            startInternal();  //初始化完,开始调用内部的start方法

            if (state.equals(LifecycleState.FAILED)) {

                // This is a 'controlled' failure. The component put itself into the

                // FAILED state so call stop() to complete the clean-up.

                stop();

            } else if (!state.equals(LifecycleState.STARTING)) {

                // Shouldn't be necessary but acts as a check that sub-classes are

                // doing what they are supposed to.

                invalidTransition(Lifecycle.AFTER_START_EVENT);

            } else {

                setStateInternal(LifecycleState.STARTED, null, false);

            }

        } catch (Throwable t) {

            // This is an 'uncontrolled' failure so put the component into the

            // FAILED state and throw an exception.

            handleSubClassException(t, "lifecycleBase.startFail", toString());

        }

    }
从上面方法可知,所有主件都会先调用int()-> startInternal();
我们继续跟进startInternal();

service.start(); 最终也是调用父类的对应方法,跟进去看看

我们只要看startInternal();方法即可
 protected void startInternal() throws LifecycleException {

        if(log.isInfoEnabled())

            log.info(sm.getString("standardService.start.name", this.name));

        setState(LifecycleState.STARTING);

        // Start our defined Container first

        if (engine != null) {

            synchronized (engine) {

                engine.start(); //这里启动engine->启动host->context

            }

        }

        synchronized (executors) {

            for (Executor executor: executors) {

                executor.start();

            }

        }

        //----- 走到下面的代码说明上面的容器节点都执行完生命周期了------------------

        mapperListener.start(); //启动监听器,这个是重点,因为servlet交给tomcat是在这里做的

        // Start our defined Connectors second

        synchronized (connectorsLock) {

            for (Connector connector: connectors) {

                // If it has already failed, don't try and start it

                if (connector.getState() != LifecycleState.FAILED) {

                    connector.start(); //启动连接器,这里也是重点,这个是初始化NIO的服务端,开始监听客户端请求

                }

            }

        }

    }
通过上面的service的start()方法,我们发现其会调用容器的start方法,之后调用mapperListener的start方法,最后调用Connector的start()方法,开始监听服务。我们一个个看:
1.engine.start(),之后也是调用父类的方法,所以只要看startInternal(); 从这里开始都是容器的启动,实现
 @Override

    protected synchronized void startInternal() throws LifecycleException {

        // Start our subordinate components, if any

        logger = null;

        getLogger();

        Cluster cluster = getClusterInternal();

        if (cluster instanceof Lifecycle) {

            ((Lifecycle) cluster).start();

        }

        Realm realm = getRealmInternal();

        if (realm instanceof Lifecycle) {

            ((Lifecycle) realm).start();

        }

        // Start our child containers, if any

        Container children[] = findChildren(); //获取子容器,这里的子容器

        List<Future<Void>> results = new ArrayList<>();

        for (Container child : children) {

            results.add(startStopExecutor.submit(new StartChild(child))); //使用线程池启动子容器StartChild实现了Callable接口

        }

        MultiThrowable multiThrowable = null;

        for (Future<Void> result : results) {

            try {

                result.get();

            } catch (Throwable e) {

                log.error(sm.getString("containerBase.threadedStartFailed"), e);

                if (multiThrowable == null) {

                    multiThrowable = new MultiThrowable();

                }

                multiThrowable.add(e);

            }

        }

        if (multiThrowable != null) {

            throw new LifecycleException(sm.getString("containerBase.threadedStartFailed"),

                    multiThrowable.getThrowable());

        }

        // Start the Valves in our pipeline (including the basic), if any

        if (pipeline instanceof Lifecycle) {

            ((Lifecycle) pipeline).start();

        }

        setState(LifecycleState.STARTING);

        // Start our thread

        if (backgroundProcessorDelay > 0) {

            monitorFuture = Container.getService(ContainerBase.this).getServer()

                    .getUtilityExecutor().scheduleWithFixedDelay(

                            new ContainerBackgroundProcessorMonitor(), 0, 60, TimeUnit.SECONDS);

        }

    }
startStopExecutor.submit(new StartChild(child));//容器的启动会调用该方法

Host的启动,会调用Context的启动,逻辑跟前面一样


Context的启动会调用Wrapper的启动
之后的Wrapper的start();后续就不分析了,现在小结生命周期的流程:

1.问题:tomcat接收到Http请求后,如何通过url找到对应的servlet的?
回答上述问题,先看看service的生命周期调用中,调用了mapperListener.start();我们看看它做了啥? 因为mapperListener也是实现生命周期接口的,所以我们看其:
startInternal();方法:
 @Override

    public void startInternal() throws LifecycleException {

        setState(LifecycleState.STARTING);

        Engine engine = service.getContainer();

        if (engine == null) {

            return;

        }

        findDefaultHost();

        addListeners(engine);

        Container[] conHosts = engine.findChildren();

        for (Container conHost : conHosts) {

            Host host = (Host) conHost;

            if (!LifecycleState.NEW.equals(host.getState())) {

                // Registering the host will register the context and wrappers

                registerHost(host); //根进这个方法

            }

        }

    }
private void registerHost(Host host) {

        String[] aliases = host.findAliases();

        mapper.addHost(host.getName(), aliases, host);

        for (Container container : host.findChildren()) {

            if (container.getState().isAvailable()) {

                registerContext((Context) container); //跟进这里,因为Context包含了wrapper,而Wrapper包含了Servlet,servlet是有对应的映射路径的

            }

        }

        // Default host may have changed

        findDefaultHost();

        if(log.isDebugEnabled()) {

            log.debug(sm.getString("mapperListener.registerHost",

                    host.getName(), domain, service));

        }

    }
 private void registerContext(Context context) {

        String contextPath = context.getPath();

        if ("/".equals(contextPath)) {

            contextPath = "";

        }

        Host host = (Host)context.getParent();

        WebResourceRoot resources = context.getResources();

        String[] welcomeFiles = context.findWelcomeFiles();

        List<WrapperMappingInfo> wrappers = new ArrayList<>();

        for (Container container : context.findChildren()) {

            prepareWrapperMappingInfo(context, (Wrapper) container, wrappers); //将wrapper封装成WrapperMappingInfo

        }

        mapper.addContextVersion(host.getName(), host, contextPath,

                context.getWebappVersion(), context, welcomeFiles, resources,

                wrappers); //加到Mapper对象中

    }

通过上图可知,经过prepareWrapperMappingInfo()方法,将Context容器中的所有Wrapper都封装成了WrapperMappingInfo对象了:
之后我们根据mapper.addContextVersion() 方法: 省略部分代码后:下面的代码存在Mapper这个类中
 protected void addWrapper(ContextVersion context, String path,

            Wrapper wrapper, boolean jspWildCard, boolean resourceOnly) {

        synchronized (context) {

            if (path.endsWith("/*")) {

                // Wildcard wrapper //如果匹配的路径是通配符

                String name = path.substring(0, path.length() - 2);

                MappedWrapper newWrapper = new MappedWrapper(name, wrapper,

                        jspWildCard, resourceOnly);

                MappedWrapper[] oldWrappers = context.wildcardWrappers;

                MappedWrapper[] newWrappers = new MappedWrapper[oldWrappers.length + 1];

                if (insertMap(oldWrappers, newWrappers, newWrapper)) {

                    context.wildcardWrappers = newWrappers; //加到ContextVersion 的WildcardWrapper数组中

                    int slashCount = slashCount(newWrapper.name);

                    if (slashCount > context.nesting) {

                        context.nesting = slashCount;

                    }

                }

            } else if (path.startsWith("*.")) {

                // Extension wrapper  //如果是拓展名结尾的映射路径

                String name = path.substring(2);

                MappedWrapper newWrapper = new MappedWrapper(name, wrapper,

                        jspWildCard, resourceOnly);

                MappedWrapper[] oldWrappers = context.extensionWrappers;

                MappedWrapper[] newWrappers =

                    new MappedWrapper[oldWrappers.length + 1];

                if (insertMap(oldWrappers, newWrappers, newWrapper)) {

                    context.extensionWrappers = newWrappers; //加到ContextVersion 的extensionWrappers数组中

                }

            } else if (path.equals("/")) {

                // Default wrapper

                MappedWrapper newWrapper = new MappedWrapper("", wrapper,

                        jspWildCard, resourceOnly);

                context.defaultWrapper = newWrapper; //默认的,我们这个的是默认的

            } else {

                // Exact wrapper

                final String name;

                if (path.length() == 0) {

                    // Special case for the Context Root mapping which is

                    // treated as an exact match

                    name = "/";

                } else {

                    name = path;

                }

                MappedWrapper newWrapper = new MappedWrapper(name, wrapper,

                        jspWildCard, resourceOnly);

                MappedWrapper[] oldWrappers = context.exactWrappers;

                MappedWrapper[] newWrappers = new MappedWrapper[oldWrappers.length + 1];

                if (insertMap(oldWrappers, newWrappers, newWrapper)) {

                    context.exactWrappers = newWrappers; //ContextVersion 的精确匹配的exactWrappers 数组中

                }

            }

        }

    }
通过上面的分析,我们可以清晰的看到,Servlet的路径不一样,最后存到ContextVersion中的数组也是不一样,分为:通配符匹配,拓展名匹配,默认匹配,精确匹配,我们看看ContextVersion对象:

我们已经知道Mapper的内部类存有所有的servlet包装类,并且也根据不同的路径分类了,那接下来,我们分析下请求过来时,如何查找对应的servlet: 还是在Mapper这个类
private final void internalMapWrapper(ContextVersion contextVersion,

                                          CharChunk path,

                                          MappingData mappingData) throws IOException {

        int pathOffset = path.getOffset();

        int pathEnd = path.getEnd();

        boolean noServletPath = false;

        int length = contextVersion.path.length();

        if (length == (pathEnd - pathOffset)) {

            noServletPath = true;

        }

        int servletPath = pathOffset + length;

        path.setOffset(servletPath);

        // Rule 1 -- Exact Match  //精确匹配 匹配到的wrapper会存到mappingData

        MappedWrapper[] exactWrappers = contextVersion.exactWrappers;

        internalMapExactWrapper(exactWrappers, path, mappingData);

        // Rule 2 -- Prefix Match //通配符匹配 匹配到的wrapper会存到mappingData

        boolean checkJspWelcomeFiles = false;

        MappedWrapper[] wildcardWrappers = contextVersion.wildcardWrappers;

        if (mappingData.wrapper == null) {

            internalMapWildcardWrapper(wildcardWrappers, contextVersion.nesting,

                                       path, mappingData);

            if (mappingData.wrapper != null && mappingData.jspWildCard) {

                char[] buf = path.getBuffer();

                if (buf[pathEnd - 1] == '/') {

                    /*

                     * Path ending in '/' was mapped to JSP servlet based on

                     * wildcard match (e.g., as specified in url-pattern of a

                     * jsp-property-group.

                     * Force the context's welcome files, which are interpreted

                     * as JSP files (since they match the url-pattern), to be

                     * considered. See Bugzilla 27664.

                     */

                    mappingData.wrapper = null;

                    checkJspWelcomeFiles = true;

                } else {

                    // See Bugzilla 27704

                    mappingData.wrapperPath.setChars(buf, path.getStart(),

                                                     path.getLength());

                    mappingData.pathInfo.recycle();

                }

            }

        }

        if(mappingData.wrapper == null && noServletPath &&

                contextVersion.object.getMapperContextRootRedirectEnabled()) {

            // The path is empty, redirect to "/"

            path.append('/');

            pathEnd = path.getEnd();

            mappingData.redirectPath.setChars

                (path.getBuffer(), pathOffset, pathEnd - pathOffset);

            path.setEnd(pathEnd - 1);

            return;

        }

        // Rule 3 -- Extension Match //拓展名匹配 匹配到的wrapper会存到mappingData

        MappedWrapper[] extensionWrappers = contextVersion.extensionWrappers;

        if (mappingData.wrapper == null && !checkJspWelcomeFiles) {

            internalMapExtensionWrapper(extensionWrappers, path, mappingData,

                    true);

        }

        // Rule 4 -- Welcome resources processing for servlets //欢迎页匹配

        if (mappingData.wrapper == null) {

            boolean checkWelcomeFiles = checkJspWelcomeFiles;

            if (!checkWelcomeFiles) {

                char[] buf = path.getBuffer();

                checkWelcomeFiles = (buf[pathEnd - 1] == '/');

            }

            if (checkWelcomeFiles) {

                for (int i = 0; (i < contextVersion.welcomeResources.length)

                         && (mappingData.wrapper == null); i++) {

                    path.setOffset(pathOffset);

                    path.setEnd(pathEnd);

                    path.append(contextVersion.welcomeResources[i], 0,

                            contextVersion.welcomeResources[i].length());

                    path.setOffset(servletPath);

                    // Rule 4a -- Welcome resources processing for exact macth

                    internalMapExactWrapper(exactWrappers, path, mappingData);

                    // Rule 4b -- Welcome resources processing for prefix match

                    if (mappingData.wrapper == null) {

                        internalMapWildcardWrapper

                            (wildcardWrappers, contextVersion.nesting,

                             path, mappingData);

                    }

                    // Rule 4c -- Welcome resources processing

                    //            for physical folder

                    if (mappingData.wrapper == null

                        && contextVersion.resources != null) {

                        String pathStr = path.toString();

                        WebResource file =

                                contextVersion.resources.getResource(pathStr);

                        if (file != null && file.isFile()) {

                            internalMapExtensionWrapper(extensionWrappers, path,

                                                        mappingData, true);

                            if (mappingData.wrapper == null

                                && contextVersion.defaultWrapper != null) {

                                mappingData.wrapper =

                                    contextVersion.defaultWrapper.object;

                                mappingData.requestPath.setChars

                                    (path.getBuffer(), path.getStart(),

                                     path.getLength());

                                mappingData.wrapperPath.setChars

                                    (path.getBuffer(), path.getStart(),

                                     path.getLength());

                                mappingData.requestPath.setString(pathStr);

                                mappingData.wrapperPath.setString(pathStr);

                            }

                        }

                    }

                }

                path.setOffset(servletPath);

                path.setEnd(pathEnd);

            }

        }

        /* welcome file processing - take 2

         * Now that we have looked for welcome files with a physical

         * backing, now look for an extension mapping listed

         * but may not have a physical backing to it. This is for

         * the case of index.jsf, index.do, etc.

         * A watered down version of rule 4

         */

        if (mappingData.wrapper == null) {

            boolean checkWelcomeFiles = checkJspWelcomeFiles;

            if (!checkWelcomeFiles) {

                char[] buf = path.getBuffer();

                checkWelcomeFiles = (buf[pathEnd - 1] == '/');

            }

            if (checkWelcomeFiles) {

                for (int i = 0; (i < contextVersion.welcomeResources.length)

                         && (mappingData.wrapper == null); i++) {

                    path.setOffset(pathOffset);

                    path.setEnd(pathEnd);

                    path.append(contextVersion.welcomeResources[i], 0,

                                contextVersion.welcomeResources[i].length());

                    path.setOffset(servletPath);

                    internalMapExtensionWrapper(extensionWrappers, path,

                                                mappingData, false);

                }

                path.setOffset(servletPath);

                path.setEnd(pathEnd);

            }

        }

        // Rule 7 -- Default servlet //默认servlet匹配,“/” 开头的匹配,springmvc的dispatcherServlet就是这种

        if (mappingData.wrapper == null && !checkJspWelcomeFiles) {

            if (contextVersion.defaultWrapper != null) {

                mappingData.wrapper = contextVersion.defaultWrapper.object;

                mappingData.requestPath.setChars

                    (path.getBuffer(), path.getStart(), path.getLength());

                mappingData.wrapperPath.setChars

                    (path.getBuffer(), path.getStart(), path.getLength());

                mappingData.matchType = MappingMatch.DEFAULT;

            }

            // Redirection to a folder

            char[] buf = path.getBuffer();

            if (contextVersion.resources != null && buf[pathEnd -1 ] != '/') {

                String pathStr = path.toString();

                // Note: Check redirect first to save unnecessary getResource()

                //       call. See BZ 62968.

                if (contextVersion.object.getMapperDirectoryRedirectEnabled()) {

                    WebResource file;

                    // Handle context root

                    if (pathStr.length() == 0) {

                        file = contextVersion.resources.getResource("/");

                    } else {

                        file = contextVersion.resources.getResource(pathStr);

                    }

                    if (file != null && file.isDirectory()) {

                        // Note: this mutates the path: do not do any processing

                        // after this (since we set the redirectPath, there

                        // shouldn't be any)

                        path.setOffset(pathOffset);

                        path.append('/');

                        mappingData.redirectPath.setChars

                            (path.getBuffer(), path.getStart(), path.getLength());

                    } else {

                        mappingData.requestPath.setString(pathStr);

                        mappingData.wrapperPath.setString(pathStr);

                    }

                } else {

                    mappingData.requestPath.setString(pathStr);

                    mappingData.wrapperPath.setString(pathStr);

                }

            }

        }

        path.setOffset(pathOffset);

        path.setEnd(pathEnd);

    }
至此,我们分析完了,servlet如何存到tomcat中,同时tomcat如何通过url查询对应的servlet:
最后我们回去看看Connector的启动流程,看看它又干了啥?

debug发现,并不是在上面图所示进行Connector进行start(),我们打断点到Connector这个类的startInternal():


继承根进:
 public final void start() throws Exception {

        if (bindState == BindState.UNBOUND) {

            bindWithCleanup();

            bindState = BindState.BOUND_ON_START;

        }

        startInternal();

    }

@Override

    public void startInternal() throws Exception {

        if (!running) {

            running = true;

            paused = false;

            if (socketProperties.getProcessorCache() != 0) {

                processorCache = new SynchronizedStack<>(SynchronizedStack.DEFAULT_SIZE,

                        socketProperties.getProcessorCache());

            }

            if (socketProperties.getEventCache() != 0) {

                eventCache = new SynchronizedStack<>(SynchronizedStack.DEFAULT_SIZE,

                        socketProperties.getEventCache());

            }

            if (socketProperties.getBufferPool() != 0) {

                nioChannels = new SynchronizedStack<>(SynchronizedStack.DEFAULT_SIZE,

                        socketProperties.getBufferPool());

            }

            // Create worker collection

            if (getExecutor() == null) {

                createExecutor();

            }

            initializeConnectionLatch();

            // Start poller thread

            poller = new Poller(); // 这里是重点,该类实现了Runnable

            Thread pollerThread = new Thread(poller, getName() + "-ClientPoller");

            pollerThread.setPriority(threadPriority);

            pollerThread.setDaemon(true);

            pollerThread.start(); //通过线程启动poller这个Runnable

            startAcceptorThread(); //这里也是重点

        }

    }
//我们先看看Poller这个类:
先来补充下NIO的几个组件知识: Selector选择器,会监听注册到该监听器的SocketChannel的各种事件
我们回到Poller来,先看其构造器,然后看其run()方法:
public class Poller implements Runnable {
private Selector selector;
private final SynchronizedQueue<PollerEvent> events =
new SynchronizedQueue<>();//栈结构,用于存储selector监听到的事件
private volatile boolean close = false;
// Optimize expiration handling
private long nextExpiration = 0;
private AtomicLong wakeupCounter = new AtomicLong(0);
private volatile int keyCount = 0;
public Poller() throws IOException {
this.selector = Selector.open(); //创建选择器,NIO的重要主件之一
}
//省略了部分代码
public void run() {
// Loop until destroy() is called
while (true) {
boolean hasEvents = false;
try {
if (!close) {
hasEvents = events();//判断是否有注册事件
if (wakeupCounter.getAndSet(-1) > 0) {
// If we are here, means we have other stuff to do
// Do a non blocking select
keyCount = selector.selectNow();
} else {
keyCount = selector.select(selectorTimeout);
}
wakeupCounter.set(0);
}
if (close) {
events();
timeout(0, false);
try {
selector.close();
} catch (IOException ioe) {
log.error(sm.getString("endpoint.nio.selectorCloseFail"), ioe);
}
break;
}
} catch (Throwable x) {
ExceptionUtils.handleThrowable(x);
log.error(sm.getString("endpoint.nio.selectorLoopError"), x);
continue;
}
// Either we timed out or we woke up, process events first
if (keyCount == 0) {
hasEvents = (hasEvents | events());
}
Iterator<SelectionKey> iterator =
keyCount > 0 ? selector.selectedKeys().iterator() : null; //选择器开始监听事件
// Walk through the collection of ready keys and dispatch
// any active event.
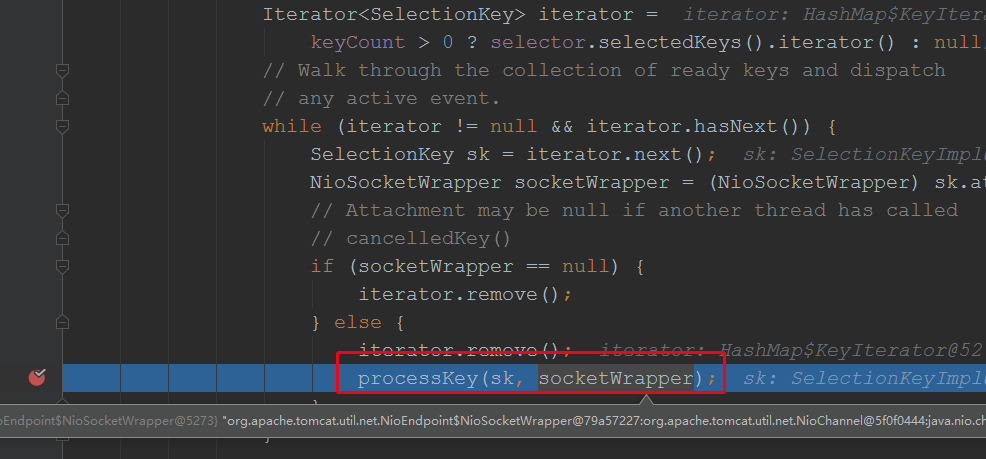
while (iterator != null && iterator.hasNext()) {
SelectionKey sk = iterator.next();
NioSocketWrapper socketWrapper = (NioSocketWrapper) sk.attachment();
// Attachment may be null if another thread has called
// cancelledKey()
if (socketWrapper == null) {
iterator.remove();
} else {
iterator.remove();
processKey(sk, socketWrapper);//如果有事件过来就会 这个是重点,服务器接收到客户端连接事件后就会调用该方法处理客户端的连接
}
}
// Process timeouts
timeout(keyCount,hasEvents);
}
getStopLatch().countDown();
}
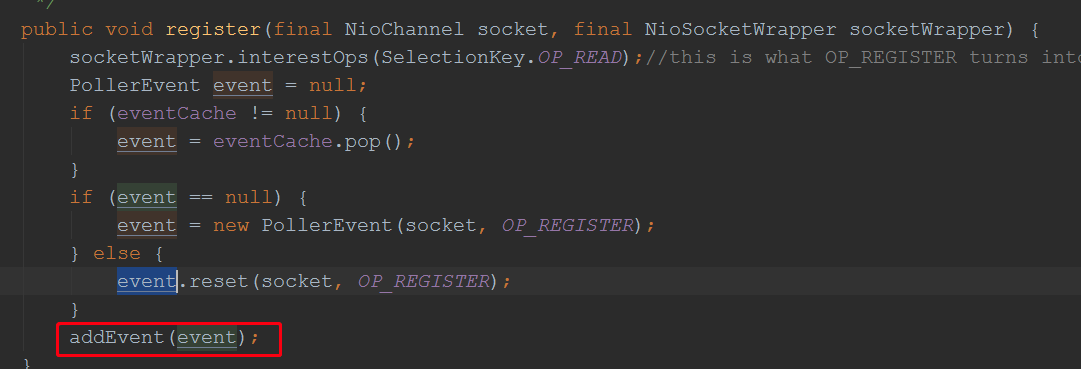
//根据看看events():下图当envents这个栈有事件时,其会调用events.poll()方法弹出一个事件,如果是注册事件,就会注册到Selector中:

小结:poller实现了Runnable 接口,其run()方法会进行客户端各种连接事件,而其evens这个栈结构用于存储ServerSocketChannel.accept()接收到的SocketChannel封装成的事件:
那么:到底是谁将客户端的连接压入Poller的events栈的呢?我们回到下面的代码:


这里有个acceptor主件,跟poller一样,它也实现了Runnable:看看其源码:
acceptor = new Acceptor<>(this); //该方法传入了this(AbstractEndpoint),而this是包含了Poller的,所以Acceptor接收的客户端才能交给Poller;
我们分析下其run方法:
 @Override

    public void run() {

        int errorDelay = 0;

        // Loop until we receive a shutdown command

        while (endpoint.isRunning()) {

            // Loop if endpoint is paused

            while (endpoint.isPaused() && endpoint.isRunning()) {

                state = AcceptorState.PAUSED;

                try {

                    Thread.sleep(50);

                } catch (InterruptedException e) {

                    // Ignore

                }

            }

            if (!endpoint.isRunning()) {

                break;

            }

            state = AcceptorState.RUNNING;

            try {

                //if we have reached max connections, wait

                endpoint.countUpOrAwaitConnection();

                // Endpoint might have been paused while waiting for latch

                // If that is the case, don't accept new connections

                if (endpoint.isPaused()) {

                    continue;

                }

                U socket = null;

                try {

                    // Accept the next incoming connection from the server

                    // socket

                    socket = endpoint.serverSocketAccept();

                } catch (Exception ioe) {

                    // We didn't get a socket

                    endpoint.countDownConnection();

                    if (endpoint.isRunning()) {

                        // Introduce delay if necessary

                        errorDelay = handleExceptionWithDelay(errorDelay);

                        // re-throw

                        throw ioe;

                    } else {

                        break;

                    }

                }

                // Successful accept, reset the error delay

                errorDelay = 0;

                // Configure the socket

                if (endpoint.isRunning() && !endpoint.isPaused()) {

                    // setSocketOptions() will hand the socket off to

                    // an appropriate processor if successful

                    if (!endpoint.setSocketOptions(socket)) {

                        endpoint.closeSocket(socket);

                    }

                } else {

                    endpoint.destroySocket(socket);

                }

            } catch (Throwable t) {

                ExceptionUtils.handleThrowable(t);

                String msg = sm.getString("endpoint.accept.fail");

                // APR specific.

                // Could push this down but not sure it is worth the trouble.

                if (t instanceof Error) {

                    Error e = (Error) t;

                    if (e.getError() == 233) {

                        // Not an error on HP-UX so log as a warning

                        // so it can be filtered out on that platform

                        // See bug 50273

                        log.warn(msg, t);

                    } else {

                        log.error(msg, t);

                    }

                } else {

                        log.error(msg, t);

                }

            }

        }

        state = AcceptorState.ENDED;

    }
 @Override

    public void run() {

        int errorDelay = 0;

        // Loop until we receive a shutdown command

        while (endpoint.isRunning()) {

            // Loop if endpoint is paused

            while (endpoint.isPaused() && endpoint.isRunning()) {

                state = AcceptorState.PAUSED;

                try {

                    Thread.sleep(50);

                } catch (InterruptedException e) {

                    // Ignore

                }

            }

            if (!endpoint.isRunning()) {

                break;

            }

            state = AcceptorState.RUNNING;

            try {

                //if we have reached max connections, wait

                endpoint.countUpOrAwaitConnection();

                // Endpoint might have been paused while waiting for latch

                // If that is the case, don't accept new connections

                if (endpoint.isPaused()) {

                    continue;

                }

                U socket = null;

                try {

                    // Accept the next incoming connection from the server

                    // socket

                    socket = endpoint.serverSocketAccept(); //接收客户端的请求,后续会根据,这个方法会一直阻塞,这也就是为何我们启动springweb项目,不会自动关掉的原因了

                } catch (Exception ioe) {

                    // We didn't get a socket

                    endpoint.countDownConnection();

                    if (endpoint.isRunning()) {

                        // Introduce delay if necessary

                        errorDelay = handleExceptionWithDelay(errorDelay);

                        // re-throw

                        throw ioe;

                    } else {

                        break;

                    }

                }

                // Successful accept, reset the error delay

                errorDelay = 0;

                // Configure the socket

                if (endpoint.isRunning() && !endpoint.isPaused()) {

                    // setSocketOptions() will hand the socket off to

                    // an appropriate processor if successful

                    if (!endpoint.setSocketOptions(socket)) {//如果接收到了客户端请求,那么就会调用该方法

                        endpoint.closeSocket(socket);

                    }

                } else {

                    endpoint.destroySocket(socket);

                }

            } catch (Throwable t) {

                ExceptionUtils.handleThrowable(t);

                String msg = sm.getString("endpoint.accept.fail");

                // APR specific.

                // Could push this down but not sure it is worth the trouble.

                if (t instanceof Error) {

                    Error e = (Error) t;

                    if (e.getError() == 233) {

                        // Not an error on HP-UX so log as a warning

                        // so it can be filtered out on that platform

                        // See bug 50273

                        log.warn(msg, t);

                    } else {

                        log.error(msg, t);

                    }

                } else {

                        log.error(msg, t);

                }

            }

        }

        state = AcceptorState.ENDED;

    }

我们根进看看: endpoint.setSocketOptions(socket)
  @Override

    protected boolean setSocketOptions(SocketChannel socket) {

        NioSocketWrapper socketWrapper = null;

        try {

            // Allocate channel and wrapper

            NioChannel channel = null;

            if (nioChannels != null) {

                channel = nioChannels.pop();

            }

            if (channel == null) {

                SocketBufferHandler bufhandler = new SocketBufferHandler(

                        socketProperties.getAppReadBufSize(),

                        socketProperties.getAppWriteBufSize(),

                        socketProperties.getDirectBuffer());

                if (isSSLEnabled()) {

                    channel = new SecureNioChannel(bufhandler, selectorPool, this);

                } else {

                    channel = new NioChannel(bufhandler);

                }

            }

            NioSocketWrapper newWrapper = new NioSocketWrapper(channel, this);

            channel.reset(socket, newWrapper);

            connections.put(socket, newWrapper);

            socketWrapper = newWrapper;

            // Set socket properties

            // Disable blocking, polling will be used

            socket.configureBlocking(false);

            socketProperties.setProperties(socket.socket());

            socketWrapper.setReadTimeout(getConnectionTimeout());

            socketWrapper.setWriteTimeout(getConnectionTimeout());

            socketWrapper.setKeepAliveLeft(NioEndpoint.this.getMaxKeepAliveRequests());

            socketWrapper.setSecure(isSSLEnabled());

            poller.register(channel, socketWrapper);//在这里将会将接收到的客户端封装成事件,存到Poller的envens栈中

            return true;

        } catch (Throwable t) {

            ExceptionUtils.handleThrowable(t);

            try {

                log.error(sm.getString("endpoint.socketOptionsError"), t);

            } catch (Throwable tt) {

                ExceptionUtils.handleThrowable(tt);

            }

            if (socketWrapper == null) {

                destroySocket(socket);

            }

        }

        // Tell to close the socket if needed

        return false;

    }
//小结上面的流程:

//最后通过调用Controller的方法,看看整个调用链条:


前面分析过,Poller的run方法会处理监听到的事件,所以,我们打个断点在该方法里:
根进去:

 public boolean processSocket(SocketWrapperBase<S> socketWrapper,

            SocketEvent event, boolean dispatch) {

        try {

            if (socketWrapper == null) {

                return false;

            }

            SocketProcessorBase<S> sc = null;

            if (processorCache != null) {

                sc = processorCache.pop();

            }

            if (sc == null) {

                sc = createSocketProcessor(socketWrapper, event); //将客户端封装成sc,sc实现了Runnable接口

            } else {

                sc.reset(socketWrapper, event);

            }

            Executor executor = getExecutor();

            if (dispatch && executor != null) {

                executor.execute(sc); //最终交给了一个线程池处理了

            } else {

                sc.run();

            }

        } catch (RejectedExecutionException ree) {

            getLog().warn(sm.getString("endpoint.executor.fail", socketWrapper) , ree);

            return false;

        } catch (Throwable t) {

            ExceptionUtils.handleThrowable(t);

            // This means we got an OOM or similar creating a thread, or that

            // the pool and its queue are full

            getLog().error(sm.getString("endpoint.process.fail"), t);

            return false;

        }

        return true;

    }
所以接下来看看:SocketProcessorBase的run方法:
@Override

    public final void run() {

        synchronized (socketWrapper) {

            // It is possible that processing may be triggered for read and

            // write at the same time. The sync above makes sure that processing

            // does not occur in parallel. The test below ensures that if the

            // first event to be processed results in the socket being closed,

            // the subsequent events are not processed.

            if (socketWrapper.isClosed()) {

                return;

            }

            doRun();

        }

    }
继续跟踪doRun();

一直到这里,我们可以看到,最终会调用Mapper的方法去找到对应的Servlet的,前面已经分析过Mapper有个根据url获取Servelet包装类的放法,并将其存到MappingData中,我们跟进去:


Pipeline最后一个基本都是xxxValue:

  @Override

    public final void invoke(Request request, Response response)

        throws IOException, ServletException {

        // Disallow any direct access to resources under WEB-INF or META-INF

        MessageBytes requestPathMB = request.getRequestPathMB();

        if ((requestPathMB.startsWithIgnoreCase("/META-INF/", 0)) //这些判断就说明了,为何前端不能直接访问WEB-INF的内容了

                || (requestPathMB.equalsIgnoreCase("/META-INF"))

                || (requestPathMB.startsWithIgnoreCase("/WEB-INF/", 0))

                || (requestPathMB.equalsIgnoreCase("/WEB-INF"))) {

            response.sendError(HttpServletResponse.SC_NOT_FOUND);

            return;

        }

        // Select the Wrapper to be used for this Request

        Wrapper wrapper = request.getWrapper();//前面分析过了,Servlet存到了Request中,这里获取出来

        if (wrapper == null || wrapper.isUnavailable()) {

            response.sendError(HttpServletResponse.SC_NOT_FOUND);

            return;

        }

        // Acknowledge the request

        try {

            response.sendAcknowledgement();

        } catch (IOException ioe) {

            container.getLogger().error(sm.getString(

                    "standardContextValve.acknowledgeException"), ioe);

            request.setAttribute(RequestDispatcher.ERROR_EXCEPTION, ioe);

            response.sendError(HttpServletResponse.SC_INTERNAL_SERVER_ERROR);

            return;

        }

        if (request.isAsyncSupported()) {

            request.setAsyncSupported(wrapper.getPipeline().isAsyncSupported());

        }

        wrapper.getPipeline().getFirst().invoke(request, response);//调用Servlet处理请求

    }


至此分析完毕整个调用流程
tomcat源码--springboot整合tomcat源码分析的更多相关文章
- springboot整合mybatis源码分析
springboot整合mybatis源码分析 本文主要讲述mybatis在springboot中是如何被加载执行的,由于涉及的内容会比较多,所以这次只会对调用关系及关键代码点进行讲解,为了避免文章太 ...
- SpringBoot系列六:SpringBoot整合Tomcat
声明:本文来源于MLDN培训视频的课堂笔记,写在这里只是为了方便查阅. 1.概念:SpringBoot 整合 Tomcat 2.背景 SpringBoot 本身支持有两类的 WEB 容器:默认的 To ...
- Springboot以Tomcat为容器实现http重定向到https的两种方式
1 简介 本文将介绍在Springboot中如何通过代码实现Http到Https的重定向,本文仅讲解Tomcat作为容器的情况,其它容器将在以后一一道来. 建议阅读之前的相关文章: (1) Sprin ...
- 很详细的SpringBoot整合UEditor教程
很详细的SpringBoot整合UEditor教程 2017年04月10日 20:27:21 小宝2333 阅读数:21529 版权声明:本文为博主原创文章,未经博主允许不得转载. https: ...
- Springboot整合Elastic-Job
Elastic-Job是当当网的任务调度开源框架,有以下功能 分布式调度协调 弹性扩容缩容 失效转移 错过执行作业重触发 作业分片一致性,保证同一分片在分布式环境中仅一个执行实例 自诊断并修复分布式不 ...
- SpringBoot 整合使用dubbo
这里主要是按照teaey作者的spring-boot-starter-dubbo框架进行一些变化的使用 依赖包: <dependency> <groupId>com.aliba ...
- SpringBoot中Tomcat和SpringMVC整合源码分析
概述 SpringBoot中集成官方的第三方组件是通过在POM文件中添加组件的starter的Maven依赖来完成的.添加相关的Maven依赖之后,会引入具体的jar包,在SpringBoot启动 ...
- SpringBoot启动tomcat源码解读
一.SpringBoot自动拉起Tomcat 原文链接:http://www.studyshare.cn/blog-front/blog/details/1136 SpringBoot框架是当前比较流 ...
- 【Tomcat】使用Eclipse运行Tomcat7源码
1.搭建开发环境 a.下载好tomcat7源码包 b.安装好jdk7,及设置好环境变量 c.安装好ant,及设置好环境变量,用于预编译tocmat源码. d.以上步骤准备好我们就可以开始进入源码的预编 ...
随机推荐
- 软件人如何快速晋升CTO(一)
1.场景描述 软件人如何快速晋升CTO? 实战操作,介绍下如何0成本拥有自己的软件公司,出任CTO/CEO. 2020年 8月16日,软件老王拿到公司的营业执照和公章了,税务登记也一起办理好了 ...
- 【Pod Terminating原因追踪系列之三】让docker事件处理罢工的cancel状态码
本篇为Pod Terminating原因追踪系列的第三篇,前两篇分别介绍了两种可能导致Pod Terminating的原因.在处理现网问题时,Pod Terminating属于比较常见的问题,而本系列 ...
- P4609 建筑师
题目描述 小 Z 是一个很有名的建筑师,有一天他接到了一个很奇怪的任务:在数轴上建 n 个建筑,每个建筑的高度是 1 到 n 之间的一个整数. 小 Z 有很严重的强迫症,他不喜欢有两个建筑的高度相同. ...
- 【jmespath】—1. 基础用法
一.jsonpath 之前我写接口自动化测试时候,对于复杂的json返回,会使用jsonpath这个第三方库,就像写xpath一样,方便的查询json元素. 因为之前写WEB自动化时候,总用xpath ...
- 详细分析链表中的递归性质(Java 实现)
目录 链表中的递归性质 前言 LeetCode 上关于链表的一道问题 203 号题目 移除链表中的元素 递归的基本概念与示例 链表天然的递归性 小结 链表中的递归性质 前言 在前面的 链表的数据结构的 ...
- 09vuex
state 大白话:获取state的值 vuex中state数据是响应式的.只要state中数据发生变化.vue组件自动更新. 要想做到响应式 前提:是在mutaion中定义函数修改state值. 最 ...
- 没事也来配一个logback
工程下载:https://files.cnblogs.com/files/xiandedanteng/logbackCfg20200115.zip 首先创建一个maven项目,pom.xml如下书写: ...
- 快速启动CMD窗口的办法
在 文件管理器的 地址栏输入cmd回车,cmd会快速在此路径下打开. --END-- 2020-01-07
- 购书网站前端实现(HTML+CSS+JavaScript)
购书+阅读静态网页设计与实现 一.主页设计HTML 1.效果展示及实现 2.完整代码 二.主页样式布局CSS 三.空间功能实现Javascript 主要功能 Javascript完整代码: 总结 购书 ...
- oracle中创建用户,指定要查询的视图 --九五小庞
--01: 创建PACS用户,并且初始密码为PACScreate user PACS identified by "PACS"; --02: 赋予该用户登录数据库的权限.grant ...