kickstart半自动安装centos系统与pxe自动安装centos系统
一、kickstart半自动安装centos系统
关闭防火墙,关闭selinux,使用system-config-kickstart生成kickstart配置文件,启动xmanger-Passive
[root@centos7 ~]#export DISPLAY=10.0.0.1:0.0
[root@centos7 ~]#system-config-kickstart
即可进入kickstart配置文件图形终端,使用system-config-kickstart生成kickstart配置文件
步骤:
1、Basic Configuration
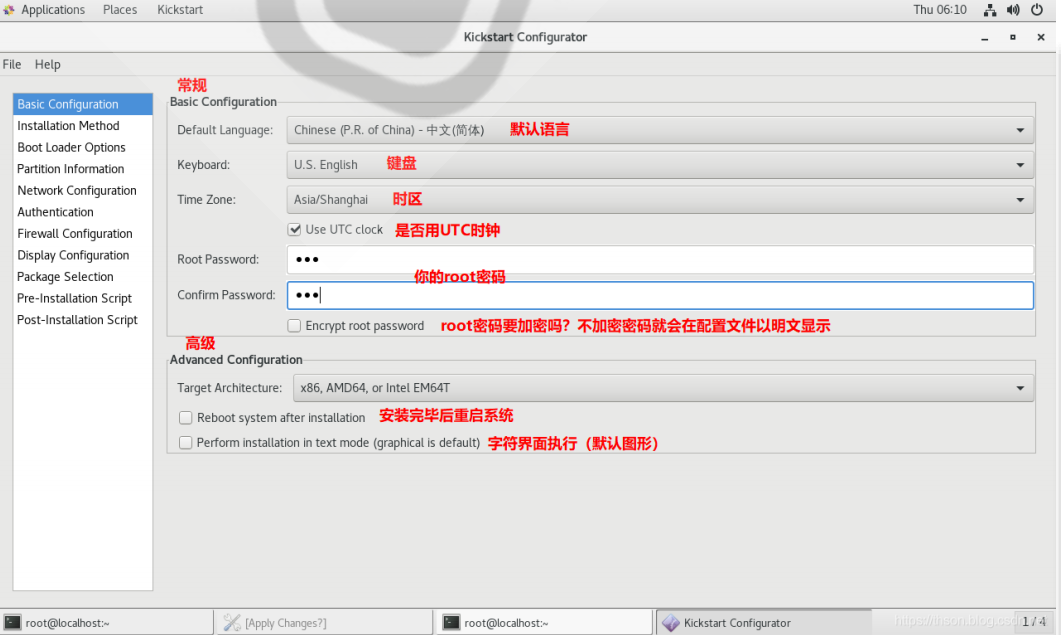
#在kickstart应答文件中会生成以下格式
#platform=x86, AMD64, or Intel EM64T

#Default Language默认语言

lang en_US

# Keyboard 键盘

keyboard 'us'

# timezone 时区(勾选了"Use UTC clock" 会追加[--isUtc])

timezone Asia/Shanghai

# Root password

rootpw --iscrypted $1$DBk7xfJp$Agxd303XUAfRKIf7gB8DG/

====================================================

#Advanced Configuration       #勾选就有,不勾没有

====================================================
# Reboot after installation

reboot

# Use text mode install

text
2、Installation Method
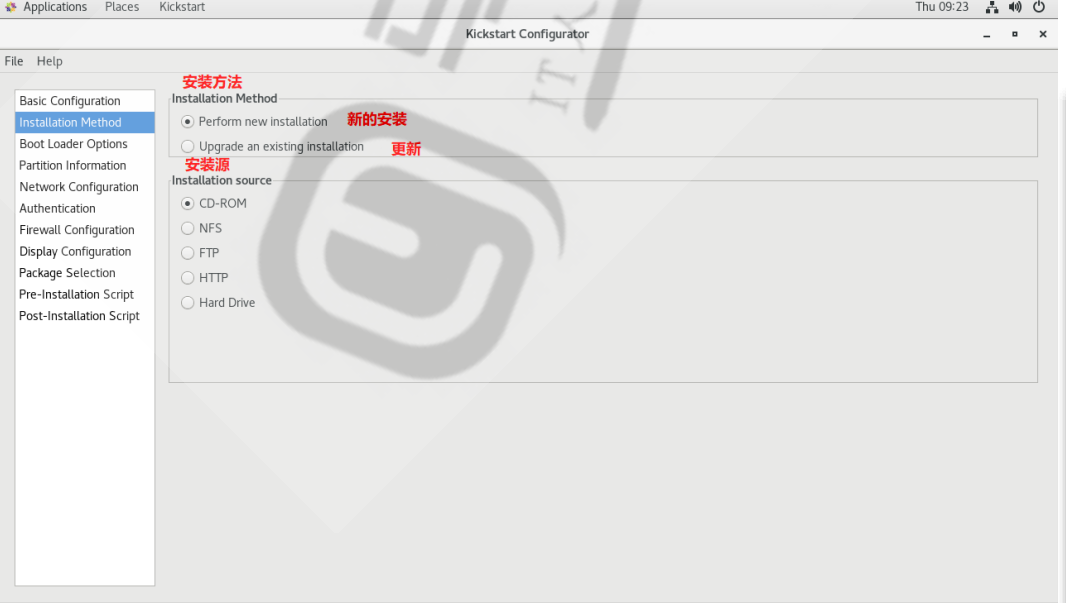
#在kickstart应答文件中会生成以下格式

# Install OS instead of upgrade

install

# Upgrade existing installation

upgrade

# Use network installation #如果是光盘就会生成cdrom

url --url="http://(服务器ip)/Centos/7/os/x86_64"
3、Boot Loader Options
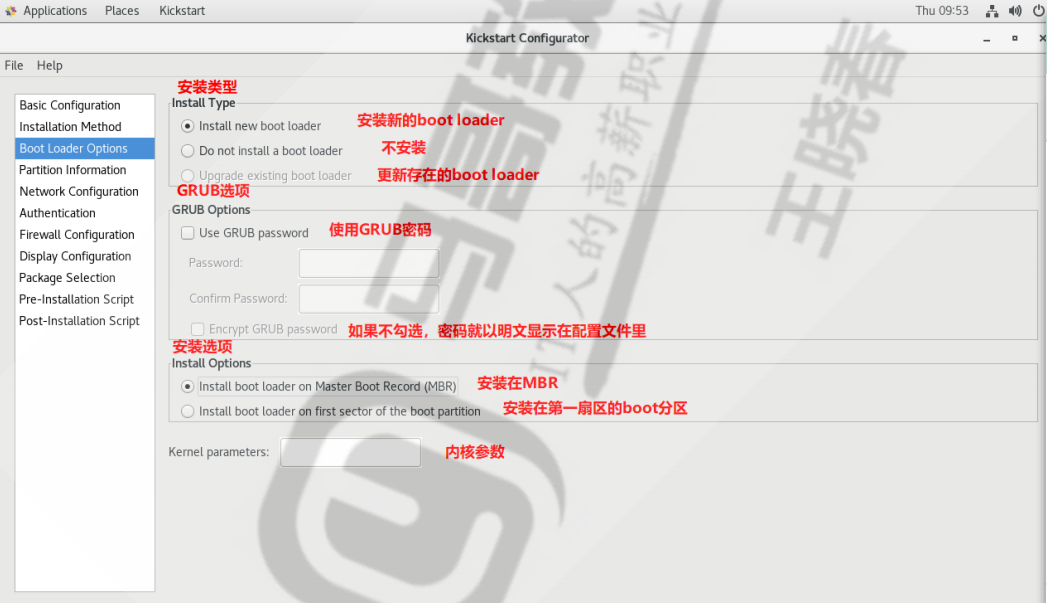
#在kickstart应答文件中会生成以下格式

# System bootloader configuration

 bootloader --append="ker" --location=mbr --password="123"

#append是内核参数,location是bootloader安装位置,password是GRUB密码
4、Partition Information
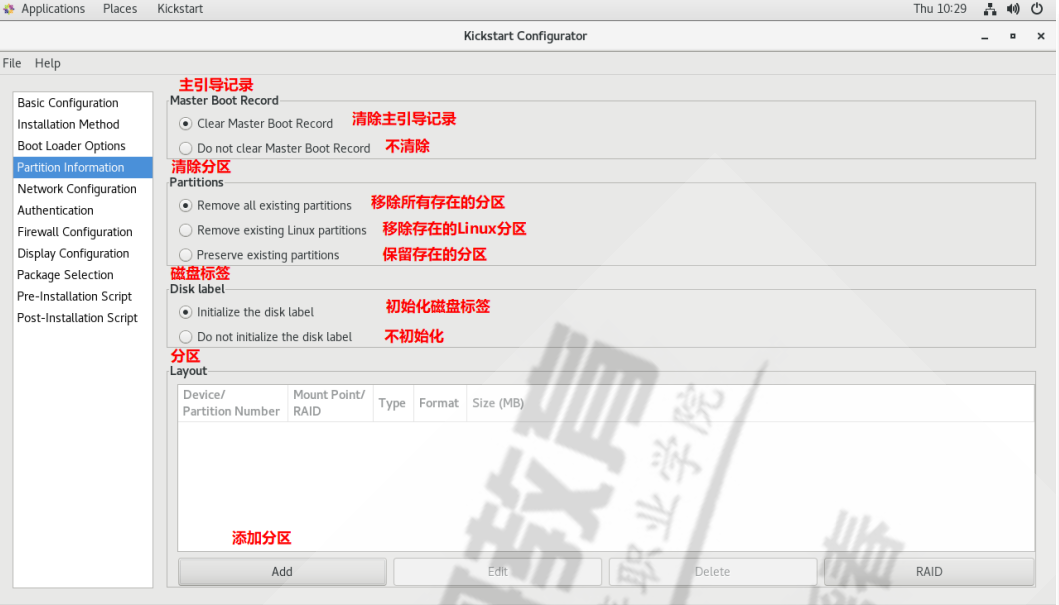
#在kickstart应答文件中会生成以下格式

# Clear the Master Boot Record

zerombr

# Partition clearing information

clearpart --linux --initlabel

# Disk partitioning information

part / --fstype="xfs" --size=10240

part /boot --fstype="ext4" --size=1024

part swap --fstype="swap" --size=2048
5、 Network Configuration

#在kickstart应答文件中会生成以下格式

# Network information

network  --bootproto=dhcp --device=ens33
6、Authentication
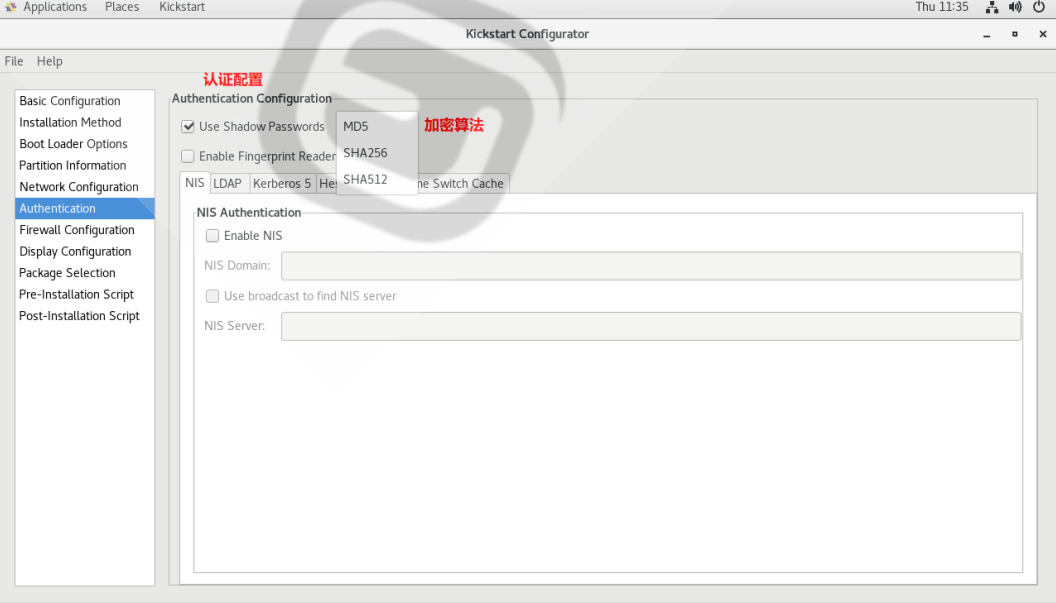
#在kickstart应答文件中会生成以下格式

# System authorization information

auth  --useshadow  --passalgo=md5
7、Firewall Configuration
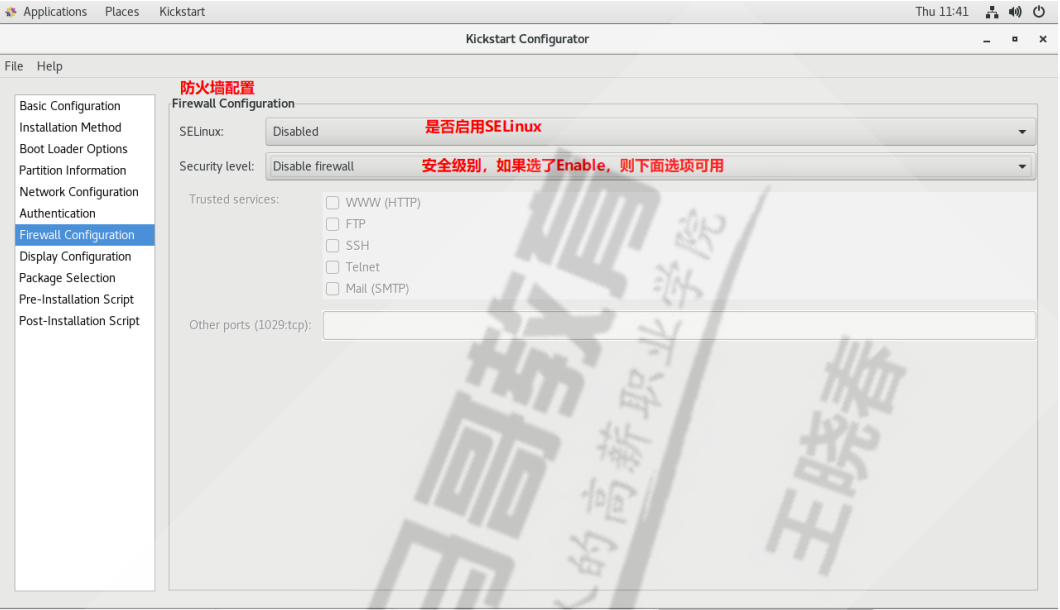
#在kickstart应答文件中会生成以下格式

# SELinux configuration

selinux  --disabled

# Firewall configuration

firewall  --disabled
8、Display Configuration
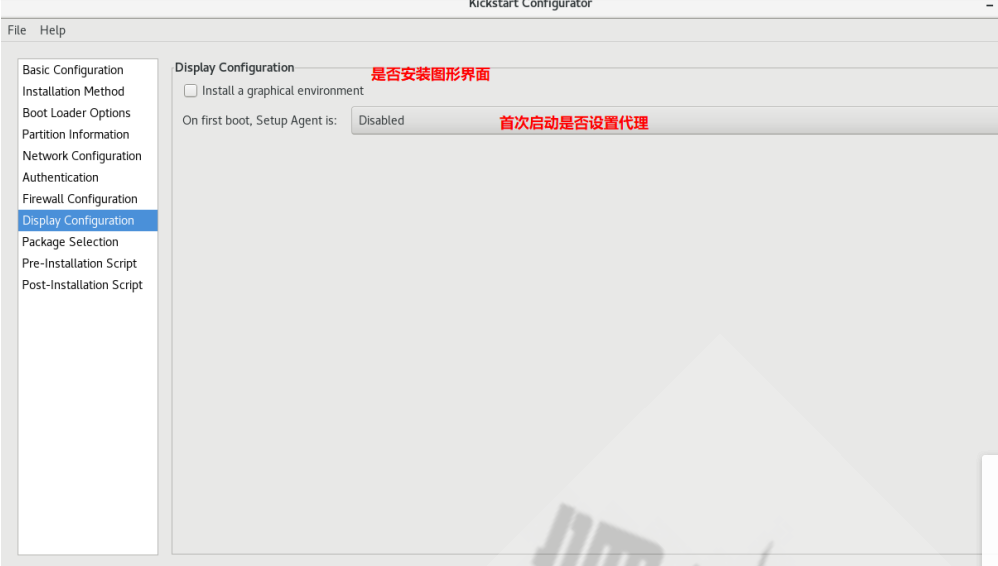
#在kickstart应答文件中会生成以下格式

# Do not configure the X Window System (如果选了安图形则没有这个界面)

skipx

# Run the Setup Agent on first boot

firstboot --enable
9、Package Selection
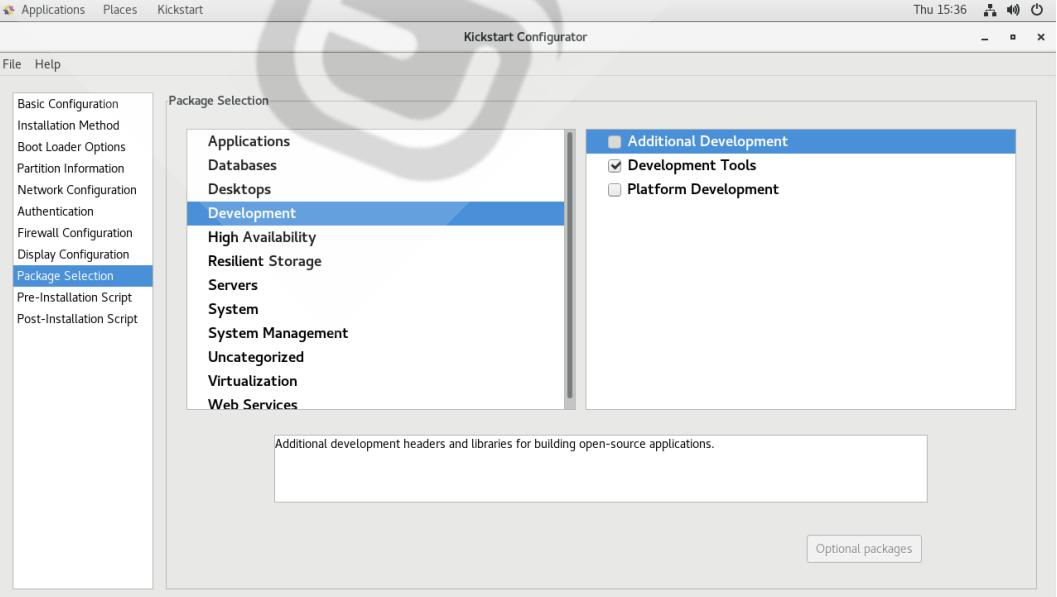
如果包安装的界面不出现可选的包信息,那么需要修改yum仓库配置文件

[root@centos ~]#vim /etc/yum.repos.d/***.repo

[development]

#把原来"[]"内的内容改成development,其它不变
#选了什么包就会生成对应的文件信息
#在kickstart应答文件中会生成以下格式
%packages
@development
-byacc
-indent
-intltool
-patchutils
-rcs
-subversion-swig
-systemtap
%end  #(必须以%end结尾)
10、Pre-Installation Script

#在kickstart应答文件中会生成以下格式

%pre    #(安装前脚本我一般都不写)

echo i am pre

%end
11、Post-Installation Script
#在kickstart应答文件中会生成以下格式

%post --nochroot

#可以再安装后脚本中创建用户或创建yum源等等等等

useradd zxc

echo 123456 |passwd --stdin zxc &> /dev/null

mkdir /etc/yum.repos.d/bak

mv /etc/yum.repos.d/* /etc/yum.repos.d/bak

cat > /etc/yum.repos.d/base.repo <<EOF

[base]

name=base

baseurl=file:///misc/cd

gpgcheck=0

EOF

%end
最后生成的应答文件如下(例如文件名ks7.cfg)
[root@centos7 ~]#vim  ks7.cfg

#platform=x86, AMD64, or Intel EM64T

#version=DEVEL

# Install OS instead of upgrade

install

# Keyboard layouts

keyboard 'us'

# Root password

rootpw --iscrypted ...................(加密的密码)................

# System language

lang en_US

# System authorization information

auth  --useshadow  --passalgo=sha512

# Use text mode install

text

firstboot --disable

# SELinux configuration

selinux --disabled

 # Firewall configuration

firewall --disabled

# Network information

network  --bootproto=dhcp --device=ens33

#network  --hostname=centos7  #(此项为指定主机名可加可不加)

# Reboot after installation

reboot

# System timezone

timezone Asia/Shanghai

# Use network installation

url --url="http://(服务器ip)/centos/7/os/x86_64/"

# Clear the Master Boot Record

zerombr

# Partition clearing information

clearpart --all --initlabel

ignoredisk --only-use=sda

# Disk partitioning information

part / --fstype="xfs" --size=10240

part /boot --fstype="ext4" --size=1024

part swap --fstype="swap" --size=2048
 %post
 useradd zxc
 echo 123456|passwd --stdin zxc
 %end
之后把该文件放到服务器上如:/var/www/html/k/下
步骤
[root@centos7 ~]#mkdir –pv /data/myiso

[root@centos7 ~]#cp -r /mnt/isolinux/ /data/myiso/

[root@centos7 ~]#vim /data/myiso/isolinux/isolinux.cfg

label linux

 menu label ^Auto Install CentOS Linux 7

 kernel vmlinuz

 append initrd=initrd.img quiet ks=http://10.0.0.18/k/ks7.cfg

label rescue

 menu label ^Rescue a CentOS Linux system

 kernel vmlinuz

 append initrd=initrd.img inst.repo=http://10.0.0.18/centos/7/os/x86_64/ rescue

quiet

label local

 menu default

 menu label Boot from ^local drive

 localboot 0xffff

[root@centos7 ~]#cp /root/myks.cfg /data/myiso/

[root@centos7 ~]#dnf -y install mkisofs

[root@centos7 ~]#mkisofs -R -J -T -v --no-emul-boot --boot-load-size 4 --bootinfo-table -V "CentOS 8.0 x86_64 boot" -b isolinux/isolinux.bin -c isolinux/boot.cat -o /root/boot.iso /data/myiso/

#从而生成boot.iso光盘
把生成的光盘boot.iso镜像刻录到U盘,插到一台新机器上
在启动菜单界面,任意选中一项安装方法,按ESC键进入boot:界面

输入linux ks=http://服务器ip/k/ks7.cfg ip=dhcp 然后回车

然后您可以出去抽个烟,溜达溜达回来后应该就已经安装好了
二、pxe自动安装centos系统
关闭防火墙和SELINUX,DHCP服务器静态IP
(温馨提示:如果同时安装数量太多可能会发生意想不到的事情呦!)
1、安装相关软件包并启动
[root@centos8 ~]#dnf -y install dhcp-server tftp-server httpd syslinux-nonlinux

[root@centos8 ~]#systemctl enable --now httpd tftp dhcpd
2、配置DHCP服务
[root@centos8 ~]#cp /usr/share/doc/dhcp-server/dhcpd.conf.example

/etc/dhcp/dhcpd.conf

[root@centos8 ~]#vim /etc/dhcp/dhcpd.conf

option domain-name "example.com";

option domain-name-servers 180.76.76.76,223.6.6.6;

default-lease-time 600;

max-lease-time 7200;

log-facility local7;

subnet 10.0.0.0 netmask 255.255.255.0 {

 range 10.0.0.1 10.0.0.200;

 option routers 10.0.0.1;

 next-server 10.0.0.100;

 filename "pxelinux.0"; }

[root@centos8 ~]#systemctl start dhcpd
3、准备yum 源和相关目录
[root@centos8 ~]#mkdir -pv /var/www/html/centos/{6,7,8}/os/x86_64/

[root@centos8 ~]#mount /dev/sr0 /var/www/html/centos/6/os/x86_64/

[root@centos8 ~]#mount /dev/sr1 /var/www/html/centos/7/os/x86_64/

[root@centos8 ~]#mount /dev/sr2 /var/www/html/centos/8/os/x86_64/
4、准备kickstart文件
[root@centos8 ~]#mkdir /var/www/html/k/         #应答文件可根据需求可自行更改,也可参考“一”生成的文件

[root@centos8 ~]#vim /var/www/html/k/ks6.cfg

install

text

reboot

url --url=http://10.0.0.18/centos/6/iso/x86_64/

lang en_US.UTF-8

keyboard us

network --onboot yes --device eth0 --bootproto dhcp  --noipv6

rootpw --iscrypted $6$loeMb/DwOAMWO9MT$lvxCJFWGgvkfhk4u3mez23BCzNS4bv.yAMcObpH/zzzwoJ.kJriKpyh1YG7gBQYDfFXr8UOV9dco2lS54ag/50

firewall --disabled

authconfig --enableshadow --passalgo=sha512

selinux --disabled

timezone Asia/Shanghai

bootloader --location=mbr --driveorder=sda --append="crashkernel=auto rhgb quiet"

zerombr

clearpart --all --initlabel

part /boot --fstype=ext4 --size=1024

part / --fstype=ext4 --size=50000

part /data --fstype=ext4 --size=30000

part swap --size=2048

%packages

@core

@server-policy

@workstation-policy

autofs

vim-enhanced

%end

%post

useradd zxc

echo asd9420 | passwd --stdin zxc &> /dev/null

mkdir /etc/yum.repos.d/bak

mv /etc/yum.repos.d/* /etc/yum.repos.d/bak

cat > /etc/yum.repos.d/base.repo <<EOF

[base]

name=base

baseurl=file:///misc/cd

gpgcheck=0

EOF

%end
================================================================================

[root@centos8 ~]#vim /var/www/html/k/ks7.cfg

install

xconfig  --startxonboot

keyboard --vckeymap=us --xlayouts='us'

rootpw --iscrypted $6$xI3rPwQBFxqTNl1M$Imk2HHxf3jTIy1qVzBn/DAYX6RJLbc2amakegO/fQgmQ.6NJBEOBufkHx2B10ZXfScr/SExe.j5j1BDfqM4J21

url  --url="http://10.0.0.18/centos/7/iso/x86_64"

lang en_US.UTF-8

auth  --useshadow  --passalgo=sha512

text

firstboot  --enable

selinux  --disabled

skipx

services  --disabled="chronyd"

ignoredisk  --only-use=sda

firewall  --disabled

network   --bootproto=dhcp --device=ens33

reboot

timezone  Asia/Shanghai --nontp

autopart --type=lvm

zerombr

clearpart  --all --initlabel

%post

useradd zxc

echo asd9420 | passwd --stdin zxc & >/dev/null

%end

%packages

@^minimal

vim-enhanced

%end


======================================================================================
[root@centos8 ~]#vim /var/www/html/k/ks8.cfg

ignoredisk --only-use=sda

zerombr

clearpart --all --initlabel

text

url --url=http://10.0.0.18/centos/8/iso/x86_64

keyboard --vckeymap=cn --xlayouts='cn'

lang zh_CN.UTF-8

firewall --disabled

network  --bootproto=dhcp --device=ens160 --ipv6=auto --activate

network  --hostname=CentOS8

rootpw --iscrypted $6$loeMb/DwOAMWO9MT$lvxCJFWGgvkfhk4u3mez23BCzNS4bv.yAMcObpH/zzzwoJ.kJriKpyh1YG7gBQYDfFXr8UOV9dco2lS54ag/50

firstboot --enable

skipx

services --disabled="chronyd"

timezone Asia/Shanghai --isUtc --nontp

user --name=zxc --password=$6$L/YFB8zwDbSjnHQK$vkKhMNIKIqZKHsvPzUaud.BuKYKwnaHUl.4lbA9Nkesbjbpdec6eNi5j3msQ285LUx7.3kgM5AirHz/4Fvjut. --iscrypted --gecos="zxc"

selinux --disabled

reboot

autopart --type=lvm

%packages

@^minimal-environment

@container-management

@legacy-unix

@network-server

@rpm-development-tools

@security-tools

@system-tools

kexec-tools

%end

%addon com_redhat_kdump --enable --reserve-mb='auto'

%end

%anaconda

pwpolicy root --minlen=6 --minquality=1 --notstrict --nochanges --notempty

pwpolicy user --minlen=6 --minquality=1 --notstrict --nochanges --emptyok

pwpolicy luks --minlen=6 --minquality=1 --notstrict --nochanges --notempty

%end

%post

useradd zxc

echo asd9420 | passwd --stdin zxc & >/dev/null

%end
5、准备PXE启动相关文件
[root@centos8 ~]#mkdir /var/lib/tftpboot/centos{6,7,8}

#准备CentOS6,7,8各自的内核相关文件

[root@centos8 ~]#cp /var/www/html/centos/6/os/x86_64/isolinux/{vmlinuz,initrd.img}  /var/lib/tftpboot/centos6

[root@centos8 ~]#cp /var/www/html/centos/7/os/x86_64/isolinux/{vmlinuz,initrd.img}  /var/lib/tftpboot/centos7

[root@centos8 ~]#cp /var/www/html/centos/8/os/x86_64/isolinux/{vmlinuz,initrd.img}  /var/lib/tftpboot/centos8

[root@centos8 ~]#cp /usr/share/syslinux/{pxelinux.0,menu.c32} /var/lib/tftpboot/
#以下三个文件是CentOS8安装所必须文件,CentOS6,7则不需要

[root@centos8 ~]#cp /var/www/html/centos/8/os/x86_64/isolinux/{ldlinux.c32,libcom32.c32,libutil.c32}  /var/lib/tftpboot/

#生成安装菜单文件

[root@centos8 ~]#mkdir /var/lib/tftpboot/pxelinux.cfg/

[root@centos8 ~]#vim /var/lib/tftpboot/pxelinux.cfg/default
default menu.c32
timeout 60

menu title CentOS Linux 6\7\8

label linux8
  menu label Auto Install CentOS Linux ^8
  kernel centos8/vmlinuz
  append initrd=centos8/initrd.img quiet ks=http://10.0.0.18/k/ks8.cfg

label linux7
  menu label Auto Install CentOS Linux ^7
  kernel centos7/vmlinuz
  append initrd=centos7/initrd.img quiet ks=http://10.0.0.18/k/ks7.cfg

label linux6
  menu label Auto Install CentOS Linux ^6
  kernel centos6/vmlinuz
  append initrd=centos6/initrd.img quiet ks=http://10.0.0.18/k/ks6.cfg

label rescue    #参考这个也可以生成6,7的救援菜单,不生成也不影响启动
  menu label ^Rescue a CentOS Linux system
  kernel centos8/vmlinuz
  append initrd=centos8/initrd.img inst.repo=http://10.0.0.18/centos/8/iso/x86_64/ rescue   quiet

label local
  menu default
  menu label Boot from ^local drive
  localboot 0xffff
6、测试客户端基于PXE实现自动安装
准备一台新主机,v>
之后选择对应的对应的版本回车就行
kickstart半自动安装centos系统与pxe自动安装centos系统的更多相关文章
- DHCP服务+PXE自动安装系统
DHCP服务+PXE自动安装系统 DHCP安装 安装DHCP服务器 yum install dhcp -y 安装完dhcp默认无法启动,需要编辑配置文件设置分配地址范围等相关信息,服务器自身IP地址要 ...
- PXE 自动安装物理机 (DHCP服务由路由提供, 不能再配置)
目录 1. PXE 自动安装物理机 (DHCP服务由路由提供, 不能再配置) 1.1. 需要的软件 1.2. 启动 proxy dhcp 服务 1.3. 关键的几个配置文件 PXE 自动安装物理机 ( ...
- 让CentOS能用yum自动安装rar和unrar
目的:让CentOS能用yum自动安装rar和unrar 系统环境: CentOS 7.0 具体操作步骤如下: 1.编辑文件 编辑dag.repo文件,或者说是新建一个dag.repo文件. vi / ...
- LINUX系统下PXE网络安装虚拟机
PXE(preboot execute environment),预启动执行环境.由于安装系统的时候,有时候是大批量的安装:这时使用磁盘或虚拟机进行单个安装,效率太差:所以我们开始使用PXE网络安装L ...
- Ubuntu/CentOS下使用脚本自动安装 Docker
Ubuntu.Debian 系列安装 Docker 系统要求 Docker 支持以下版本的 Ubuntu 和 Debian 操作系统: Ubuntu Xenial 16.04 (LTS) Ubuntu ...
- pxe自动安装
首先我们要用到的linux的桌面模式,没有桌面模式的请自觉安装.注意要关闭防火墙 需要的支持环境,dhcp,tftp,vsftp. 1.先创建ftp的共享光盘目录 mkdir -p /var/ftp/ ...
- Centos7 linux 卸载自带安装的jdk 并yum自动安装jdk1.8
一:卸载系统自带安装的JDK 注:本文参考了< 使用CentOS7卸载自带jdk安装自己的JDK1.8> 通过xshell工具成功连接安装好的虚拟机之后可通过 rpm -qa | g ...
- 【转】CentOS 6.3 X64自动安装OpenERP 7.0脚本
原文地址:OpenERP 7.0安装与配置 #!/bin/bash -e # Modified script from Carlos E. Fonseca Zorrilla # . Add the t ...
- 关于虚拟机VMware Tools安装中出现的无法自动安装VMCI驱动程序的问题
问题 解决方法 根据配置文件信息找到所在的虚拟机位置 找到后缀名为vmx的文件,右键打开方式中选择使用记事本打开 选择左上角编辑中的查找功能输入图中的查找内容后,点击查找下一个 将其原先的TRUE值改 ...
随机推荐
- scanf函数与getchar函数
#define _CRT_SECURE_NO_WARNINGS#include<stdio.h>#include<string.h>#include<stdlib.h&g ...
- Kafka 为什么快
Kafka 为什么能那么快 | Kafka高效读写数据的原因 无论 kafka 作为 MQ 也好,作为存储层也罢,无非就是两个功能(好简单的样子),一是 Producer 生产的数据存到 broker ...
- myBatis源码解析-类型转换篇(5)
前言 开始分析Type包前,说明下使用场景.数据构建语句使用PreparedStatement,需要输入的是jdbc类型,但我们一般写的是java类型.同理,数据库结果集返回的是jdbc类型,而我们需 ...
- HashMap 21问!!
1:HashMap的数据结构? A:哈希表结构(链表散列:数组+链表)实现,结合数组和链表的优点.当链表长度超过8时,链表转换为红黑树. transient Node<K,V>\[\] t ...
- JavaScript正则表达式的模式匹配教程,并且附带充足的实战代码
JavaScript正则表达式的模式匹配 引言 正文 一.正则表达式定义 二.正则表达式的使用 三.RegExp直接量 (1)正则表达式初体验 (2)深入了解正则 字符类 重复 选择 分组与引用 指定 ...
- Mybatis_day2
二 mybatis配置详解 MyBatis最关键的组成部分是SqlSessionFactory,我们可以从中获取SqlSession, 并执行映射的SQL语句.SqlSessionFactory对象可 ...
- Debian 镜像使用帮助
链接: Debian 镜像使用帮助 buster: # 默认注释了源码镜像以提高 apt update 速度,如有需要可自行取消注释 deb https://mirrors.tuna.tsinghua ...
- Sqlalchemy 事件监听与初始化
sqlalchemy不仅仅能自动创建数据库,更提供了其他更强大的功能,今天要介绍的就是sqlalchemy中的事件监听,并将其应用到数据库的初始化中. 需求:当插入设置password字段时,自动加密 ...
- 团队作业4:第一篇Scrum冲刺博客(歪瑞古德小队)
目录 一.Alpha阶段任务认领 二.明日任务安排 三.项目预期任务量 四.敏捷开发前的感想 五.团队期望 Author:歪瑞古德小队 Project:海岛漂流 集合贴:团队作业4:项目冲刺集合贴(歪 ...
- 第7篇scrum冲刺(5.27)
一.站立会议 1.照片 2.工作安排 成员 昨天已完成的工作 今天的工作安排 困难 陈芝敏 学习云开发,云函数调用以及数据的前后端传递 今天实现云词库搭建,随机获取并显示,对云开发有更深的认识 ...