Spring MVC 源码解析
本文的 MVC 基于传统的 Servlet 应用,所使用的 Spring Web 的环境为 Spring Boot 2.5.2
静态资源的加载
参考 Spring Boot 中给出的文档,原文如下:
By default, Spring Boot serves static content from a directory called
/static(or/publicor/resourcesor/META-INF/resources) in the classpath or from the root of theServletContext. It uses theResourceHttpRequestHandlerfrom Spring MVC so that you can modify that behavior by adding your ownWebMvcConfigurerand overriding theaddResourceHandlersmethod.In a stand-alone web application, the default servlet from the container is also enabled and acts as a fallback, serving content from the root of the
ServletContextif Spring decides not to handle it. Most of the time, this does not happen (unless you modify the default MVC configuration), because Spring can always handle requests through theDispatcherServlet.
大致的翻译如下:
默认情况下,Spring Boot 服务端的静态内容来自以下几个在 classpath 路径下或者是
ServletContext的根目录路径下的目录的三个子目录:/static、/resource 和 /META-NF/resources。它使用 Spring MVC 中的ResourceHttpRequestHandler来加载这些静态资源,因此你可以通过添加你自己的WebMvcConfigurer并且重写addResourceHandlers方法来修改它的行为在单一的 Web 应用中,默认的容器中的 Servlet 已经启用作为备用。如果 Spring 决定不去处理它,则从
ServletContext的根目录下获取内容。在大部分的情况下,这种事件不会发生(除非你修改了默认的 MVC 配置),因为 Spring 总是能够通过DispatcherServlet来处理请求
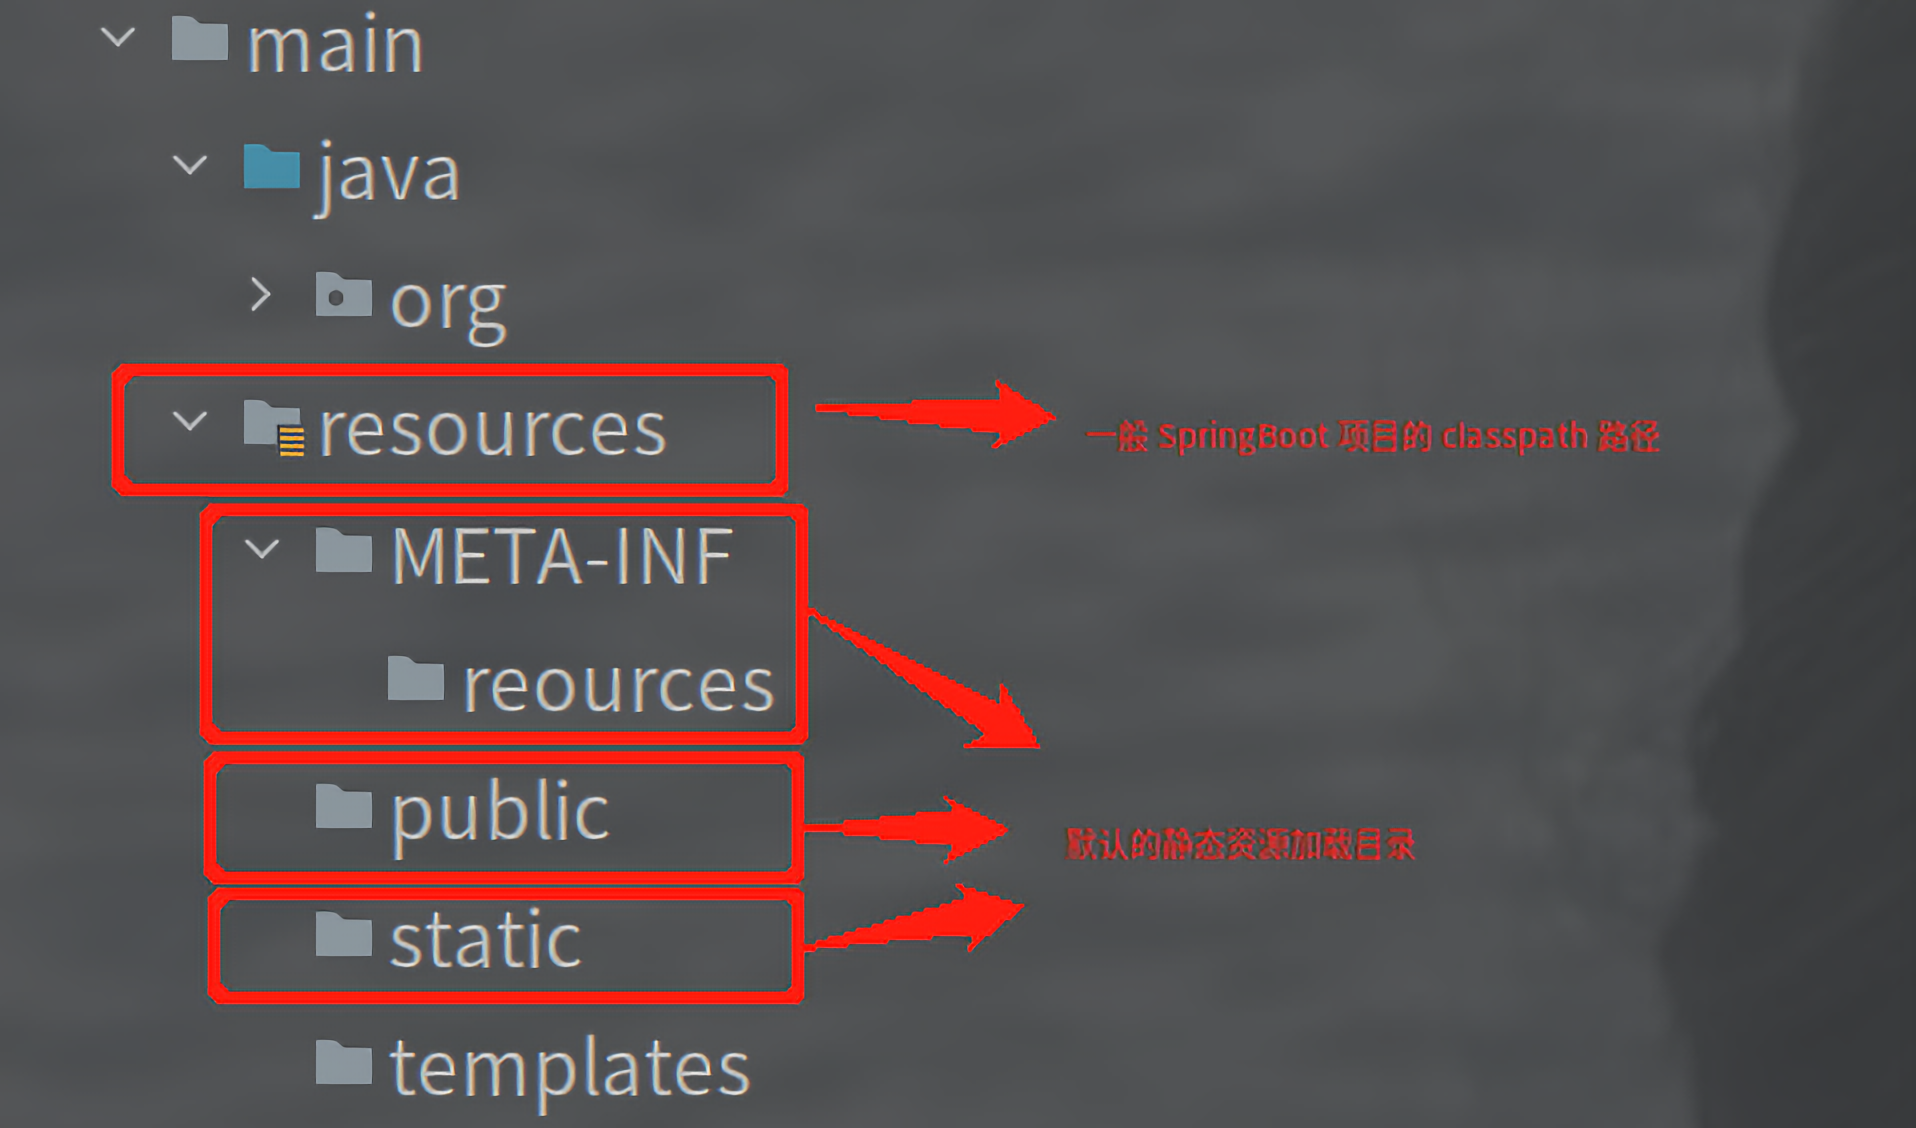
对于一般的 Spring Boot 的 Web 应用来讲,classpath 就是对应的项目中的 resources 目录,具体结构如下图所示:
可以通过加入相关的配置来修改静态资源的加载行为:
application.yml 或 application.properties 配置文件中:
spring:

  mvc:

  	# 这个配置属性的作用是为每个加载的静态资源添加一个访问地址前缀,默认是 "/"

    static-path-pattern: "/static/**" # 现在将访问地址前缀设置为 "/static"

   web:

    resources:

      # 这个配置属性的作用是定义静态资源的加载路径(相对于 "resources")

      static-locations: [classpath:/mine/]
源码分析
按照官方文档,具体的逻辑定义在 WebMvcConfigurer 的 addResourceHandlers 方法中:
/**

	Spring 默认的具体实现类为 org.springframework.boot.autoconfigure.web.servlet.WebMvcAutoConfiguration

*/

public void addResourceHandlers(ResourceHandlerRegistry registry) {

    // 如果在配置文件中禁用了自动添加 Mapping 的属性,则不会为静态资源创建 Mapping

    if (!this.resourceProperties.isAddMappings()) {

        logger.debug("Default resource handling disabled");

        return;

    }

    addResourceHandler(registry, "/webjars/**", "classpath:/META-INF/resources/webjars/");

    /*

    	在这里设置静态资源的前缀请求路径,

    	以及将对应的静态资源的路径注册到 this.resourceProperties.getStaticLocations() 中

    	这里最终会生成对应的具体资源访问路径

    */

    addResourceHandler(registry, this.mvcProperties.getStaticPathPattern(), (registration) -> {

        registration.addResourceLocations(this.resourceProperties.getStaticLocations());

        if (this.servletContext != null) { // 对应官方文档中 ServletContext 的根目录

            ServletContextResource resource = new ServletContextResource(this.servletContext, SERVLET_LOCATION);

            registration.addResourceLocations(resource);

        }

    });

}
Spring MVC 的执行流程
一般的执行流程如下:

源码分析
处理请求之前的准备工作
对应的源代码位于
org.springframework.web.servlet.DispatcherServlet中,具体内容如下:protected void doService(
HttpServletRequest request,
HttpServletResponse response
) throws Exception {
logRequest(request);// 打印请求相关的日志,需要开启日志级别:trace // 保存当前请求的一个快照,以便在之后某个时刻能够恢复
Map<String, Object> attributesSnapshot = null;
if (WebUtils.isIncludeRequest(request)) {
attributesSnapshot = new HashMap<>();
Enumeration<?> attrNames = request.getAttributeNames();
while (attrNames.hasMoreElements()) {
String attrName = (String) attrNames.nextElement();
if (this.cleanupAfterInclude || attrName.startsWith(DEFAULT_STRATEGIES_PREFIX)) {
attributesSnapshot.put(attrName, request.getAttribute(attrName));
}
}
} // 使得 framework 对象对于 Handler 对象和 View 对象可用
request.setAttribute(WEB_APPLICATION_CONTEXT_ATTRIBUTE, getWebApplicationContext());
request.setAttribute(LOCALE_RESOLVER_ATTRIBUTE, this.localeResolver);
request.setAttribute(THEME_RESOLVER_ATTRIBUTE, this.themeResolver);
request.setAttribute(THEME_SOURCE_ATTRIBUTE, getThemeSource()); // 这一部分的主要作用也是保存一个请求的快照信息,大部分情况下是为了请求重定向而准备的
if (this.flashMapManager != null) {
FlashMap inputFlashMap = this.flashMapManager.retrieveAndUpdate(request, response);
if (inputFlashMap != null) {
request.setAttribute(INPUT_FLASH_MAP_ATTRIBUTE, Collections.unmodifiableMap(inputFlashMap));
}
request.setAttribute(OUTPUT_FLASH_MAP_ATTRIBUTE, new FlashMap());
request.setAttribute(FLASH_MAP_MANAGER_ATTRIBUTE, this.flashMapManager);
} // 解析请求的路径,然后缓存它
RequestPath previousRequestPath = null;
if (this.parseRequestPath) {
previousRequestPath = (RequestPath) request.getAttribute(ServletRequestPathUtils.PATH_ATTRIBUTE);
ServletRequestPathUtils.parseAndCache(request);
} try {
// 核心部分,这个方法的主要作用是处理请求的分发
doDispatch(request, response);
}
finally {
// 如果需要的话,将请求回复到原来的状态
if (!WebAsyncUtils.getAsyncManager(request).isConcurrentHandlingStarted()) {
// Restore the original attribute snapshot, in case of an include.
if (attributesSnapshot != null) {
restoreAttributesAfterInclude(request, attributesSnapshot);
}
}
if (this.parseRequestPath) {
ServletRequestPathUtils.setParsedRequestPath(previousRequestPath, request);
}
}
}
开始处理请求
处理请求对应着
doDispatch方法,该方法依旧位于org.springframework.web.servlet.DispatcherServlet中protected void doDispatch(
HttpServletRequest request,
HttpServletResponse response
) throws Exception {
HttpServletRequest processedRequest = request;
HandlerExecutionChain mappedHandler = null; // 请求处理链
boolean multipartRequestParsed = false; // 获取一个处理当前请求的异步处理管理器
WebAsyncManager asyncManager = WebAsyncUtils.getAsyncManager(request); ModelAndView mv = null;
Exception dispatchException = null;
processedRequest = checkMultipart(request); multipartRequestParsed = (processedRequest != request); /*
通过当前的请求获取包含处理器 Handler 和拦截器 HandlerInterceptor
的处理执行链 HandlerExecutionChain
*/
mappedHandler = getHandler(processedRequest);
if (mappedHandler == null) {
noHandlerFound(processedRequest, response);
return;
} /*
为当前的请求选择对应的处理适配器 HandlerAdapter
*/
HandlerAdapter ha = getHandlerAdapter(mappedHandler.getHandler()); // 省略一部分不太重要的代码 /*
通过处理器适配器 HandlerAdapter 来调用处理器 Handler 完成对请求的处理 适配器模式的使用。。。。。
*/
mv = ha.handle(processedRequest, response, mappedHandler.getHandler()); if (asyncManager.isConcurrentHandlingStarted()) {
return;
} // 为视图设置默认的视图名
applyDefaultViewName(processedRequest, mv); // 调用所有已注册的拦截器的方法,在将响应返回给客户端时做的一次的处理
mappedHandler.applyPostHandle(processedRequest, response, mv); // 省略一部分一场捕获带代码 // 处理结果。。。。 返回视图给客户端
processDispatchResult(processedRequest, response, mappedHandler, mv, dispatchException); // 省略一部分异常捕获代码 // 省略一部分不太重要的代码
}
获取处理器
Handler具体源代码依旧位于
org.springframework.web.servlet.DispatcherServlet中protected HandlerExecutionChain getHandler(HttpServletRequest request) throws Exception {
/**
调用具体的 HandleMapping 的 getHandler 方法获取对应的 HandlerExecutionChain
*/
if (this.handlerMappings != null) {
for (HandlerMapping mapping : this.handlerMappings) {
HandlerExecutionChain handler = mapping.getHandler(request);
if (handler != null) {
return handler;
}
}
}
return null;
}
HandlerMapping的类结构图如下: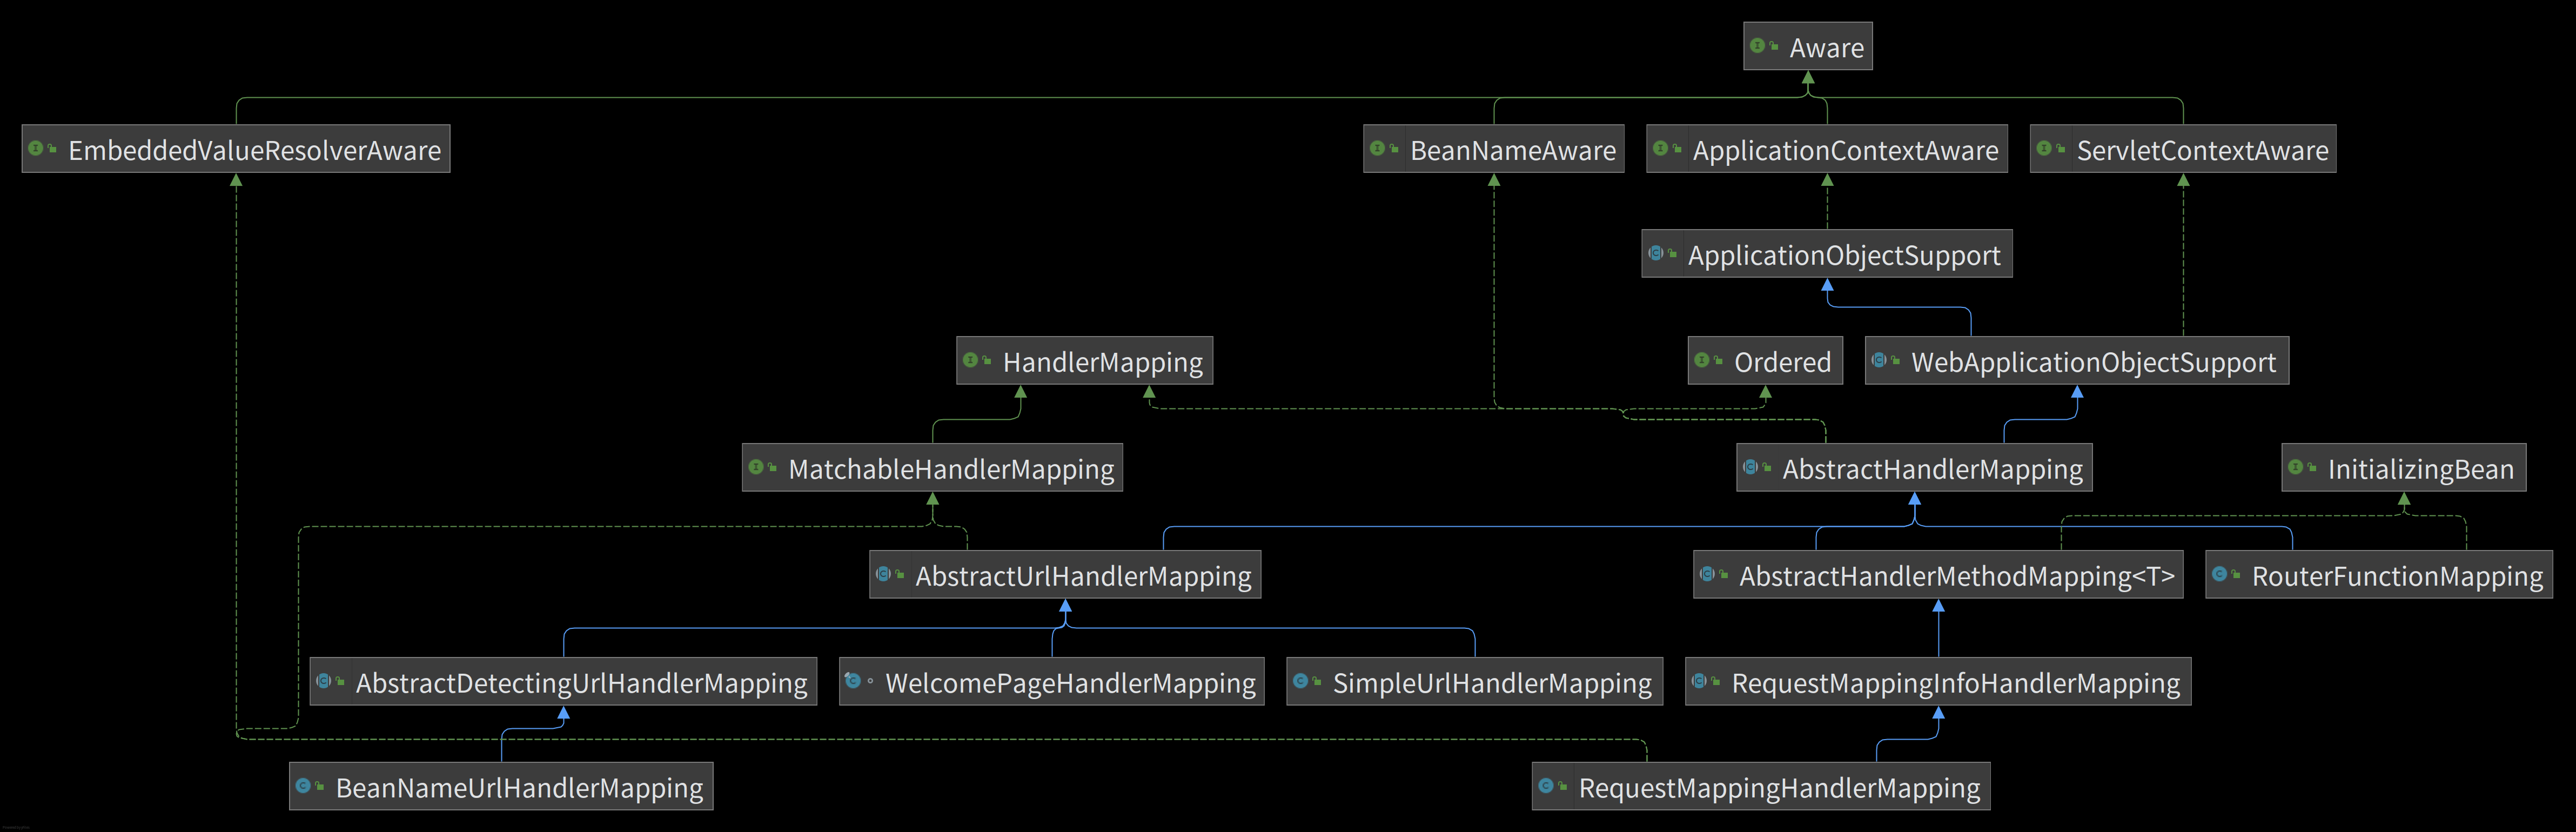
可以看到,在 Spring 的 Web 应用中,主要存在以下几种
HandleMapping的具体类:RequestMappingHandlerMapping、BeanNameUrlHandlerMapping、RouterFunctionMapping、SimpleUrlHandlerMapping、WelcomePageHandlerMapping。它们都继承自AbstractHandlerMapping,具体的getHandler(request)方法就是在AbstractHandlerMapping中定义的。具体的
getHandler(request)方法如下:public final HandlerExecutionChain getHandler(HttpServletRequest request) throws Exception {
/*
通过给定的 request 查找对应的 handler,如果没有的话则返回 null
这里返回的 Handler 就是处理这个请求的 Bean 的对应方法,除了方法的一些基本属性之外,还包括这个方法所在的 Bean 和 BeanFactory getHandlerInternal(request) 由具体子类定义其行为
*/
Object handler = getHandlerInternal(request); // 省略一部分不太重要的代码 // 这里是获取处理链的部分,通过对应的 Handler 和 request 来获取
HandlerExecutionChain executionChain = getHandlerExecutionChain(handler, request); // 省略一部分日志打印的代码 // 省略一部分 CORS 配置的代码 return executionChain;
}
getHandlerExecutionChain(handler, request)对应的源代码如下:// 该方法依旧位于 org.springframework.web.servlet.handler.AbstractHandlerMapping 类中
protected HandlerExecutionChain getHandlerExecutionChain(
Object handler,
HttpServletRequest request
) {
// 获取一个 HandlerExecutionChain 对象,直接获取或者新包装一个
HandlerExecutionChain chain = (handler instanceof HandlerExecutionChain ?
(HandlerExecutionChain) handler : new HandlerExecutionChain(handler)); /**
将所有的拦截器 Bean 都放入 HandlerExecutionChain 对象中
*/
for (HandlerInterceptor interceptor : this.adaptedInterceptors) {
if (interceptor instanceof MappedInterceptor) {
MappedInterceptor mappedInterceptor = (MappedInterceptor) interceptor;
if (mappedInterceptor.matches(request)) {
chain.addInterceptor(mappedInterceptor.getInterceptor());
}
}
else {
chain.addInterceptor(interceptor);
}
}
return chain;
}
一般情况下,默认会添加两个
HandlerInterceptor:一个是ConversionServiceExposingInterceptor,用于处理传入的参数之间的转换,这是在执行请求时可以自动将String转化为Long等其它类型的原因。如果想要自定义请求参数的转换,那么只需要定义一个实现了org.springframework.core.convert.converter.Converter接口的 Bean 即可;另一个是ResourceUrlProviderExposingInterceptor,用于处理静态资源的访问相关的请求现在再回到
DispatcherServlet,接下来是获取HandlerAapter具体的源代码如下:
// 该方法位于 org.springframework.web.servlet.DispatcherServlet

protected HandlerAdapter getHandlerAdapter(Object handler) throws ServletException {

    if (this.handlerAdapters != null) {

        /*

        	RequestMappingHandlerAdapter、HandlerFunctionAdapter、HttpRequestHandlerAdapter、SimpleControllerHandlerAdapter

        	找到能够处理对应 Handler 的 HandlerAdapter

        */

        for (HandlerAdapter adapter : this.handlerAdapters) {

            if (adapter.supports(handler)) {

                return adapter;

            }

        }

    }

    throw new ServletException("No adapter for handler [" + handler +

                               "]: The DispatcherServlet configuration needs to include a HandlerAdapter that supports this handler");

}
具体
HandlerAdapter的类结构如下所示:
接下来便是调用对应的
Handler,对请求进行处理由于针对的是一般的
Servlet类型的处理,因此在本文环境下会执行org.springframework.web.servlet.mvc.method.AbstractHandlerMethodAdapter中的handle方法public final ModelAndView handle(HttpServletRequest request, HttpServletResponse response, Object handler)
throws Exception { return handleInternal(request, response, (HandlerMethod) handler);
}
handleInternal的具体实现类为org.springframework.web.servlet.mvc.method.annotation.RequestMappingHandlerAdapter:protected ModelAndView handleInternal(
HttpServletRequest request,
HttpServletResponse response,
HandlerMethod handlerMethod
) throws Exception { ModelAndView mav;
checkRequest(request); // 省略一同步化的代码。。。 // 调用具体的 Handler 方法对请求进行处理
mav = invokeHandlerMethod(request, response, handlerMethod); // 设置响应头。。。。
if (!response.containsHeader(HEADER_CACHE_CONTROL)) {
if (getSessionAttributesHandler(handlerMethod).hasSessionAttributes()) {
applyCacheSeconds(response, this.cacheSecondsForSessionAttributeHandlers);
}
else {
prepareResponse(response);
}
} return mav;
}
invokeHandlerMethod方法对应的源代码:// 该方法依旧位于 org.springframework.web.servlet.mvc.method.annotation.RequestMappingHandlerAdapter
protected ModelAndView invokeHandlerMethod(
HttpServletRequest request,
HttpServletResponse response,
HandlerMethod handlerMethod
) throws Exception { ServletWebRequest webRequest = new ServletWebRequest(request, response);
try {
WebDataBinderFactory binderFactory = getDataBinderFactory(handlerMethod);
ModelFactory modelFactory = getModelFactory(handlerMethod, binderFactory); // 创建一个方法调用对象。。。。
ServletInvocableHandlerMethod invocableMethod = createInvocableHandlerMethod(handlerMethod);
/*
设置这个方法的参数处理对象,包括对请求参数的转化 (String ——> Long 等)、参数获取来源等 类似 @RequestParam、@PathVariable 等修饰的参数就是在这里进行处理的
*/
if (this.argumentResolvers != null) {
invocableMethod.setHandlerMethodArgumentResolvers(this.argumentResolvers);
}
// 对这个方法执行后的返回值的进一步处理。。。
if (this.returnValueHandlers != null) {
invocableMethod.setHandlerMethodReturnValueHandlers(this.returnValueHandlers);
} invocableMethod.setDataBinderFactory(binderFactory);
invocableMethod.setParameterNameDiscoverer(this.parameterNameDiscoverer); // 创建 ModelAndViewContainer,用于存储 ModelAndView 对象
ModelAndViewContainer mavContainer = new ModelAndViewContainer();
mavContainer.addAllAttributes(RequestContextUtils.getInputFlashMap(request));
/*
填充到 ModelAndViewContainer,按照以下顺序:
1. 获取会话属性(@SessionAttribute 修饰),将它们填充到 Model 中;
2. 调用 @ModelAttribute 修饰的方法,并将返回值填充到 Model 中;
3. 找到被 @ModelAttribute 注解修饰的方法参数,并将它们填充到 Model 中
*/
modelFactory.initModel(webRequest, mavContainer, invocableMethod);
mavContainer.setIgnoreDefaultModelOnRedirect(this.ignoreDefaultModelOnRedirect); // 移除异步处理的相关代码。。。。 /*
正式调用对应的 Handle 方法。。。。
*/
invocableMethod.invokeAndHandle(webRequest, mavContainer); /*
返回获取的 ModelAndView 对象,这里主要是为了解决重定向的一些问题。。
*/
return getModelAndView(mavContainer, modelFactory, webRequest);
}
finally {
webRequest.requestCompleted();
}
}
再回到
DispatcherServlet,下一步就是调用后置处理了对应的源代码如下:
// 该方法位于 org.springframework.web.servlet.mvc.method.annotation.RequestMappingHandlerAdapter 中

void applyPostHandle(

    HttpServletRequest request,

    HttpServletResponse response,

    @Nullable ModelAndView mv

) throws Exception {

    /*

    	遍历所有的拦截器对象,执行每个拦截器的后置处理

    */

    for (int i = this.interceptorList.size() - 1; i >= 0; i--) {

        HandlerInterceptor interceptor = this.interceptorList.get(i);

        interceptor.postHandle(request, response, this.handler, mv);

    }

}
最后一部分就是对于结果的处理
// 该方法位于 org.springframework.web.servlet.DispatcherServlet

private void processDispatchResult(

    HttpServletRequest request, HttpServletResponse response,

    @Nullable HandlerExecutionChain mappedHandler, @Nullable ModelAndView mv,

    @Nullable Exception exception

) throws Exception {

    // 省略一部分不太重要的代码。。。

    render(mv, request, response);

}
具体
render方法的源代码如下:// 该方法依旧位于 org.springframework.web.servlet.DispatcherServlet 中
protected void render(
ModelAndView mv,
HttpServletRequest request,
HttpServletResponse response
) throws Exception {
// Determine locale for request and apply it to the response.
Locale locale =
(this.localeResolver != null ? this.localeResolver.resolveLocale(request) : request.getLocale());
response.setLocale(locale); View view;
String viewName = mv.getViewName(); // 省略一部分不太重要的代码。。。。 if (mv.getStatus() != null) {
response.setStatus(mv.getStatus().value());
}
// 由具体的第三方库完成 view 的解析。。。。
view.render(mv.getModelInternal(), request, response); // 省略一部分异常捕获代码
}
之后还有一些收尾的工作,如:将请求状态置为 “已处理”,调用拦截器的完成时处理等。具体细节在此不做展开
参考:
[1] https://www.jianshu.com/p/5ed8fbd409fb
Spring MVC 源码解析的更多相关文章
- spring mvc源码解析
1.从DispatcherServlet开始 与很多使用广泛的MVC框架一样,SpringMVC使用的是FrontController模式,所有的设计都围绕DispatcherServlet 为中心来 ...
- Spring MVC源码——Servlet WebApplicationContext
上一篇笔记(Spring MVC源码——Root WebApplicationContext)中记录了下 Root WebApplicationContext 的初始化代码.这一篇来看 Servlet ...
- Spring Boot系列(四):Spring Boot源码解析
一.自动装配原理 之前博文已经讲过,@SpringBootApplication继承了@EnableAutoConfiguration,该注解导入了AutoConfigurationImport Se ...
- 精尽Spring MVC源码分析 - 寻找遗失的 web.xml
该系列文档是本人在学习 Spring MVC 的源码过程中总结下来的,可能对读者不太友好,请结合我的源码注释 Spring MVC 源码分析 GitHub 地址 进行阅读 Spring 版本:5.2. ...
- 精尽Spring MVC源码分析 - 一个请求的旅行过程
该系列文档是本人在学习 Spring MVC 的源码过程中总结下来的,可能对读者不太友好,请结合我的源码注释 Spring MVC 源码分析 GitHub 地址 进行阅读 Spring 版本:5.2. ...
- 精尽Spring MVC源码分析 - MultipartResolver 组件
该系列文档是本人在学习 Spring MVC 的源码过程中总结下来的,可能对读者不太友好,请结合我的源码注释 Spring MVC 源码分析 GitHub 地址 进行阅读 Spring 版本:5.2. ...
- 精尽Spring MVC源码分析 - HandlerMapping 组件(一)之 AbstractHandlerMapping
该系列文档是本人在学习 Spring MVC 的源码过程中总结下来的,可能对读者不太友好,请结合我的源码注释 Spring MVC 源码分析 GitHub 地址 进行阅读 Spring 版本:5.2. ...
- 精尽Spring MVC源码分析 - HandlerMapping 组件(二)之 HandlerInterceptor 拦截器
该系列文档是本人在学习 Spring MVC 的源码过程中总结下来的,可能对读者不太友好,请结合我的源码注释 Spring MVC 源码分析 GitHub 地址 进行阅读 Spring 版本:5.2. ...
- 精尽Spring MVC源码分析 - HandlerMapping 组件(三)之 AbstractHandlerMethodMapping
该系列文档是本人在学习 Spring MVC 的源码过程中总结下来的,可能对读者不太友好,请结合我的源码注释 Spring MVC 源码分析 GitHub 地址 进行阅读 Spring 版本:5.2. ...
- 精尽Spring MVC源码分析 - HandlerMapping 组件(四)之 AbstractUrlHandlerMapping
该系列文档是本人在学习 Spring MVC 的源码过程中总结下来的,可能对读者不太友好,请结合我的源码注释 Spring MVC 源码分析 GitHub 地址 进行阅读 Spring 版本:5.2. ...
随机推荐
- Springboot集成Netty实现TCP通讯
Netty测试客户端 package com.coremain; import com.coremain.handler.ServerListenerHandler; import io.netty. ...
- Docker系列——介绍、安装、镜像、容器、docker容器与镜像、数据卷、Dockerfile、docker 配置pycharm连接
目录 1 Docker 介绍 1.1 简介 1.2 Docker平台介绍 1.3 为什么使用Docker 2 Docker 整体结构(了解) 2.1 Docker引擎介绍 (Docker Engine ...
- PostgreSQL学习笔记-4.基础知识:空值NULL、别名AS
NULL 值代表遗漏的未知数据. 默认地,表的列可以存放 NULL 值. 本章讲解 IS NULL 和 IS NOT NULL 操作符. 语法 当创建表时,NULL 的基本语法如下: CREATE T ...
- 文本编辑器vi使用命令
使用对象: 用于编辑任何ASCII文本,对于编辑源程序尤其有用.可以对文本进行创建]查找.替换.删除.复制和粘贴等操作. 三种工作模式 命令模式:进入vi编辑器默认处于命令模式.命令模式下控制屏幕光标 ...
- A piece of cake
1. A piece of cake(易事情)2. Break a leg(祝好运)3. Don't count your chickens before they hatch(不要过早乐观)4. D ...
- FFmpeg H.264编码器指南[译]
H264 视频编码器指南 本指引着眼于x264编码器,这里假设你的FFmpeg 编译了--enable-libx264支持.如果你需要编译支持的帮助请看这篇文档:https://trac.ffmpeg ...
- FSCTF 2023(公开赛道)CRYPTO WP
RSA 1 1.题目信息 提交格式:FSCTF{你所解出的内容} p=1458769258361 q=4556983871563 e=17 求d 2.解题方法 exp from gmpy2 impor ...
- vscode/sublime 语法高亮定义和代码段的区别
vscode插件数据格式基于json,sublime插件数据格式基于xml.sublime插件的官方文档说的不清楚,相关教程也很难找,遇到的一些坑记录一下 语法定义文件对比 同样使用TextMate定 ...
- form表单调接口校验 比如后台验证用户名是否存在
<FormItem {...formItemLayout} label={'显示名'}> {getFieldDecorator('displayName', { initialValue: ...
- 一个java文件的JVM之旅
准备 我是小C同学编写得一个java文件,如何实现我的功能呢?需要去JVM(Java Virtual Machine)这个地方旅行. 变身 我高高兴兴的来到JVM,想要开始JVM之旅,它确说:&quo ...