Android颜色配置器
一、Android Color设置
1、在xml文件中
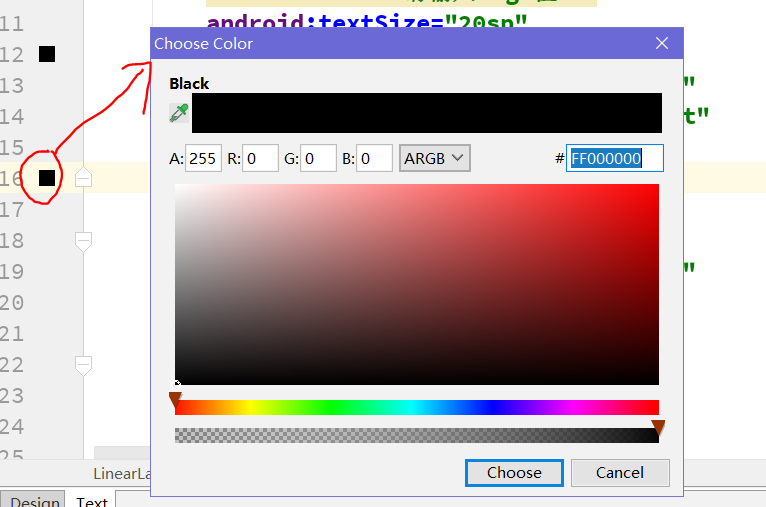
想设置颜色直接设置background的属性或者其他的color属性。随便设置一个颜色如#000,再点击左边的颜色方块,弹出颜色选择器选择颜色
2、在java代码中
①Color.parseColor("#000");
tvShow.setBackgroundColor(Color.parseColor("#000"));
【提示】可以在布局文件中配置好颜色值,然后把用“#”表示的颜色带到java代码中用
②Color.BLACK 使用Color类自带的颜色,不过都是一些基本色
tvShow.setBackgroundColor(Color.BLACK);
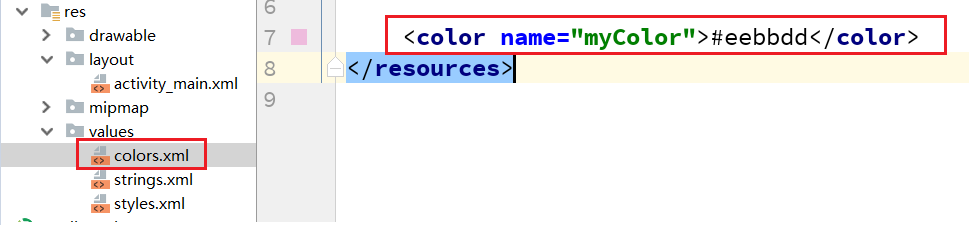
③定义Color资源文件,通过R.color.myColor引用
int color = R.color.myColor;
tvShow.setBackgroundResource(R.color.myColor);
④Color.argb(a,r,g,b)方法:
tvShow.setBackgroundColor(Color.argb(255, 255, 0, 0));
分别是alpha、红(red)、绿(green)、蓝(blue)四个颜色值(ARGB)。每个数字取值0-255,因此一个颜色可以用一个整数来表示。为了运行效率,Android编码时用整数Color类实例来表示颜色。
【提示】通过此方法传入对应的透明度值,红色值,绿色值,蓝色值进行颜色配置。因此我们可以通过此方法做一个简单的颜色配置器。
二、颜色配置器案例
1、【效果】
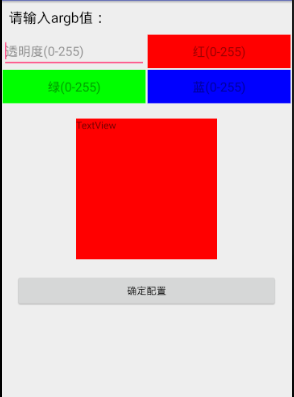
界面设计的比较粗糙,希望大家能学到实现效果,优化界面。
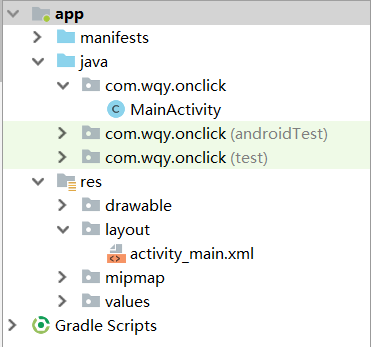
2、【项目结构】
3、【代码】
①activity_main.xml布局文件
 <?xml version="1.0" encoding="utf-8"?>

 <LinearLayout xmlns:android="http://schemas.android.com/apk/res/android"

     xmlns:tools="http://schemas.android.com/tools"

     android:layout_width="match_parent"

     android:layout_height="match_parent"

     tools:context=".MainActivity"

     android:orientation="vertical">

     <TextView

         android:text="请输入argb值:"

         android:textSize="20sp"

         android:textColor="#000"

         android:layout_width="match_parent"

         android:layout_height="wrap_content"

         android:layout_margin="10dp"/>

     <LinearLayout

         android:layout_width="match_parent"

         android:layout_height="50dp"

         android:orientation="horizontal">

         <EditText

             android:id="@+id/etA"

             android:layout_width="0dp"

             android:layout_weight="1"

             android:layout_height="match_parent"

             android:layout_margin="1dp"

             android:hint="透明度(0-255)"

             android:inputType="number"/>

         <EditText

             android:id="@+id/etR"

             android:hint="红(0-255)"

             android:layout_width="0dp"

             android:layout_weight="1"

             android:layout_height="match_parent"

             android:background="#f00"

             android:layout_margin="1dp"

             android:gravity="center"

             android:inputType="number"/>

     </LinearLayout>

     <LinearLayout

         android:layout_width="match_parent"

         android:layout_height="50dp"

         android:orientation="horizontal">

         <EditText

             android:id="@+id/etG"

             android:hint="绿(0-255)"

             android:layout_width="0dp"

             android:layout_weight="1"

             android:layout_height="match_parent"

             android:background="#0f0"

             android:layout_margin="1dp"

             android:gravity="center"

             android:inputType="number"/>

         <EditText

             android:id="@+id/etB"

             android:hint="蓝(0-255)"

             android:layout_width="0dp"

             android:layout_weight="1"

             android:layout_height="match_parent"

             android:background="#00f"

             android:layout_margin="1dp"

             android:gravity="center"

             android:inputType="number"/>

     </LinearLayout>

     <TextView

         android:id="@+id/tv_show"

         android:text="TextView"

         android:layout_width="200dp"

         android:layout_height="200dp"

         android:background="#000"

         android:layout_gravity="center"

         android:layout_marginTop="20dp"

         />

     <Button

         android:id="@+id/btn"

         android:text="确定配置"

         android:layout_margin="20dp"

         android:layout_width="match_parent"

         android:layout_height="wrap_content" />

 </LinearLayout>
【提示】EditText 中hint属性:这是设置输入框内的提示文字。 inputType属性:设置输入框输入的文本类型,此处设置为整数型
②MainActivity.java文件
 public class MainActivity extends AppCompatActivity implements View.OnClickListener {

     private EditText etA;

     private EditText etR;

     private EditText etG;

     private EditText etB;

     private TextView tvShow;

     private Button btn;

     @Override

     protected void onCreate(Bundle savedInstanceState) {

         super.onCreate(savedInstanceState);

         setContentView(R.layout.activity_main);

         initView();

     }

     private void initView() {

         etA = (EditText) findViewById(R.id.etA);

         etR = (EditText) findViewById(R.id.etR);

         etG = (EditText) findViewById(R.id.etG);

         etB = (EditText) findViewById(R.id.etB);

         tvShow = (TextView) findViewById(R.id.tv_show);

         btn = (Button) findViewById(R.id.btn);

         btn.setOnClickListener(this);

     }

     @Override

     public void onClick(View v) {

         switch (v.getId()) {

             case R.id.btn:

                 submit();

                 break;

         }

     }

     private void submit() {

         // validate

         if (!etA.getText().equals("")&&!etB.getText().equals("")

                 &&!etR.getText().equals("")&&!etG.getText().equals("")) {

             //对用户输入的数值进行判断是否为空。避免空字符无法转换为int异常

             int et_a = Integer.parseInt(etA.getText().toString());

             int et_r = Integer.parseInt(etR.getText().toString());

             int et_g = Integer.parseInt(etG.getText().toString());

             int et_b = Integer.parseInt(etB.getText().toString());

             tvShow.setBackgroundColor(Color.argb(et_a, et_r, et_g, et_b));

         }else {

             Toast.makeText(this, "输入的值不能为空", Toast.LENGTH_SHORT).show();

         }

     }

 }
Android颜色配置器的更多相关文章
- Android 颜色配置表-颜色类
android开发中,常常会用到color.xml颜色配置,好的颜色配置可以让尼的应用让人看起来赏心悦目! 不罗嗦,上图先 该工程已经罗列了常用的颜色配置 附上工程链接:http://download ...
- 实用的android颜色配置表(亮瞎尼的双眼)
android开发中,常常会用到color.xml颜色配置,好的颜色配置可以让尼的应用让人看起来赏心悦目! 不罗嗦,上图先 该工程已经罗列了常用的颜色配置 附上工程链接:http://download ...
- 【转】android颜色对应的xml配置值
原文网址:http://www.cnblogs.com/etgyd/archive/2011/04/02/2003778.html android颜色对应的xml配置值 <?xml versio ...
- 基于Android的rgb七彩环颜色采集器
代码地址如下:http://www.demodashi.com/demo/11892.html 一.前言. 在大学期间,看到这个rgb灯,蛮好奇的,这么漂亮的颜色采集,并且可以同步到设备rbg灯颜色, ...
- Android Studio 配置SVN实现代码管理
Refference From:http://iaiai.iteye.com/blog/2267346 一.Android Studio配置SVN Android Studio关联配置SVN很简单,在 ...
- android 资讯阅读器
最近找申请到了一个不错的接口 , 非常适合拿来写一个资讯类的app. 现在着手写,随写随更.也算是抛砖引玉.烂尾请勿喷.╭(╯^╰)╮ android 资讯阅读器 第一阶段目标样式(滑动切换标签 , ...
- Android 颜色渲染(六) RadialGradient 环形渲染
Android 颜色处理(六) RadialGradient 环形渲染 public RadialGradient(float x, float y, float radius, int[] colo ...
- Android 颜色渲染(十) ComposeShader组合渲染
版权声明:本文为博主原创文章,未经博主允许不得转载. 目录(?)[+] Android 颜色处理(十) ComposeShader组合渲染 public ComposeShader(Shader sh ...
- Android 颜色渲染(五) LinearGradient线性渲染
版权声明:本文为博主原创文章,未经博主允许不得转载. Android 颜色处理(五) LinearGradient线性渲染 相信很多人都看过歌词同步的效果, 一是竖直方向的滚动,另一方面是水平方面的歌 ...
随机推荐
- Spring Security入门(2-3)Spring Security 的运行原理 3
关键组件关系 FilterSecurityInterceptor--- authenticationManager --- UserDetailService--- accessDecisionMan ...
- windows计划任务
前段时间写了一个小工具,实现两个数据库的数据同步. 需求:要求每天的某个时间自动同步数据 功能写好之后,发现了windows一个自带的功能不错,可以实现我的需要,不用写定时器触发了 控制面板-> ...
- MySql中的varchar长度究竟是字节还是字符
今天在设计表的时候,遇到个小问题,由于不知道未来将要存储的数据有多长(数据是通过第三方http接口提供的,根据sample显示,数据大概是如下:) 也就是6个字符. 我在设计表的时候,有点犹豫,本来准 ...
- python API验证
API验证 1 2 3 4 5 6 7 8 9 10 11 12 13 14 15 16 17 18 19 20 21 API验证: a. 发令牌: 静态 PS: 隐患 key ...
- React-Native(一):React Native环境搭建
第一步:安装jdk 从java官网下载jdk8 配置环境变量: JAVA_HOME:D:\Program Files\Java\jdk1.8.0_111 Path中追加:%JAVA_HOME%\bin ...
- 28.C++- 单例类模板(详解)
单例类 描述 指在整个系统生命期中,一个类最多只能有一个实例(instance)存在,使得该实例的唯一性(实例是指一个对象指针) , 比如:统计在线人数 在单例类里,又分为了懒汉式和饿汉式,它们的区 ...
- hdu1010 Tempter of the Bone---DFS+奇偶剪枝
题目链接: http://acm.hdu.edu.cn/showproblem.php?pid=1010 题目描述:根据地图,'S'为开始位置,'D'为门的位置,' . '为空地,'X'为墙,不能经过 ...
- hdu1045 Fire Net---二进制枚举子集
题目链接:http://acm.hdu.edu.cn/showproblem.php?pid=1045 题目大意: 给你一幅n*n的图,再给你一些点,这些点的上下左右不能再放其他点,除非有墙('X') ...
- python的调试
调试 程序能一次写完并正常执行的概率很小.总会有各种各样的bug需要修正. 有的bug很简单,看看错误信息就知道,有的bug很复杂,我们需要知道出错时 哪些变量的值是正确的,哪些变量的值是错误的,因此 ...
- 泡菜的使用pickle
如何实现对列表和字典的写入? 需要将对象流式化,实现对象持久存储,这里用到的事pickle 一.制作泡菜 >>> list1 = ['我',123,3.14,['aaa',1]] # ...